


 本教程详细介绍了如何在Unity中添加暂停菜单、主菜单和游戏结束屏幕,包括创建暂停文字、按钮,以及在游戏不同阶段显示特定UI元素的方法。通过这个过程,开发者可以学习如何在Unity中实现用户界面交互,如暂停、重新开始和切换场景,并掌握UI元素的管理和显示控制。
unity 暂停菜单
What are the buttons, text, dropdowns, etc. that can be seen when playing a game? All of that is part of what is called the User Interface (UI). Most games have some sort of UI which makes it easier for players to switch between levels and activate certain controls (such as pausing the game or restarting a level). In a previous article describing how to create Dodger in Unity, we created a small button to refresh the game if a player lost.
玩游戏时可以看到哪些按钮,文本,下拉菜单等? 所有这些都是所谓的用户界面(UI)的一部分。 大多数游戏都有某种UI,这使玩家可以更轻松地在关卡之间切换并激活某些控件(例如暂停游戏或重新启动关卡)。 在上一篇文章中描述了如何在Unity中创建Dodger的文章中,我们创建了一个小按钮,可以在玩家输球时刷新游戏。
In this tutorial, we are going to take that to the next level, and allow users to pause or restart the game and switch between different scenes. We will also be taking a look at how to show certain UI elements only at certain times – such as when the game is paused or when the player dies/loses.
在本教程中,我们将把它带到一个新的水平,并允许用户暂停或重新启动游戏并在不同场景之间切换。 我们还将研究如何仅在某些时间显示某些UI元素,例如游戏暂停或玩家死亡/失败时。
Most games contain a pause menu, a game over screen, and a main menu. Since these are some of the few elements that are required for a “finished” game, we will insert all three into our Dodger clone. In addition, we will also create an instructions screen so that players will be able to learn the controls they can use before they start playing the game.
大多数游戏包含一个暂停菜单,一个屏幕游戏和一个主菜单。 由于这些是“完成”游戏所需的一些要素,因此我们将全部三个要素插入“道奇”副本中。 此外,我们还将创建一个说明屏幕,使玩家能够在开始玩游戏之前学习他们可以使用的控件。
The completed game can be played at itch.io.
完整的游戏可以在itch.io上播放。
创建基本的暂停屏幕 (Creating a Basic Pause Screen)
A pause screen has a common set of controls that players are able to use to restart a level, move back to the main menu, or un-pause the game. Pause screens should only be visible when the game is paused. In Unity we are, in general, able to differentiate between a paused and un-paused game by using Time.timescale. If the time scale is zero, the game is paused. If it’s greater than zero, the game is un-paused (we’ll discuss this later). Let’s get started!
暂停屏幕具有一组常见的控件,玩家可以使用这些控件来重新启动关卡,移回主菜单或取消暂停游戏。 暂停屏幕仅在游戏暂停时才可见。 通常,在Unity中,我们可以使用Time.timescale来区分已暂停和未暂停的游戏。 如果时间标度为零,则游戏暂停。 如果大于零,则表示游戏已暂停(我们将在后面讨论)。 让我们开始吧!
创建暂停文字 (Creating Pause Text)
First, we are going to need to create a title which tells the player that the game is paused. We should create a text object by right-clicking in the hierarchy pane and selecting UI -> Text. Let’s name the newly created object PauseText.
首先,我们需要创建一个标题来告诉玩家游戏已暂停。 我们应该通过在层次结构窗格中右键单击并选择UI-> Text来创建文本对象。 让我们将新创建的对象命名为PauseText。
We need to create a title which tells the player that the game is paused. We should create a text object by right-clicking in the hierarchy pane and selecting UI -> Text. Let’s name the newly created object PauseText.
我们需要创建一个标题来告知玩家游戏已暂停。 我们应该通过在层次结构窗格中右键单击并选择UI-> Text来创建文本对象。 让我们将新创建的对象命名为PauseText。
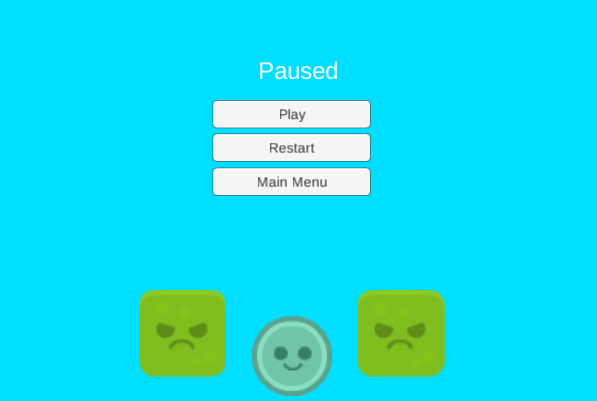
Now we can format the Text object to have it look better within the game screen. In order to change the text of a Text object we have to click in the Inspector pane under the text attribute where the words “New Text” are. Inside the text attribute, we can change the text of our pause text to “Paused”. To keep with the color scheme for the game we should change the color of the text to white. This can be accomplished by clicking under the color object (where black or another color may be selected) and choosing white.
现在,我们可以设置Text对象的格式,使其在游戏屏幕中看起来更好。 为了更改文本对象的文本,我们必须在“检查器”窗格中的“新文本”一词的文本属性下单击。 在text属性内,我们可以将暂停文本的文本更改为“ Paused”。 为了保持游戏的配色方案,我们应该将文本的颜色更改为白色。 这可以通过在颜色对象(可以选择黑色或其他颜色的对象)下单击并选择白色来实现。
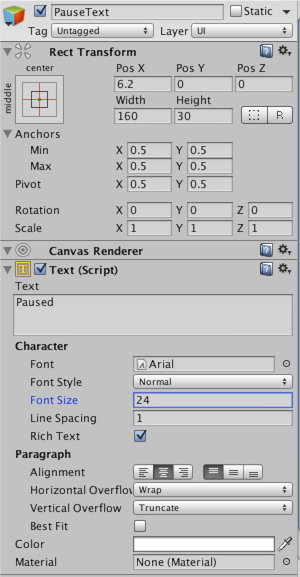
Let’s adjust the placement of our text. The pause text should be centered horizontally on the screen and be at about the top third of the game screen. The pause text can be moved by changing the values of X and Y inside of the Rect Transform attribute or by using the four way arrows in the mouse controls in the top left corner of the Unity editor. If needed or wanted, we can also change the text size by changing the value and by changing the size of the width and height attributes (under Rect Transform).
让我们调整文本的位置。 暂停文本应在屏幕上水平居中,并且应位于游戏屏幕的前三分之一左右。 可以通过更改Rect Transform属性内的X和Y的值或使用Unity编辑器左上角的鼠标控件中的四向箭头来移动暂停文本。 如果需要或需要,我们还可以通过更改值以及更改width和height属性的大小来更改文本大小(在Rect Transform下)。
All we need to do now is tag the object so that the program, after we add code, will be able to tell that we only want this object to show when the game is paused. We can click under the name of the pause text where it says “Untagged” and then click “Add tag…”. Now we can create a tag named “ShowOnPause”. Once this tag is created we need to add it to the pause text.
现在我们要做的就是标记对象,以便程序在添加代码后能够告诉我们,只希望该对象在游戏暂停时显示。 我们可以单击暂停文本名称下的“未标记”,然后单击“添加标记…”。 现在我们可以创建一个名为“ ShowOnPause”的标签。 创建此标签后,我们需要将其添加到暂停文本中。
创建暂停的按钮 (Creating the Paused Buttons)
Since we have created the pause text and added a new tag for game objects that should appear when the game is paused, we can begin creating the buttons that will make up the paused game menu.
由于我们已经创建了暂停文本,并为游戏对象添加了一个新标签,该标签将在游戏暂停时出现,因此我们可以开始创建用于构成暂停游戏菜单的按钮。
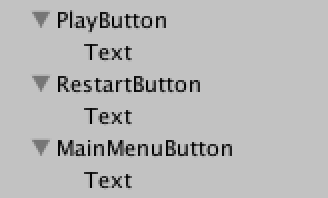
We will be creating three different buttons: a play button, a restart button, and a main menu button. The play button will un-pause the game, the restart button will restart the game, and the main menu button will take players back to the main menu scene of the game.
我们将创建三个不同的按钮:一个播放按钮,一个重新启动按钮和一个主菜单按钮。 播放按钮将取消暂停游戏,重新启动按钮将重新启动游戏,而主菜单按钮会将玩家带回到游戏的主菜单场景。
Let’s begin by creating a new button (right-click in hierarchy -> UI -> Button) and naming it “PlayButton”. We should set the play button’s tag to ShowOnPause so that it will only be shown when the game is paused. Now let’s set the text of the play button to “Play”. This can be done by opening the text child object in the inspector (click the dropdown next to the play button in the hierarchy and select the text object) and then changing the text property to “Play”. We should align the play button with the center of the screen so that it will be under the pause text.
首先创建一个新按钮(在层次结构中-> UI->按钮上单击鼠标右键)并将其命名为“ PlayButton”。 我们应该将播放按钮的标签设置为ShowOnPause,以便仅在游戏暂停时才显示。 现在,将播放按钮的文本设置为“播放”。 这可以通过在检查器中打开文本子对象(单击层次结构中“播放”按钮旁边的下拉菜单并选择文本对象),然后将文本属性更改为“播放”来完成。 我们应该将播放按钮与屏幕的中心对齐,使其位于暂停文本下方。
A quick way to create the other two buttons is to select the play button in the hierarchy and duplicating it (Command / CTRL + D) twice. We can name the new buttons “RestartButton” and “MainMenuButton”. We should also give each of the new buttons the appropriate text. The restart button should say “Restart” and the main menu button should say “Main Menu”. Now let’s delete the refresh button that was created in the last tutorial. We can see now that we have a basic pause menu. However, the menu doesn’t do anything because we haven’t attached any code to the objects.
创建其他两个按钮的快速方法是在层次结构中选择播放按钮,然后将其复制两次(Command / CTRL + D)。 我们可以将新按钮命名为“ RestartButton”和“ MainMenuButton”。 我们还应该为每个新按钮提供适当的文本。 重新启动按钮应显示为“重新启动”,主菜单按钮应显示为“主菜单”。 现在,让我们删除在上一教程中创建的刷新按钮。 现在我们可以看到我们有一个基本的暂停菜单。 但是,菜单没有执行任何操作,因为我们没有将任何代码附加到对象上。
Let’s open the UIManager script that was created in the last tutorial. We should edit our UIManager script so that it looks like the code below.
让我们打开在上一个教程中创建的UIManager脚本。 我们应该编辑我们的UIManager脚本,使其看起来像下面的代码。
GameObject[] pauseObjects;

	// Use this for initialization
	void Start () {
		Time.timeScale = 1;
		pauseObjects = GameObject.FindGameObjectsWithTag("ShowOnPause");
		hidePaused();
	}

	// Update is called once per frame
	void Update () {

		//uses the p button to pause and unpause the game
		if(Input.GetKeyDown(KeyCode.P))
		{
			if(Time.timeScale == 1)
			{
				Time.timeScale = 0;
				showPaused();
			} else if (Time.timeScale == 0){
				Debug.Log ("high");
				Time.timeScale = 1;
				hidePaused();
			}
		}
	}


	//Reloads the Level
	public void Reload(){
		Application.LoadLevel(Application.loadedLevel);
	}

	//controls the pausing of the scene
	public void pauseControl(){
			if(Time.timeScale == 1)
			{
				Time.timeScale = 0;
				showPaused();
			} else if (Time.timeScale == 0){
				Time.timeScale = 1;
				hidePaused();
			}
	}

	//shows objects with ShowOnPause tag
	public void showPaused(){
		foreach(GameObject g in pauseObjects){
			g.SetActive(true);
		}
	}

	//hides objects with ShowOnPause tag
	public void hidePaused(){
		foreach(GameObject g in pauseObjects){
			g.SetActive(false);
		}
	}

	//loads inputted level
	public void LoadLevel(string level){
		Application.LoadLevel(level);
	}
Now that we have the code we need accessible in the UIManager script, we can go back to Unity. Inside Unity, let’s select the play button and attach the pauseControl method to it. To do this we can select the play button and drag the UIManager game object onto the game object space under the OnClick() attribute in the inspector pane. With the UIManager game object added, we can now use the second dropdown to select the pauseControl function (UIManager -> pauseControl).
现在我们有了在UIManager脚本中需要访问的代码,我们可以回到Unity。 在Unity内,让我们选择播放按钮,并在其上附加pauseControl方法。 为此,我们可以选择播放按钮并将UIManager游戏对象拖到检查器窗格中OnClick()属性下的游戏对象空间上。 添加了UIManager游戏对象后,我们现在可以使用第二个下拉列表来选择pauseControl函数(UIManager-> pauseControl)。
Using the same steps, we can add the reload() method to the restart button and the loadLevel() method to the main menu button. Since the loadLevel() method takes a string parameter, we should type “MainMenu” into the box under the function dropdown.
使用相同的步骤,我们可以将reload()方法添加到reload()启动按钮,并将loadLevel()方法添加到主菜单按钮。 由于loadLevel()方法采用字符串参数,因此我们应在函数下拉菜单下的框中键入“ MainMenu”。
If we hit play now, we will notice that the play and restart buttons work. Also, if we hit P while the game is playing, we are able to pause and un-pause the game. The only problem is that the main menu button doesn’t work. This is because we haven’t added a scene named “MainMenu” to the build settings.
如果我们现在点击“播放”,我们将注意到“播放”和“重新开始”按钮起作用。 另外,如果我们在玩游戏时按P,则可以暂停和取消暂停游戏。 唯一的问题是主菜单按钮不起作用。 这是因为我们尚未在构建设置中添加名为“ MainMenu”的场景。
创建主菜单场景 (Creating a Main Menu Scene)
创建场景 (Creating the Scene)
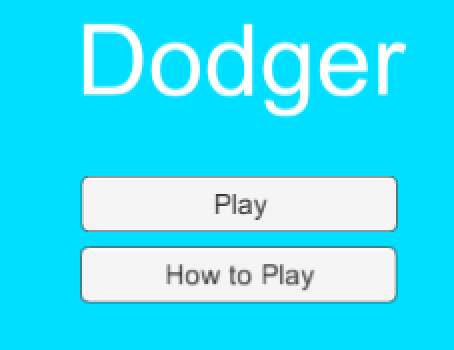
With the pause menu created in the play scene, we can now create a new scene that will function as the main menu of the game. The main menu we will create will be simple and only contain a Play button that will take players to the play scene.
通过在游戏场景中创建的暂停菜单,我们现在可以创建一个新场景,该场景将用作游戏的主菜单。 我们将创建的主菜单非常简单,仅包含一个“播放”按钮,该按钮会将玩家带到播放场景。
First, we should save the current scene that we are working in so that the work we have done will not get deleted when we open a new one. Let’s create a new scene (Command / CTRL + N or File -> New Scene). Once the scene is open, save it and name it “MainMenu”.
首先,我们应该保存正在使用的当前场景,以便在打开新场景时不会删除已经完成的工作。 让我们创建一个新场景(Command / CTRL + N或File-> New Scene)。 打开场景后,将其保存并命名为“ MainMenu”。
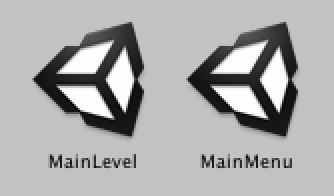
Note: We are naming it “MainMenu” because that is the string property to which we set the main menu button in the play scene. If we wanted a different name, then we could change the string property of the loadLevel() function attached to the main menu button in the play scene.
注意:我们将其命名为“ MainMenu”,因为这是我们在播放场景中将主菜单按钮设置为的字符串属性。 如果要使用其他名称,则可以更改附加到播放场景中主菜单按钮上的loadLevel()函数的string属性。
创建菜单 (Creating the Menu)
Now that the scene has been saved we can begin working on it. Let’s start by selecting the main camera game object and changing its background to the same color as in the play scene (R: 0, G: 223, B: 255).
现在,场景已保存,我们可以开始对其进行处理。 让我们从选择主要的相机游戏对象开始,并将其背景更改为与游戏场景中相同的颜色(R:0,G:223,B:255)。
For this scene, we will need to be able to access the loadLevel() method inside the UIManager script. This means we need to create a UIManager game object and attach the UIManager script to it so that we can add the function to our button.
对于此场景,我们将需要能够访问UIManager脚本中的loadLevel()方法。 这意味着我们需要创建一个UIManager游戏对象并将UIManager脚本附加到该对象,以便可以将该功能添加到按钮中。
Let’s create an empty game object (right-click in hierarchy -> Create Empty) and name it UIManager. Now we can add the UIManager script to the UIManager game object.
让我们创建一个空的游戏对象(在层次结构中右键单击->创建空)并将其命名为UIManager。 现在,我们可以将UIManager脚本添加到UIManager游戏对象。
We can begin creating the simple menu that will contain the text that says “Dodger” and a play button. We’ll begin by creating the text (right-click in hierarchy -> UI -> Text) and naming it “TitleText”. We should change the text to say “Dodger” and align it to the center of the screen, a little towards the top. Now let’s set the color of title text to white.
我们可以开始创建简单的菜单,其中包含说“ Dodger”的文本和一个播放按钮。 我们将首先创建文本(在层次结构中右键单击-> UI->文本)并将其命名为“ TitleText”。 我们应该将文本更改为“ Dodger”,并将其与屏幕中心对齐,向顶部稍稍对齐。 现在,将标题文本的颜色设置为白色。
With the text created and edited we can create a new button and name it “PlayButton”. We should change the text of the play button’s child object to “Play”. Finally, let’s add the UIManager game object to the button’s OnClick() attribute and choose the loadLevel() function. The parameter of the loadLevel() function depends on what the name of the play scene from the last tutorial is. We can find the name of the play scene by finding the scene in the Assets pane.
创建和编辑文本后,我们可以创建一个新按钮并将其命名为“ PlayButton”。 我们应该将播放按钮的子对象的文本更改为“播放”。 最后,让我们将UIManager游戏对象添加到按钮的OnClick()属性中,然后选择loadLevel()函数。 loadLevel()函数的参数取决于上一个教程中的播放场景的名称。 我们可以通过在“资产”窗格中找到场景来找到播放场景的名称。
If we run the game and hit the play button, we will notice that the button does not work. The reason is the same as it was when the main menu button didn’t work in our play scene: we haven’t added the MainMenu scene to the build settings. To add our current scene to the build settings, we can open the build settings (File -> Build Settings) and click Add Current.
如果我们运行游戏并按下播放按钮,我们将注意到该按钮不起作用。 原因与播放菜单中的主菜单按钮不起作用时相同:我们尚未将MainMenu场景添加到构建设置中。 要将当前场景添加到构建设置中,我们可以打开构建设置(文件->构建设置),然后单击添加当前。
完成游戏 (Finishing the Game)
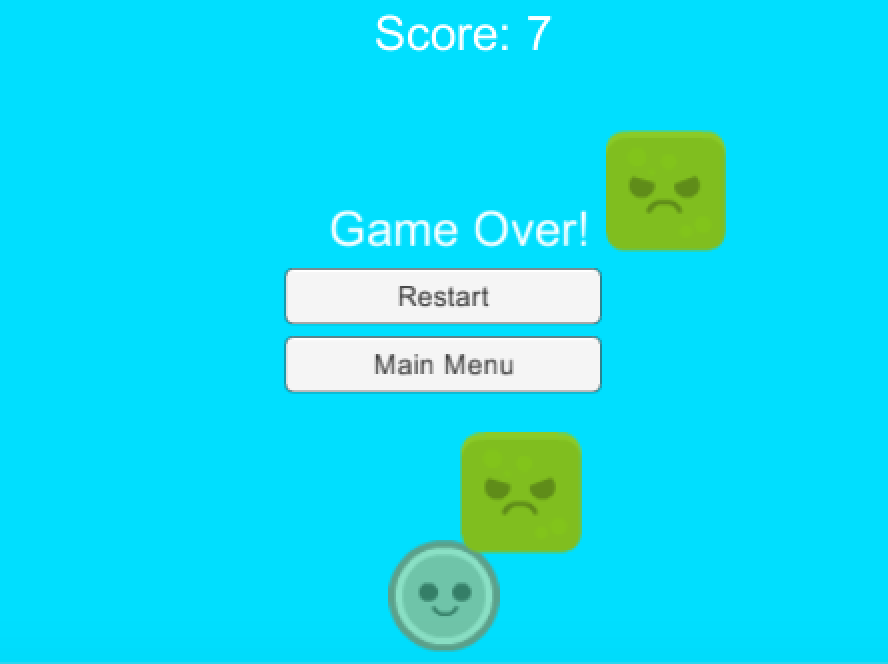
For the game to be considered “finished” it needs to have a game over screen so that players will be able to tell when they have lost. We will also add a score counter to the game, so players will know how high they scored.
为了使游戏被视为“完成”,它需要在屏幕上进行游戏,以便玩家能够知道何时输了。 我们还将在游戏中添加一个计分计数器,以便玩家知道自己的得分。
添加分数 (Adding a Score)
We should save our current scene and open the play scene. With the play scene open, we can create a text object and name it “ScoreText”. The score text object should be aligned to the top of the screen. With the score text object selected we can add a top stretch anchor to it by looking in the Rect transform property and clicking the anchor menu. We should also center the text and make it white.
我们应该保存当前场景并打开播放场景。 打开游戏场景后,我们可以创建一个文本对象并将其命名为“ ScoreText”。 乐谱文本对象应与屏幕顶部对齐。 选中得分文本对象后,我们可以通过在Rect变换属性中查看并单击锚点菜单来为其添加顶部拉伸锚点。 我们还应该将文本居中并使其变为白色。
The condition that we will use to update the score will be blocks going off screen (meaning the blocks the player has already dodged). For this condition to be active we will need to check for the blocks’ collision off screen and increment a variable for the score.
我们将用来更新比分的条件将是屏幕外的方块(意味着玩家已经躲过的方块)。 为了使这种情况有效,我们将需要在屏幕外检查块的碰撞并为得分增加一个变量。
Let’s create an empty game object and name it “BottomBorder”. We add a BoxCollider2D to the bottom border and set the X size to a large number that goes slightly past the camera’s borders. Now we can add a Rigidbody2D to the bottom border object and set the gravity scale attribute to 0 so that the bottom border object doesn’t fall. We can align the bottom border object slightly below the player making sure that it is off screen.
让我们创建一个空的游戏对象并将其命名为“ BottomBorder”。 我们将BoxCollider2D添加到底部边框,并将X大小设置为一个较大的数字,该大小稍微超出相机的边界。 现在,我们可以向底部边框对象添加Rigidbody2D并将重力比例属性设置为0,以使底部边框对象不会掉落。 我们可以将底部边框对象对准播放器下方,以确保它不在屏幕上。
We need to create a new script in order to set a score for the player. Let’s create a new C# script named “PointCounter” inside of our Scripts folder. Once the PointCounter script has been created we can open it in our IDE and type:
我们需要创建一个新脚本来为玩家设置分数。 让我们在“脚本”文件夹中创建一个名为“ PointCounter”的新C#脚本。 创建PointCounter脚本后,我们可以在IDE中打开它并键入:
public int score;

	// Use this for initialization
	void Start () {
		score = 0;
	}

	// Update is called once per frame
	void Update () {

	}

	//checks for entering a trigger
	void OnTriggerEnter2D(Collider2D other){
		//checks other collider's tag
		if(other.gameObject.tag == "Enemy"){
			score++;								//increments score
			Destroy (other.gameObject);				//destroys other collider's gameobject
		}
	}
The PointCounter script should be added to the bottom border game object so that once a block collides with it, the block will be destroyed and the score updated.
应该将PointCounter脚本添加到底部边框游戏对象,以便一旦一个块与它碰撞,该块将被销毁并更新分数。
Now, let’s create a script named “PointUpdater” which will update the score text. We can open the PointUpdater script in our IDE and type:
现在,让我们创建一个名为“ PointUpdater”的脚本,它将更新乐谱文本。 我们可以在IDE中打开PointUpdater脚本,然后键入:
public PointCounter pointCounter;
	// Use this for initialization
	void Start () {
		text = gameObject.GetComponent<Text>();
    text.text = "Score: 0";
	}

	// Update is called once per frame
	void Update () {
		text.text = "Score: " + pointCounter.score.ToString();

	}
We should add the PointUpdater script to the score text game object. The bottom border game object should be added to the point counter value so that the score can be updated.
我们应该将PointUpdater脚本添加到分数文本游戏对象中。 底部边框游戏对象应添加到点计数器值,以便可以更新分数。
通过菜单创建游戏 (Creating a Game over Menu)
To finish up the game, we need to add a game over menu that will appear when the player has died.
要完成游戏,我们需要添加一个游戏菜单,该菜单会在玩家死亡时显示。
Let’s open the PlayerController script in our IDE and below the last variable declaration add:
让我们在IDE中打开PlayerController脚本,在最后一个变量声明下面添加:
public bool alive;
	// Use this for initialization
	void Start () {
		alive = true;
	}
Inside of the EnemyController script let’s add:
在EnemyController脚本中,我们添加:
void OnTriggerEnter2D(Collider2D other){

  //Checks if other gameobject has a Tag of Player
  if(other.gameObject.tag == "Player"){
    other.gameObject.GetComponent<PlayerController>().alive = false;
    Time.timeScale = 0;
  }
}
To begin fleshing out the menu, we can create a new text game object and name it “GameOverText”. The text should be set to “Game Over” and the text color should be white. We should align the game over text to be slightly above the center of the screen. To make sure that this menu will only appear when the player has died we should create a new tag named “ShowOnFinish” and add it to the game over text.
要开始充实菜单,我们可以创建一个新的文字游戏对象并将其命名为“ GameOverText”。 文字应设置为“ Game Over”,文字颜色应为白色。 我们应该使游戏与文字对齐,使其略高于屏幕中心。 为确保此菜单仅在玩家死亡时出现,我们应创建一个名为“ ShowOnFinish”的新标签,并将其添加到文本上方的游戏中。
Now let’s duplicate the restart and main menu buttons. We should rename the buttons to “FinRestartButon” and “FinMainMenuButton” and add the ShowOnFinish tag to both of the buttons.
现在,让我们复制重新启动和主菜单按钮。 我们应该将按钮重命名为“ FinRestartButon”和“ FinMainMenuButton”,并将ShowOnFinish标记添加到两个按钮中。
Finally, let’s open the UIManager script in our IDE and edit it so that it looks like the code below.
最后,让我们在IDE中打开UIManager脚本并对其进行编辑,使其看起来像下面的代码。
GameObject[] pauseObjects;
	GameObject[] finishObjects;
	PlayerController playerController;
	// Use this for initialization
	void Start () {
		Time.timeScale = 1;

		pauseObjects = GameObject.FindGameObjectsWithTag("ShowOnPause");			//gets all objects with tag ShowOnPause
		finishObjects = GameObject.FindGameObjectsWithTag("ShowOnFinish");			//gets all objects with tag ShowOnFinish


		hidePaused();
		hideFinished();

		//Checks to make sure MainLevel is the loaded level
		if(Application.loadedLevelName == "MainLevel")
			playerController = GameObject.FindGameObjectWithTag("Player").GetComponent<PlayerController>();
	}

	// Update is called once per frame
	void Update () {

		//uses the p button to pause and unpause the game
		if(Input.GetKeyDown(KeyCode.P))
		{
			if(Time.timeScale == 1 && playerController.alive == true)
			{
				Time.timeScale = 0;
				showPaused();
			} else if (Time.timeScale == 0 && playerController.alive == true){
				Time.timeScale = 1;
				hidePaused();
			}
		}

		//shows finish gameobjects if player is dead and timescale = 0
		if (Time.timeScale == 0 && playerController.alive == false){
			showFinished();
		}
	}


	//Reloads the Level
	public void Reload(){
		Application.LoadLevel(Application.loadedLevel);
	}

	//controls the pausing of the scene
	public void pauseControl(){
			if(Time.timeScale == 1)
			{
				Time.timeScale = 0;
				showPaused();
			} else if (Time.timeScale == 0){
				Time.timeScale = 1;
				hidePaused();
			}
	}

	//shows objects with ShowOnPause tag
	public void showPaused(){
		foreach(GameObject g in pauseObjects){
			g.SetActive(true);
		}
	}

	//hides objects with ShowOnPause tag
	public void hidePaused(){
		foreach(GameObject g in pauseObjects){
			g.SetActive(false);
		}
	}

	//shows objects with ShowOnFinish tag
	public void showFinished(){
		foreach(GameObject g in finishObjects){
			g.SetActive(true);
		}
	}

	//hides objects with ShowOnFinish tag
	public void hideFinished(){
		foreach(GameObject g in finishObjects){
			g.SetActive(false);
		}
	}

	//loads inputted level
	public void LoadLevel(string level){
		Application.LoadLevel(level);
	}
结论 (Conclusion)
We have now added a simple UI to our game. Players will now be able to move through the two scenes using the buttons. We have also gained experience in modular Unity development and DRY coding (Don’t-Repeat-Yourself). The way we created the score text is a good example of how Unity code should be divided so that it is recyclable.
现在,我们在游戏中添加了一个简单的UI。 玩家现在可以使用按钮在两个场景之间移动。 我们还获得了模块化Unity开发和DRY编码(不要重复自己)的经验。 我们创建乐谱文本的方式很好地说明了如何对Unity代码进行分割以使其可回收。
Questions? Comments? Please leave them below!
有什么问题吗 注释? 请把它们留在下面!
The finished project can be downloaded from GitHub.
可以从GitHub下载完成的项目。
翻译自: https://www.sitepoint.com/adding-pause-main-menu-and-game-over-screens-in-unity/
unity 暂停菜单


 8298
8298

 被折叠的 条评论
为什么被折叠?
被折叠的 条评论
为什么被折叠?
 到【灌水乐园】发言


