


tilemap软件使用
With the release of Unity 2018.3, we introduced Isometric Tilemap support – closely following Hexagonal Tilemap support which was added in the 2018.2 release. The new Tilemap features provide a fast and performant way to create 2D environments based on isometric and hexagonal grid layouts, the likes of which are seen in many game classics, including the first entries of the Diablo and Fallout franchises, Civilization, Age of Empires, and many more.
随着Unity 2018.3的发布,我们引入了Isometric Tilemap支持-紧跟在2018.2版本中添加的Hexagonal Tilemap支持。 新的Tilemap功能提供了一种快速,高效的方法来基于等距和六边形网格布局创建2D环境,在许多经典游戏中,例如《暗黑破坏神》和《辐射》系列的首批作品,《文明》,《帝国时代》,还有很多。
Both features build on top of the existing Tilemap system introduced back in Unity 2017.2, and working with them today is just as easy! They are also natively integrated into the Editor. In further Unity releases, they might be moved to the package manager.
这两个功能都建立在Unity 2017.2中引入的现有Tilemap系统的基础上,今天就可以轻松使用它们了! 它们也被本地集成到编辑器中。 在Unity的其他发行版中,它们可能会移到软件包管理器中。
If you’re interested in following along and experimenting with the techniques shown, we’ve created a pre-configured Isometric Starter Kit project with an animated character and multiple environment tilesets, which you can download for free.
如果您有兴趣遵循并尝试显示的技术,我们已经创建了一个预配置的Isometric Starter Kit项目,该项目具有动画角色和多个环境tileset,可以免费下载 。
等轴测图的项目设置 (Project Settings for Isometric Tilemap)
Before we start working with Tilemap, it is important to set up our project correctly. Isometric Tilemap works with 2-dimensional sprites, and it relies on correct renderer sorting in order to create the illusion of a top-down isometric view. We need to make sure that the tiles that are further away from the viewer get painted first; and those that are closer painted on top of them.
在开始使用Tilemap之前,正确设置项目很重要。 等轴测图贴图可用于二维Sprite,并且它依赖于正确的渲染器排序,以创建自上而下的等轴测图的错觉。 我们需要确保距离观看者更远的瓷砖首先被绘制; 以及那些更靠近它们的画。
To customize the order in which 2D objects are painted on the screen, we can use Unity’s Custom Axis Sort feature. You can define this setting either per-camera (currently, this is the default way to do it in the Scriptable Render Pipelines, including LWRP and HDRP) – or globally at the project level.
要自定义2D对象在屏幕上的绘制顺序,我们可以使用Unity的“自定义轴排序”功能。 您可以按摄像机定义此设置(当前,这是在可编写脚本的渲染管道(包括LWRP和HDRP)中进行此设置的默认方法),也可以在项目级别进行全局定义。
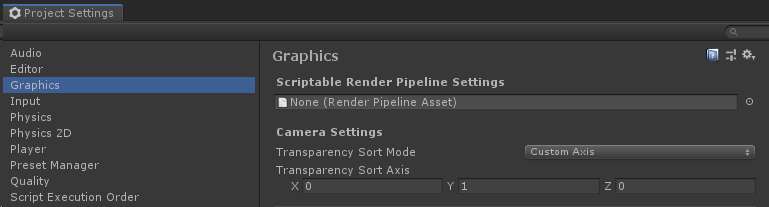
To define a Custom Axis Sort at the Project level, go to Edit > Project Settings > Graphics. In the Camera Settings section, you will see a Transparency Sort Mode dropdown, as well as the X, Y, and Z value settings for the Transparency Sort Axis.
要在项目级别定义自定义轴排序,请转到 编辑>项目设置>图形 。 在“相机设置”部分中,您会看到一个“透明度排序模式”下拉列表以及“透明度排序轴”的X,Y和Z值设置。
By default, the Transparency Sort Axis in Unity is set to (0, 0, 1) for XYZ respectively. However, all of our 2D tiles are actually on the same Z plane. Instead, we can determine which tiles are behind or in front by using their height on screen, rather than their depth. Tiles which are positioned higher on the screen will be sorted behind those which are placed lower. To sort the tiles based on height, change the Transparency Sort Mode to Custom; and set the Transparency Sort Axis values to (0, 1, 0).
默认情况下,对于XYZ,Unity中的透明度排序轴分别设置为(0,0,1)。 但是,我们所有的2D切片实际上都在同一Z平面上。 取而代之的是,我们可以通过使用屏幕上的高度而不是深度来确定哪些图块在后面还是在前面。 屏幕上位于较高位置的图块将排在较低位置的后面。 要根据高度对图块进行排序,请将透明度排序模式更改为自定义; 并将“透明度排序轴”值设置为(0,1,0)。
You can read the relevant Unity Documentation page for 2D sorting if you want to learn more about how it works.
如果您想了解更多有关2D排序的信息, 可以阅读相关的Unity文档 页面 。
In some cases, you may also want to adjust the Z value of your Transparency Sort Axis. We will cover this in more depth later on in this blog post.
在某些情况下,您可能还需要调整透明度排序轴的Z值。 我们将在本博客文章的后面部分对此进行更深入的介绍。
Tilemap类型 (Tilemap Types)
The Tilemap feature consists of several components working together. The first two are the Grid and Tilemap Game Objects. To create a Grid, simply right-click anywhere in the Hierarchy, go to 2D Object, and select the type of Tilemap you wish to use. By default, each new Grid is created with one child Tilemap Game Object of the corresponding type. The currently available Tilemap types are as follows:
Tilemap功能由多个相互配合的组件组成。 前两个是Grid和Tilemap游戏对象。 要创建网格,只需右键单击层次结构中的任意位置,转到2D对象,然后选择要使用的Tilemap类型。 默认情况下,将使用一个对应类型的子Tilemap游戏对象创建每个新Grid。 当前可用的Tilemap类型如下:
Tilemap – creates a rectangular Grid and Tilemap. An example of using this Tilemap can be seen in Unity’s 2D Game Kit.
Tilemap –创建一个矩形的Grid和Tilemap。 在Unity的 2D游戏工具包中 可以看到使用此Tilemap的示例 。
Hexagonal Point Top Tilemap – creates a Hexagonal Grid and Tilemap, where one of the vertices of each hexagon is pointing upwards.
六边形点顶部图块贴图 –创建一个六边形网格和图块图,其中每个六边形的一个顶点指向上方。
Hexagonal Flat Top Tilemap – another Hexagonal Grid type, where the top of the hexagon is an edge which is parallel to the top of the screen.
六边形平顶图块贴图 -另一种六边形网格类型,其中六边形的顶部是与屏幕顶部平行的边。
The last two types, Isometric and Isometric Z as Y, create two different implementations of the isometric grid. The difference between them arises when simulating different tile elevation levels, such as when we have a raised platform in our Isometric level.
最后两种类型, 等距 和 等距Z为Y ,创建等距网格的两种不同实现。 当模拟不同的图块高程级别时,例如当我们在等轴测图中有一个升高的平台时,它们之间的差异就会出现。
A regular Isometric Tilemap is best used when you wish to create separate Tilemap Game Objects for each individual elevation level of the tiles. This will simplify the process of creating automatic collision shapes – but you will have less flexibility when it comes to height variation between the tiles since all the tiles on one layer will have to be on the same ‘plane’.
当您希望为图块的每个单独的高程级别创建单独的图块地图游戏对
 最低0.47元/天 解锁文章


 9357
9357


 被折叠的 条评论
为什么被折叠?
被折叠的 条评论
为什么被折叠?
 到【灌水乐园】发言


