


修改时间延长软件使用时间
Unity launched Timeline along with Unity 2017.1 and since then, we have received a lot of feedback about it. After talking with many developers and responding to users on the forums, we realized how many of you want to use Timeline for more than as a simple sequencing tool. I have already delivered a couple of talks about this (for instance, at Unite Austin 2017) and wrote a blog post on how to use Timeline for non-conventional uses. Read this blog post to find out about how Timeline can drive dialogues, support branching, or even connect with the AI systems of your game.
Unity与Unity 2017.1一起启动了Timeline,自那时以来,我们收到了很多有关它的反馈。 在与许多开发人员交谈并在论坛上回复用户之后,我们意识到您中有多少人想将Timeline用作一种简单的排序工具以外的其他工具。 我已经就此进行了几次演讲(例如,在Unite Austin 2017上 ),并写了一篇博客文章 ,介绍如何将时间轴用于非常规用途。 阅读此博客文章,了解有关时间轴如何驱动对话,支持分支甚至与游戏的AI系统连接的信息。
Timeline was designed with extensibility as a main goal from the beginning; the team which designed the feature always had in mind that users would want to create their own clips and tracks in addition to the built-in ones. As such, there are a lot of questions about scripting with Timeline. The system on which Timeline is built upon is powerful, but it can be difficult to work with for the non-initiated.
从一开始,时间轴的设计就以可扩展性为主要目标。 设计该功能的团队始终牢记,用户除了内置的剪辑和音轨外,还希望创建自己的剪辑和音轨。 因此,关于使用时间轴编写脚本存在很多问题。 建立时间轴的系统功能强大,但对于未启动的系统可能很难使用。
But first, what’s Timeline? It is a linear editing tool to sequence different elements: animation clips, music, sound effects, camera shots, particle effects, and even other Timelines. In essence, it is very similar to tools such as Premiere®, After Effects®, or Final Cut®, with the difference that it is engineered for real-time playback.
但是首先,时间表是什么? 它是一个线性编辑工具,用于对不同元素进行排序:动画剪辑,音乐,声音效果,相机镜头,粒子效果,甚至其他时间轴。 从本质上讲,它与Premiere®,AfterEffects®或FinalCut®之类的工具非常相似,不同之处在于它是为实时回放而设计的。
For a more in-depth look at the basics of Timeline, I advise you to visit the Timeline documentation section of the Unity Manual, since I will make extensive use of those concepts.
要更深入地了解时间轴的基础知识,我建议您访问Unity手册的时间轴文档部分 ,因为我将广泛使用这些概念。
可播放的API (The Playable API)
Timeline is implemented on top of the Playables API.
时间轴是在Playables API的基础上实现的 。
It is a set of powerful APIs that allows you to read and mix multiple data sources (animation, audio and more) and play them through an output. This system offers precise programmatic control, it has a low overhead and is tuned for performance. Incidentally, it’s the same framework behind the state machine that drives the Animator Component, and if you have programmed for the Animator you will probably see some familiar concepts.
它是一组功能强大的API,可让您读取和混合多个数据源(动画,音频等)并通过输出进行播放。 该系统提供精确的程序控制,具有较低的开销,并针对性能进行了调整。 顺便说一句,它是驱动Animator组件的状态机背后的相同框架,如果为Animator编程,则可能会看到一些熟悉的概念。
Basically, when a Timeline begins playing, a graph is built composed of nodes called Playables. They are organised in a tree-like structure called the PlayableGraph.
基本上,当时间线开始播放时,便会建立一个由称为Playables的节点组成的图形。 它们以称为PlayableGraph的树状结构进行组织。
Note: If you want to visualise the tree of any PlayableGraph in the scene (Animators, Timelines, etc.) you can download a tool called PlayableGraph Visualizer. This post uses it to visualize the graphs for the different custom clips. To know more about the Playable API and the graph (in relationship to the Animator), you can check Pierre-Paul’s blog post.
注意 :如果要可视化场景中任何PlayableGraph的树(动画师,时间轴等),可以下载一个名为PlayableGraph Visualizer的工具。 这篇文章使用它来可视化不同自定义剪辑的图形。 要了解有关Playable API和图形(与Animator的关系)的更多信息,可以查看Pierre-Paul的博客文章 。
I will now go through three simple examples that will show you how to extend Timeline. In order to lay the groundwork, I will begin with the easiest way to add a script in Timeline. Then, more concepts will be added gradually to make use of most of the functionalities.
现在,我将通过三个简单的示例向您展示如何扩展时间轴。 为了打基础,我将从在时间轴中添加脚本的最简单方法开始。 然后,将逐渐添加更多概念以利用大多数功能。
资产 (Assets)
I have packaged a small demo project with all of the examples used in this post. Feel free to download it to follow along. Otherwise, you can enjoy the post on its own.
我已经用本文中使用的所有示例打包了一个小型演示项目 。 随时下载并继续。 否则,您可以自己欣赏该帖子。
Note: For the assets, I have used prefixes to differentiate the classes in each example (“Simple_”, “Track_”, “Mixer_”, etc.). In the code below, these prefixes are omitted for the sake of readability.
注意 :对于资产,我在每个示例中使用前缀来区分类(“ Simple _”,“ Track _”,“ Mixer_”等)。 在下面的代码中,为便于阅读,省略了这些前缀。
示例1 –自定义剪辑 (Example 1 – Custom clips)
This first example is very simple: the goal is to change the color and intensity of a Light component with a custom clip. To create a custom clip, you need two scripts:
第一个示例非常简单:目标是使用自定义剪辑更改Light组件的颜色和强度。 要创建自定义剪辑,您需要两个脚本:
One for the data: inheriting from PlayableAsset
一个用于数据:从PlayableAsset继承
One for the logic: inheriting from PlayableBehaviour
逻辑之一:从PlayableBehaviour继承
A core tenet of the Playable API is the separation of logic and data. This is why you will need to first create a PlayableBehaviour, in which you will write what you want to do, like so:
Playable API的核心宗旨是逻辑和数据的分离。 这就是为什么您需要首先创建一个PlayableBehaviour的原因 ,您将在其中编写要执行的操作,如下所示:
|
1
2
3
4
5
6
7
8
9
10
11
12
13
14
15
|
public class LightControlBehaviour : PlayableBehaviour
{
public Light light = null;
public Color color = Color.white;
public float intensity = 1f;
public override void ProcessFrame(Playable playable, FrameData info, object playerData)
{
if (light != null)
{
light.color = color;
light.intensity = intensity;
}
}
}
|
|
1
2
3
4
5
6
7
8
9
10
11
12
13
14
15
|
public class LightControlBehaviour : PlayableBehaviour
{
public Light light = null ;
public Color color = Color . white ;
public float intensity = 1f ;
public override void ProcessFrame ( Playable playable , FrameData info , object playerData )
{
if ( light != null )
{
light . color = color ;
light . intensity = intensity ;
}
}
}
|
What’s going on here? First, there is information about which properties of the Light you want to change. Also, PlayableBehaviour has a method named ProcessFrame that you can override.
这里发生了什么? 首先,有关于您要更改灯光的哪些属性的信息。 另外, PlayableBehaviour 具有一个名为 ProcessFrame 的方法 ,您可以重写 该方法 。
ProcessFrame is called on each update. In that method, you can set the Light’s properties. Here’s the list of methods you can override in PlayableBehaviour. Then, you create a PlayableAsset for the custom clip:
每次更新都会调用 ProcessFrame 。 在该方法中,您可以设置灯光的属性。 这是 您可以在 PlayableBehaviour中 覆盖 的方法 的 列表 。 然后, 为自定义剪辑 创建一个 PlayableAsset :
|
1
2
3
4
5
6
7
8
9
10
11
12
13
14
15
16
17
18
|
public class LightControlAsset : PlayableAsset
{
public ExposedReference<Light> light;
public Color color = Color.white;
public float intensity = 1.0f;
public override Playable CreatePlayable (PlayableGraph graph, GameObject owner)
{
var playable = ScriptPlayable<LightControlBehaviour>.Create(graph);
var lightControlBehaviour = playable.GetBehaviour();
lightControlBehaviour.light = light.Resolve(graph.GetResolver());
lightControlBehaviour.color = color;
lightControlBehaviour.intensity = intensity;
return playable;
}
}
|
|
1
2
3
4
5
6
7
8
9
10
11
12
13
14
15
16
17
18
|
public class LightControlAsset : PlayableAsset
{
public ExposedReference < Light > light ;
public Color color = Color . white ;
public float intensity = 1.0f ;
public override Playable CreatePlayable ( PlayableGraph graph , GameObject owner )
{
var playable = ScriptPlayable < LightControlBehaviour > . Create ( graph ) ;
var lightControlBehaviour = playable . GetBehaviour ( ) ;
lightControlBehaviour . light = light . Resolve ( graph . GetResolver ( ) ) ;
lightControlBehaviour . color = color ;
lightControlBehaviour . intensity = intensity ;
return playable ;
}
}
|
A PlayableAsset has two purposes. First, it contains clip data, as it is serialized within the Timeline asset itself. Second, it builds the PlayableBehaviour that will end up in the Playable graph.
一个 PlayableAsset 有两个目的。 首先,它包含剪辑数据,因为它是在时间轴资产本身中序列化的。 其次,它构建了 PlayableBehaviour ,它将最终出现在Playable图中。
Look at the first line:
看第一行:
|
1 |
var playable = ScriptPlayable<LightControlBehaviour>.Create(graph);
|
|
1 |
var playable = ScriptPlayable < LightControlBehaviour > . Create ( graph ) ;
|
This creates a new Playable and attaches a LightControlBehaviour, our custom behaviour, to it. You can then set the light properties on the PlayableBehaviour.
这将创建一个新的Playable,并将一个 LightControlBehaviour (我们的自定义行为) 附加 到它。 然后,您可以在PlayableBehaviour上设置灯光属性。
What about the ExposedReference? Since a PlayableAsset is an asset, it is not possible to refer directly to an object in a scene. An ExposedReference then acts as a promise that, when CreatePlayable is called, an object will be resolved.
那 ExposedReference 呢? 由于 PlayableAsset 是资产,因此不可能直接引用场景中的对象。 一个 ExposedReference 然后充当的是,当 CreatePlayable 被调用,一个对象会得到解决 的承诺 。
Now you can add a Playable Track in the timeline, and add the custom clip by right-clicking on that new track. Assign a Light component to the clip to see the result.
现在,您可以 在时间轴中 添加可播放轨道 ,并通过右键单击该新轨道来添加自定义剪辑。 将Light组件分配给剪辑以查看结果。
In this scenario, the built-in Playable Track is a generic track that can accept these simple Playable clips such as the one you just created. For more complex situations, you will need to host the clips on a dedicated track.
在这种情况下,内置的Playable Track是一种通用轨道,可以接受这些简单的Playable剪辑,例如您刚刚创建的剪辑。 对于更复杂的情况,您需要将片段托管在专用轨道上。
示例2 –自定义曲目 (Example 2 – Custom tracks)
One caveat of the first example is that each time you add your custom clip, you need to assign a Light component to each one of your clips, which can be tedious if you have a lot of them. You can solve this by using a track’s bound object.
第一个示例的一个警告是,每次添加自定义剪辑时,都需要为每个剪辑分配一个Light组件,如果其中有很多组件,则可能很乏味。 您可以通过使用轨道的 绑定对象 解决此问题 。
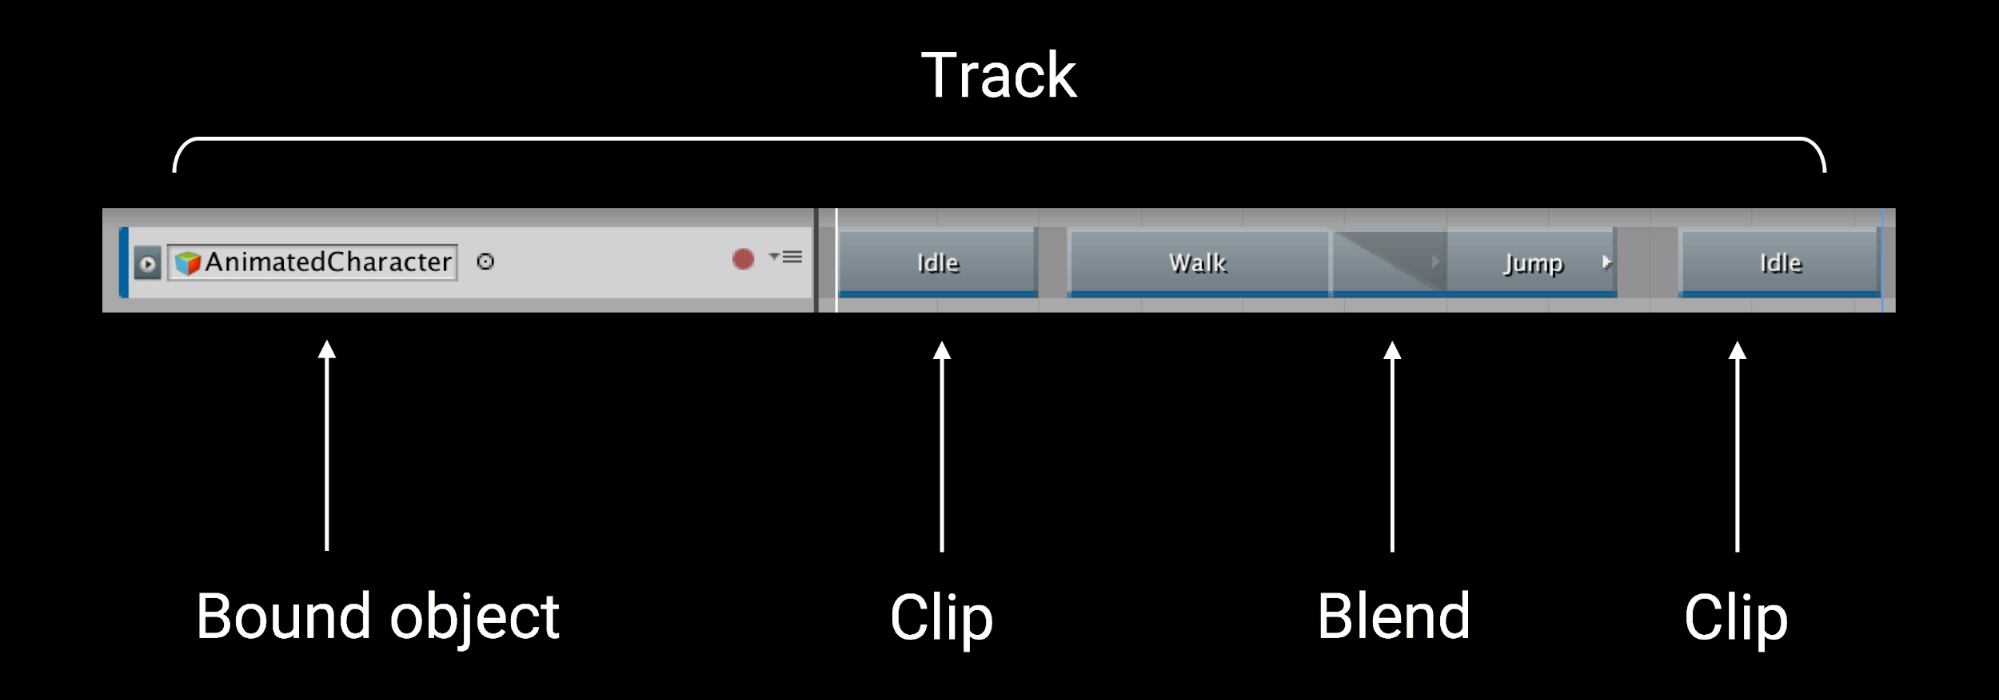
Anatomy of a track.
轨道的解剖。
A track can have an object or a component bound to it, which means that each clip on the track can then operate on the bound object directly. This is very common behaviour and in fact it’s how the Animation, Activation, and Cinemachine tracks work.
轨道可以具有绑定的对象或组件,这意味着轨道上的每个剪辑都可以直接在绑定的对象上操作。 这是非常常见的行为,实际上是动画,激活和电影机器跟踪的工作方式。
If you want to modify the properties of a Light with multiple clips, you can create a custom track which asks for a Light component as a bound object. To create a custom track, you need another script that extends TrackAsset:
如果要使用多个剪辑修改Light的属性,则可以创建一个自定义轨道,该轨道要求将Light组件作为绑定对象。 要创建自定义轨道,您需要另一个扩展 TrackAsset的 脚本 :
|
1
2
3
|
[TrackClipType(typeof(LightControlAsset))]
[TrackBindingType(typeof(Light))]
public class LightControlTrack : TrackAsset {}
|
|
1
2
3
|
[ TrackClipType ( typeof ( LightControlAsset ) ) ]
[ TrackBindingType ( typeof ( Light ) ) ]
public class LightControlTrack : TrackAsset { }
|
There are two attributes here:
这里有两个属性:
TrackClipType specifies which PlayableAsset type the track will accept. In this case, you will specify the custom LightControlAsset.
TrackClipType 指定 轨道将接受的 PlayableAsset 类型。 在这种情况下,您将指定自定义 LightControlAsset 。
TrackBindingType specifies which type of binding the track will ask for (it can be a GameObject, a Component, or an Asset). In this case, you want a Light component.
TrackBindingType 指定轨道要求的绑定类型(可以是GameObject,Component或Asset)。 在这种情况下,您需要一个Light组件。
You also need to slightly modify the PlayableAsset and PlayableBehaviour in order to make them work with a track. For reference, I have commented-out the lines that you don’t need anymore.
您还需要稍微修改 PlayableAsset 和 PlayableBehaviour ,以使其与轨道一起使用。 作为参考,我已经注释掉了您不再需要的行。
|
1
2
3
4
5
6
7
8
9
10
11
12
13
14
15
16
17
|
public class LightControlBehaviour : PlayableBehaviour
{
//public Light light = null;
public Color color = Color.white;
public float intensity = 1f;
public override void ProcessFrame(Playable playable, FrameData info, object playerData)
{
Light light = playerData as Light;
if (light != null)
{
light.color = color;
light.intensity = intensity;
}
}
}
|
|
1
2
3
4
5
6
7
8
9
10
11
12
13
14
15
16
17
|
public class LightControlBehaviour : PlayableBehaviour
{
//public Light light = null;
public Color color = Color . white ;
public float intensity = 1f ;
public override void ProcessFrame ( Playable playable , FrameData info , object playerData )
{
Light light = playerData as Light ;
if ( light != null )
{
light . color = color ;
light . intensity = intensity ;
}
}
}
|
The PlayableBehaviour doesn’t need a Light variable now. In this case, the method ProcessFrame provides the track’s bound object directly. All that you need is to cast the object to the appropriate type. That’s neat!
该 PlayableBehaviour 不现在需要一个光变。 在这种情况下, ProcessFrame 方法 将直接提供轨道的绑定对象。 您所需要做的就是将对象转换为适当的类型。 那很整齐!
|
1
2
3
4
5
6
7
8
9
10
11
12
13
14
15
16
17
18
|
public class LightControlAsset : PlayableAsset
{
//public ExposedReference<Light> light;
public Color color = Color.white;
public float intensity = 1f;
public override Playable CreatePlayable (PlayableGraph graph, GameObject owner)
{
var playable = ScriptPlayable<LightControlBehaviour>.Create(graph);
var lightControlBehaviour = playable.GetBehaviour();
//lightControlBehaviour.light = light.Resolve(graph.GetResolver());
lightControlBehaviour.color = color;
lightControlBehaviour.intensity = intensity;
return playable;
}
}
|
|
1
2
3
4
5
6
7
8
9
10
11
12
13
14
15
16
17
18
|
public class LightControlAsset : PlayableAsset
{
//public ExposedReference<Light> light;
public Color color = Color . white ;
public float intensity = 1f ;
public override Playable CreatePlayable ( PlayableGraph graph , GameObject owner )
{
var playable = ScriptPlayable < LightControlBehaviour > . Create ( graph ) ;
var lightControlBehaviour = playable . GetBehaviour ( ) ;
//lightControlBehaviour.light = light.Resolve(graph.GetResolver());
lightControlBehaviour . color = color ;
lightControlBehaviour . intensity = intensity ;
return playable ;
}
}
|
The PlayableAsset doesn’t need to hold an ExposedReference for a Light component anymore. The reference will be managed by the track and given directly to the PlayableBehaviour.
该 PlayableAsset 不需要 再保持光组件 的 ExposedReference。 引用将由曲目管理,并直接提供给 PlayableBehaviour 。
In our timeline, we can add a LightControl track and bind a Light to it. Now, each clip we add to that track will operate on the Light component that is bound to the track.
在时间轴中,我们可以添加 LightControl 轨道并将Light绑定到它。 现在,我们添加到该轨道的每个剪辑都将在绑定到该轨道的Light组件上运行。
If you use the Graph Visualizer to display this graph, it looks something like this:
如果使用Graph Visualizer来显示此图,则它看起来像这样:
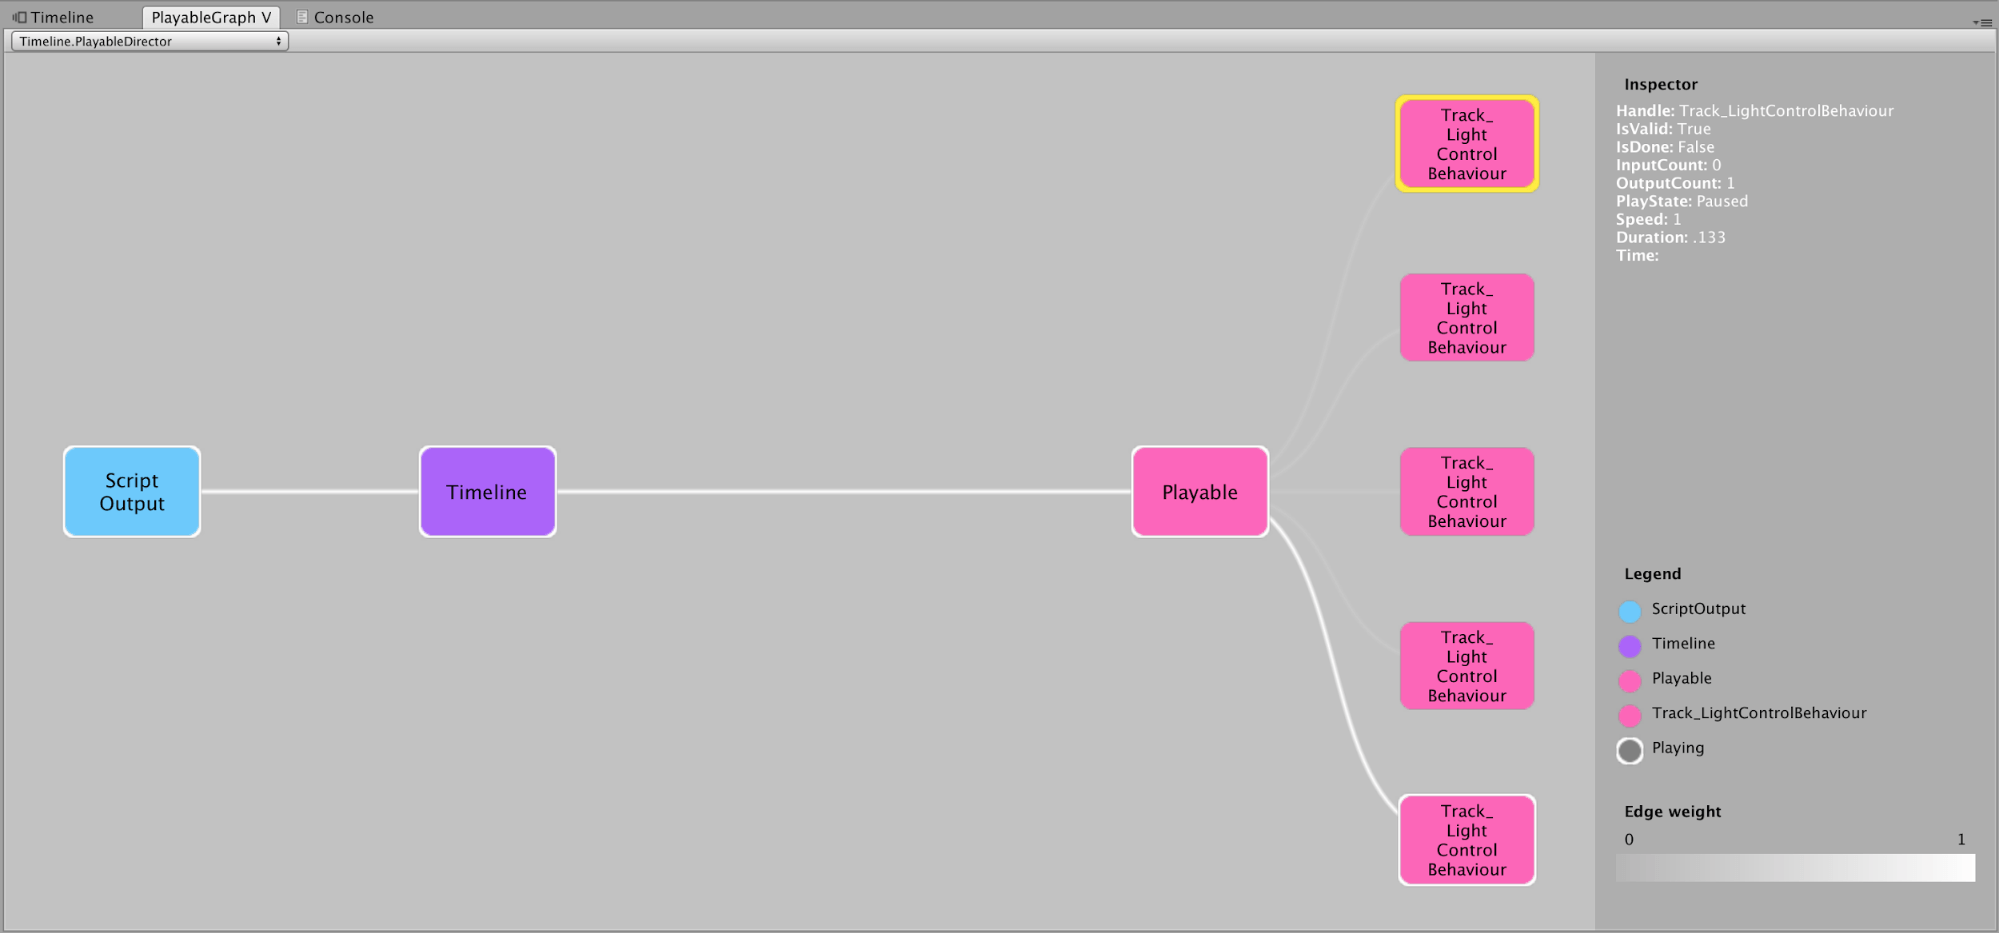
As expected, you see the clips on the right side as 5 blocks that feed into one. You can think of the one box as the track. Then, everything goes into the Timeline: the purple box.
不出所料,您将在右侧看到的剪辑为5个块,可合并为一个块。 您可以将一个盒子视为轨道。 然后,所有内容进入时间轴:紫色框。
Note: The pink box called “Playable” is actually a courtesy mixer Playable that Unity creates for you. That’s why it’s the same colour as the clips. What is a mixer? I’ll talk about mixers in the next example.
注意: 名为“ Playable”的粉红色框实际上是Unity为您创建的调音台Playable。 这就是为什么它与剪辑的颜色相同。 什么是搅拌机? 在下一个示例中,我将讨论混音器。
示例3 –用混合器混合剪辑 (Example 3 – Blending clips with a mixer)
Timeline supports overlapping clips to create blending, or crossfading, between them. Custom clips also support blending. To enable it though, you need to create a mixer that accesses the data from all of the clips and blends it.
时间轴支持重叠的剪辑,以在它们之间创建混合或交叉渐变。 自定义剪辑还支持混合。 但是,要启用它,您需要创建一个混合器,以访问所有剪辑中的数据并将其混合。
A mixer derives from PlayableBehaviour, just like the LightControlBehaviour you used earlier. In fact, you still use the ProcessFrame function. The key difference is that this Playable is explicitly declared as a mixer by the track script, by overriding the function CreateTrackMixer.The LightControlTrack script now looks like this:
混合器派生自 PlayableBehaviour ,就像您先前使用的LightControlBehaviour一样。 实际上,您仍然使用 ProcessFrame 函数。 关键区别在于,通过覆盖功能 CreateTrackMixer ,轨道脚本将此Playable明确声明为混合器 。 现在 , LightControlTrack 脚本如下所示:
|
1
2
3
4
5
6
7
8
|
[TrackClipType(typeof(LightControlAsset))]
[TrackBindingType(typeof(Light))]
public class LightControlTrack : TrackAsset
{
public override Playable CreateTrackMixer(PlayableGraph graph, GameObject go, int inputCount) {
return ScriptPlayable<LightControlMixerBehaviour>.Create(graph, inputCount);
}
}
|
|
1
2
3
4
5
6
7
8
|
[ TrackClipType ( typeof ( LightControlAsset ) ) ]
[ TrackBindingType ( typeof ( Light ) ) ]
public class LightControlTrack : TrackAsset
{
public override Playable CreateTrackMixer ( PlayableGraph graph , GameObject go , int inputCount ) {
return ScriptPlayable < LightControlMixerBehaviour > . Create ( graph , inputCount ) ;
}
}
|
When the Playable Graph for this track is created, it will also create a new behaviour (the mixer), and connect it to all of the clips on the track.
创建此轨道的“可播放图形”时,它还将创建一个新的行为(混合器),并将其连接到轨道上的所有片段。
You also want to move the logic from the PlayableBehaviour to the mixer. As such, the PlayableBehaviour will now look quite empty:
您还希望将逻辑从 PlayableBehaviour 移到混音器。 因此, PlayableBehaviour 现在看起来很空白:
|
1
2
3
4
5
|
public class LightControlBehaviour : PlayableBehaviour
{
public Color color = Color.white;
public float intensity = 1f;
}
|
|
1
2
3
4
5
|
public class LightControlBehaviour : PlayableBehaviour
{
public Color color = Color . white ;
public float intensity = 1f ;
}
|
It basically only contains the data that will come from the PlayableAsset at runtime. The mixer, on the other hand, will have all of the logic in its ProcessFrame function:
它基本上只包含 运行时 来自 PlayableAsset 的数据 。 另一方面,混合器将在其 ProcessFrame 函数中 具有所有逻辑 :
|
1
2
3
4
5
6
7
8
9
10
11
12
13
14
15
16
17
18
19
20
21
22
23
24
25
26
27
28
29
30
|
public class LightControlMixerBehaviour : PlayableBehaviour
{
// NOTE: This function is called at runtime and edit time. Keep that in mind when setting the values of properties.
public override void ProcessFrame(Playable playable, FrameData info, object playerData)
{
Light trackBinding = playerData as Light;
float finalIntensity = 0f;
Color finalColor = Color.black;
if (!trackBinding)
return;
int inputCount = playable.GetInputCount (); //get the number of all clips on this track
for (int i = 0; i < inputCount; i++)
{
float inputWeight = playable.GetInputWeight(i);
ScriptPlayable<LightControlBehaviour> inputPlayable = (ScriptPlayable<LightControlBehaviour>)playable.GetInput(i);
LightControlBehaviour input = inputPlayable.GetBehaviour();
// Use the above variables to process each frame of this playable.
finalIntensity += input.intensity * inputWeight;
finalColor += input.color * inputWeight;
}
//assign the result to the bound object
trackBinding.intensity = finalIntensity;
trackBinding.color = finalColor;
}
}
|
|
1
2
3
4
5
6
7
8
9
10
11
12
13
14
15
16
17
18
19
20
21
22
23
24
25
26
27
28
29
30
|
public class LightControlMixerBehaviour : PlayableBehaviour
{
// NOTE: This function is called at runtime and edit time. Keep that in mind when setting the values of properties.
public override void ProcessFrame ( Playable playable , FrameData info , object playerData )
{
Light trackBinding = playerData as Light ;
float finalIntensity = 0f ;
Color finalColor = Color . black ;
if ( ! trackBinding )
return ;
int inputCount = playable . GetInputCount ( ) ; //get the number of all clips on this track
for ( int i = 0 ; i < inputCount ; i ++ )
{
float inputWeight = playable . GetInputWeight ( i ) ;
ScriptPlayable < LightControlBehaviour > inputPlayable = ( ScriptPlayable < LightControlBehaviour > ) playable . GetInput ( i ) ;
LightControlBehaviour input = inputPlayable . GetBehaviour ( ) ;
// Use the above variables to process each frame of this playable.
finalIntensity += input . intensity * inputWeight ;
finalColor += input . color * inputWeight ;
}
//assign the result to the bound object
trackBinding . intensity = finalIntensity ;
trackBinding . color = finalColor ;
}
}
|
Mixers have access to all of the clips present on a track. In this case you need to read the values of intensity and color of all the clips currently participating in the blend, so you need to iterate through them with a for loop. On each cycle, you access the inputs (GetInput(i)) and build up the final values using the weight of each clip (GetInputWeight(i)) to obtain how much that clip is contributing to the blend.
混合器可以访问轨道上存在的所有剪辑。 在这种情况下,您需要读取当前参与混合的所有片段的强度和颜色值,因此需要使用for循环遍历它们。 在每个周期,则可以访问输入(GetInput(i)) 和使用每个剪辑的重量(GetInputWeight(I)), 以获得多少该剪辑是有助于共混物 建立的最终值 。
So, imagine you have two clips blending: one is contributing red and the other is contributing white. When the blend is a quarter of the way through, the color is 0.25 * Color.red + 0.75 * Color.white, which results in a slightly faded red.
因此,假设您有两个混合的剪辑:一个贡献红色,另一个贡献白色。 当混合完成四分之一时,颜色为 0.25 * Color.red + 0.75 * Color.white ,这会导致红色稍微褪色。
Once the loop is over, you apply the totals to the bound Light component. This lets you create something like this:
循环结束后,将总计应用于绑定的Light组件。 这使您可以创建如下内容:
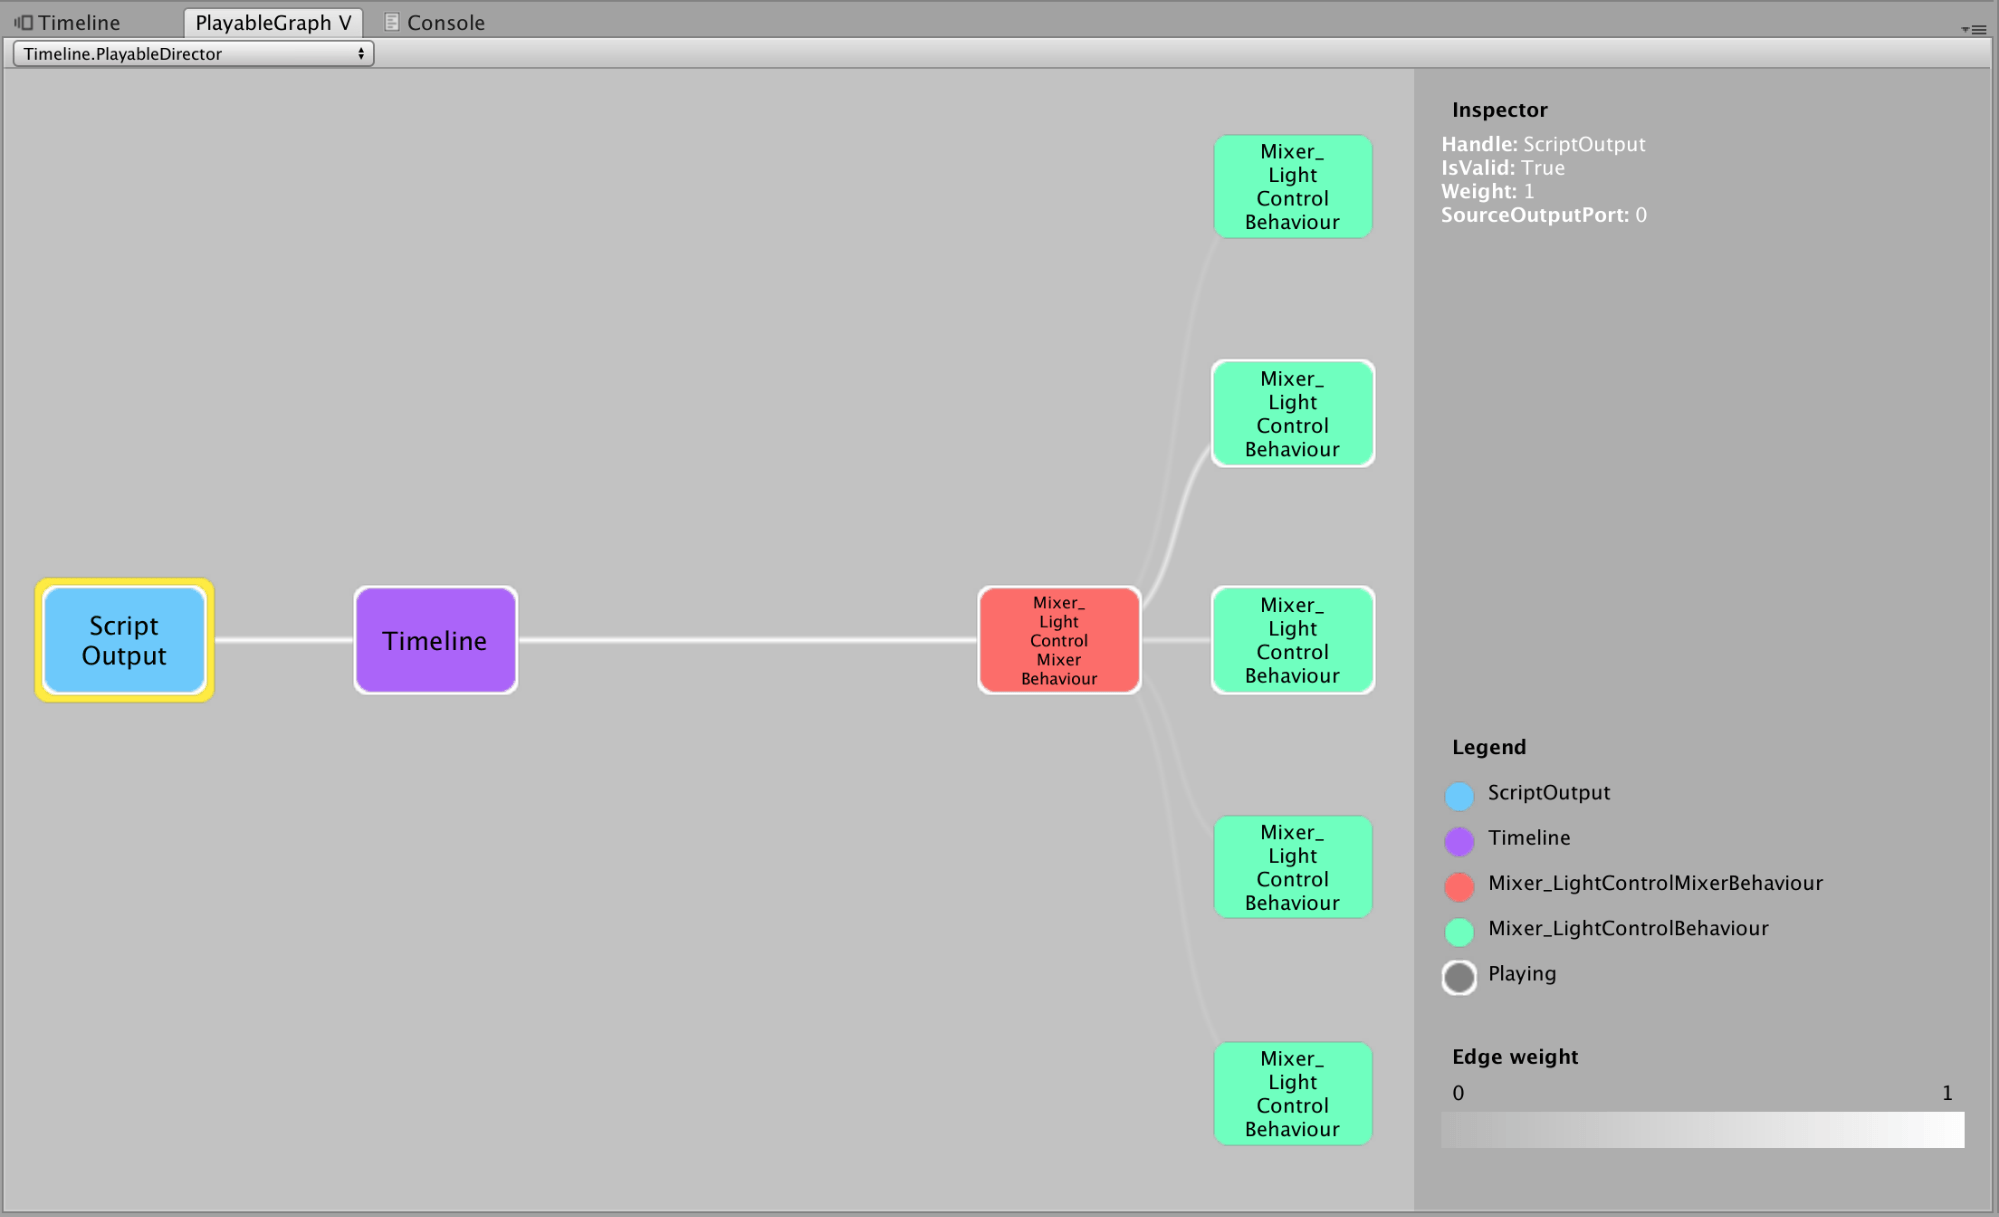
You can see now that the red box is exactly the mixer Playable that you programmed, and on which you now have full control. This is in contrast with the Example 2 above, where the mixer was the default one provided by Unity.
现在您可以看到红色框恰好是您编程的调音台Playable,并且您现在可以完全控制它了。 这与上面的示例2相反,在示例2中,混音器是Unity提供的默认混音器。
Also notice that because the graph is in the middle of a blend, the green boxes 2 and 3 both have a bright line connecting to the mixer, indicating that their weight is somewhat like 0.5 each.
还要注意,由于图形位于混合的中间,因此绿色框2和3都有一条亮线连接到混合器,表明它们的重量分别约为0.5。
Keep in mind that whenever you implement blends in a mixer, it’s up to you to decide what the logic is. Blending two colors is easy, but what happens when you’re blending (wild example) two clips which represent different AI states in your AI system? Two lines of dialogue in your UI? How do you blend two static poses in a stop-motion animation? Maybe your blend is not continuous, but it’s “stepped” (so the poses morph into each other, but in discrete increments: 0, 0.25, 0.5, 0.75, 1).
请记住,每当您在混合器中实现混合时,由您决定逻辑是什么。 混合两种颜色很容易,但是当您混合(以野生示例为例)两个代表AI系统中不同AI状态的剪辑时会发生什么呢? 您的用户界面中有两行对话? 如何在定格动画中混合两个静态姿势? 也许您的混合不是连续的,而是“逐步的”(因此,姿势彼此变形,但离散的增量为:0、0.25、0.5、0.75、1)。
With this powerful system at your disposal, the scenarios are exciting and endless!
有了这个强大的系统供您使用,各种场景将无穷无尽!
示例4 –动画自定义剪辑 (Example 4 – Animating custom clips)
As a final step in this guide, let’s go back to the previous example and implement a different way of moving data around using something we refer to as “templates”. One big advantage of this pattern is that it lets you keyframe the properties of the template, making it possible to create animations for custom clips directly on the Timeline.
作为本指南的最后一步,让我们回到上一个示例,并使用一种称为“模板”的东西来实现另一种移动数据的方式。 这种模式的一大优势是,它使您可以对模板的属性进行关键帧设置,从而可以直接在时间轴上为自定义剪辑创建动画。
In the previous example, you had a reference to the Light component, the color and the intensity on both the PlayableAsset and the PlayableBehaviour. The data was set-up on the PlayableAsset in the Inspector, then at runtime it was copied into the PlayableBehaviour when creating the graph.
在上一个示例中,您引用了Light组件, PlayableAsset 和 PlayableBehaviour 上的颜色和强度 。 数据 在检查器中 的 PlayableAsset 上设置 ,然后在运行 时在创建图形 时将其复制到 PlayableBehaviour中 。
This is a valid way of doing things, but it duplicates the data which then needs to be kept in sync at all times. This can easily lead to mistakes. Instead, you can use the concept of a PlayableBehaviour “template”, by creating a reference to it in the PlayableAsset.So, first, rewrite your LightControlAsset like this:
这是一种有效的处理方式,但是它会复制数据,然后需要始终保持同步。 这很容易导致错误。 相反,你可以 通过创建在 PlayableAsset 对它的引用 使用 PlayableBehaviour“模板” 的概念 。 因此,首先, 像这样 重写您的 LightControlAsset :
|
1
2
3
4
5
6
7
8
9
|
public class LightControlAsset : PlayableAsset
{
public LightControlBehaviour template;
public override Playable CreatePlayable (PlayableGraph graph, GameObject owner) {
var playable = ScriptPlayable<LightControlBehaviour>.Create(graph, template);
return playable;
}
}
|
|
1
2
3
4
5
6
7
8
9
|
public class LightControlAsset : PlayableAsset
{
public LightControlBehaviour template ;
public override Playable CreatePlayable ( PlayableGraph graph , GameObject owner ) {
var playable = ScriptPlayable < LightControlBehaviour > . Create ( graph , template ) ;
return playable ;
}
}
|
The LightControlAsset now only has a reference to the LightControlBehaviour rather than the values themselves. It’s even less code than before!
现在 , LightControlAsset 仅具有对 LightControlBehaviour 的引用, 而不是值本身。 它的代码比以前更少了!
Leave the LightControlBehaviour unchanged:
保持 LightControlBehaviour 不变:
|
1
2
3
4
5
6
|
[System.Serializable]
public class LightControlBehaviour : PlayableBehaviour
{
public Color color = Color.white;
public float intensity = 1f;
}
|
|
1
2
3
4
5
6
|
[ System . Serializable ]
public class LightControlBehaviour : PlayableBehaviour
{
public Color color = Color . white ;
public float intensity = 1f ;
}
|
The reference to the template now automatically produces this Inspector when you select the clip in the Timeline:
现在,当您在时间轴中选择剪辑时,对模板的引用会自动生成此检查器:
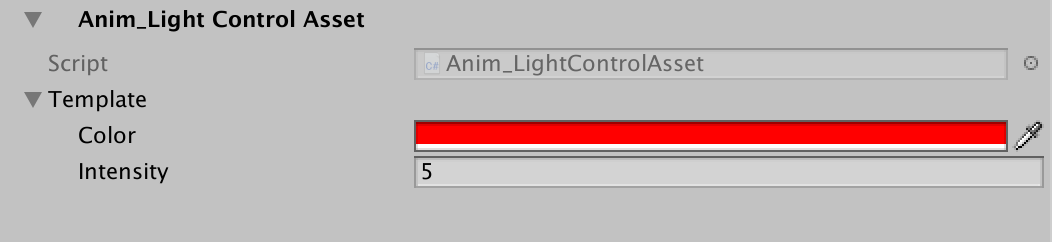
Once you have this script in place, you are ready to animate. Notice that if you create a new clip, you will see a circular red button on the Track Header. This means that the clip can now be keyframed without needing to add an Animator to it. You just click the red button, select the clip, position the playhead where you want to create a key, and change the value of that property.
放置好该脚本后,就可以制作动画了。 请注意,如果您创建一个新的剪辑,则在“轨迹标题”上将看到一个红色的圆形按钮。 这意味着现在可以对剪辑进行关键帧设置,而无需向其添加动画器。 您只需单击红色按钮,选择剪辑,将播放头放置在要创建关键点的位置,然后更改该属性的值。
You can also expand the Curves view by clicking on the white box button, to see the curves created by the keyframes:
您还可以通过单击白框按钮来展开“曲线”视图,以查看关键帧创建的曲线:

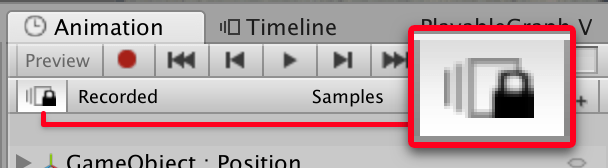
There’s one extra perk: you can double-click on the Timeline clip, and Unity will open the Animation panel and link it to Timeline. You will noticed they are linked when this button shows up:
还有一个额外的好处:您可以双击时间轴剪辑,然后Unity将打开“动画”面板并将其链接到时间轴。 当此按钮出现时,您会注意到它们已链接:
When this happens, you can scrub on both the Timeline and the Animation window and the playheads will be kept in sync, so you have full control over your keyframes. You can now modify your animation in the Animation window to work on the keyframes in a more comfortable environment:
发生这种情况时,您可以在“时间轴”和“动画”窗口上进行擦洗,并且播放头将保持同步,因此您可以完全控制关键帧。 现在,您可以在“动画”窗口中修改动画,以在更舒适的环境中处理关键帧:
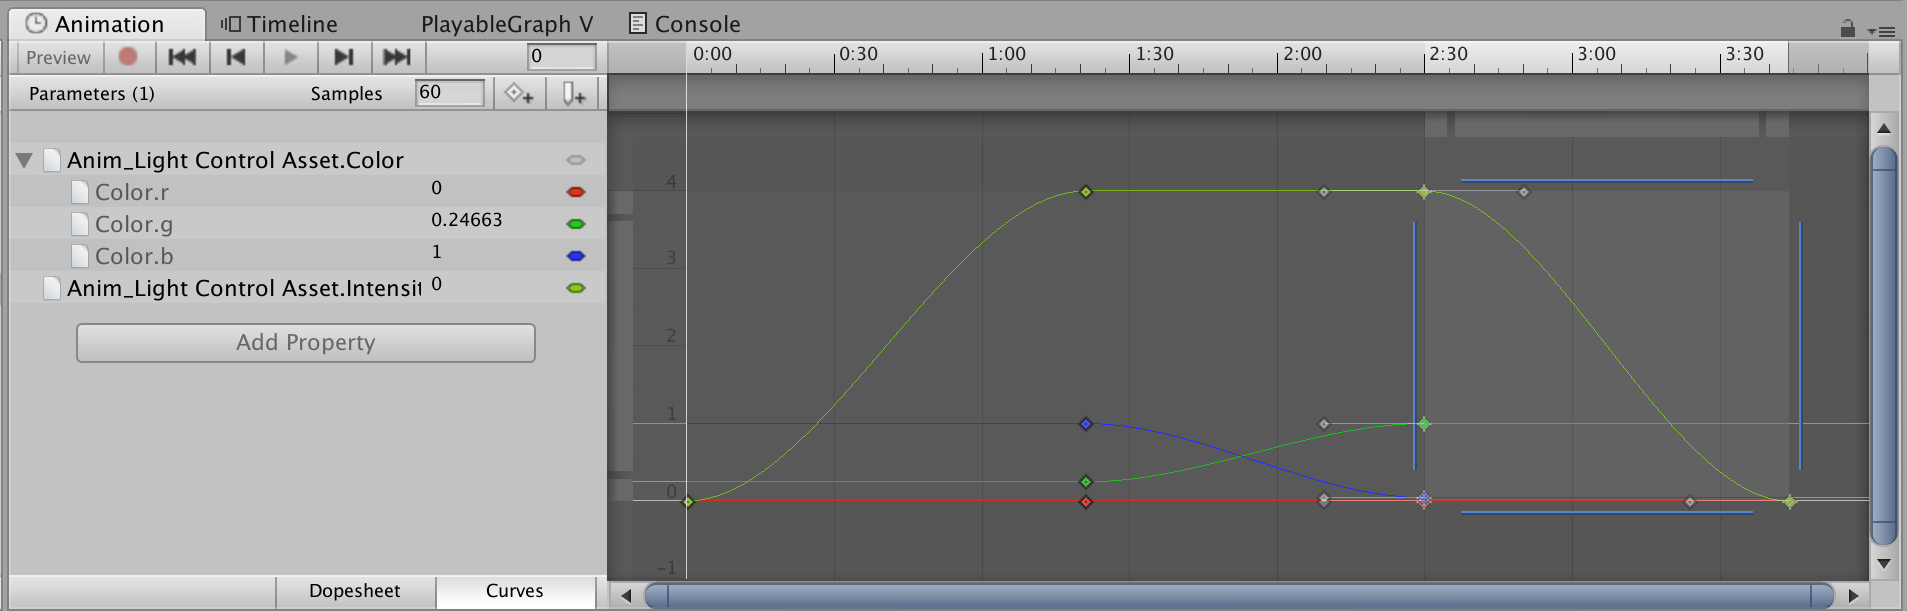
In this view, you can use the full power of animation curves and the dopesheet to really refine the animations of your custom clips.
在此视图中,您可以使用动画曲线的全部功能和摄影表来真正优化自定义剪辑的动画。
Note: When you animate things this way, you are creating Animation Clips. You can find them under the Timeline asset:
注意:以 这种方式为事物设置动画时,将创建动画剪辑。 您可以在“时间轴”资产下找到它们:

结论 (In conclusion)
I hope this post was a valuable introduction to the endless possibilities that Timeline can offer when you take it to the next level with scripting.
我希望这篇文章是宝贵的介绍,介绍了当您使用脚本将其升级到更高水平时,Timeline可以提供的无尽可能性。
Please ping me on Twitter with your questions, feedback, and your Timeline creations!
请 在Twitter上 向 我ping 您的问题,反馈和时间表创建!
翻译自: https://blogs.unity3d.com/2018/09/05/extending-timeline-a-practical-guide/
修改时间延长软件使用时间


 5355
5355

 被折叠的 条评论
为什么被折叠?
被折叠的 条评论
为什么被折叠?
 到【灌水乐园】发言


