


陈鸽:正统或异端
Creating a realistic human is a complex technical challenge, as you need a huge amount of data to achieve a high level of visual fidelity.When working on The Heretic, the Demo Team developed tools to overcome many problems related to facial animation; attaching hair to skin; and eye, teeth and skin rendering in Unity. Those tools are now available on GitHub. Read on for a full technical breakdown of the process behind these solutions.
创建现实的人类是一项复杂的技术挑战,因为您需要大量的数据来实现高水平的视觉保真度。在处理《异端》时,演示团队开发了工具来解决与面部动画有关的许多问题; 将头发附着在皮肤上; Unity中的眼睛,牙齿和皮肤渲染。 这些工具现在可以在GitHub上使用 。 请继续阅读,以获取这些解决方案背后流程的完整技术细分。
My name is Lasse Jon Fuglsang Pedersen, and I am a Senior Software Engineer on the Unity Demo Team. During the production of The Heretic, one of the things I worked on is the set of technical solutions that drive the face of Gawain, the digital human in the film.
我叫Lasse Jon Fuglsang Pedersen,我是Unity演示团队的高级软件工程师。 在制作 《异教徒》的过程中 ,我从事的工作之一是一套技术解决方案,这些技术解决方案推动了电影中数字化人物加文(Gawain)的面貌。
This work was recently released as a standalone package on GitHub. In this blog post I will discuss some of the features of the package and share some insights into the development process behind those features.
这项工作最近作为 独立软件包 发布 在GitHub上 。 在这篇博客文章中,我将讨论该软件包的某些功能,并分享对这些功能背后的开发过程的一些见解。
面部动画 (Facial animation)
One of the goals for the digital human in The Heretic was to attempt to avoid the uncanny valley in terms of facial animation, while still taking a realistic approach to the character as a whole. To match the actor’s performance as closely as possible, we decided to try using 4D capture data (a 3D scan per frame of animation) for the animation of the face mesh, which would then at least have the potential to be geometry-accurate to the actor’s facial performance (where not obstructed).
The Heretic中的数字人的目标之一是试图避免面部动画方面的神秘谷,同时仍然对整个角色采取逼真的方法。 为了尽可能接近演员的表演,我们决定尝试使用4D捕获数据(每帧动画进行3D扫描)来制作人脸网格动画,这至少可能具有几何精确度。演员的面部表情(不被遮挡)。
Using 4D capture data brought many interesting new challenges, as Krasimir Nechevski, our animation director, explains in more detail in this previous blog post. A lot of effort went into figuring out how to process and tweak the captured data, and then actually doing that, to get it into a state that we were happy with for the film.
使用4D捕获数据带来了许多有趣的新挑战,正如我们的动画总监Krasimir Nechevski在 上一篇博客文章 中更详细地解释的那样 。 为了弄清楚如何处理和调整捕获的数据,然后进行实际操作,使数据进入我们对电影满意的状态,我们付出了很多努力。
加工注意事项 (Notes on processing)
As an example, one of the issues we had was related to the geometry of the eyelids. Because eyelashes partially obstructed the eyelids during capture, the captured data also contained some influence from eyelashes, which manifested itself as noise in those regions. As a result, the geometry of the eyelids was inaccurate and jittery, and this meant that we had to find a way to reconstruct the geometry in those regions.
例如,我们遇到的一个问题与眼睑的几何形状有关。 由于在捕获过程中睫毛部分遮挡了眼睑,因此捕获的数据还包含来自睫毛的某些影响,这些影响在这些区域表现为噪声。 结果,眼睑的几何形状不准确且不稳定,这意味着我们必须找到一种方法来重建那些区域的几何形状。
Jittery geometry near the eyelids
眼皮附近的抖动几何
The issue with the eyelid geometry was apparent quite early in the process, so as part of working on the importer for just getting the data into Unity, we also experimented with region-specific noise reduction and reconstruction, using differential mesh processing techniques. Specifically, we would perform noise reduction by smoothing the regional change in curvature over time, and we would perform reconstruction by transplanting the curvature of a (clean) base mesh onto each damaged region of each frame of the captured sequence.
眼睑几何形状的问题在此过程的早期就很明显了,因此,在将导入数据导入Unity的导入器中,我们还使用差分网格处理技术对特定区域的降噪和重构进行了实验。 具体而言,我们将通过平滑曲率随时间变化的区域变化来执行降噪,并通过将(干净的)基本网格的曲率移植到捕获序列的每个帧的每个受损区域上来执行重构。
Denoising and transplanting geometry near the eyelids
对眼睑附近的几何体进行去噪和移植
While the results were fairly robust, we felt they were unfortunately also a bit too synthetic when compared to the original data: The eyelids, while more stable, lost some of the original motion that effectively made them feel human. It became clear that we needed a middle ground, which might have required more research than we realistically had time for. So when an external vendor offered to tackle the reconstruction work, that was an easy choice. The GitHub package, however, includes the internal tools originally written for denoising and region transplant, as they might be useful as a learning resource.
尽管结果相当可靠,但与原始数据相比,我们感到遗憾的是它们也太合成了:眼睑虽然更稳定,却失去了一些原始运动,有效地使它们感觉像人。 显然,我们需要一个中间立场,这可能需要比实际需要的时间更多的研究。 因此,当外部供应商提出进行重建工作时,这是一个简单的选择。 但是,GitHub软件包包括最初为降噪和区域移植而编写的内部工具,因为它们可能作为学习资源很有用。
抚平皱纹 (Fitting the wrinkles)
Another issue we had was that of fine surface details, or rather the lack of fine surface details, due to the resolution of the target face mesh: The face mesh of Gawain has ~28,000 vertices, and this was not sufficient for geometrically representing the fine wrinkles of the actor’s performance, much less the stretching of pores in the skin. Even if the raw 4D data had some of those details, we were not able to keep them after processing the data to fit the vertex budget of the mesh we were deforming and rendering. We considered baking a normal map per frame, but that would have required quite some space on disk, which we wanted to conserve.
我们遇到的另一个问题是精细的表面细节,或者由于目标面部网格的分辨率而缺少精细的表面细节:Gawain的面部网格具有〜28,000个顶点,这不足以在几何上表示精细演员的皱纹,更不用说伸展毛Kong了。 即使原始4D数据具有其中的一些细节,在处理数据以适应我们要变形和渲染的网格的顶点预算之后,我们也无法保留它们。 我们考虑过每帧烘焙一个法线贴图,但这将需要在磁盘上保留一些空间,我们希望节省这些空间。
To handle the fine surface details, we decided to try to couple the geometry of the imported sequence with the pose-driven feature maps from a blend shape-based facial rig from Snappers Systems. The pose-driven feature maps from the facial rig contained the type of surface detail that we were missing in the imported sequence, like wrinkles and the stretching of pores. So the basic idea was this: If we could figure out which combination of blend shapes would best approximate each frame of 4D, then we should also be able to use those weights to drive just the pose-driven feature maps (excluding the deformation from the blend shapes), for added surface detail during 4D playback.
为了处理精细的表面细节,我们决定尝试将导入序列的几何形状与来自 Snappers Systems 的基于混合形状的面部钻机的姿态驱动特征图耦合 。 来自面部钻机的姿势驱动的特征图包含我们在导入序列中缺少的表面细节类型,例如皱纹和毛Kong伸展。 因此,基本思想是:如果我们能找出哪种混合形状组合最适合4D的每个帧,那么我们还应该能够使用这些权重来驱动仅由姿势驱动的特征图(不包括混合形状),以便在4D播放期间增加表面细节。
Finding a good way to fit the blend shapes to the 4D was a two-step process. The first step was a least squares approach, for which we put the problem in matrix form. If we write up all the blend shapes (which are deltas to the base mesh) as one large matrix A, where each column holds the delta of a single blend shape, then the composite delta is given by Ax = b, where x represents the weights of the individual blend shapes.
寻找一种将混合形状适合4D的好方法是一个两步过程。 第一步是最小二乘法,为此我们将问题以矩阵形式表示。 如果我们将所有混合形状(相对于基本网格的增量)写为一个大矩阵 A ,其中每一列都包含单个混合形状的增量,则复合增量由 Ax = b 给出 ,其中 x 代表各个混合形状的权重。
Solving for x is often not possible, due to A often not being invertible (in our case it is not invertible, simply because it is not square). It is, however, often possible to arrive at an approximate solution x*, by formulating the problem slightly differently: Using the so-called normal equation ATAx* = ATb, we can write the least squares solution as x* = (ATA)-1ATb, which then only requires that A has linearly independent columns. Working with blend shapes, we need to filter the included shapes to ensure that they are linearly independent, and then we can work towards an approximate solution: We precompute (ATA)-1AT for the filtered blend shapes of the rig, and then we plug in the delta b for each frame of 4D, to compute x* (the fitted weights) for each frame of 4D.
由于 A 经常是不可逆的,所以 x的 求解 通常是不可能的 (在我们的例子中,它不是可逆的,仅因为它不是平方的)。 但是,通常可以通过以下方式得出问题的近似解 x *:使用所谓的正规方程 A T Ax * = A T b ,我们可以将最小二乘解写为 x * = ( A T A ) -1 A T b ,则仅要求 A 具有线性独立的列。 与混合形状合作,我们需要过滤包括形状,以确保它们是线性无关的,然后我们就可以对一个近似解的工作:我们预先计算(A T A)-1 T 代表钻机的过滤混合形状,然后 为4D的每一帧 插入增量 b ,以计算4D的每一帧的 x *(拟合权重)。
While the unconstrained least squares approach outlined above was nice for building a basic understanding of the problem, it did not work well for us in practice. The solution would also sometimes contain negative weights, to get closer overall to the given 4D frame. But the facial rig expected blend shapes to be only added, not subtracted, so the fitted weights effectively exceeded the constraints of the rig, and therefore it was not always possible to translate them into meaningful wrinkles.
尽管上面概述的不受约束的最小二乘法很好地建立了对该问题的基本理解,但是在实践中它对我们来说效果不佳。 解决方案有时还会包含负权重,以使整体更接近给定的4D框架。 但是面部钻机预期只能添加而不是减去混合形状,因此拟合的权重实际上超出了钻机的限制,因此,并非总是可能将它们转换为有意义的皱纹。
In other words, we needed a non-negative solution to get the wrinkles that we wanted. To compute the non-negative solution, we used a subset of a third-party library called Accord.NET, which contains an iterative solver specifically for the non-negative least squares problem. After having dissected the problem and tested the unconstrained solution, we already had the filtered blend shape matrix A and the desired delta b, and it was straightforward to plug those into the iterative solver to obtain a non-negative set of fitted weights for each frame of 4D.
换句话说,我们需要一个非负的解决方案来获得我们想要的皱纹。 为了计算非负解,我们使用了第三方库 Accord.NET 的子集,该子库 包含专门用于非负最小二乘问题的迭代求解器。 在解决了问题并测试了无约束的解决方案之后,我们已经有了过滤后的混合形状矩阵 A 和所需的增量 b ,可以很容易地将它们插入迭代求解器中,以获取每个框架的非负拟合权重集4D。
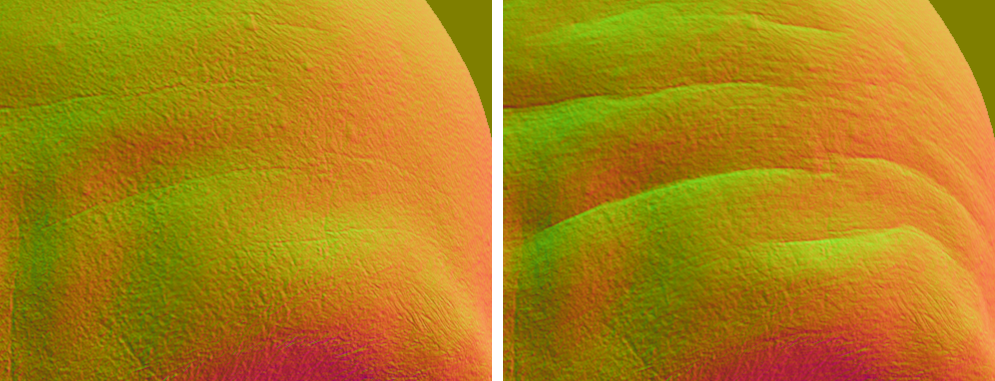
Section of forehead before and after fitting the wrinkles
前后皱纹的额头部分
As a side note, we also experimented with computing the fitted weights based on mesh edge lengths as well as based on edge curvatures, rather than base mesh position deltas. If we had not been able to remove the head motion from the 4D data, we would have needed to use one of these paths to make the fit independent of the head motion. For Gawain, we ended up fitting the position deltas, but the other two options are still available in the package.
附带说明一下,我们还尝试根据网格边缘长度以及边缘曲率而不是基础网格位置增量计算拟合权重。 如果我们无法从4D数据中删除头部运动,则需要使用这些路径之一来使拟合与头部运动无关。 对于Gawain,我们最终拟合了位置增量,但包装中仍然提供其他两个选项。
Unity中的工作流程 (Workflow in Unity)
Before getting the 4D data into Unity, it is important to note that we first rely on external tools to ensure that the 4D capture data is turned into a sequence of meshes (delivered as .obj) with frame-to-frame matching topology. The topology also needs to match that of the target mesh for which the data is imported. (See Krasimir Nechevsky’s blog post for more details.)
在将4D数据导入Unity之前,需要特别注意的是,我们首先依靠外部工具来确保4D捕获数据被转换为具有帧到帧匹配拓扑的一系列网格(以.obj形式提供)。 拓扑还需要与导入数据的目标网格的拓扑匹配。 (有关 更多详细信息, 请参见Krasimir Nechevsky的 博客 。)
Then, to get the preprocessed 4D data into Unity and turn it into a runtime-ready clip, the package provides a custom type of asset, that we call the SkinDeformationClip. Once created, a SkinDeformationClip exposes the tools for importing (and optionally processing) a segment of 4D data, which can be specified as either a path to .obj files anywhere on disk (removing the need for including intermediate assets in the project) or as a path to Mesh assets already within the project.
然后,为了将预处理的4D数据转换为Unity并将其转换为可用于运行时的剪辑,该包提供了一种自定义类型的资产,我们将其称为SkinDeformationClip。 创建后,SkinDeformationClip会公开用于导入(和可选地处理)一段4D数据的工具,这些工具可以指定为磁盘上任何位置的.obj文件的路径(无需在项目中包括中间资产)或项目中已存在的Mesh资源的路径。
Creating a clip asset and importing the 4D frames from .obj
创建剪辑资产并从.obj导入4D框架
After configuring the SkinDeformationClip asset, click the Import button in the Inspector to start importing and processing the frame data. Note that if either mesh processing or frame fitting is enabled on the asset, this can take a while. After the import finishes, the clip asset now stores the imported frame intervals, fitted weights, etc., but not the final frame data. The frame data is stored in a separate binary next to the asset, so that we can stream the data efficiently from disk during playback.
配置SkinDeformationClip资产后,单击 检查器中的 “ 导入” 按钮以开始导入和处理框架数据。 请注意,如果对资产启用了网格处理或框架拟合,则可能需要一段时间。 导入完成后,剪辑资源现在存储导入的帧间隔,拟合权重等,但不存储最终的帧数据。 帧数据存储在资产旁边的单独二进制文件中,因此我们可以在播放期间从磁盘高效地流式传输数据。
Once imported, you can play back the asset by dragging it onto a custom type of track for Unity Timeline, called the SkinDeformationTimeline. This type of track specifically targets a SkinDeformationRenderer component, which then acts as an output for the clip data on the track. The video below illustrates the process of sequencing and playing back the imported 4D data on the Timeline.
导入后,您可以通过将资产拖到Unity 时间轴 的自定义类型的轨道 (称为SkinDeformationTimeline)上来播放资产。 此类轨道专门针对SkinDeformationRenderer组件,该组件随后充当轨道上剪辑数据的输出。 以下视频说明了在时间轴上排序和播放导入的4D数据的过程。
Playing back the clip asset using Unity Timeline
使用Unity时间轴播放剪辑资产
Through using the custom track and the SkinDeformationRenderer, it is possible to also blend multiple 4D clips, which allows artists to get creative with the data. For example, for the first part of The Heretic we used only a very short segment of 4D data, which contained only a test phrase and the three-second performance for the initial close-up. And yet, through careful reuse (cutting, scaling, and blending), it was possible to use this same single clip for the remaining facial animation in the entire first part of the film.
通过使用自定义轨道和SkinDeformationRenderer,还可以混合多个4D剪辑,从而使艺术家可以利用数据进行创作。 例如,对于《异教徒》的第一部分,我们仅使用了非常短的4D数据片段,其中仅包含测试短语和初始特写的三秒钟性能。 但是,通过仔细的重用(剪切,缩放和混合),可以将同一剪辑用于 影片 整个 第一部分 中的 其余面部动画 。
皮肤附件 (Skin attachments)
Since we chose to use the 4D data directly for the facial animation, we could not rely on bone-weighted skinning or blend shapes to resolve the positions of important secondary features, such as eyelashes, eyebrows, or stubble. Basically, we needed a way to resolve these features as a function of the animated face mesh itself.
由于我们选择直接将4D数据用于面部动画,因此我们不能依靠骨骼加权蒙皮或混合形状来解析重要的次要特征(例如睫毛,眉毛或茬)的位置。 基本上,我们需要一种根据动画的面部网格物体本身来解决这些特征的方法。
Technically, we could have loaded the processed 4D data into an external tool, modeled and attached the secondary features there, and baked out additional data for all of them. However, streaming in tens of thousands of extra vertices per frame was not viable in terms of storage, and the result also would not have been very dynamic. We knew that we needed to iterate on the 4D data throughout the production, so our solution would have to react to these iterations without a tedious baking step.
从技术上讲,我们可以将处理后的4D数据加载到外部工具中,在那里建模和附加辅助特征,然后为所有辅助特征烘焙附加数据。 但是,就存储而言,每帧成千上万个额外顶点的流式传输是不可行的,结果也不是很动态。 我们知道我们需要在整个生产过程中迭代4D数据,因此我们的解决方案必须对这些迭代做出React,而无需繁琐的烘焙步骤。
To solve this problem, the Digital Human package has a feature that we called the skin attachment system. This system basically allows attaching arbitrary meshes and transforms to a given target mesh at editor time, and then resolves them at runtime to conform to the target mesh, independent of how the target mesh is animated.
为了解决这个问题,Digital Human软件包具有我们称为皮肤附着系统的功能。 该系统基本上允许在编辑器时将任意网格附加并变换到给定的目标网格,然后在运行时解析它们以符合目标网格,而与目标网格的动画方式无关。
For the digital human in The Heretic, we used the skin attachment system primarily to drive the eyebrows, eyelashes, stubble and logical markers in relation to the skin. We also used the system to attach the fur mesh to the jacket, as Plamen Tamnev, Senior 3D Artist on the team, has described in more detail.
对于The Heretic中的数字人,我们主要使用皮肤附着系统来驱动与皮肤相关的眉毛,睫毛,胡茬和逻辑标记。 正如团队中的高级3D美术师Plamen Tamnev 所详细描述的 那样,我们还使用该系统将毛皮网格连接到夹克上 。
To illustrate how to use the system, here are the steps to attach, for example, the transform of a GameObject to the face of Gawain:
为了说明如何使用该系统,下面是将游戏对象的转换附加到Gawain的脸的步骤:
Add a SkinAttachment component.
添加一个SkinAttachment组件。
In the Inspector, set the type of attachment to Transform.
在检查器中,将附件类型设置为 Transform 。
In the Inspector, point the target field to the SkinAttachmentTarget on the face.
在检查器中,将目标字段指向脸上的SkinAttachmentTarget。
Move the transform to the desired relative location.
将变换移动到所需的相对位置。
Click the Attach button in the Inspector.
单击 检查器中 的“ 附加” 按钮。
Placing and attaching a transform
放置并附加变换
这个怎么运作 (How it works)
Under the hood, when clicking the Attach button to attach a transform, the system uses the position of the transform to query a k-d tree for the closest vertex on the face mesh. The closest vertex is then used to identify all incident triangles to the closest vertex, and for each of the incident triangles, the system generates a local pose given the current position of the transform, resulting in a set of local poses for the transform.
在引擎盖下,单击“ 附加” 按钮以附加变换时,系统将使用变换的位置来查询 k -d树以获取面网格上最接近的顶点。 然后使用最接近的顶点来标识所有与最接近的顶点有关的入射三角形,并且对于每个入射三角形,系统在给定变换的当前位置的情况下生成局部姿势,从而为变换提供一组局部姿势。
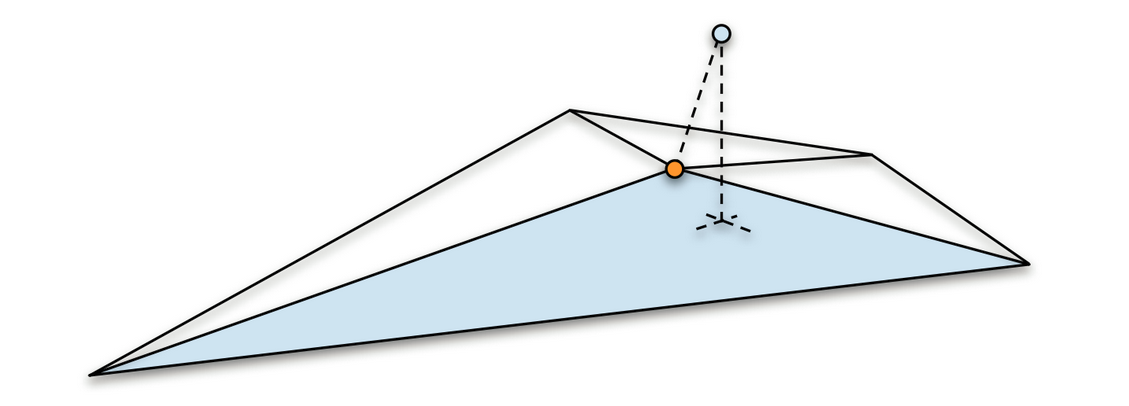
Projection onto incident triangle to closest vertex
投影到入射三角形上最接近的顶点
Each local pose is a projection of the attached point onto the plane of a given triangle, and it contains the vertex indices of the triangle, the normal distance from the attached point to the triangle, and the barycentric coordinates of the projected point.
每个局部姿势都是附加点在给定三角形平面上的投影,它包含三角形的顶点索引,从附加点到三角形的法向距离以及投影点的重心坐标。
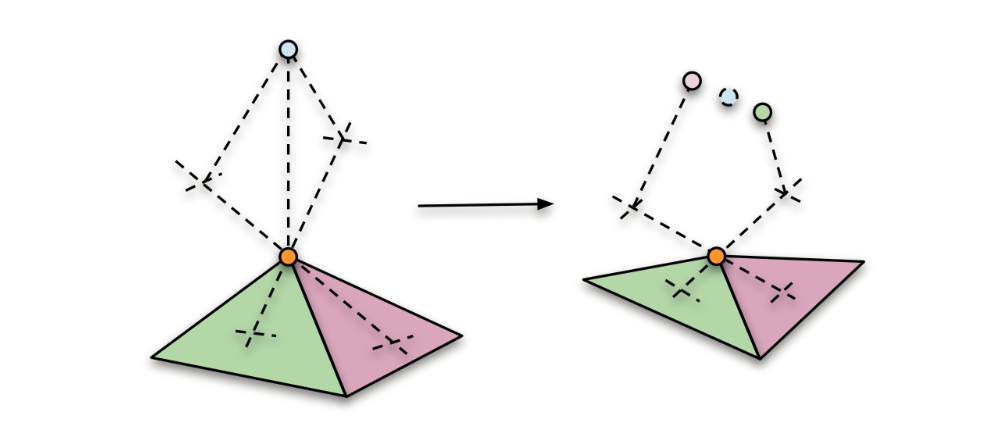
After deformation, unproject separately and average the results
变形后,分别解投影并取平均结果
The reason that we generate multiple local poses for each attached point, rather than just for a single triangle, is to support points that do not belong to any particular triangle in the mesh. This is the case for some of our hair cards, for example, which float slightly above the mesh. To resolve the attached point based on multiple local poses, we first unproject the local pose for each triangle separately, and then average the results weighing by triangle area.
我们为每个附加点而不是仅为单个三角形生成多个局部姿势的原因是为了支持不属于网格中任何特定三角形的点。 例如,我们的一些发卡就是这种情况,它们稍微浮在网格上方。 要基于多个局部姿势来解析连接点,我们首先分别取消投影每个三角形的局部姿势,然后对按三角形面积加权的结果求平均值。
Once generated, the local poses are stored in a large continuous array, along with all the other local poses for all the other attachments to the face. Each attachment keeps a reference into this data, along with a checksum, as a safety measure in case the underlying data is modified by other means.
生成后,局部姿势将与其他所有附加到面部的其他局部姿势一起存储在一个大的连续数组中。 每个附件都保留对此数据的引用以及校验和,作为安全措施,以防基础数据被其他方式修改。
The process of attaching a mesh is very similar to that of a transform, just many times over. When attaching a mesh, the system simply generates a set of local poses for each vertex in the mesh, rather than for the single position of a transform.
附加网格的过程与转换过程非常相似,只是多次。 附加网格时,系统只为网格中的每个顶点生成一组局部姿势,而不是为变换的单个位置生成一组局部姿势。
Eyebrows attached using the regular mesh mode
使用常规网格模式附着眉毛
For meshes, there is also a secondary attachment mode called MeshRoots: With this mode, the system first groups the mesh into islands based on mesh connectivity, and then finds the “roots” of each island in relation to the face mesh. Finally, it attaches every vertex within each island, in relation to the closest root within the island. The MeshRoots mode is necessary for some use cases, because it ensures that the individual islands stay rigid. For example, the eyelashes are attached in this way, while the eyebrows are not. This is because the hair cards for the eyebrows are mostly flush with the skin and expected to deform, while the hair cards for the eyelashes are expected to maintain shape.
对于网格,还有一个辅助连接模式称为 MeshRoots :在这种模式下,系统首先根据网格连接性将网格分组为岛,然后找到相对于面网格的每个岛的“根”。 最后,它会将每个岛内的每个顶点(相对于岛内最近的根)进行附加。 在 某些用例中, MeshRoots 模式是必需的,因为它可以确保各个岛保持刚性。 例如,以这种方式附着睫毛,而没有以这种方式附着眉毛。 这是因为用于眉毛的发卡通常与皮肤齐平并可能变形,而用于睫毛的发卡则希望保持形状。

Eyelashes as separate islands attached at the root
睫毛根部附有独立的小岛
At runtime, the system takes care that the positions and vertices of the attachments (transforms as meshes) are continuously updated to conform to the face mesh. Every frame, the final output state of the face mesh is calculated and used in combination with the known local poses to resolve all positions and vertices in relation to the skin. The image below illustrates the density of the attachments we used for Gawain.
在运行时,系统会注意将附件的位置和顶点(转换为网格)不断更新以符合面网格。 在每一帧中,都会计算出面部网格的最终输出状态,并将其与已知的局部姿势结合使用,以解析相对于皮肤的所有位置和顶点。 下图显示了我们用于Gawain的附件的密度。

Plot of points resolved with the face mesh
用面网格解析的点图
The runtime resolve is accelerated by the C# Job System and the Burst Compiler, which enables it to handle a relatively large amount of data. As an example, for the face of Gawain, the resolve jobs were collectively responsible for evaluating hundreds of thousands of local poses every frame, to resolve the secondary features of the face.
C#Job System 和 Burst Compiler 加快了运行时解析 ,这使它能够处理相对大量的数据。 例如,对于Gawain的脸部,由分解工作共同负责评估每帧数十万个局部姿势,以解决脸部的次要特征。
着色器和渲染 (Shaders and rendering)
When work started on the Digital Human package as a standalone release, one of the primary goals was to transition everything rendering-related to a strictly unmodified version of the High Definition Rendering Pipeline (HDRP), to ensure better upgradeability through new HDRP features for extensibility.
当开始以独立发行版形式发布Digital Human软件包时,主要目标之一就是将所有与渲染相关的内容过渡到严格未经修改的 High Definition Rendering Pipeline(HDRP)版本 ,以确保通过新的HDRP功能实现更好的可扩展性以实现可扩展性。 。
For context: At the time when we started prototyping the visuals for The Heretic, we were still missing some rather general features in HDRP for extensibility. We did not yet have a sensible way of writing custom upgradeable shaders, and we did not yet have a way to inject custom commands during a frame, e.g., for a custom rendering pass.
对于上下文:在我们开始为The Heretic制作视觉效果的原型时,我们仍然缺少HDRP中一些可扩展性的通用功能。 我们还没有一种明智的方式来编写自定义可升级着色器,并且还没有办法在帧中注入自定义命令,例如,进行自定义渲染过程。
As a result, the custom shaders for the digital human (and several other effects in the film) were initially prototyped as direct forks of existing materials in HDRP, which at the time was still in Preview and still undergoing major structural changes. Many of the custom shaders also required core modifications to HDRP, which contributed to making upgrades often difficult. Thus, we were generally on the lookout for more extensibility features in HDRP, so that we would be able to reduce the number of customizations.
结果,数字人的自定义着色器(以及电影中的其他几种效果)最初被原型化为HDRP中现有材料的直接分支,当时仍在Preview中,并且仍在进行重大的结构更改。 许多自定义着色器还需要对HDRP进行核心修改,这使得升级通常很困难。 因此,我们通常在寻找HDRP中的更多可扩展性功能,以便我们能够减少自定义项的数量。
Therefore, creating the Digital Human package involved transitioning those then-necessary customizations to use the current-day extensibility features now provided by HDRP. This meant porting the digital human custom shaders to Shader Graph, using the HDRP-specific master nodes, and using the CustomPass API for executing the necessary custom rendering passes. Also, thanks to Unity’s Lead Graphics Programmer Sebastien Lagarde and a team at Unity Hackweek 2019, HDRP gained the Eye Master node, which was feature-compatible with the custom work previously done for The Heretic and therefore a great help in porting the eyes.
因此,创建Digital Human程序包涉及将那些必要的定制过渡为使用HDRP现在提供的当前可扩展性功能。 这意味着使用特定于HDRP的主节点,并使用 CustomPass API 执行必需的自定义渲染过程,将 数字化人类自定义着色器移植到Shader Graph 。 此外,感谢Unity的首席图形程序员Sebastien Lagarde和Unity Hackweek 2019的团队,HDRP获得了Eye Master节点,该节点与以前为The Heretic完成的自定义工作功能兼容,因此在移植眼睛方面有很大帮助。
In the following sections I will go over the resulting shader graphs for skin, eyes and teeth, that can all be found in the package. There is also a shader graph for hair in the package, but it is mostly a pass-through setup for the Hair master node.
在以下各节中,我将遍历在包装中可以找到的针对皮肤,眼睛和牙齿的着色器图形。 包中还包含一个用于头发的着色器图,但这主要是用于“ 头发”主节点 的传递设置 。
皮肤 (Skin)
In general, the skin shader relies heavily on the built-in subsurface scattering feature of HDRP, which readily enables artists to author and assign different diffusion profiles to emulate various materials, including different types of skin. The skin graph itself uses the StackLit master node, in order to provide artists with two specular lobes (a setup commonly used for skin and not supported by the Lit master node), and for this reason the skin shader is forward-only.
通常,皮肤着色器在很大程度上依赖于 HDRP 的内置 次表面散射 功能,该功能使美术师能够创作和分配不同的扩散配置文件以模拟包括不同类型皮肤的各种材料。 外观图本身使用 StackLit主节点 ,以便为美术师提供两个镜面波瓣(该设置通常用于皮肤,但Lit主节点不支持该设置),因此,皮肤着色器仅向前。

Shader Graph for the skin shader
皮肤着色器的着色器图
For the two specular lobes, the primary smoothness value is provided via a mask map, similar to the regular Lit shader, while the secondary smoothness value is exposed as a tweakable constant in the material inspector. Similar to the regular Lit shader, the mask map also allows artists to control an ambient occlusion factor, as well as the influence of two detail maps: one for detail normals and one for detail smoothness, where the detail smoothness affects both the primary and the secondary smoothness value.
对于两个镜面波瓣,类似于常规的Lit着色器,通过蒙版贴图提供了主要平滑度值,而辅助平滑度值作为可调整常数在材质检查器中公开。 类似于常规的Lit着色器,遮罩贴图还允许艺术家控制环境遮挡因子,以及两个细节贴图的影响:一个用于细节法线,另一个用于细节平滑度,其中细节平滑度影响主曲面和二级平滑度值。
In addition to the regular mask map, the skin shader also accepts a cavity map (single channel texture, with lower values in cavities), which can be used to control a specular occlusion factor and/or reduce smoothness in small cavities, such as pores in the skin. The influence of the cavity map can also optionally be blended out at grazing angles, to emulate the effect of small cavities being hidden from view at grazing angles.
除了常规的蒙版贴图外,皮肤着色器还可以接受腔贴图(单通道纹理,在腔中具有较低的值),该贴图可用于控制镜面光遮挡因子和/或减小小Kong(例如毛Kong)中的平滑度在皮肤上。 空腔贴图的影响也可以选择在掠射角处融合,以模拟小空腔在掠射角处不可见的效果。

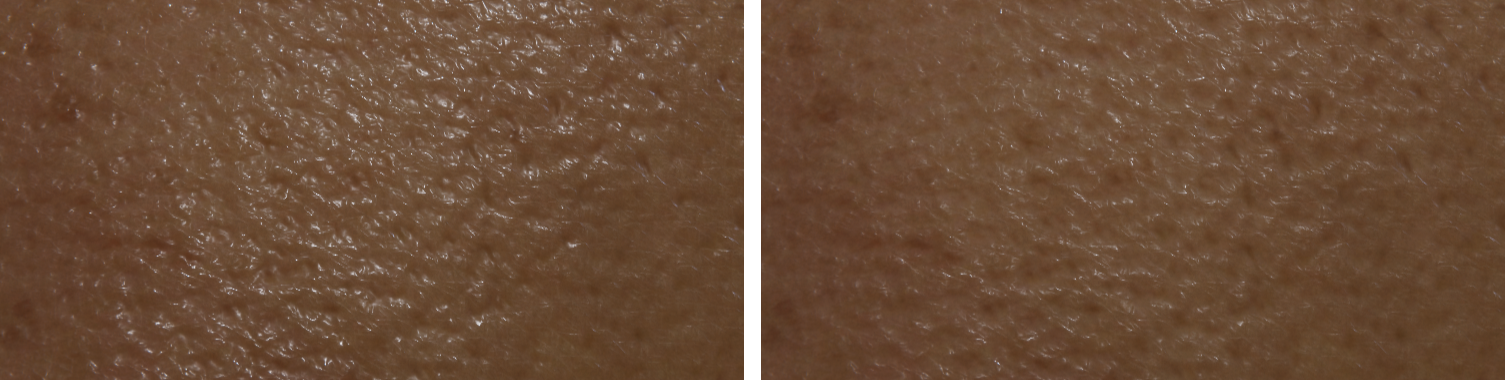
Modulating smoothness in small cavities using a cavity map
使用型腔贴图在小型腔中调节平滑度
The skin shader also contains support for pose-driven features (e.g., wrinkles) from the specific Snappers facial rig that we used for Gawain. In the skin graph, this functionality is encapsulated in a custom function node, which has some hidden inputs that are not visible in the graph itself. These hidden inputs are driven by the SnappersHeadRenderer component in the package, which needs to be placed on the same GameObject as the SkinnedMeshRenderer that uses the shader.
皮肤着色器还支持我们用于Gawain的特定Snappers面部装备对姿势驱动的功能(例如,皱纹)的支持。 在外观图中,此功能封装在自定义功能节点中,该节点具有一些隐藏的输入,这些输入在图形本身中不可见。 这些隐藏的输入由包中的SnappersHeadRenderer组件驱动,该组件需要与使用着色器的SkinnedMeshRenderer放置在同一GameObject上。
Fitted weights translated into wrinkles in the skin shader
合适的体重在皮肤着色器中转换为皱纹
Another curious node in the skin graph is related to the tearline setup, which I will explain a bit later, following the eyes section. Basically, to allow the tearline setup to modify the normals of the skin, we have to compute and store the normals during depth prepass, and then specifically sample them again in the forward pass (instead of recomputing them, which would discard the intermediate processing).
皮肤图中的另一个奇怪节点与泪线设置有关,我将在后面的“眼睛”部分中稍作解释。 基本上,为了允许泪痕线设置修改皮肤的法线,我们必须在深度预通过过程中计算并存储法线,然后在正向通过中再次对它们进行抽样(而不是重新计算它们,这将丢弃中间处理) 。
眼睛 (Eyes)
The custom eye shader for The Heretic was a collaboration with Senior Software Engineer Nicholas Brancaccio, who contributed some of the initial work, including the two-layer split lighting model, and the implementation of the evaluation function for the occlusion near the eyelids. For the Digital Human package, some of that previously custom functionality has moved to the Eye Master node in HDRP, which the eye graph uses as an output.
The Heretic的定制眼影器是与高级软件工程师Nicholas Brancaccio的合作,后者参与了一些初期工作,包括两层分离照明模型以及对眼睑附近的遮挡进行评估的功能的实现。 对于Digital Human程序包,某些以前自定义的功能已移至HDRP中的Eye Master节点,眼图用作输出。
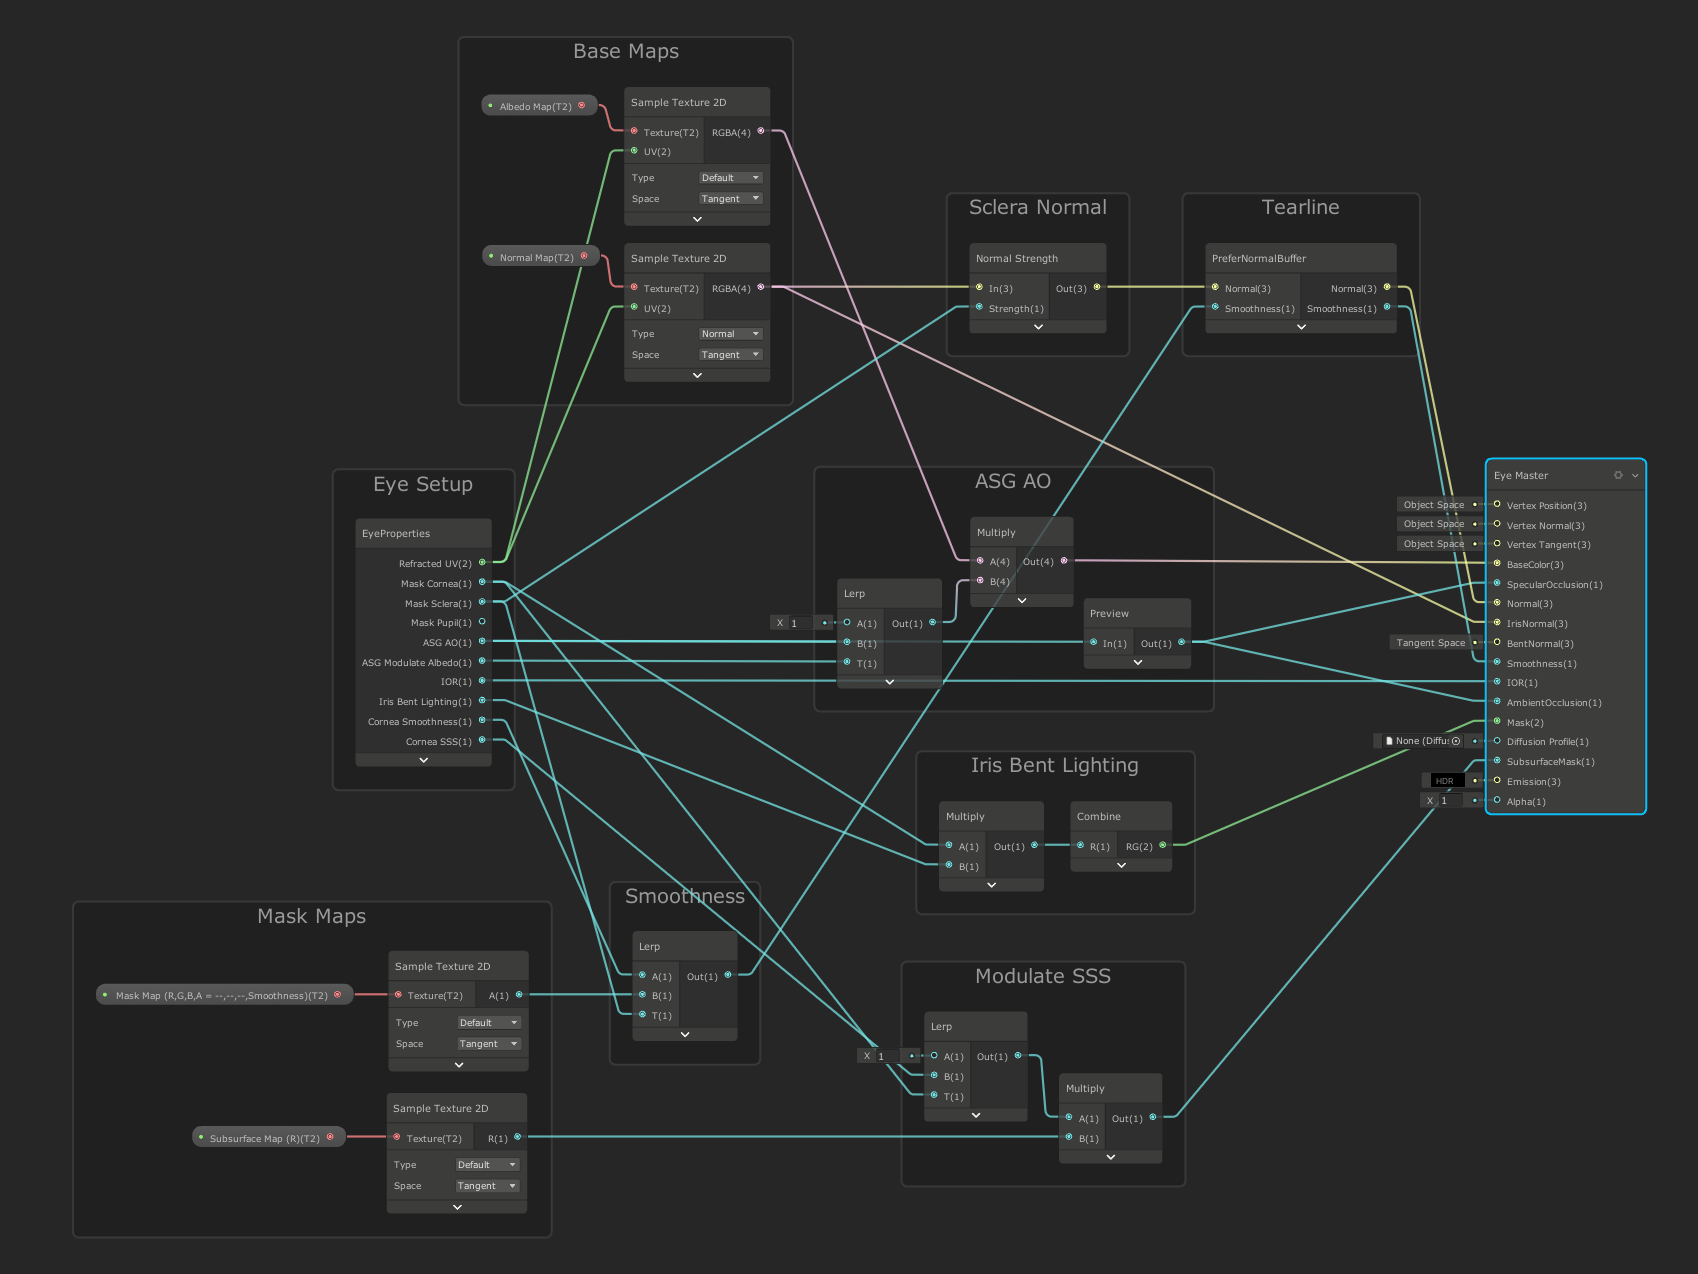
Shader Graph for the eye shader
眼影器的Shader Graph
The eye shader effectively models the eye as a two-layer material, where the first layer is used to describe the cornea and fluids at the surface, and the second layer is used to describe the sclera and the iris, visible through the first layer. Lighting is split between the two layers: specular lighting is evaluated exclusively for the top layer (representing cornea and surface fluids, which are more glossy), while the diffuse lighting is evaluated only for the bottom layer (iris and sclera).
眼影器可将眼睛有效地建模为两层材料,其中第一层用于描述表面的角膜和液体,第二层用于描述从第一层可见的巩膜和虹膜。 照明分为两层:仅针对顶层评估镜面照明(代表角膜和表面流体,它们更具光泽),而仅针对底层评估漫反射照明(虹膜和巩膜)。
Unobstructed view of the eyeball and a moving point light
眼球和移动点灯的视野一览无余
Refraction in the cornea is handled internally, and the effect depends on both the input geometry and a couple of user-specified parameters. The eye input geometry needs to be a single mesh that describes only the surface of the eye, including the bulge of the cornea.
角膜的折射是在内部处理的,效果取决于输入的几何形状和几个用户指定的参数。 眼睛输入几何形状必须是仅描述眼睛表面(包括角膜凸起)的单个网格。
Then, given a user-specified cross-section that (roughly) describes where the surface of the cornea begins, we can determine during rendering if a given fragment is part of the cornea. If the fragment is part of the cornea, then we refract the view ray and intersect the refracted ray with a virtual plane that represents the iris. The iris plane is adjustable via an offset from the cornea cross-section, to enable artists to adjust the amount of visual parallax in the eye.
然后,给定用户指定的横截面(大致)描述了角膜表面开始的位置,我们可以在渲染过程中确定给定的片段是否为角膜的一部分。 如果碎片是角膜的一部分,则我们折射视线,并使折射光线与代表虹膜的虚拟平面相交。 虹膜平面可通过与角膜横截面的偏移量进行调整,以使艺术家能够调整眼睛的视觉视差量。
Orbiting the eyeball to illustrate refraction in cornea
绕眼球运动以说明角膜折射
To evaluate the diffuse lighting in the iris, the eye shader also specifically provides an option for refracting the incident direction of light towards the iris, based on the currently rasterized fragment of the surface (cornea). While this does not give us proper caustics (we only accumulate the contribution from a single fragment at the refracting surface), artists can at least rely on the iris not appearing unnaturally in shadow when the eye is lit, e.g., from the side. The refracted lighting feature is now part of the Eye Master node, and it can be enabled through the Eye Cinematic mode.
为了评估虹膜中的漫射照明,眼影器还特别提供了一个选项,用于根据表面(角膜)的当前光栅化片段将光的入射方向折射到虹膜。 虽然这不能给我们适当的焦散(我们仅累积折射表面上单个片段的贡献),但艺术家至少可以依靠虹膜在眼睛睁开时(例如从侧面)不会在阴影中不自然地出现。 现在,折射照明功能是Eye Master节点的一部分,可以通过Eye Cinematic模式启用它。

Refracting incident direction of light towards the iris
朝着虹膜折射光的入射方向
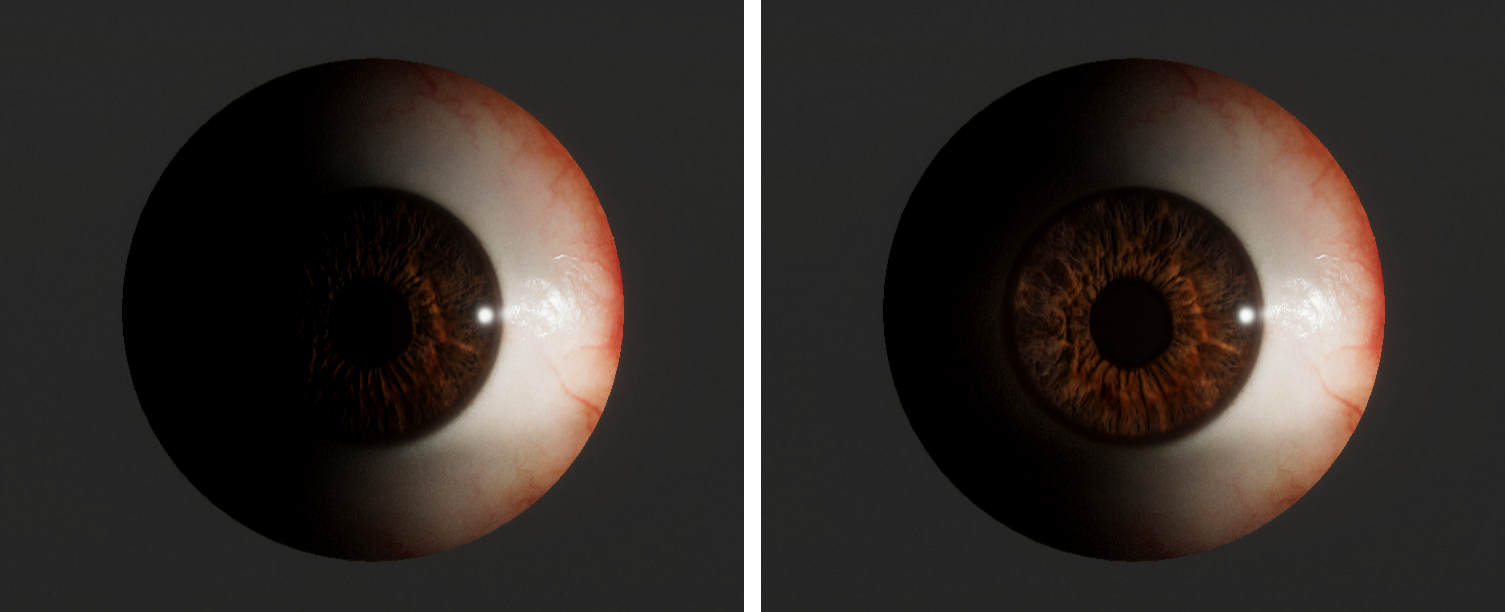
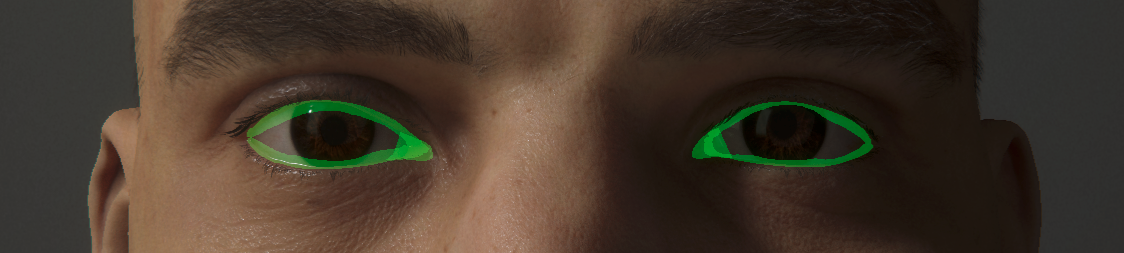
We model the occlusion near the eyelids using an anisotropic spherical Gaussian. The distribution is driven by four markers (transforms) that track the eyelids using the skin attachment system. Specifically, we use two markers to track the corners of the eye to form a closing axis, and then another two markers to track the upper and lower eyelids, which allows us to infer a closing angle. The closing axis and the closing angle are then used to generate the necessary basis vectors for evaluating the anisotropic spherical Gaussian at the surface of the eye. We use the result of this evaluation directly as an input to the ambient and specular occlusion factors on the Eye Master node, as well as to (optionally) modulate the albedo to artificially darken the occluded region.
我们使用各向异性的球形高斯模型对眼睑附近的咬合进行建模。 该分布由使用皮肤附着系统跟踪眼睑的四个标记(变换)驱动。 具体来说,我们使用两个标记来跟踪眼睛的角以形成闭合轴,然后使用另外两个标记来跟踪上眼睑和下眼睑,这使我们能够推断出闭合角度。 然后,使用闭合轴和闭合角生成必要的基础向量,以评估眼睛表面的各向异性球形高斯分布。 我们将评估结果直接用作Eye Master节点上的环境和镜面反射遮挡因子的输入,以及(可选)调制反照率以人为地使遮挡区域变暗。
Four markers drive an anisotropic spherical Gaussian for occlusion
四个标记驱动各向异性球面高斯进行遮挡
In the eye graph, most of the described features, including the refraction in the cornea and the occlusion near the eyelids, are facilitated by a single custom function node in the graph, labelled EyeSetup, which provides a number of readable outputs to the graph itself. Much like the custom function node for the facial rig in the skin graph, the custom function node in the eye graph uses hidden parameters that are not controlled through the material inspector, but through script code, due to the complexity and per-frame nature of those parameters. For the eye graph specifically, the hidden parameters are driven by the EyeRenderer component in the package, which needs to be placed on the same GameObject as the renderer that uses the shader, in order for the shader to produce a meaningful result.
在眼图中,所描述的大多数功能(包括角膜折射和眼睑附近的遮挡)都由图中标记为 EyeSetup 的单个自定义功能节点实现,该节点 为该图本身提供了许多可读输出。 与皮肤图中的面部绑定的自定义功能节点非常相似,眼图中的自定义功能节点使用隐藏参数,这些参数不是通过材质检查器来控制的,而是通过脚本代码来控制的,这是因为其复杂性和每帧的性质这些参数。 具体来说,对于眼图,隐藏参数由包中的EyeRenderer组件驱动,该组件需要与使用着色器的渲染器放置在同一GameObject上,以使着色器产生有意义的结果。
The EyeRenderer component, in addition to computing and passing values to the shader, also provides some useful gizmos and handles that are meant to assist in setting up the eyes. For example, the gizmos allow artists to visualize and tweak the offset to the cross-section that defines the cornea region, or to inspect and slightly adjust the forward axis for the planar texture projection, in case the provided eye geometry is not exactly facing down the z-axis.
除了计算值并将值传递给着色器之外,EyeRenderer组件还提供了一些有用的Gizmos和手柄,旨在帮助设置眼睛。 例如,在所提供的眼睛几何形状未完全朝下的情况下,小控件可让艺术家可视化并微调到定义角膜区域的横截面的偏移量,或者检查并稍微调整平面纹理投影的前向轴z轴。
Tweaking the eye using handles in the scene view
在场景视图中使用手柄调整眼睛
Lastly, like in the skin graph, in the eye graph we also have a node that handles the integration with the tearline setup: Normals and smoothness are written during depth prepass, and then sampled again during the forward pass.
最后,就像在皮肤图中一样,在眼睛图中,我们还有一个节点可以处理与撕裂线设置的集成:法线和平滑度是在深度预通过时写入的,然后在前向通过时再次进行采样。
泪珠 (Tearline)
To reconstruct the tearline (the wetness between the eyes and the skin), we rely on the HDRP CustomPass API, which allows applications to inject custom rendering work at certain stages during a frame.
为了重建泪线(眼睛和皮肤之间的湿度),我们依赖于HDRP CustomPass API,该API允许应用程序在帧中的某些阶段注入自定义渲染工作。
Using a custom pass that operates on the contents of the HDRP normal buffer (which holds both normal and smoothness data), we blur the normals and smoothness values in specific screen space regions on the face (e.g., where the eyes meet the skin). Since the skin and the eyes are forward-only materials, we also had to insert specific nodes in those graphs to ensure that they specifically sample the result during the forward pass.
使用对HDRP普通缓冲区(既包含普通数据又包括平滑数据)的内容进行操作的自定义过程,我们可以模糊面部特定屏幕空间区域(例如,眼睛与皮肤接触的区域)中的普通值和平滑度值。 由于皮肤和眼睛是仅前进的材质,因此我们还必须在这些图中插入特定的节点,以确保它们在前进过程中专门对结果进行采样。
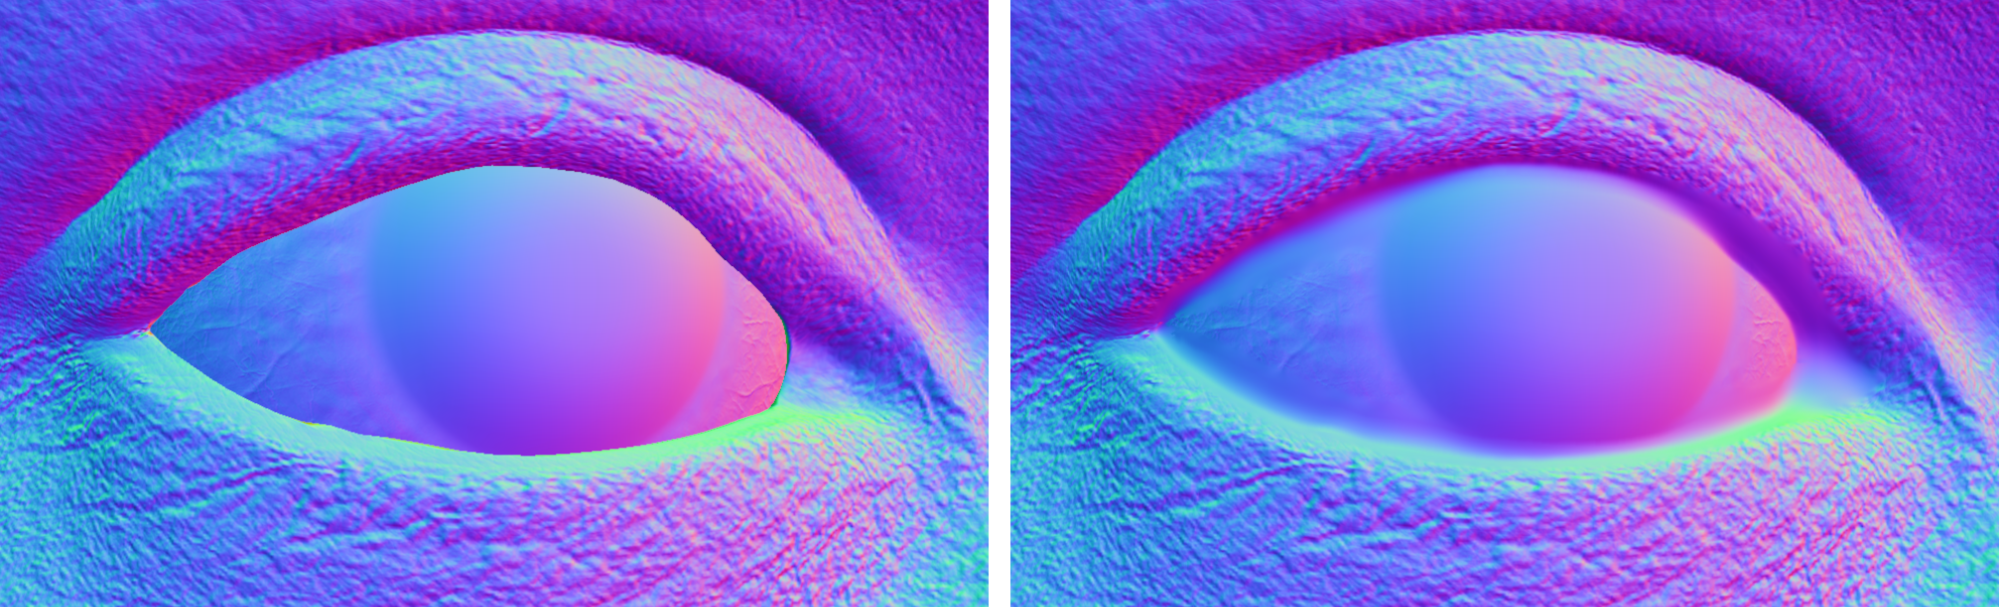
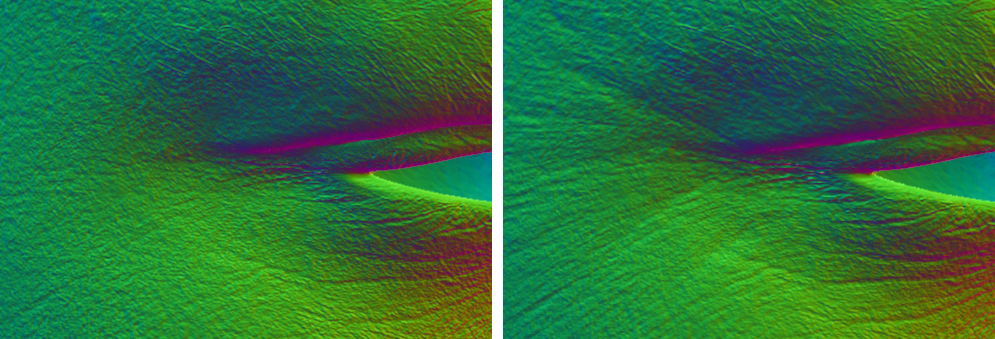
Normals before and after the tearline blur pass
撕裂线通过前后的法线
Creating a smooth transition in the normal buffer helps visually bridge the two surfaces. In combination with a high smoothness value in the region, this setup will often result in a specular highlight appearing in-between the two materials, which effectively makes the tearline region appear wet.
在普通缓冲区中创建平滑过渡有助于在视觉上桥接两个曲面。 结合该区域的高平滑度值,此设置通常会导致镜面反射高光出现在两种材料之间,这有效地使撕裂线区域显得潮湿。
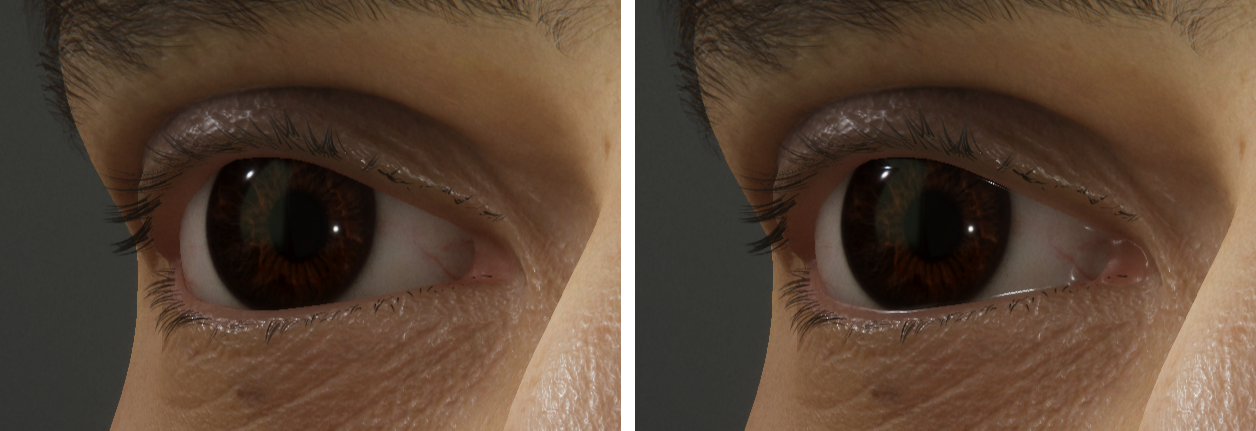
Shaded result before and after adding the tearline
添加泪痕前后的阴影效果
To mark the regions where the blurring should occur, we use a simple setup of masking decals that are placed in a specific user layer and never render any color to the screen (except for debugging purposes). By placing the decals in a specific user layer, we can more easily filter and render them exclusively in a custom pass, which mostly just sets one of the HDRP user stencil bits. Once all the masking decals have been drawn into the stencil, then we effectively have a screen space mask for where to perform the blur. We also use this mask to avoid blurring past the edges of the desired blur regions, by dynamically shrinking the width of the blur kernel to the edge of the mask.
为了标记应发生模糊的区域,我们使用简单的遮罩贴图设置,将其放置在特定的用户层中,并且从不向屏幕呈现任何颜色(除调试目的外)。 通过将贴图放置在特定的用户层中,我们可以更轻松地在自定义遍历中过滤和渲染它们,而这通常只是设置HDRP 用户模板位之一 。 将所有遮罩贴花绘制到模具中之后,我们就可以有效地使用屏幕空间遮罩,在哪里进行模糊处理。 我们还使用此蒙版,通过动态地将模糊内核的宽度缩小到蒙版的边缘来避免模糊超出所需的模糊区域的边缘。
Debug overlay showing the tearline masking decals
调试叠加显示撕裂线遮罩贴花
For the tearline of Gawain, a masking decal was authored specifically for each eye, to visually overlap both the eyelid and eyeball in the neutral face pose, and then attached to the skin using the attachment system. To support a small gap between the eyeball and the eyelid (as was evident with some of our 4D data), we also slightly exaggerated the geometry, so that it would have more inward-facing overlap with the eyeball.
对于Gawain的泪线,专门为每只眼睛设计了一个遮盖贴花,以中性的脸部姿势在视觉上重叠眼睑和眼球,然后使用附着系统附着到皮肤上。 为了支持眼球和眼睑之间的小缝隙(从我们的一些4D数据中可以明显看出),我们还稍微夸大了几何形状,以使其与眼球有更多的向内重叠。
牙齿 (Teeth)
The teeth shader relies on many of the features of the Lit master node, including the subsurface scattering and the mask for clear coat. Apart from using the existing features of Lit, the shader also adds a custom type of attenuation that we use to smoothly darken the interior of the mouth, based on the current size of the mouth opening.
牙齿着色器依赖于Lit主节点的许多功能,包括地下散射和用于透明涂层的蒙版。 除了使用Lit的现有功能之外,着色器还添加了一种自定义类型的衰减,我们可以根据当前的嘴巴开口大小来平滑地使嘴巴内部变暗。
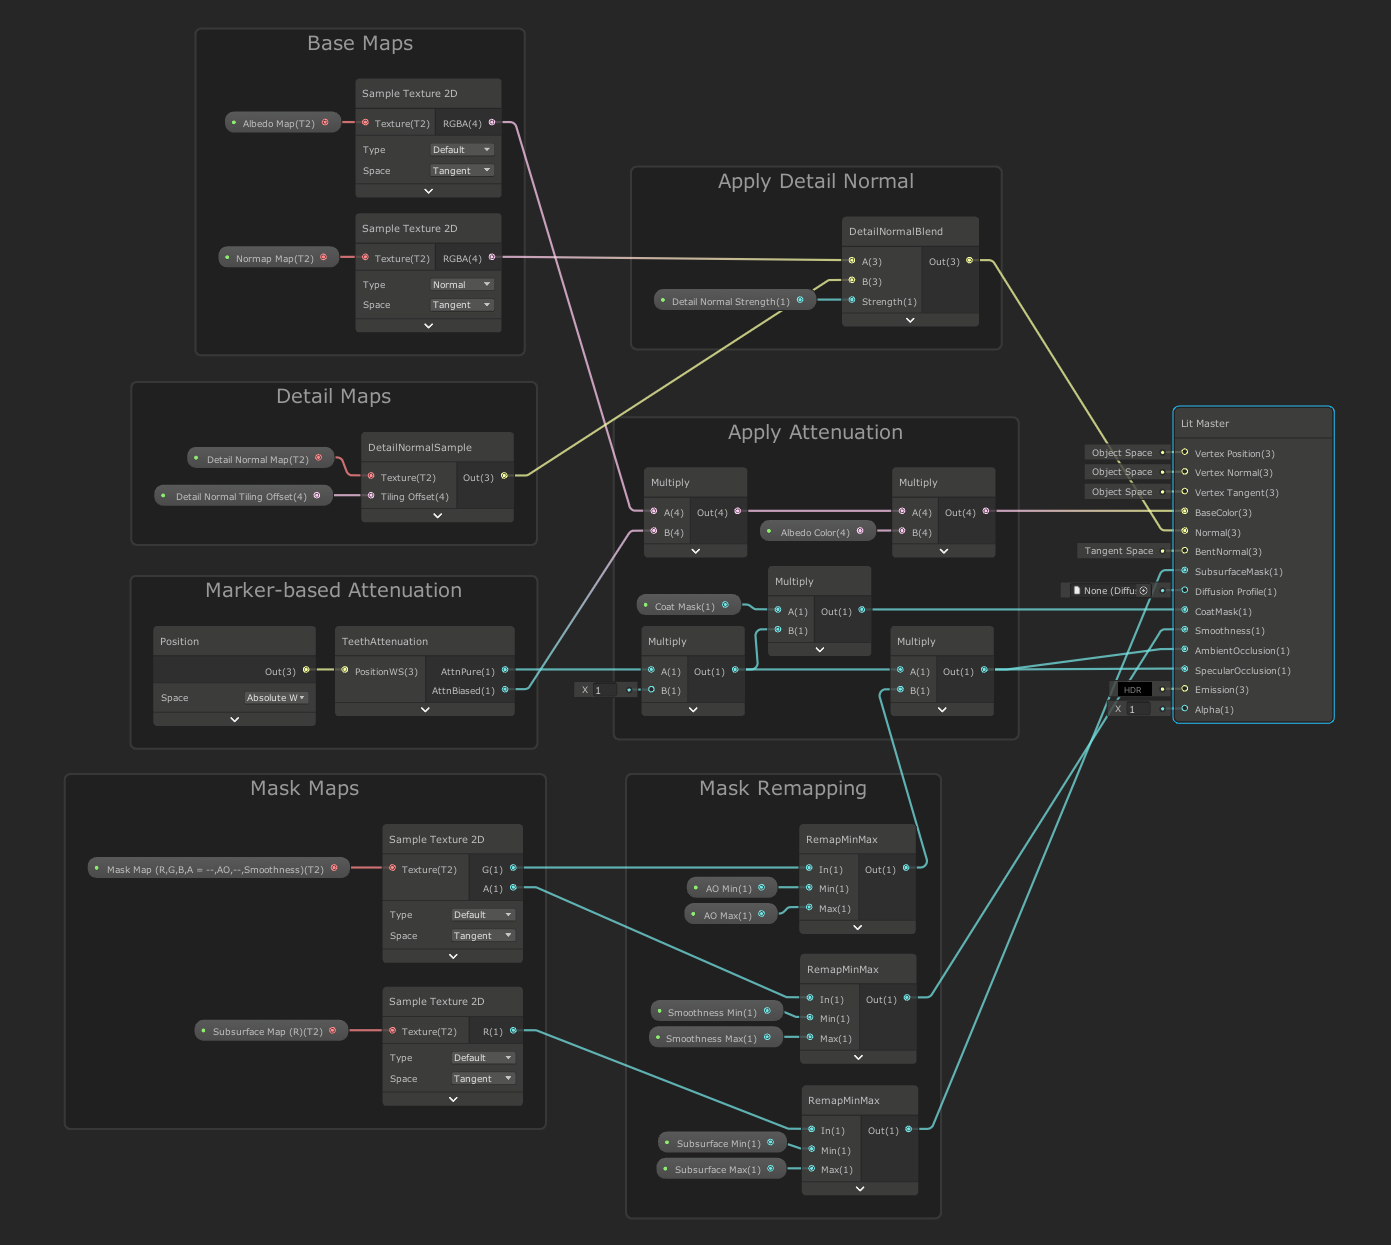
Shader Graph for the teeth shader
牙齿着色器的着色器图
To approximate the current size of the mouth opening, we place six markers near the opening of the mouth, to form a polygon that roughly approximates the interior contour of the lips. For Gawain, we used the skin attachment system to drive these markers, so that they will follow the lips regardless of how the face mesh is animated.
为了近似当前嘴巴的大小,我们在嘴巴的开口附近放置了六个标记,以形成一个近似于嘴唇内部轮廓的多边形。 对于Gawain,我们使用皮肤附着系统来驱动这些标记,从而无论脸部网格如何设置动画,它们都将跟随嘴唇移动。
During rendering, we start by passing this polygon to the shader, and then in the shader we project the polygon onto the unit hemisphere around the current fragment to obtain a spherical polygon. Intuitively, this spherical polygon then tells us something about how much of the exterior is visible through the mouth opening, from the point of view of the current fragment.
在渲染过程中,我们首先将多边形传递给着色器,然后在着色器中将多边形投影到当前片段周围的单位半球上,以获得球形多边形。 从当前片段的角度来看,从直觉上讲,这个球形多边形告诉我们多少东西可以通过张口看到。
Visualizing the spherical polygon on a sphere in the mouth
可视化嘴中球体上的球形多边形
To darken the interior of the mouth, we then simply use the area of the spherical polygon, in relation to the area of the unit hemisphere, as a non-physical attenuation term (ignoring the cosine). Specifically, we attenuate the existing ambient and specular occlusion factors, the coat mask, and the albedo, before passing these to the Lit master node in the graph.
为了使嘴内部变暗,我们然后简单地使用球形多边形的面积(相对于单位半球的面积)作为非物理衰减项(忽略余弦)。 具体来说,我们先衰减现有的环境和镜面遮挡因子,涂层蒙版和反照率,然后再将它们传递到图中的Lit主节点。
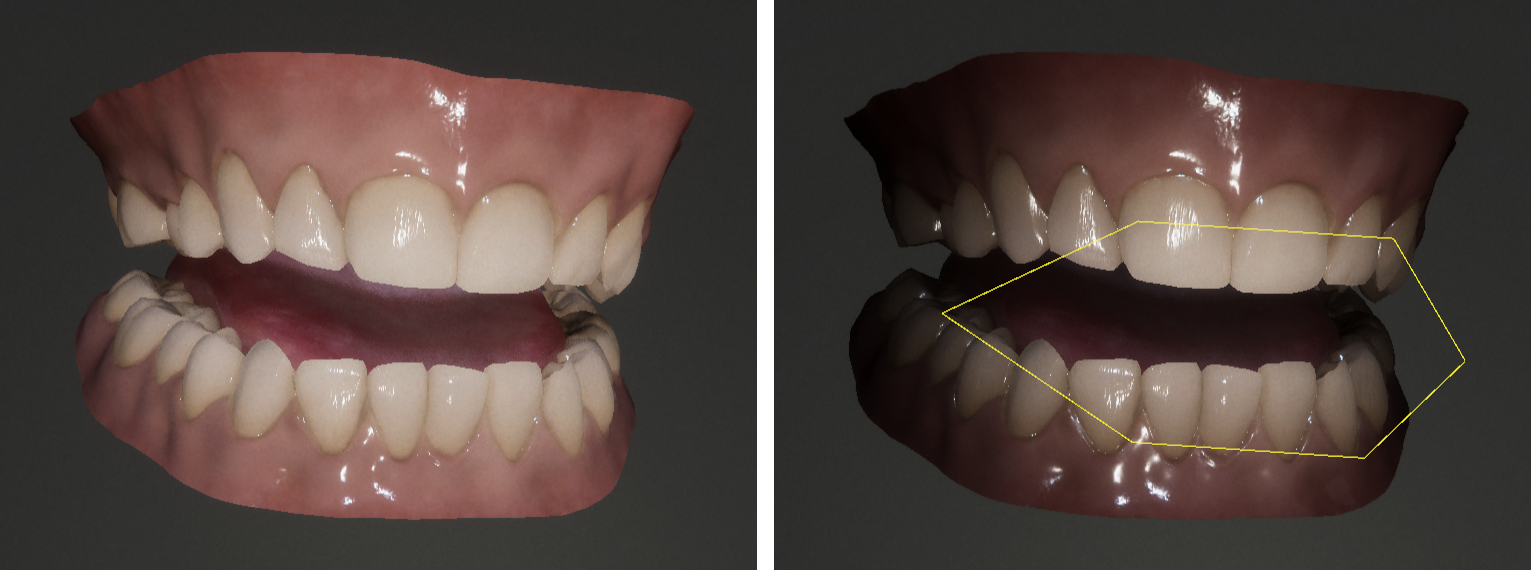
Before and after the custom attenuation
自定义衰减前后
Similar to the skin and eye graphs, the teeth graph also contains a custom function node whose inputs are not visible in the graph. For the teeth graph, the hidden inputs are provided by the TeethRenderer component in the package, which must be added to the same GameObject as the renderer that uses the shader.
与皮肤和眼睛图相似,牙齿图也包含一个自定义功能节点,其输入在图中不可见。 对于牙齿图,隐藏的输入由包中的TeethRenderer组件提供,必须将其添加到与使用着色器的渲染器相同的GameObject中。
最后的笔记 (Final notes)
I hope this blog post has helped illustrate some of the challenges and work that went into creating the set of technical solutions for the face of Gawain.
我希望这篇博客文章能够帮助说明在为Gawain的脸部创建一套技术解决方案时遇到的一些挑战和工作。
If you want to explore or build on the tools that we are sharing, you can download the library from GitHub and use the technology in your own projects, including commercial productions. We would love to see what you make with it!
如果您想探索或利用我们共享的工具,则可以从 GitHub 下载该库, 并在您自己的项目(包括商业产品)中使用该技术。 我们很乐意看到您用它做什么!
We’re sharing more learnings from the creation process behind this project on The Heretic landing page.
我们正在 “异端”登陆页面 上分享该项目背后的创建过程中的更多经验 。
翻译自: https://blogs.unity3d.com/2020/07/10/making-of-the-heretic-digital-human-tech-package/
陈鸽:正统或异端


 1413
1413

 被折叠的 条评论
为什么被折叠?
被折叠的 条评论
为什么被折叠?
 到【灌水乐园】发言


