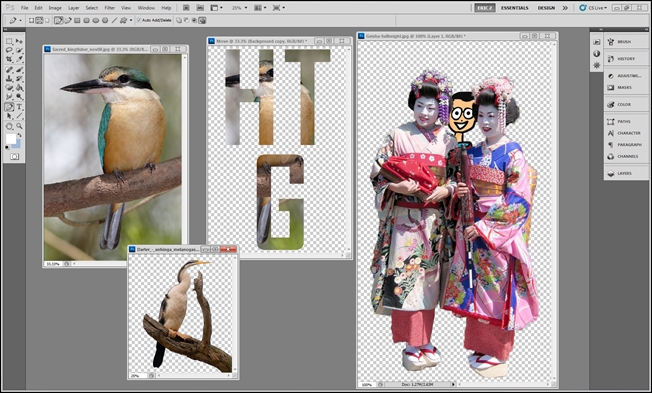
Last week we said there were hundreds of ways to remove backgrounds in Photoshop, and now we’re diving deeper into that claim. Keep reading for the next huge installment of ways to remove backgrounds in Photoshop!
上周,我们说过有数百种方法可以在Photoshop中删除背景,现在我们正在深入探讨这一主张。 继续阅读下一部分有关在Photoshop中删除背景的方法!
Today, we’ll cover masking images, and why some people prefer masking to erasing big chunks of your images, as well as a bunch of basic (and some not so basic) ways to remove all those image backgrounds using masks image erasing methods.
今天,我们将介绍遮罩图像,以及为什么有些人喜欢遮罩而不是擦除图像的大块内容,以及一堆使用遮罩图像擦除方法删除所有这些图像背景的基本方法(有些不是那么基本)。
遮罩图像,删除图像...有什么区别? (Masking Images, Deleting Them… What’s the Difference?)
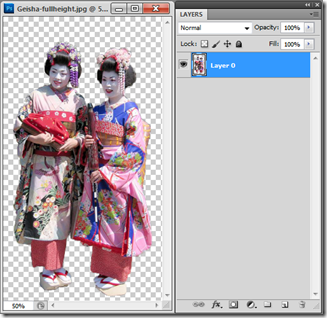
Last week, we covered the difference between unlocking an image background and duplicating it. Now, let’s take a look at the differences between masking and deleting, which aren’t apparent when you simply look at the images themselves.
上周 ,我们讨论了解锁图像背景和复制图像背景之间的区别。 现在,让我们看一下掩蔽和删除之间的区别,当您简单地查看图像本身时,这些区别并不明显。

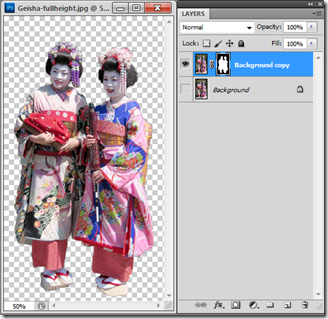
Layer Masks, which you can read more about here, are a simple way to hide information in layers while keeping maximum editability. Many professional Photoshop users often find a number of reasons they need to that hidden information, and Layer Masks allow them to keep it, while still hiding it away.
您可以在此处了解更多信息的“ 图层蒙版”是一种在保持最大可编辑性的同时将信息隐藏在图层中的简单方法。 许多专业的Photoshop用户经常会发现需要这些隐藏信息的多种原因,并且“图层蒙版”允许他们保留这些信息,同时仍将其隐藏起来。
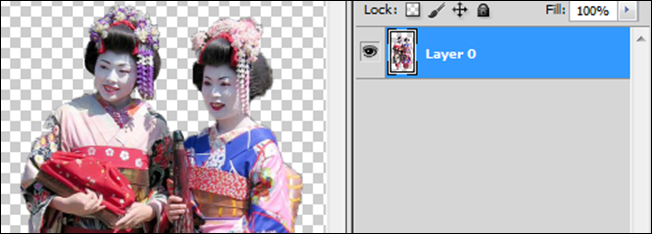
Create a layer mask by clicking the icon in the Layers Panel when you have a selection with the marquee, or any of the advanced methods located below. If your mask blocks off the wrong area, you can select the mask and press Ctrl + I to invert it, and switch the transparent and opaque areas. Layer Masks require unlocked layers, like the copy of the background layer above, or the “Layer 0” unlocked version of the Background located directly below. Refer to Part 1 to learn more about these two methods.
通过选取框或位于下面的任何高级方法进行选择时,通过单击“图层”面板中的图标来创建图层蒙版。 如果遮罩遮挡了错误的区域,则可以选择遮罩,然后按Ctrl + I将其反转,然后切换透明区域和不透明区域。 图层蒙版需要解锁的图层,例如上方背景图层的副本,或直接位于下方的背景的“图层0”解锁版本。 请参阅第1部分,以了解有关这两种方法的更多信息 。
 ()
()

There is, however, something to be said for deleting image information when cutting out background, some of which is not terribly useful to keep around. Many of Photoshop’s background erasing tools only work with the “image deletion method,” so it’s obvious to see there’s no right and wrong way sanctioned by Adobe. We’ll leave it up to the discretion of the reader which method suits them best, because Photoshop is all about the user’s options. Simply keep in mind that deleted information will never come back once it is deleted unless you can revert to an older version of your file.
但是,切出背景时要删除图像信息还有一些要说的,其中一些对于保持周围环境不是很有用。 Photoshop的许多背景删除工具只能使用“图像删除方法”,因此很明显,可以看出Adobe并没有批准对与错的方式。 我们将由读者自行决定哪种方法最适合他们,因为Photoshop完全取决于用户的选择。 只需记住,删除的信息一旦删除就永远不会回来,除非您可以还原到文件的较旧版本。
Erasing or deleting image information can be done on any layer that is unlocked, like the unlocked Layer 0 above, or the duplicated Background copy layer shown in the last example.
可以在任何未锁定的层上进行擦除或删除图像信息,例如上面的未锁定层0或上一个示例中显示的重复的背景复制层。
删除图像信息的方法 (Methods to Delete Image Information)
| Eraser: Shortcut Key (E)
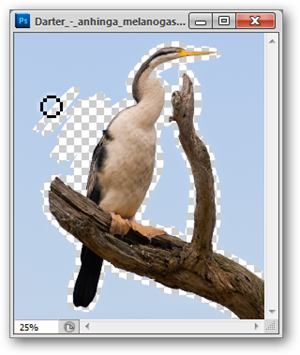
Many Photoshop users do not like using the Eraser tool to remove backgrounds, as it can be time consuming to accurately cut out an image, particularly for users that struggle to paint accurate marks with the mouse. The eraser is one of the most basic tools to remove backgrounds, and should be used as little as possible, if you can manage. Still, HTG has previously covered a more in depth how-to on the eraser tool. | |
Magic Eraser Tool: Shortcut Key (Shift + E)

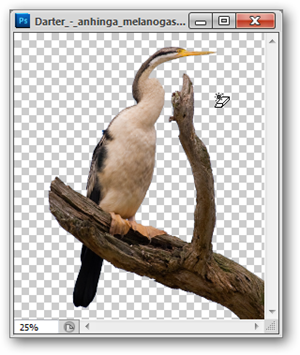
One of the great benefits for new Photoshop users is that this tool actually will unlock background layers in a single step—simply click in a contiguous field of a single color in your “Background” layer, and watch it disappear to transparency. A more complete how-to on the Magic Eraser Tool can be found here. | |
Background Eraser Tool: Shortcut Key (Shift + 3)

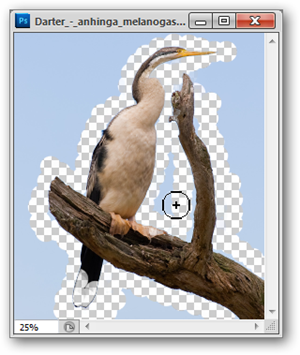
Using Photoshop’s edge detection, the Background Eraser tool is far from perfect. There are three settings: Contiguous, Non-Contiguous, and Edge-Detect. Frankly, all three have their inaccuracies, although one may have an advantage over others in certain situations. This tool is far from the best method on this list to remove a background. Experiment with it, but don’t expect to get a lot of use out of it. | |
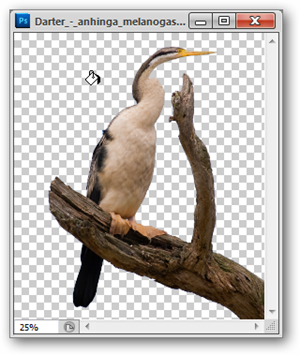
Paint Bucket (painting transparancy): Shortcut Key (G)

|
|
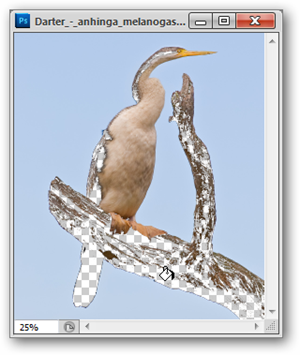
| Non-Contiguous Paint/Magic EraserBoth the Paint Bucket Tool and the Magic Eraser have a special setting called “Contiguous.” Leaving this setting on means your fill will go to work on all enclosed shapes of that particular color. Turning it off will erase every instance of that color in that layer in the entire image. In cases where skies and random bits of backgrounds end up in enclosed parts of the image, this can be helpful, as it grabs all of it at once, reducing it to transparancy. It doesn’t discriminate between the parts of the image you want and those that you don’t, so use with care and be prepared to with a quick Ctrl + Z to undo goof ups. |
|
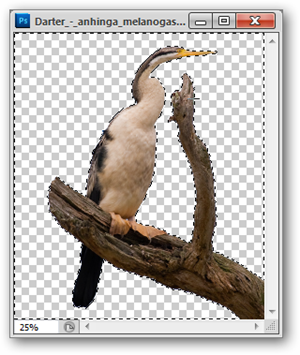
| Delete: Shortcut Key (Backspace, Delete) With a selection loaded on an unlocked layer, a simple press of the Delete or Backspace key can knock a layer down to transparency. It doesn’t get any simpler than that! |
|
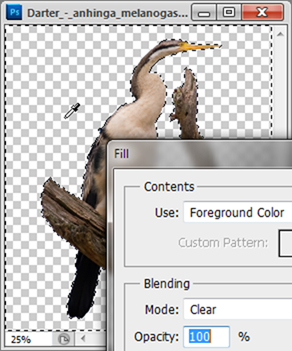
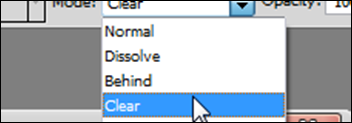
| Fill: Shortcut Key (Shift + F5)A much under-utilized tool, the Edit > Fill tool is the superpowered version of the Paint Bucket Tool that works independent of the cursor. A quick tap of Shift + F5 will bring up the Fill dialog box, where you can fill all selected areas with preselected sets of colors, or simply fill said areas with transparancy. Because the Fill command is independent of the cursor tool, there is no way to control which colors will be knocked back to transparency, so make certain your selections are the way you want them before using the Fill tool. To knock back to transparency using this tool, set your “Blending Mode” to clear, as shown on the right. |
|
| 橡皮擦 : 快捷键(E) 橡皮擦的工作方式类似于画笔工具,并且足够容易掌握和理解。 像我们上周向您展示的那样,解锁您的背景图层,然后简单地绘制您不想使用的背景信息。 许多Photoshop用户不喜欢使用橡皮擦工具删除背景,因为准确地剪切图像可能很耗时,特别是对于那些难以使用鼠标绘制准确标记的用户而言。 橡皮擦是去除背景的最基本工具之一 ,如果可以的话,应尽量少使用。 尽管如此,HTG先前仍在橡皮擦工具上介绍了更深入的方法 。 |
|
| 魔术橡皮擦工具 : 快捷键(Shift + E) 埋在普通的橡皮擦工具下,您会找到简单的魔术橡皮擦工具。 该工具有点像“油漆桶”工具,只能填充透明度。 魔术橡皮擦的灵敏度有很多设置和方法,可以带来许多不同的结果。 对于新的Photoshop用户而言,最大的好处之一是,该工具实际上可以一步完成对背景图层的解锁-只需在“背景”图层中单击单色的连续字段,然后观察它消失为透明即可。 |
|
| 后台橡皮擦工具: 快捷键(Shift + 3) 虽然此工具看起来像是Photoshop工具的圣杯,但将Background Eraser Tool投入实际实践时,您可能会失望。 使用Photoshop的边缘检测,背景橡皮擦工具远非完美。 共有三种设置:连续,不连续和边缘检测。 坦白说,这三者都有其不正确之处,尽管在某些情况下一个可能比其他人有优势。 此工具远不是删除背景的最佳方法。 尝试一下,但是不要期望从中得到很多利用。 |
|
油漆桶(油漆透明度) : 快捷键(G) 由于某些奇怪的原因,Adobe认为可以为Photoshop用户提供两种功能几乎相同的工具。 油漆桶工具的设置允许其绘画透明性,这是魔术橡皮擦将在一个步骤中解锁并绘画成透明性的唯一区别,并且除非解锁该图层,否则该工具将不起作用。 您可以在顶部选项中找到“清除”的设置。
| |
| 非连续式油漆/魔术橡皮擦
它不会区分您想要的图像部分和您不需要的部分,因此请谨慎使用,并准备使用快速Ctrl + Z来消除毛刺。 | |
| 删除 : 快捷键(退格,删除)
将选择加载到未锁定的图层上后,只需按Delete或Backspace键就可以将图层击倒为透明。 没有比这更简单的了! | |
| 填充 : 快捷键(Shift + F5)
快速按一下Shift + F5将弹出“填充”对话框,您可以在其中用预选的颜色集填充所有选定区域,或仅用透明性填充所述区域。 由于“填充”命令独立于光标工具,因此无法控制将哪种颜色还原为透明色,因此在使用“填充”工具之前,请确保您选择的颜色是您想要的。 要使用此工具恢复透明度,请将“混合模式”设置为清除,如右图所示。 |
创建蒙版的高级方法 (Advanced Methods for Creating Masks)
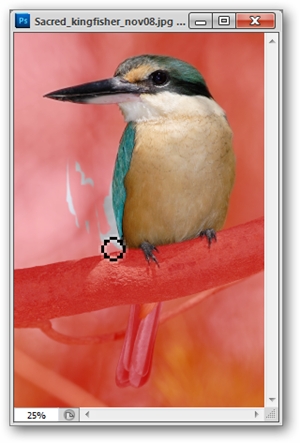
| Quick Mask Mode: Shortcut Key (Q) Press Q to jump to Photoshop’s Quick Mask mode, which allows you to create masks using the paintbrushes and buckets. The mask color is automatically transparent red, marking the color you’re masking out, or removing. 
In Quick Mask mode, you can use the Brush Tool, Pencil Tool, or Paint Bucket Tool to paint in solid colors. Since you’re technically working with a mask, you can only work with shades of gray, preferably black and white. In Quick Mask Mode, painting black represents masked or “erased” areas, while painting white represents your image areas. Press Q again to end quick mask mode, which will automatically create a selection from your painting. |
| Pen Tool: Shortcut Key (P)
Using the pen tool, draw a vector shape around your object or objects. This can be tricky, as the pen tool is difficult. Once you finish your enclosed shape, you’ll need to find your Paths panel to load your selection. You’re looking for the button that looks like a Photoshop marquee that creates a selection for this path. | |
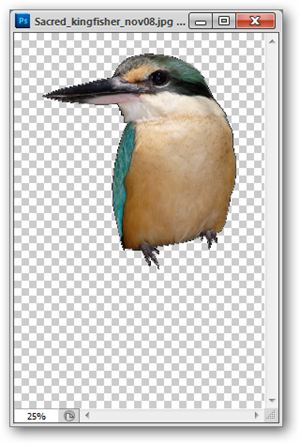
| Vector Masks with the Pen Tool: You can also create a Vector mask from any path you’ve drawn. Instead of creating a raster selection from your vector drawing, you can navigate to Layer > Vector Mask > Current Path to automatically create a mask from your currently loaded path in your Paths panel. Vector Masks have the advantage of being scalable, and keeping edges clean even when artwork is blown up to large sizes. Beyond that, there’s little advantage of vector masks over Layer Masks, as vector masks seem to render masked images in a near-identical manner to raster-based Layer Masks. 
Simply use whichever mask style suits you best. |
Freeform Pen Tool: Shortcut Key (Shift + P)

This tool allows you to draw line segments in the same freeform manner the Lasso tool allows. Simply click and drag to create vector paths to become selections or vector masks, exactly like the previous techniques. If you find you have broken line segments, you can simply switch to the Pen Tool to join them. | |
| Vector Mask from Type Tool
One of the fun things about Photoshop, is that there’s rarely one single way to do things. In the case of vector masks, they’re not limited to paths drawn by the pen tool. Typography can also be used as a mask with this trick. Create some type of any size or typeface. Right click on your text and find “Create Work Path.” Photoshop creates vector lines around your text. From there you can return to Layer > Vector Mask > Current Layer to create a mask from your typography. |

| 快速遮罩模式: 快捷键(Q) 按Q跳到Photoshop的“快速蒙版”模式,该模式允许您使用画笔和水桶创建蒙版。 遮罩颜色自动为透明的红色,标记要遮罩或去除的颜色。 
在“快速蒙版”模式下,可以使用“ 画笔工具”,“铅笔工具”或“油漆桶工具”以纯色绘画。 由于您在技术上使用面具,因此只能使用灰色阴影,最好是黑色和白色。 在快速蒙版模式下,涂成黑色表示蒙版或“擦除”区域,而涂成白色则表示您的图像区域。 再次按Q结束快速蒙版模式,它将自动从绘画中创建一个选择。 |
| 笔工具 : 快捷键(P)
使用钢笔工具在一个或多个对象周围绘制矢量形状。 这可能很棘手,因为钢笔工具很困难。 完成封闭的形状后,您需要找到“路径”面板以加载选择。 您正在寻找的按钮看起来像是为该路径创建选择的Photoshop选框。 | |

| 使用钢笔工具的矢量蒙版 : 您还可以从绘制的任何路径创建矢量蒙版。 可以从“ 图层”>“矢量蒙版”>“当前路径”导航到“ 图层”>“矢量蒙版”>“当前路径”,以从“路径”面板中当前加载的路径自动创建蒙版,而不是从矢量图形中创建栅格选择。 矢量蒙版具有可伸缩的优势,即使艺术品被炸成大尺寸也能保持边缘清洁。 除此之外,矢量蒙版与图层蒙版相比几乎没有优势,因为矢量蒙版似乎以与基于栅格的图层蒙版几乎相同的方式渲染蒙版图像。 
只需使用最适合您的面具样式即可。 |
自由笔工具 : 快捷键(Shift + P)

该工具允许您以套索工具允许的相同自由格式绘制线段。 只需单击并拖动以创建矢量路径即可成为选择或矢量蒙版,就像之前的技术一样。 如果发现折线段,只需切换到钢笔工具即可将它们连接起来。 | |
| 文字工具的向量遮罩
Photoshop的有趣之处之一是,几乎没有一种单一的处理方式。 对于矢量蒙版,它们不仅限于钢笔工具绘制的路径。 印刷术也可以用作此技巧的遮罩。 创建任何大小或字体的某种类型。 右键单击您的文本,然后找到“创建工作路径”。 Photoshop在您的文本周围创建矢量线。 从那里您可以返回“图层”>“矢量蒙版”>“当前图层”以根据版式创建蒙版。 |
Like last week’s how-tos, these techniques aren’t necessarily independent of each other—the beauty of Photoshop is the creative combination of all of these techniques to create interesting, easy, and fun ways to accomplish your image goals. Check us out next time, where we’ll take on Part 3 of “50+ Ways to Remove Image Backgrounds.”
就像上周的操作方法一样,这些技术不一定彼此独立— Photoshop的美在于所有这些技术的创造性结合,以创造有趣,轻松且有趣的方式来实现图像目标。 下次再查看我们,我们将在“ 50多种删除图像背景的方法”的第3部分中进行介绍。
Image Credits: Geisha Fullheight by Michael Reeve, available under Creative Commons. Darter – anhinga melanogaster and Sacred kingfisher by Fir0002, available under GNU License.
图片来源: Michael Reeve的 Geisha Fullheight,可在“ 知识共享”下找到 。 由Fir0002开发的Darter-美洲蛇黑猩猩和神圣翠鸟,可在GNU许可下获得 。
翻译自: https://www.howtogeek.com/61686/50-tools-techniques-to-remove-image-backgrounds-in-photoshop-pt-2/


 本文深入探讨了在Photoshop中删除背景的各种方法和技术,包括使用遮罩、橡皮擦工具、魔术橡皮擦等基本及高级技巧。还介绍了如何通过笔工具、快速遮罩模式等方法创建精确的遮罩。


 1244
1244

 被折叠的 条评论
为什么被折叠?


