


以差速轮式机器人为例,使用Gazebo构建机器人仿真平台
1 资料
上一篇博客:ROS高效进阶第二章 – 以差速轮式机器人为例,学习URDF机器人建模与xacro优化 ,我们使用urdf和xacro搞了一个差速轮式机器人的 外形 建模,并使用 rviz 可视化查看。
本文对该差速轮式机器人进行升级,添加 物理 属性,使用gazebo+rviz进行仿真。通过编写机器人控制程序,遥控机器人在gazeob仿真环境中移动,并通过rviz实时察看 camera,kinect和lidar三种传感器的仿真效果。
(1)ROS高效进阶第一章 – ROS高级组件之 gazebo :这里有gazebo和rviz的比较,以及gazebo生成三维场景的方法。
(2)ROS高效进阶第二章 – 以差速轮式机器人为例,学习URDF机器人建模与xacro优化
(3)《ROS机器人开发实践》胡春旭 第6章
(4)ROS探索总结-24.使用gazebo中的插件 :gazebo提供了丰富的插件,差速轮式机器人的差速控制,camera仿真,kinect仿真和lidar仿真都使用了gazebo的插件。
(5)ROS探索总结-31.ros_control :差速轮式机器人能动起来,依赖ROS为开发者提供的机器人控制中间件,即ros_control。
本系列博客汇总:ROS高效进阶系列。
2 正文
2.1 绘制 hometown_room 空间模型
(1)创建 mbot_gazebo 软件包,以及相关文件
cd ~/catkin_ws/src
catkin_create_pkg mbot_gazebo urdf xacro gazebo_plugins gazebo_ros gazebo_ros_control geometry_msgs roscpp rospy

cd mbot_gazebo
mkdir -p config launch meshes scripts urdf/sensor worlds
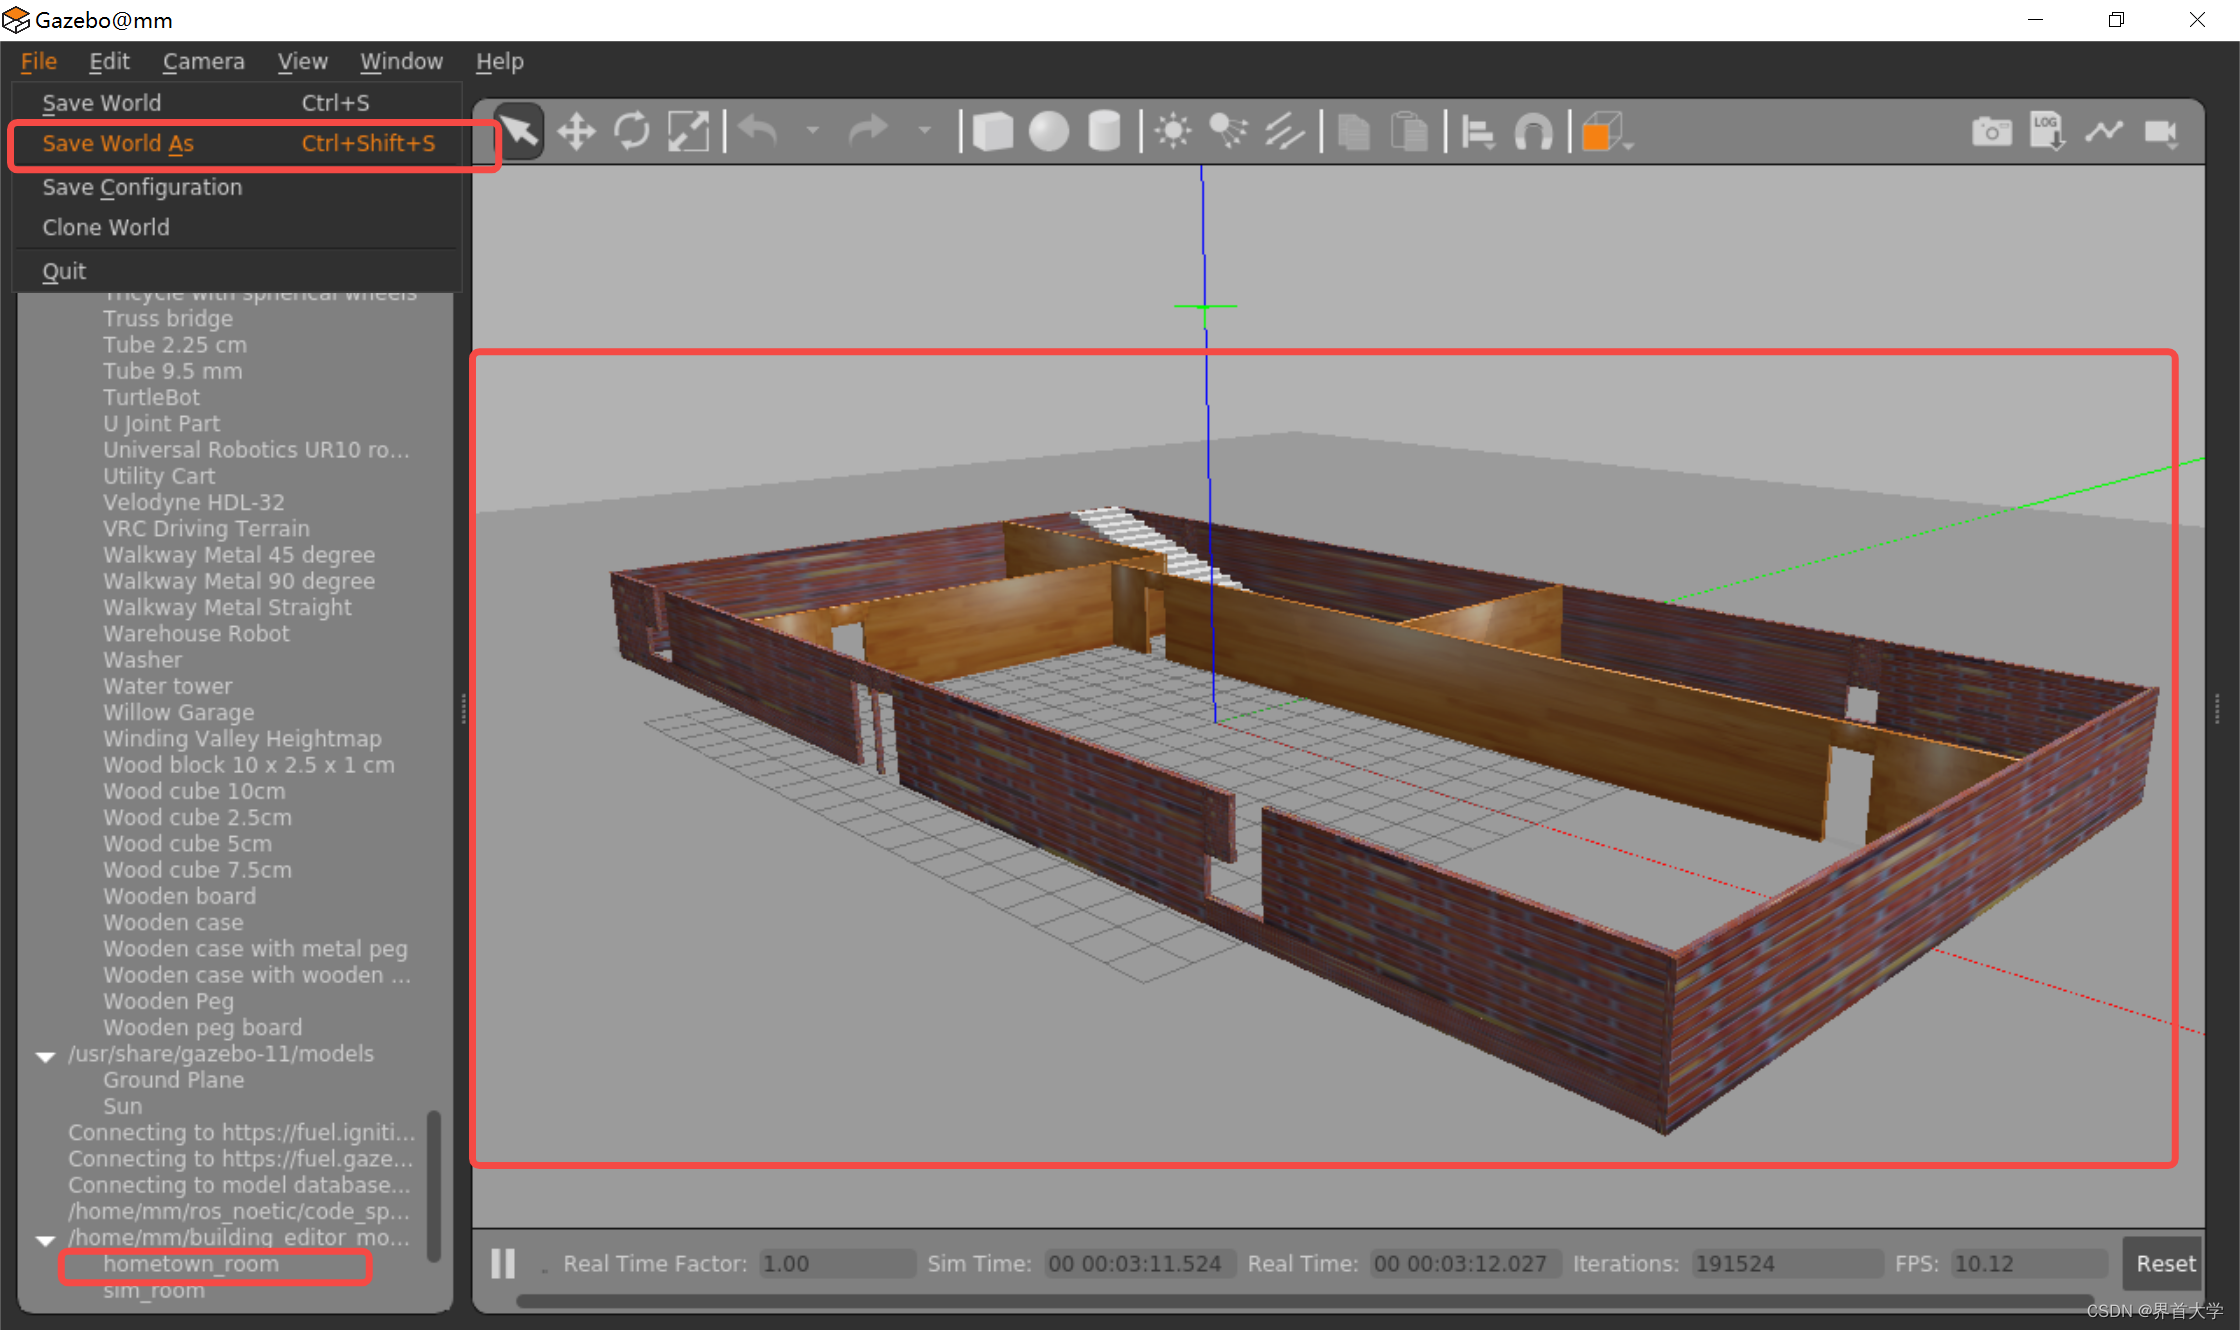
(2)启动gazebo,绘制hometown_room 空间模型,并保存 hometown_room.world 文件。绘制模型的过程可以参考:ROS高效进阶第一章 – ROS高级组件之 gazebo
roslaunch gazebo_ros hometown_room.launch
2.2 为机器人模型添加物理属性和差速控制器插件
(1)在 mbot_gazebo 的 urdf 目录内,创建机器人模型文件
cd ~/catkin_ws/src/mbot_gazebo
touch mbot_base.xacro
touch sensor/camera.xacro sensor/kinect.xacro sensor/laser.xacor
(2)转动惯量和惯性矩阵:
转动惯量:Moment of Inertia,在物理学中,用于描述物体绕特定轴线旋转时的惯性大小,也就是物体抵抗旋转运动的能力。具体而言,对于某个轴线,离该轴线越远的物体质量对转动惯量的贡献越大。
惯性矩阵:描述物体关于某一点的转动惯量的3x3的对称矩阵。在ROS中,这个矩阵的形式如下:
    | ixx  ixy  ixz |
    | ixy  iyy  iyz |
    | ixz  iyz  izz |
对角线上的元素(ixx, iyy, izz)分别表示物体绕x轴、y轴和z轴的主转动惯量。非对角元素(ixy, ixz, iyz)表示物体关于不同轴之间的耦合作用,也就是说他们表示当物体同时绕多个轴旋转时存在的影响,这些被称为非对角转动惯量。
对于均匀的几何体(如长方体、圆柱体、球体等),它们的主轴通常与物体的对称轴相沿。在这种情况下,如果我们选择这些对称轴作为参考系(坐标系),那么非对角元素(也就是耦合项)将会消失,所以设为0。如果,物体旋转轴并不完全沿着这些主轴,那么就需要计算和考虑非对角元素了。
(3)圆柱体的惯性矩阵:m是物体质量,r是圆柱半径,h是圆柱高度
ixx:圆柱体绕x轴的转动惯量,I = m * (3 * r^2 + h^2) / 12
iyy:圆柱体绕y轴的转动惯量,与绕x轴相同
izz:圆柱体绕z轴的转动惯量,I = m * r^2 / 2
ixy, ixz, iyz均为0,表示非对角转动惯量为0。
(4)球体的惯性矩阵:m是物体质量,r是圆柱半径
ixx/iyy/izz:球体绕x,y,z轴的转动惯量公式:I = 2 * m * r^2 / 5
ixy, ixz, iyz均为0,表示非对角转动惯量为0。
(5)在 ROS高效进阶第二章 – 以差速轮式机器人为例,学习URDF机器人建模与xacro优化 中,我们讲了一个刚体 link,有外观和物理两大属性,其中物理属性又包括:惯性矩阵(inertial matrix)和碰撞参数(collision properties)。
以差速轮式机器人主导轮为例,其惯性矩阵为:
  <xacro:macro name="cylinder_inertial_matrix" params="m r h">
      <inertial>
          <mass value="${m}" />
          <inertia ixx="${m*(3*r*r+h*h)/12}" ixy = "0" ixz = "0"
              iyy="${m*(3*r*r+h*h)/12}" iyz = "0"
              izz="${m*r*r/2}" />
      </inertial>
  </xacro:macro>
以差速轮式机器人万向轮为例,其惯性矩阵为:
  <xacro:macro name="sphere_inertial_matrix" params="m r">
      <inertial>
          <mass value="${m}" />
          <inertia ixx="${2*m*r*r/5}" ixy="0" ixz="0"
              iyy="${2*m*r*r/5}" iyz="0"
              izz="${2*m*r*r/5}" />
      </inertial>
  </xacro:macro>
至于刚体的碰撞参数,一般与外观一致,以底盘base_link为例,其外观,惯性矩阵和碰撞参数为:
    <link name="base_link">
      <visual>
        <origin xyz="0 0 0" rpy="0 0 0"/>
        <geometry>
          <cylinder length="${base_length}" radius="${base_radius}"/>
        </geometry>
        <material name="red" />
      </visual>
      <collision>
          <origin xyz=" 0 0 0" rpy="0 0 0" />
          <geometry>
              <cylinder length="${base_length}" radius="${base_radius}"/>
          </geometry>
      </collision>
      <xacro:cylinder_inertial_matrix  m="${base_mass}" r="${base_radius}" h="${base_length}" />
    </link>
完整内容见:mbot_base.xacro
(6)刚体link如果要在gazebo上显示,必须使用gazebo标签,可以添加颜色,或者关闭重力:
    <gazebo reference="${prefix}_wheel_link">
        <material>Gazebo/White</material>
    </gazebo>
    // base_footprint是影子link,无重力
    <gazebo reference="base_footprint">
        <turnGravityOff>false</turnGravityOff>
    </gazebo>
完整内容见:mbot_base.xacro
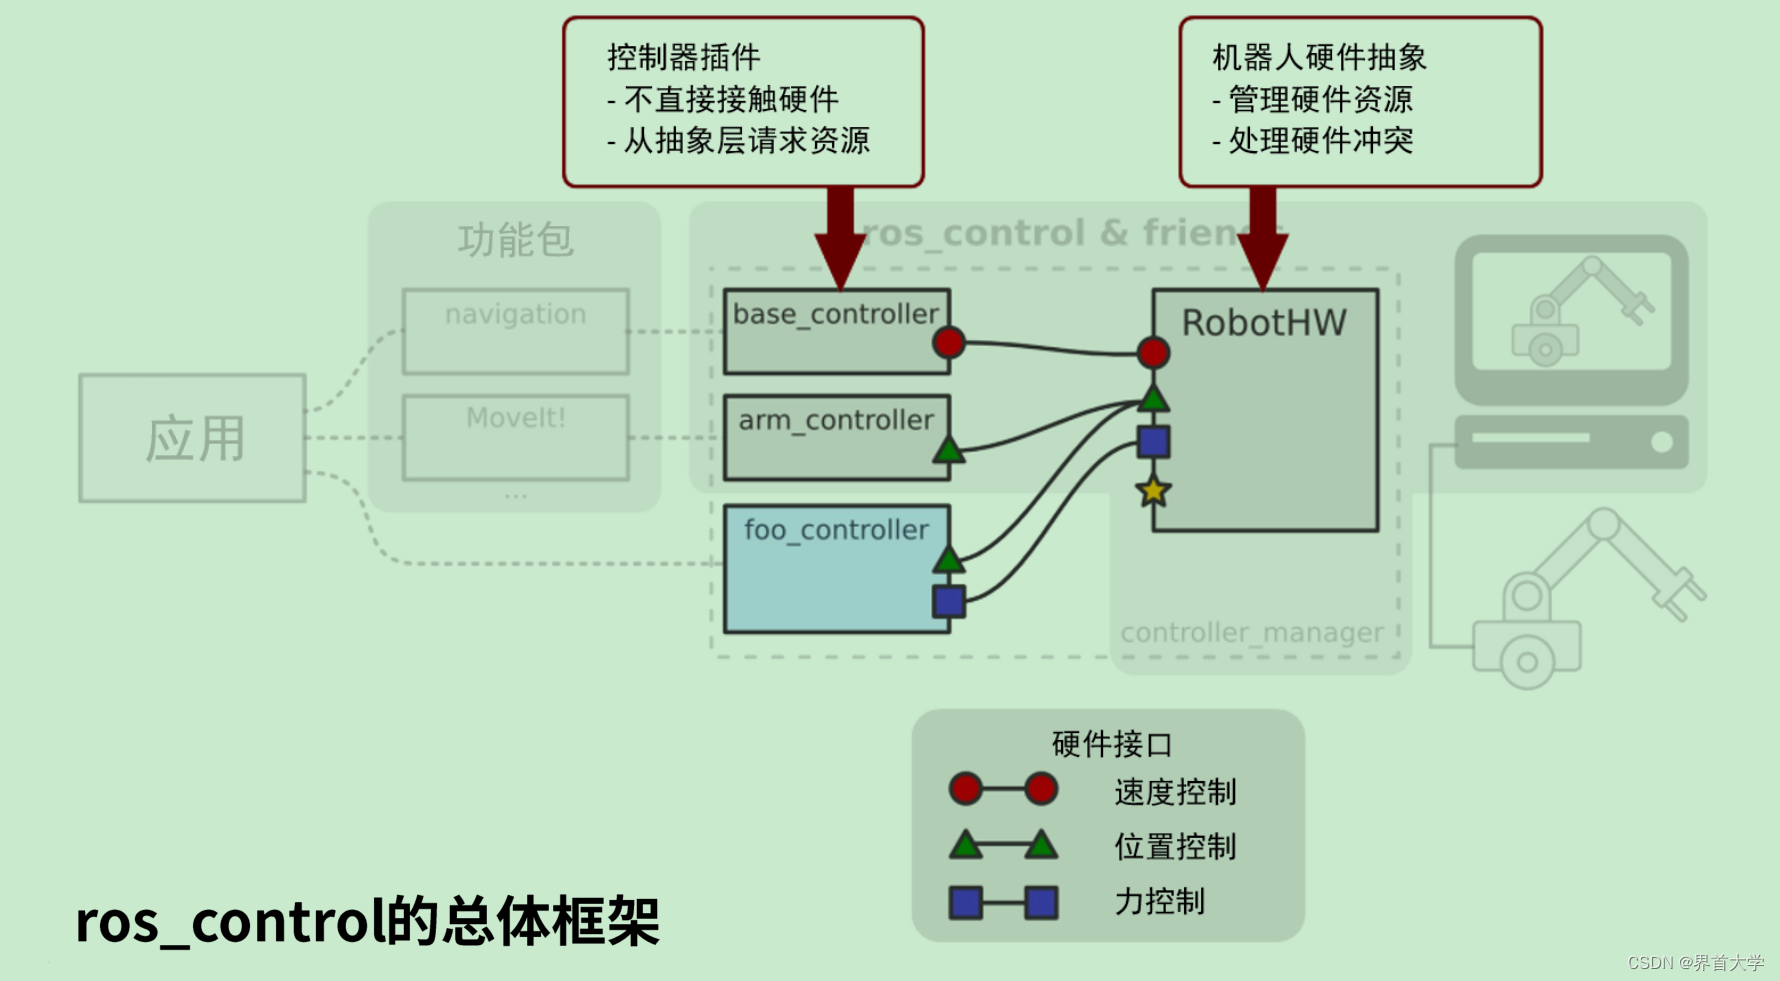
(7)一个机器人实现运动,无论是自主运动还是被动控制运动,在应用程序与底层执行机构之间,需要一个控制中间件,其能对各种底层硬件,无论是真实的还是仿真的,进行抽象,并提供多种控制器,而这就是ros提供的ros_control。
ros_control以插件的形式,提供了多种控制器,本文的差速轮式机器人使用的是差速控制器插件。
(8)为差速轮式机器人的两个主动轮,添加传动装置,这里添加的是两个速度控制接口。
    <!-- Transmission is important to link the joints and the controller -->
    <transmission name="${prefix}_wheel_joint_trans">
        <type>transmission_interface/SimpleTransmission</type>
        <joint name="${prefix}_wheel_joint" >
            <hardwareInterface>hardware_interface/VelocityJointInterface</hardwareInterface>
        </joint>
        <actuator name="${prefix}_wheel_joint_motor">
            <hardwareInterface>hardware_interface/VelocityJointInterface</hardwareInterface>
            <mechanicalReduction>1</mechanicalReduction>
        </actuator>
    </transmission>
然后为差速轮式机器人添加差速控制器插件:
    <!-- controller -->
    <gazebo>
        <plugin name="differential_drive_controller"
                filename="libgazebo_ros_diff_drive.so">
            <rosDebugLevel>Debug</rosDebugLevel>
            <publishWheelTF>true</publishWheelTF>
            // 机器人命名空间
            <robotNamespace>/</robotNamespace>
            <publishTf>1</publishTf>
            <publishWheelJointState>true</publishWheelJointState>
            <alwaysOn>true</alwaysOn>
            <updateRate>100.0</updateRate>
            <legacyMode>true</legacyMode>
            // 左右两个动力轮关节
            <leftJoint>left_wheel_joint</leftJoint>
            <rightJoint>right_wheel_joint</rightJoint>
            <wheelSeparation>${wheel_joint_y*2}</wheelSeparation>
            <wheelDiameter>${2*wheel_radius}</wheelDiameter>
            <broadcastTF>1</broadcastTF>
            <wheelTorque>30</wheelTorque>
            <wheelAcceleration>1.8</wheelAcceleration>
            // 控制器订阅的速度和方向控制topic: /cmd_vel
            <commandTopic>cmd_vel</commandTopic>
            // 里程计数据的参考坐标系,一般称为odom
            <odometryFrame>odom</odometryFrame>
            // 里程和位置数据topic: /odom
            <odometryTopic>odom</odometryTopic>
            <robotBaseFrame>base_footprint</robotBaseFrame>
        </plugin>
    </gazebo>
完整内容见:mbot_base.xacro
2.3 为机器人模型添加传感器仿真
(1)为差速轮式机器人添加camera仿真
    <gazebo reference="camera_link">
    	// sensor标签,camera类型
        <sensor type="camera" name="camera_node">
            <update_rate>30.0</update_rate>
            // camera标签,添加摄像头参数
            <camera name="head">
                <horizontal_fov>1.3962634</horizontal_fov>
                <image>
                    <width>1280</width>
                    <height>720</height>
                    <format>R8G8B8</format>
                </image>
                <clip>
                    <near>0.02</near>
                    <far>300</far>
                </clip>
                <noise>
                    <type>gaussian</type>
                    <mean>0.0</mean>
                    <stddev>0.007</stddev>
                </noise>
            </camera>
            // 加载camera仿真插件
            <plugin name="gazebo_camera" filename="libgazebo_ros_camera.so">
                <alwaysOn>true</alwaysOn>
                <updateRate>0.0</updateRate>
                <cameraName>/camera</cameraName>
                // camera内容topic: /camera/image_raw
                <imageTopicName>image_raw</imageTopicName>
                <cameraInfoTopicName>camera_info</cameraInfoTopicName>
                <frameName>camera_link</frameName>
                <hackBaseline>0.07</hackBaseline>
                <distortionK1>0.0</distortionK1>
                <distortionK2>0.0</distortionK2>
                <distortionK3>0.0</distortionK3>
                <distortionT1>0.0</distortionT1>
                <distortionT2>0.0</distortionT2>
            </plugin>
        </sensor>
    </gazebo>
完整内容见:camera.xacro
(2)为差速轮式机器人添加kinect(深度相机,即带红外的相机)仿真:
    <gazebo reference="kinect_link">
    	// sensor标签,类型是depth
        <sensor type="depth" name="kinect">
            <always_on>true</always_on>
            <update_rate>20.0</update_rate>
            <camera>
                <horizontal_fov>${60.0*M_PI/180.0}</horizontal_fov>
                <image>
                    <format>R8G8B8</format>
                    <width>640</width>
                    <height>480</height>
                </image>
                <clip>
                    <near>0.05</near>
                    <far>8.0</far>
                </clip>
            </camera>
            // 加载kinect仿真插件
            <plugin name="kinect_kinect_controller" filename="libgazebo_ros_openni_kinect.so">
                <cameraName>kinect</cameraName>
                <alwaysOn>true</alwaysOn>
                <updateRate>10</updateRate>
                <imageTopicName>rgb/image_raw</imageTopicName>
                <depthImageTopicName>depth/image_raw</depthImageTopicName>
                // kinect内容topic: /kinect/depth/points
                <pointCloudTopicName>depth/points</pointCloudTopicName>
                <cameraInfoTopicName>rgb/camera_info</cameraInfoTopicName>
                <depthImageCameraInfoTopicName>depth/camera_info</depthImageCameraInfoTopicName>
                <frameName>kinect_frame_optical</frameName>
                <baseline>0.1</baseline>
                <distortion_k1>0.0</distortion_k1>
                <distortion_k2>0.0</distortion_k2>
                <distortion_k3>0.0</distortion_k3>
                <distortion_t1>0.0</distortion_t1>
                <distortion_t2>0.0</distortion_t2>
                <pointCloudCutoff>0.4</pointCloudCutoff>
            </plugin>
        </sensor>
    </gazebo>
完整内容见:kinect.xacro
(3)为差速轮式机器人添加lidar仿真:
    <gazebo reference="laser_link">
        <sensor type="ray" name="rplidar">
            <pose>0 0 0 0 0 0</pose>
            <visualize>false</visualize>
            <update_rate>5.5</update_rate>
            <ray>
                <scan>
                  <horizontal>
                    <samples>360</samples>
                    <resolution>1</resolution>
                    <min_angle>-3</min_angle>
                    <max_angle>3</max_angle>
                  </horizontal>
                </scan>
                <range>
                  <min>0.10</min>
                  <max>6.0</max>
                  <resolution>0.01</resolution>
                </range>
                <noise>
                  <type>gaussian</type>
                  <mean>0.0</mean>
                  <stddev>0.01</stddev>
                </noise>
            </ray>
            <plugin name="gazebo_rplidar" filename="libgazebo_ros_laser.so">
            	// 点云topic:/scan
                <topicName>/scan</topicName>
                <frameName>laser_link</frameName>
            </plugin>
        </sensor>
    </gazebo>
完整内容见:laser.xacro
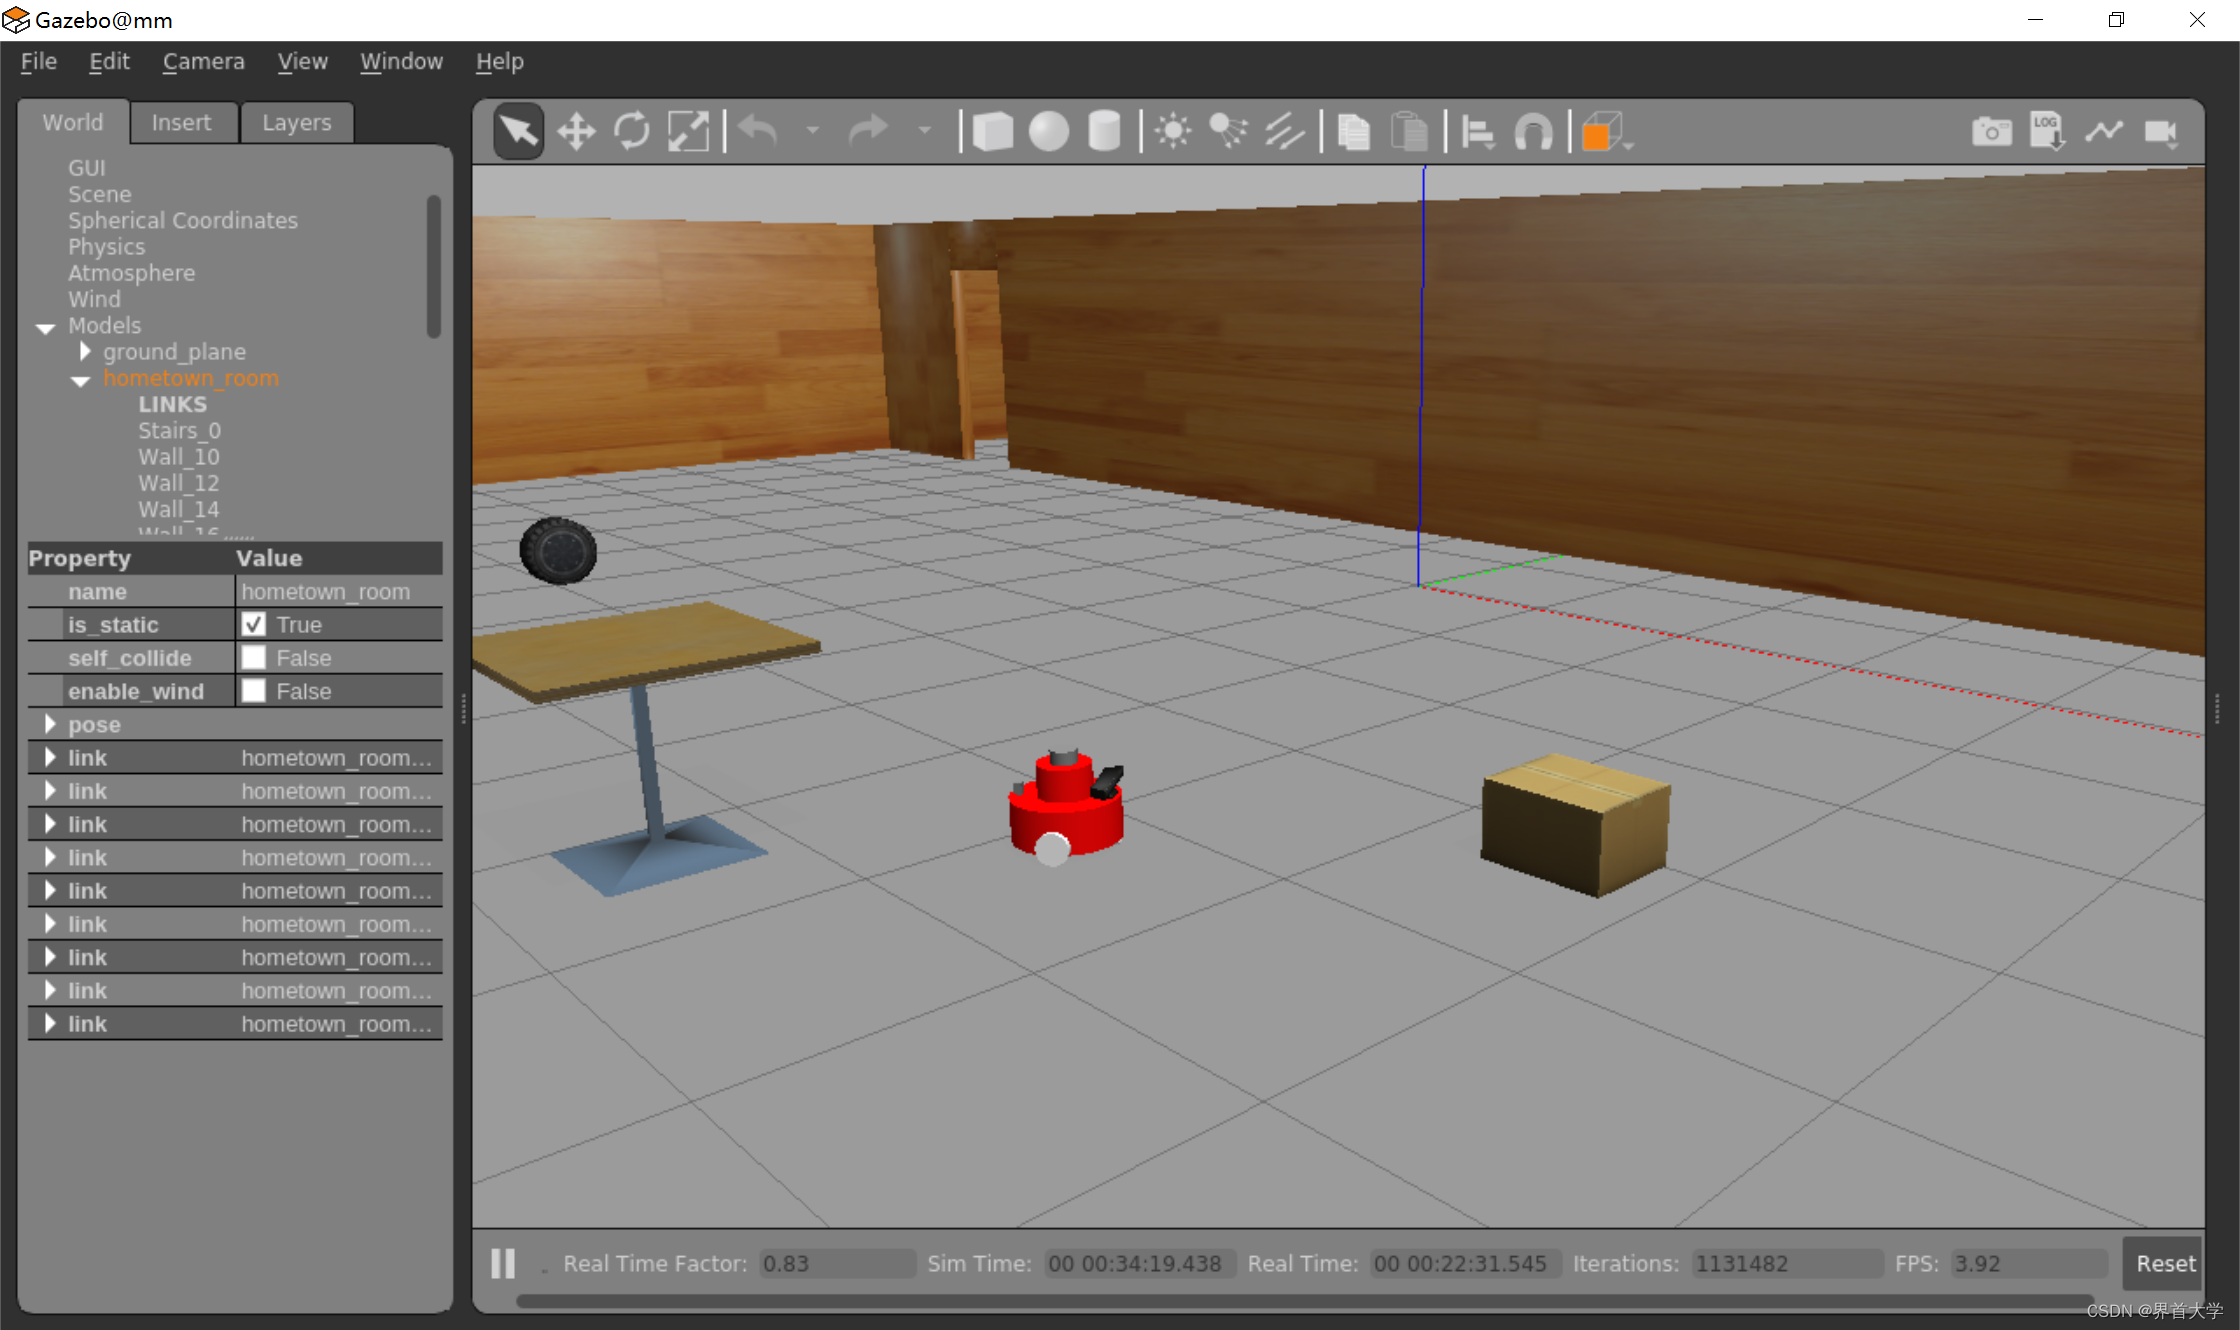
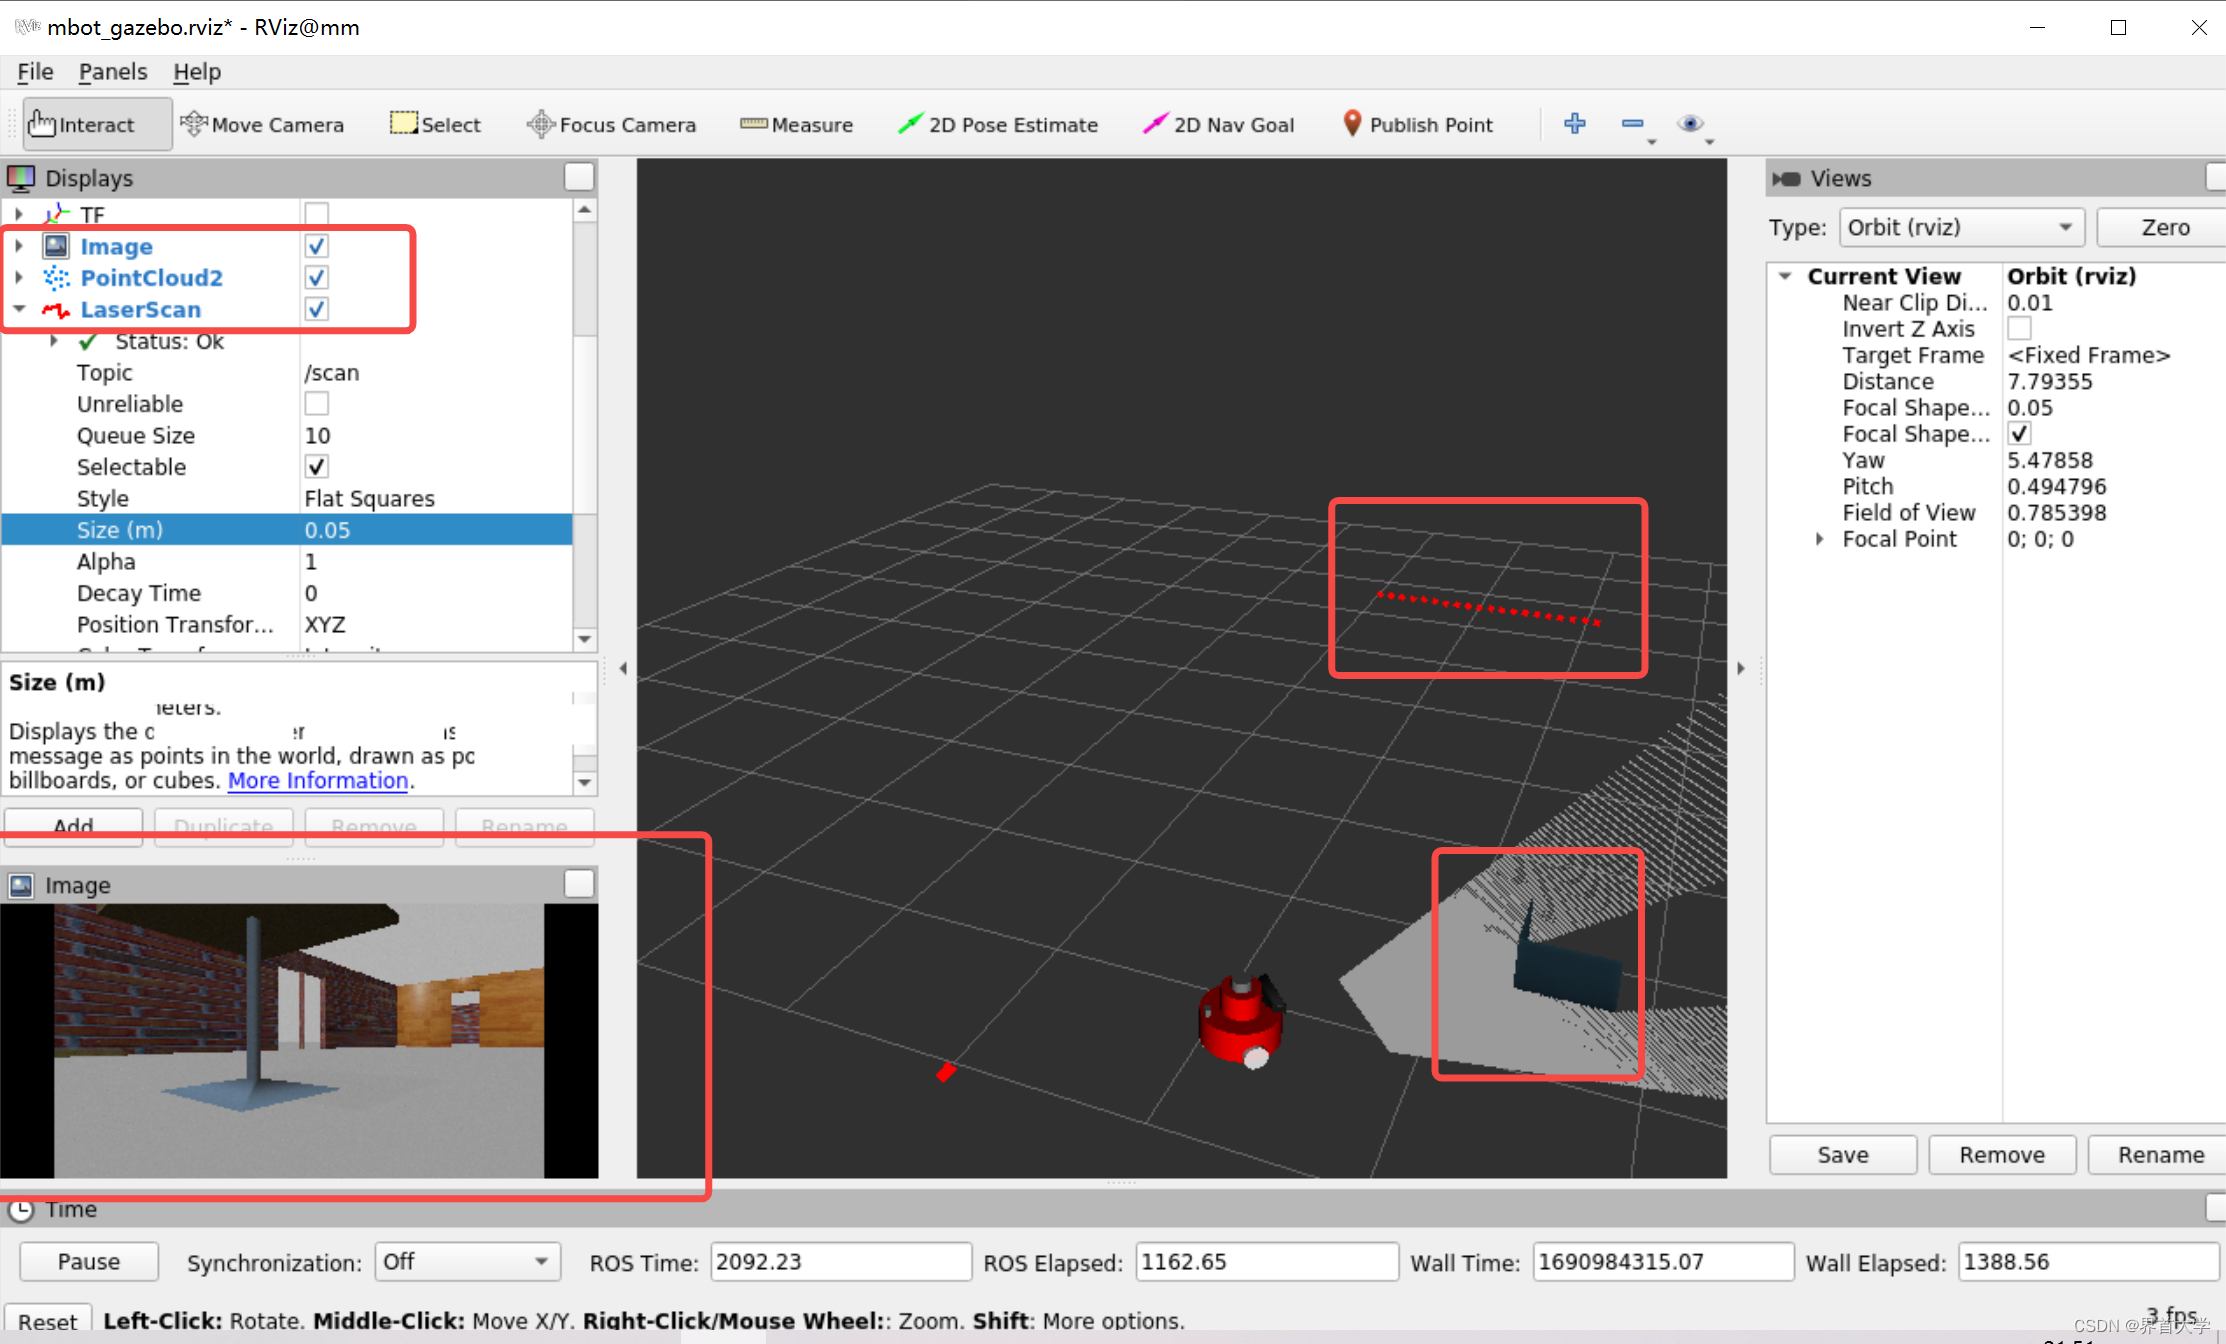
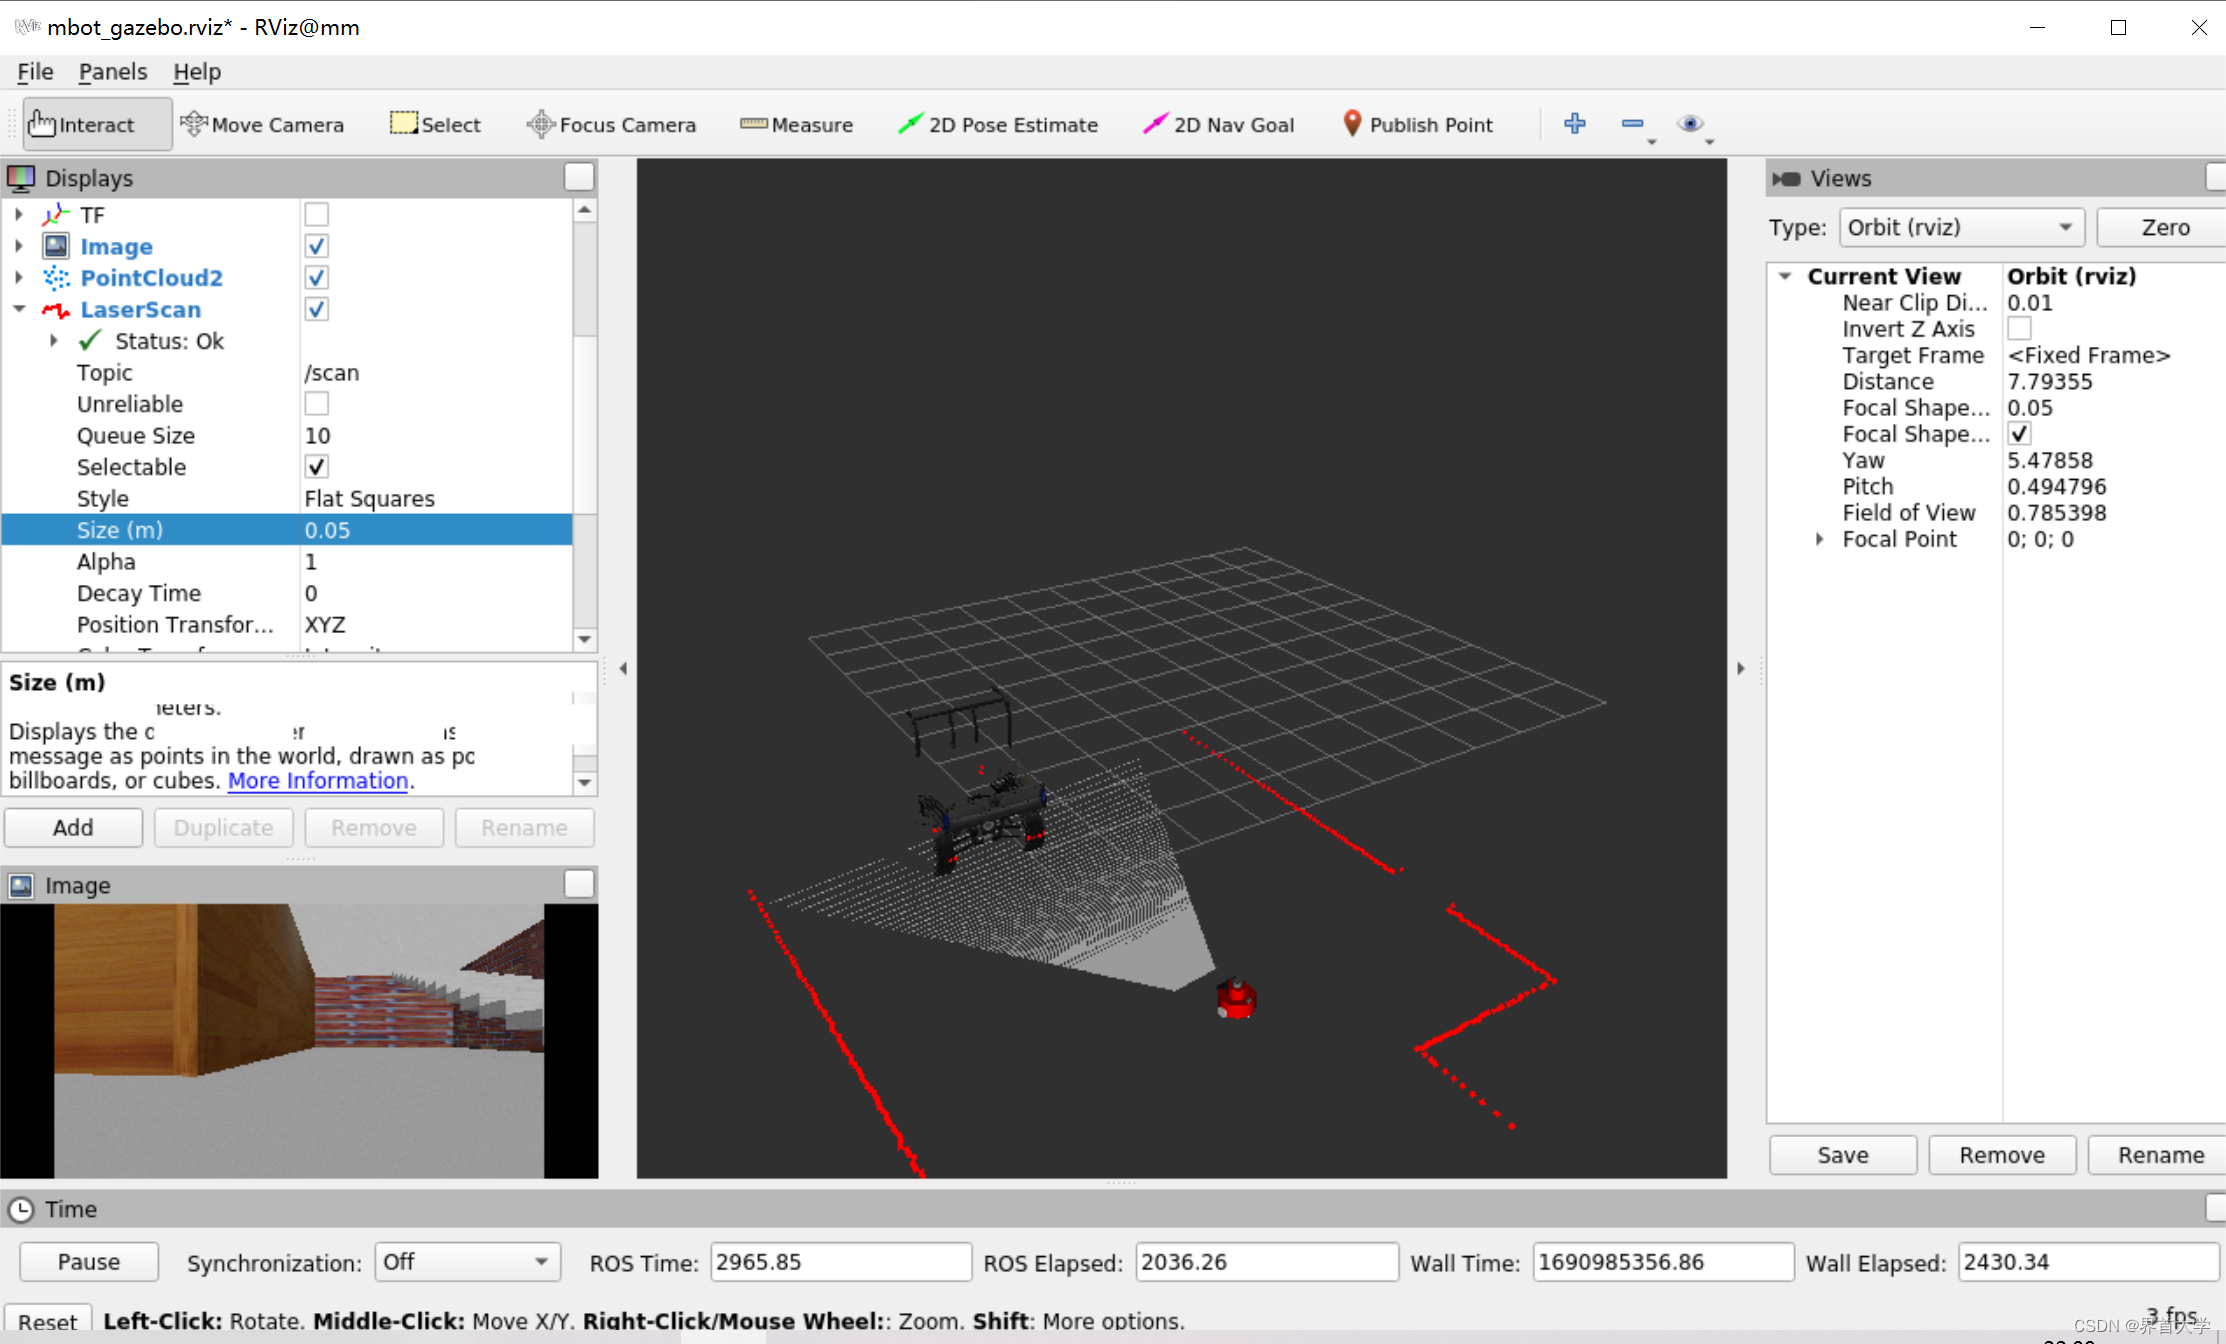
2.4 在gazebo中显示模型,并使用rviz查看三种传感器仿真效果
(1)创建launch文件
cd ~/catkin_ws/src/mbot_gazebo
touch launch/view_mbot_gazebo.launch
(2)view_mbot_gazebo.launch
<launch>
    <!-- 设置launch文件的参数,核心是指定hometown_room.world -->
    <arg name="world_name" value="$(find mbot_gazebo)/worlds/hometown_room.world"/>
    <arg name="paused" default="false"/>
    <arg name="use_sim_time" default="true"/>
    <arg name="gui" default="true"/>
    <arg name="headless" default="false"/>
    <arg name="debug" default="false"/>

    <!-- 运行gazebo仿真环境,使用gazebo_ros自带的empty_world.launch -->
    <include file="$(find gazebo_ros)/launch/empty_world.launch">
        <arg name="world_name" value="$(arg world_name)" />
        <arg name="debug" value="$(arg debug)" />
        <arg name="gui" value="$(arg gui)" />
        <arg name="paused" value="$(arg paused)"/>
        <arg name="use_sim_time" value="$(arg use_sim_time)"/>
        <arg name="headless" value="$(arg headless)"/>
    </include>

    <!-- 加载机器人模型描述参数,即mbot_base.xacro -->
    <param name="robot_description" command="$(find xacro)/xacro --inorder '$(find mbot_gazebo)/urdf/mbot_base.xacro'" />

    <!-- 运行joint_state_publisher节点,发布机器人的关节状态  -->
    <node name="joint_state_publisher" pkg="joint_state_publisher" type="joint_state_publisher" ></node>

    <!-- 运行robot_state_publisher节点,发布tf  -->
    <node name="robot_state_publisher" pkg="robot_state_publisher" type="robot_state_publisher"  output="screen" >
        <param name="publish_frequency" type="double" value="50.0" />
    </node>

    <!-- 使用spawn_model,在gazebo中加载机器人模型-->
    <node name="urdf_spawner" pkg="gazebo_ros" type="spawn_model" respawn="false" output="screen"
          args="-urdf -model mbot -param robot_description"/>

	<!-- 运行rviz可视化界面,其中mbot_gazebo.rviz是之前保存的 -->
	<node name="rviz" pkg="rviz" type="rviz" args="-d $(find mbot_gazebo)/config/mbot_gazebo.rviz" required="true" />
</launch>
(3)编译并运行launch程序
cd ~/catkin_ws/
catkin_make --source src/mbot_gazebo
source devel/setup.bash
roslaunch mbot_gazebo view_mbot_gazebo.launch
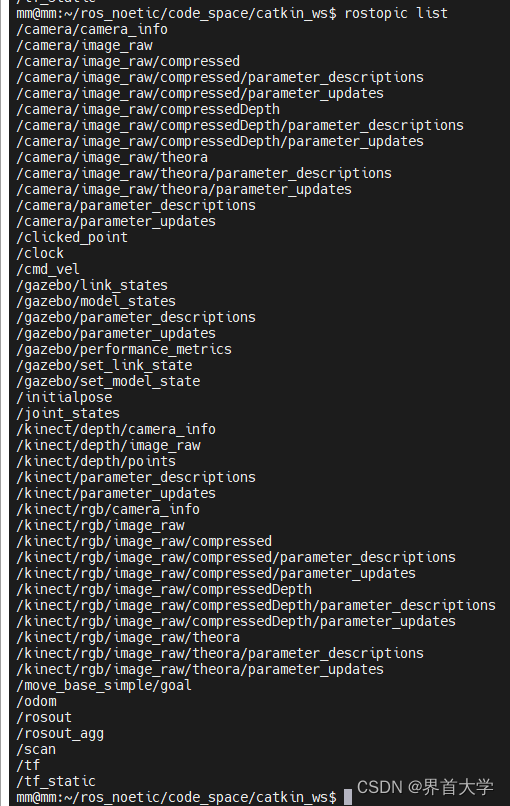
topic列表:
2.5 编写机器人运动控制程序,遥控机器人运动
(1)创建控制脚本和launch文件
cd ~/catkin_ws/src/mbot_gazebo
touch scripts/mbot_teleop.py
touch launch/mbot_teleop.launch
(2)mbot_teleop.py
#! /usr/bin/env python3
# -*- coding: utf-8 -*-
import rospy
from geometry_msgs.msg import Twist
import sys, select, termios, tty
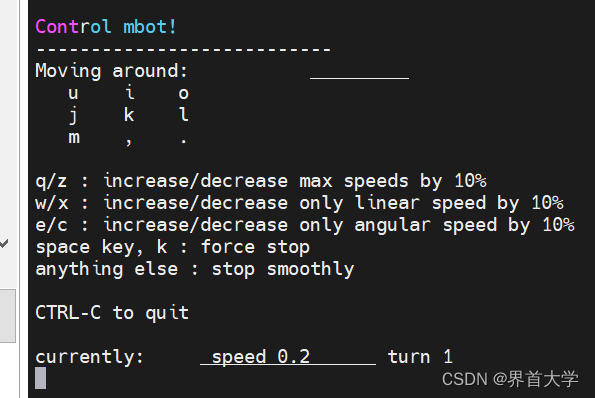
g_msg = """
Control mbot!
---------------------------
Moving around:
u i o
j k l
m , .
q/z : increase/decrease max speeds by 10%
w/x : increase/decrease only linear speed by 10%
e/c : increase/decrease only angular speed by 10%
space key, k : force stop
anything else : stop smoothly
CTRL-C to quit
"""
g_move_bindings = {
'i':(1,0),
'o':(1,-1),
'j':(0,1),
'l':(0,-1),
'u':(1,1),
',':(-1,0),
'.':(-1,1),
'm':(-1,-1),
}
g_speed_bindings={
'q':(1.1,1.1),
'z':(.9,.9),
'w':(1.1,1),
'x':(.9,1),
'e':(1,1.1),
'c':(1,.9),
}
def getKey(settings):
tty.setraw(sys.stdin.fileno())
rlist, _, _ = select.select([sys.stdin], [], [], 0.1)
if rlist:
key = sys.stdin.read(1)
else:
key = ''
termios.tcsetattr(sys.stdin, termios.TCSADRAIN, settings)
return key
def main():
rospy.init_node('mbot_teleop')
pub = rospy.Publisher('/cmd_vel', Twist, queue_size=5)
settings = termios.tcgetattr(sys.stdin)
x = 0
th = 0
status = 0
count = 0
target_speed = 0
target_turn = 0
control_speed = 0
control_turn = 0
speed = .2
turn = 1
try:
print(g_msg)
print("currently:\tspeed %s\tturn %s " % (speed,turn))
while(1):
key = getKey(settings)
# 运动控制方向键(1:正方向,-1负方向)
if key in g_move_bindings.keys():
x = g_move_bindings[key][0]
th = g_move_bindings[key][1]
count = 0
# 速度修改键
elif key in g_speed_bindings.keys():
speed = speed * g_speed_bindings[key][0] # 线速度增加0.1倍
turn = turn * g_speed_bindings[key][1] # 角速度增加0.1倍
count = 0
print("currently:\tspeed %s\tturn %s " % (speed,turn))
if (status == 14):
print (msg)
status = (status + 1) % 15
# 强制停止键
elif key == ' ' or key == 'k' :
x = 0
th = 0
control_speed = 0
control_turn = 0
print("currently:\tforce stop !!")
# 其他键都是慢慢停止键
else:
count = count + 1
if count > 4:
x = 0
th = 0
if (key == '\x03'):
break
# 目标速度=速度值*方向值
target_speed = speed * x
target_turn = turn * th
# 速度限位,防止速度增减过快
if target_speed > control_speed:
control_speed = min( target_speed, control_speed + 0.02 )
elif target_speed < control_speed:
control_speed = max( target_speed, control_speed - 0.02 )
else:
control_speed = target_speed
# 角度限位,防止角度增减过快
if target_turn > control_turn:
control_turn = min( target_turn, control_turn + 0.1 )
elif target_turn < control_turn:
control_turn = max( target_turn, control_turn - 0.1 )
else:
control_turn = target_turn
# 创建并发布twist消息
twist = Twist()
twist.linear.x = control_speed;
twist.linear.y = 0;
twist.linear.z = 0
twist.angular.x = 0;
twist.angular.y = 0;
twist.angular.z = control_turn
pub.publish(twist)
except:
print(e)
finally:
twist = Twist()
twist.linear.x = 0; twist.linear.y = 0; twist.linear.z = 0
twist.angular.x = 0; twist.angular.y = 0; twist.angular.z = 0
pub.publish(twist)
termios.tcsetattr(sys.stdin, termios.TCSADRAIN, settings)
if __name__ == "__main__":
main()
(3)mbot_teleop.launch
<launch>
  <node name="mbot_teleop" pkg="mbot_gazebo" type="mbot_teleop.py" output="screen">
  </node>
</launch>
(4)编译并运行
cd ~/catkin_ws/
catkin_make --source src/mbot_gazebo
source devel/setup.bash
roslaunch mbot_gazebo view_mbot_gazebo.launch
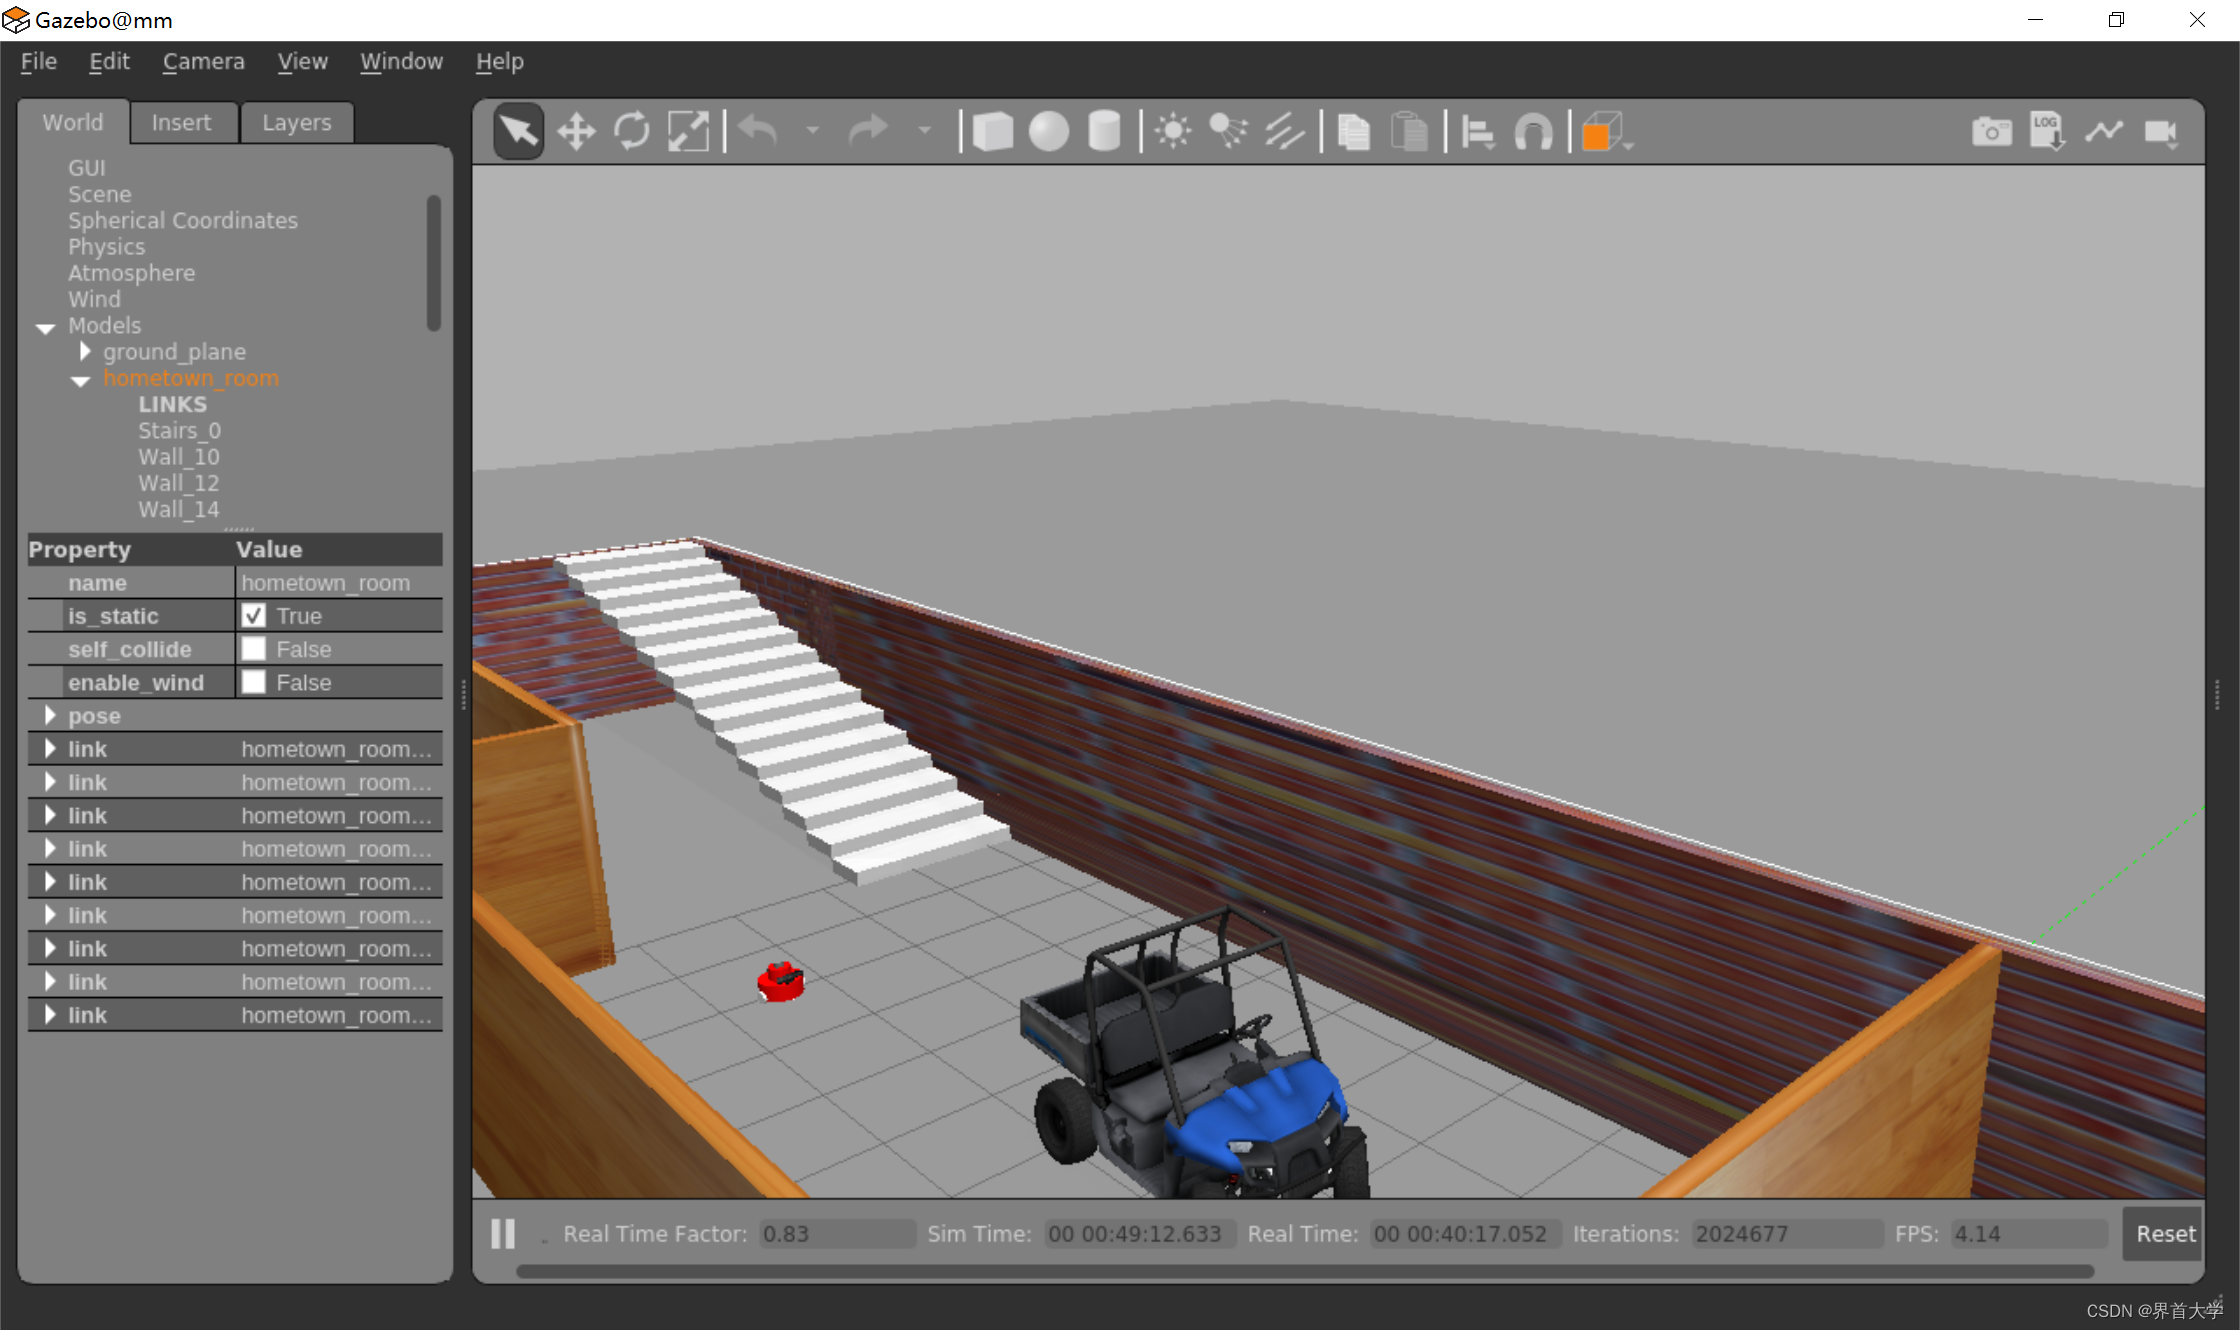
// 再开一个窗口,启动控制程序,讲小机器人移动到小房间去,里面有个小汽车
roslaunch mbot_gazebo mbot_teleop.launch
3 总结
本文的差速轮式机器人都是基于gazebo现成的包和插件,没有任何cpp代码,除了xacore建模的部分,更深入的原理和实现细节暂时不用深究。
至此我们有了一个完整的差速轮式机器人,可以使用键盘控制它,在rviz实时查看它,但是它自己没有感知规划能力,基于这个机器人,我们将深入研究各个算法模块。
本文的代码见本人的github:mbot_gazebo


 314
314

 被折叠的 条评论
为什么被折叠?
被折叠的 条评论
为什么被折叠?
 到【灌水乐园】发言


