


This chapter discusses tips and techniques that can improve app performance or developer productivity.
In iOS 8, Apple released a new API for GPU-accelerated 3D graphics called Metal.
Metal is similar to OpenGL ES, in that it is a low-level API for interacting with 3D graphics hardware.
The difference is that Metal is not cross platform. Instead, it is designed to be extremely efficient with Apple hardware, offering much improved speed and low overhead compared to using OpenGL ES.
In this tutorial, you’ll get some hands-on experience using Metal and Swift to create a bare-bones app: drawing a simple triangle. In the process, you’ll learn about some of the most important classes in Metal, such as devices, command queues, and more.
This tutorial is designed so that anyone can go through it, regardless of your 3D graphics background – however, we will go fairly quickly. If you do have some prior 3D programming or OpenGL experience you will find things much easier, as many of the concepts you’re already familiar with apply to Metal.
This tutorial assumes you are familiar with Swift. If you are new to Swift, check out Apple’s Swift site or some of our Swift tutorials first.
Metal vs. Sprite Kit, Scene Kit, or Unity

Before we get started, I wanted to discuss how Metal compares to higher level frameworks like Sprite Kit, Scene Kit, or Unity.
Metal is a low-level 3D graphics API, similar to OpenGL ES but lower overhead. It is a very thin layer above the GPU, so doing just about anything (such as rendering a sprite or a 3D model to the screen) requires you to write all of the code to do this. The tradeoff is you have full power and control.
Higher level game frameworks like Sprite Kit, Scene Kit, or Unity are built on top of a lower-level 3D graphics API like Metal or OpenGL ES. They provide much of the boilerplate code you normally need to write in a game, such as rendering a sprite or 3D model to the screen.

If all you’re trying to do is make a game, most of the time I’d recommend you use a higher level game framework like Sprite Kit, Scene Kit, or Unity because it will make your life much easier. If this sounds like you, we havetons of tutorials to help get you started with these frameworks.
However, there are still two really good reasons to learn Metal:
- Push the hardware to its limits: Since Metal is at such a low level, it allows you to really push the hardware to its limits and have full control over how your game works.
- It’s a great learning experience: Learning Metal teaches you a lot about 3D graphics, writing your own game engine, and how higher level game frameworks work.
If either of these sound like good reasons to you, keep reading!
Metal vs OpenGL ES

Next let’s take a look at the difference between Metal and OpenGL ES.
OpenGL ES has been designed to be cross-platform. That means you can write C++ OpenGL ES code, and most of the time with some small modifications can run it on other platforms (such as Android).
Apple realized that although the cross-platform support of OpenGL ES was nice, it was missing something fundamental to how Apple designs its products: how Apple integrates the operating system, hardware, and software as a complete package.
So Apple took a clean-room approach to see what it would look like if they were to design a graphics API specifically for their hardware with the goal of being extremely low overhead and performant, and supporting the latest and greatest features.
The result was Metal – which can provide up to 10x the number of draw calls for your application compared to OpenGL ES. This can result in some amazing effects, like you may remember from the Zen Garden example in the WWDC 2014 keynote.
Let’s dig right in and see some Metal code!
Getting Started
Xcode’s iOS Game template comes with a Metal option, but you are not choosing that here. This is because I want to show you how to put together a Metal app from scratch, so you can understand every step of the process.
So open Xcode 6 and make a new project with the iOS\Application\Single View Application template. EnterHelloMetal for the ProductName, set the Language to Swift, and set Devices to Universal. Click Next, choose a directory, and click Create.
There are 7 steps to set up metal:
- Create a MTLDevice
- Create a CAMetalLayer
- Create a Vertex Buffer
- Create a Vertex Shader
- Create a Fragment Shader
- Create a Render Pipeline
- Create a Command Queue
Let’s go through them one at a time.
1) Create a MTLDevice
The first thing you need to do to use Metal is to get a reference to a MTLDevice.
You can think of a MTLDevice as your direct connection to the GPU. You will create all the other Metal objects you need (like command queues, buffers, and textures) using this MTLDevice.
To do this, open ViewController.swift and add this import to the top of the file:
import Metal |
This imports the Metal framework so that you can use Metal classes (like MTLDevice inside this file.
Next, add this property to the ViewController class:
var device: MTLDevice! = nil |
You are going to initialize this property in viewDidLoad() rather than in an initializer, so it has to be an optional. Since you know you’re definitely going to initialize it before you use it, you mark it as an implicitly unwrapped optional for convenience purposes.
Finally, add this line to the end of viewDidLoad():
device = MTLCreateSystemDefaultDevice() |
This function returns a references to the default MTLDevice that your code should use.
2) Create a CAMetalLayer
In iOS, everything you see on screen is backed by a CALayer. There are subclasses of CALayers for different effects, like gradient layers, shape layers, replicator layers, and more.
Well, if you want to draw something on the screen with Metal, you need to use a special subclass of CALayercalled CAMetalLayer. So let’s add one of these to your view controller.
First add this import to the top of the file:
import QuartzCore |
You need this because CAMetalLayer is part of the QuartzCore framework, not Metal framework.
Then add this new property to the class:
var metalLayer: CAMetalLayer! = nil |
This will store a handy reference to your new layer.
Finally, add this code to the end of viewDidLoad():
metalLayer = CAMetalLayer() // 1 metalLayer.device = device // 2 metalLayer.pixelFormat = .BGRA8Unorm // 3 metalLayer.framebufferOnly = true // 4 metalLayer.frame = view.layer.frame // 5 view.layer.addSublayer(metalLayer) // 6 |
Let’s go over this line-by-line:
- You create a new
CAMetalLayer. - You must specify the
MTLDevicethat the layer should use. You simply set this to the device you obtained earlier. - You set the pixel format to
BGRA8Unorm, which is a fancy way of saying “8 bytes for Blue, Green, Red, and Alpha, in that order – with normalized values between 0 and 1”. This is one of only 2 possible formats to use for aCAMetalLayer, so normally you just leave this as-is. - Apple encourages you to set
framebufferOnlyto true for performance reasons unless you need to sample from the textures generated for this layer, or if you need to enable compute kernels on the layer drawable texture (most of the time, you don’t need to do this). - You set the frame of the layer to match the frame of the view.
- You add the layer as a sublayer of the view’s main layer.
3) Create a Vertex Buffer
Everything in Metal is a triangle. In this app, you’re just going to draw one triangle, but even complex 3D shapes can be decomposed into a series of triangles.
In Metal, the default coordinate system is the normalized coordinate system, which means that by default you are looking at a 2x2x1 cube centered at (0, 0, 0.5).
If you consider the Z=0 plain, then (-1, -1, 0) is the lower left, (0, 0, 0) is the center, and (1, 1, 0) is the upper right. In this tutorial, you want to draw a triangle with these there points:

Let’s create a buffer for this. Add the following constant property to your class:
let vertexData:[Float] = [ 0.0, 1.0, 0.0, -1.0, -1.0, 0.0, 1.0, -1.0, 0.0] |
This creates an array of floats on the CPU – you need to send this data to the GPU by moving it to something called a MTLBuffer.
Add another new property for this:
var vertexBuffer: MTLBuffer! = nil |
Then add this code to the end of viewDidLoad():
let dataSize = vertexData.count * sizeofValue(vertexData[0]) // 1 vertexBuffer = device.newBufferWithBytes(vertexData, length: dataSize, options: nil) // 2 |
Let’s go over this line-by-line:
- You need to get the size of the vertex data in bytes. You do this by multiplying the size of the first element by the count of elements in the array.
- You call
newBufferWithBytes(length:options:)on theMTLDeviceyou created earlier to create a new buffer on the GPU, passing in the data from the CPU. You pass nil to accept the default options.
4) Create a Vertex Shader
The vertices you created in the previous section will become the input to a little program you will write called a vertex shader.
A vertex shader is simply a tiny program that runs on the GPU, written in a C++-like language called the Metal Shading Language.
A vertex shader is called once per vertex, and its job is to take that vertex’s information (like position and possibly other information such as color or texture coordinate), and return a potentially modified position (and possibly other data).
To keep things simple, your simple vertex shader will return the same position as the position passed in.

The easiest way to understand vertex shaders is to see it yourself. Go to File\New\File, chooseiOS\Source\Metal File, and click Next. Enter Shaders.metal for the filename and click Create.
Add the following code to the bottom of Shaders.metal:
vertex float4 basic_vertex( // 1 const device packed_float3* vertex_array [[ buffer(0) ]], // 2 unsigned int vid [[ vertex_id ]]) { // 3 return float4(vertex_array[vid], 1.0); // 4 } |
Let’s go over this line-by-line:
- All vertex shaders must begin with the keyword
vertex. The function must return (at least) the final position of the vertex – you do so here by indicatingfloat4(a vector of 4 floats). You then give the name of the vertex shader – you will look up the shader later using this name. - The first parameter a pointer to an an array of
packed_float3(a packed vector of 3 floats) – i.e. the position of each vertex.The
[[ ... ]]syntax is used to declare attributes which can be used to specify additional information such as resource locations, shader inputs, and built-in variables. Here you mark this parameter with[[ buffer(0) ]], to indicate that this parameter will be populated by the first buffer of data that you send to your vertex shader from your Metal code. - The vertex shader will also take a special parameter with the
vertex_idattribute, which means it will be filled in with the index of this particular vertex inside the vertex array. - Here you look up the position inside the vertex array based on the vertex id and return that. You also convert the vector to a
float4, where the final value is 1.0 (long story short, this is required for 3D math purposes).
5) Create a Fragment Shader
After the vertex shader completes, another shader is called for each fragment (think pixel) on the screen: the fragment shader.
The fragment shader gets its input values by interpolating the output values from the vertex shader. For example, consider the fragment between the bottom two vertices of the triangle:

The input value for this fragment will be the 50/50 blend of the output value of the bottom two vertices.
The job of a fragment shader is to return the final color for each fragment. To keep things simple, you will make each fragment white.
Add the following code to the bottom of Shaders.metal:
fragment half4 basic_fragment() { // 1 return half4(1.0); // 2 } |
Let’s go over this line-by-line:
- All fragment shaders must begin with the keyword
fragment. The function must return (at least) the final color of the fragment – you do so here by indicatinghalf4(a 4-component color value RGBA). Note thathalf4is more memory efficient thanfloat4because you are writing to less GPU memory. - Here you return (1, 1, 1, 1) for the color (which is white).
6) Create a Render Pipeline
Now that you’ve created a vertex and fragment shader, you need to combine them (along with some other configuration data) into a special object called the render pipeline.
One of the cool things about Metal is that the shaders are precompiled, and the render pipeline configuration is compiled after you first set it up, so everything is made extremely efficient.
First add a new property to ViewController.swift:
var pipelineState: MTLRenderPipelineState! = nil |
This will keep track of the compiled render pipeline you are about to create.
Next, add the following code to the end of viewDidLoad():
// 1 let defaultLibrary = device.newDefaultLibrary() let fragmentProgram = defaultLibrary!.newFunctionWithName("basic_fragment") let vertexProgram = defaultLibrary!.newFunctionWithName("basic_vertex") // 2 let pipelineStateDescriptor = MTLRenderPipelineDescriptor() pipelineStateDescriptor.vertexFunction = vertexProgram pipelineStateDescriptor.fragmentFunction = fragmentProgram pipelineStateDescriptor.colorAttachments.objectAtIndexedSubscript(0).pixelFormat = .BGRA8Unorm // 3 var pipelineError : NSError? pipelineState = device.newRenderPipelineStateWithDescriptor(pipelineStateDescriptor, error: &pipelineError) if pipelineState == nil { println("Failed to create pipeline state, error \(pipelineError)") } |
Let’s go over this section by section:
- You can access any of the precompiled shaders included in your project through the
MTLLibraryobject that you can get by callingdevice.newDefaultLibrary(). Then you can look up each shader by name. - You set up your render pipeline configuration here. It contains the shaders you want to use, and the pixel format for the color attachment (i.e. the output buffer you are rendering to – the
CAMetalLayeritself). - Finally you compile the pipeline configuration into a pipeline state that is efficient to use here on out.
7) Create a Command Queue
The final one-time-setup step you need to do is to create a MTLCommandQueue
Think of this as an ordered list of commands that you tell the GPU to execute, one at a time.
To create a command queue, simply add a new property:
var commandQueue: MTLCommandQueue! = nil |
And add this line at the end of viewDidLoad():
commandQueue = device.newCommandQueue() |
Congrats – your one-time set up code is done!
Rendering the Triangle
Now it’s time to move on to the code that executes each frame, to render the triangle!
This is done in 5 steps:
- Create a Display Link
- Create a Render Pass Descriptor
- Create a Command Buffer
- Create a Render Command Encoder
- Commit your Command Buffer
Let’s dive in!
1) Create a Display Link
You want a function to be called every time the device screen refreshes so you can re-draw the screen.
On iOS, you do this with the handy CADisplayLink class. To use this, add a new property to the class:
var timer: CADisplayLink! = nil |
And initialize it at the end of viewDidLoad() as follows:
timer = CADisplayLink(target: self, selector: Selector("gameloop")) timer.addToRunLoop(NSRunLoop.mainRunLoop(), forMode: NSDefaultRunLoopMode) |
This sets up your code to call a method named gameloop() every time the screen refreshes.
Finally, add these stub methods to the class:
func render() { // TODO } func gameloop() { autoreleasepool { self.render() } } |
Here gameloop() simply calls render() each frame, which right now just has an empty implementation. Let’s flesh this out.
2) Create a Render Pass Descriptor
The next step is to create a MTLRenderPassDescriptor, which is an object that configures what texture is being rendered to, what the clear color is, and a bit of other configuration.
Simply add these lines inside render():
let renderPassDescriptor = MTLRenderPassDescriptor() renderPassDescriptor.colorAttachments.objectAtIndexedSubscript(0).texture = drawable.texture renderPassDescriptor.colorAttachments.objectAtIndexedSubscript(0).loadAction = .Clear renderPassDescriptor.colorAttachments.objectAtIndexedSubscript(0).clearColor = MTLClearColor(red: 0.0, green: 104.0/255.0, blue: 5.0/255.0, alpha: 1.0) |
First you call nextDrawable() on the metal layer you created earlier, which returns the texture you need to draw into in order for something to appear on the screen.
Next you configure the render pass descriptor to use that. You set the load action to Clear, which means clear the texture to the clear color before doing any drawing, and you set the clear color to the green color we use on the site.
3) Create a Command Buffer
The next step is to create a command buffer. Think of this as the list of render commands that you wish to execute for this frame. The cool thing is nothing actually happens until you commit the command buffer, giving you fine-grained control over when things occur.
Creating a command buffer is easy. Simply add this line to the end of render():
let commandBuffer = commandQueue.commandBuffer() |
A command buffer contains one or more render commands. Let’s create one of these next.
4) Create a Render Command Encoder
To create a render command, you use a helper object called a render command encoder. To try this out, add these lines to the end of render():
let renderEncoderOpt = commandBuffer.renderCommandEncoderWithDescriptor(renderPassDescriptor) if let renderEncoder = renderEncoderOpt { renderEncoder.setRenderPipelineState(pipelineState) renderEncoder.setVertexBuffer(vertexBuffer, offset: 0, atIndex: 0) renderEncoder.drawPrimitives(.Triangle, vertexStart: 0, vertexCount: 3, instanceCount: 1) renderEncoder.endEncoding() } |
Here you create a command encoder and specify the pipeline and vertex buffer you created earlier.
The most important part is the call to drawPrimitives(vertexStart:vertexCount:instanceCount:). Here you are telling the GPU to draw a set of triangles, based on the vertex buffer. Each triangle consists of 3 vertices, starting at index 0 inside the vertex buffer, and there is 1 triangle total.
When you’re done, you simply call endEncoding().
5) Commit your Command Buffer
The final step is to commit the command buffer. Add these lines to the end of render():
commandBuffer.presentDrawable(drawable) commandBuffer.commit() |
The first line is needed to make sure the new texture is presented as soon as the drawing completes. Then you commit the transaction to send the task to the GPU.
Phew! That was a ton of code, but at long last you are done! Build and run the app and bask in your triangle glory:

The most beautiful triangle I’ve ever seen!
Where To Go From Here?
Here is the final example project from this iOS 8 Metal Tutorial.
Congratulations, you have learned a ton about the new Metal API! You now have an understanding of some of the most important concepts in Metal, such as shaders, devices, command buffers, pipelines, and more.
Next, check out part 2 of this series on moving to 3D.
We may write some more tutorials in this series – add a comment below about what you’d like covered in our next Metal tutorial!
Also, be sure to check out some great resources from Apple:
- Apple’s Metal for Developers page, with tons of links to documentation, videos, and sample code
- Apple’s Metal Programming Guide
- Apple’s Metal Shading Language Guide
- The Metal videos from WWDC 2014
I hope you enjoyed this tutorial, and if you have any comments or questions, please join the forum discussion below!
Creating Libraries During the App Build Process
Compiling shader language source files and building a library (.metallib file) during the app build process achieves better app performance than compiling shader source code at runtime. You can build a library within Xcode or by using command line utilities.
Using Xcode to Build a Library
Any shader source files that are in your project are automatically used to generate the default library, which you can access from Metal framework code with thenewDefaultLibrary method of MTLDevice.
Using Command Line Utilities to Build a Library
Figure 8-1 shows the command line utilities that form the compiler toolchain for Metal shader source code. When you include .metal files in your project, Xcode invokes these tools to build a library file that you can access in your app at run time.
To compile shader source into a library without using Xcode:
-
Use
metalto compile each.metalfile into a single.airfile, which stores an intermediate representation of shader language code. -
Use
metal-arto archive several.airfiles together into a single.metalarfile.metal-aris similar to the Unix utilityar. -
Use
metallibto build a Metal.metalliblibrary file from the archive.metalarfile.
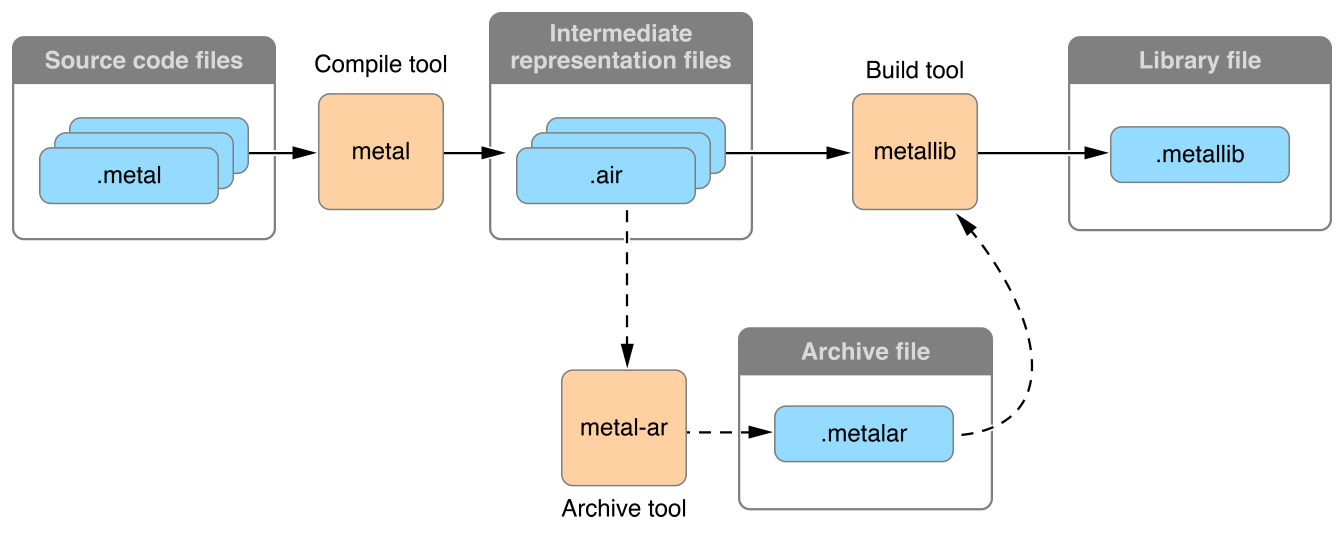
To access the resulting library in framework code, call the newLibraryWithFile:error: method of MTLDevice.
Xcode Scheme Settings and Performance
When a Metal app is running from Xcode, the default scheme settings reduce performance. Xcode detects whether the Metal API is used in the source code and automatically enables the GPU Frame Capture and Metal API Validation settings, as seen in Figure 8-2. When GPU Frame Capture is enabled, the debug layer is activated. When Metal API Validation is enabled, each call is validated, which affects performance further. For both settings, CPU performance is more affected than GPU performance. Unless you disable these settings, app performance may noticeably improve when the app is run outside of Xcode.
Figure 8-2 Xcode Scheme Editor Settings for a Metal App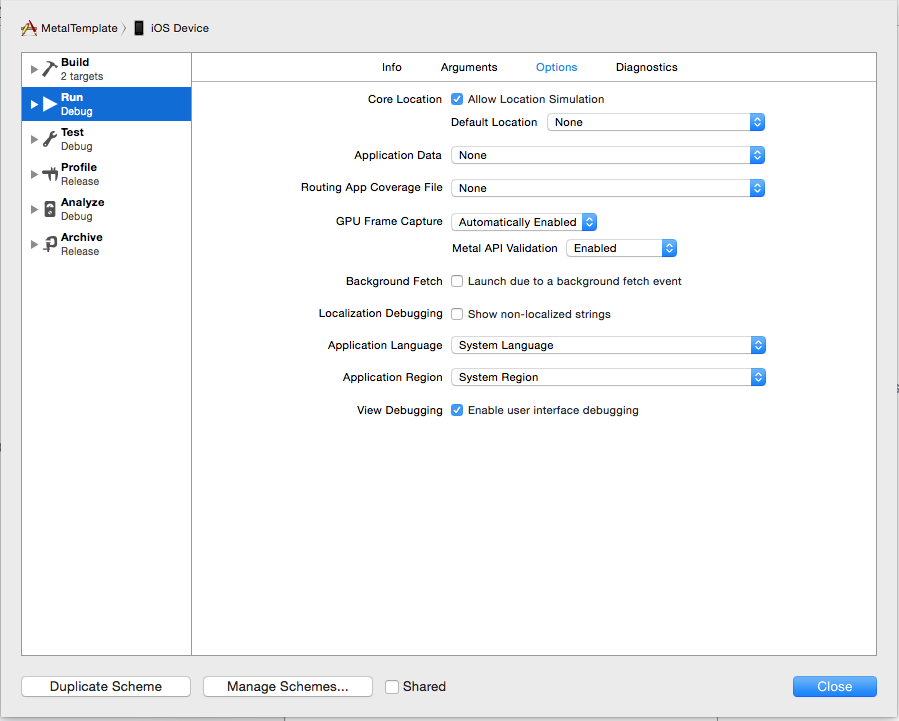
Debugging
Use the tips in the following sections to gain more useful diagnostic information when debugging and profiling your Metal app.
File Extension for Metal Shading Language Source Files
For Metal shading language source code file names, you must use the .metal file name extension to ensure that the development tools (Xcode and the GPU frame debugger) recognize the source files when debugging or profiling.
Performing Frame Capture with Xcode
To perform frame capture in Xcode, enable debug and call the insertDebugCaptureBoundary method of MTLCommandQueue to inform Xcode. The presentDrawable: andpresentDrawable:atTime: methods of MTLCommandBuffer similarly inform Xcode about frame capture, so call insertDebugCaptureBoundary only if those methods are not present.
The Label Property
Many Metal framework objects—such as command buffers, pipeline states, and resources—support a label property. You can use this property to assign a name for each object that is meaningful in the context of your application’s design. These labels appear in the Xcode Frame Capture debugging interface, allowing you to more easily identify objects.


 2119
2119

 被折叠的 条评论
为什么被折叠?
被折叠的 条评论
为什么被折叠?
 到【灌水乐园】发言


