


本文预测68个关键点
1.观察图像
2.预处理
2.1构造输入数据
torch.utils.data.Dataset是一个表示数据集的抽象类。这个类可以让我们加载批量的图像/关键点数据,并统一地将转换应用于我们的数据,例如,为了训练神经网络,重新缩放和归一化化图像。
你的自定义数据集应继承Dataset并覆盖以下方法:
-
__len__,从而使len(dataset)返回数据集的大小。 -
__getitem__,用于支持索引,使dataset[i]可 用于获取第i个图像/关键点数据样本。
接下来,让我们为人脸关键点数据集创建一个dataset类。我们要读取__init__中的CSV文件,但将图像的读取留给__getitem__。这就是高效存储,因为所有图像都不是一次性存储在内存中,而是根据需要读取。
from torch.utils.data import Dataset, DataLoader

class FacialKeypointsDataset(Dataset):
    """Face Landmarks dataset."""

    def __init__(self, csv_file, root_dir, transform=None):
        """
        Args:
            csv_file (string): Path to the csv file with annotations.
            root_dir (string): Directory with all the images.
            transform (callable, optional): Optional transform to be applied
                on a sample.
        """
        self.key_pts_frame = pd.read_csv(csv_file)
        self.root_dir = root_dir
        self.transform = transform

    def __len__(self):
        return len(self.key_pts_frame)

    def __getitem__(self, idx):
        image_name = os.path.join(self.root_dir,
                                self.key_pts_frame.iloc[idx, 0])

        image = mpimg.imread(image_name)

        # if image has an alpha color channel, get rid of it
        if(image.shape[2] == 4):
            image = image[:,:,0:3]

        key_pts = self.key_pts_frame.iloc[idx, 1:].as_matrix()
        key_pts = key_pts.astype('float').reshape(-1, 2)
        sample = {'image': image, 'keypoints': key_pts}

        if self.transform:
            sample = self.transform(sample)

        return sample
2.2图像转换
现在,上面的图像尺寸不同,但是,神经网络通常期望的是标准化的图像。因此,我们需要固定的尺寸、颜色范围和坐标的标准化范围。对于PyTorch来说,还需要把numpy列表和数组转换为Tensors。
因此,我们需要编写一些预处理代码。 下面,创建四个转换:
Normalize: 将彩色图像转换为范围为[0,1]的灰度值,并将关键点标准化为约[-1,1]的范围Rescale: 将图像重新缩放到所需尺寸。RandomCrop: 随机裁剪图像。ToTensor: 将numpy图像转换为torch图像。
我们将它们编写为可调用类而不是简单函数,这样,每次调用时都不需要传递转换的参数。 为此,我们只需要实现 __call__ 方法就可以了。如果我们需要传入参数,还需要实现__init__方法。 我们可以使用类似下面的转换:
tx = Transform(params)
transformed_sample = tx(sample)
import torch
from torchvision import transforms, utils
# tranforms

class Normalize(object):
    """Convert a color image to grayscale and normalize the color range to [0,1]."""

    def __call__(self, sample):
        image, key_pts = sample['image'], sample['keypoints']

        image_copy = np.copy(image)
        key_pts_copy = np.copy(key_pts)

        # convert image to grayscale
        image_copy = cv2.cvtColor(image, cv2.COLOR_RGB2GRAY)

        # scale color range from [0, 255] to [0, 1]
        image_copy=  image_copy/255.0

        # scale keypoints to be centered around 0 with a range of [-1, 1]
        # mean = 100, sqrt = 50, so, pts should be (pts - 100)/50
        key_pts_copy = (key_pts_copy - 100)/50.0


        return {'image': image_copy, 'keypoints': key_pts_copy}


class Rescale(object):
    """Rescale the image in a sample to a given size.

    Args:
        output_size (tuple or int): Desired output size. If tuple, output is
            matched to output_size. If int, smaller of image edges is matched
            to output_size keeping aspect ratio the same.
    """

    def __init__(self, output_size):
        assert isinstance(output_size, (int, tuple))
        self.output_size = output_size

    def __call__(self, sample):
        image, key_pts = sample['image'], sample['keypoints']

        h, w = image.shape[:2]
        if isinstance(self.output_size, int):
            if h > w:
                new_h, new_w = self.output_size * h / w, self.output_size
            else:
                new_h, new_w = self.output_size, self.output_size * w / h
        else:
            new_h, new_w = self.output_size

        new_h, new_w = int(new_h), int(new_w)

        img = cv2.resize(image, (new_w, new_h))

        # scale the pts, too
        key_pts = key_pts * [new_w / w, new_h / h]

        return {'image': img, 'keypoints': key_pts}


class RandomCrop(object):
    """Crop randomly the image in a sample.

    Args:
        output_size (tuple or int): Desired output size. If int, square crop
            is made.
    """

    def __init__(self, output_size):
        assert isinstance(output_size, (int, tuple))
        if isinstance(output_size, int):
            self.output_size = (output_size, output_size)
        else:
            assert len(output_size) == 2
            self.output_size = output_size

    def __call__(self, sample):
        image, key_pts = sample['image'], sample['keypoints']

        h, w = image.shape[:2]
        new_h, new_w = self.output_size

        top = np.random.randint(0, h - new_h)
        left = np.random.randint(0, w - new_w)

        image = image[top: top + new_h,
                      left: left + new_w]

        key_pts = key_pts - [left, top]

        return {'image': image, 'keypoints': key_pts}


class ToTensor(object):
    """Convert ndarrays in sample to Tensors."""

    def __call__(self, sample):
        image, key_pts = sample['image'], sample['keypoints']

        # if image has no grayscale color channel, add one
        if(len(image.shape) == 2):
            # add that third color dim
            image = image.reshape(image.shape[0], image.shape[1], 1)

        # swap color axis because
        # numpy image: H x W x C
        # torch image: C X H X W
        image = image.transpose((2, 0, 1))

        return {'image': torch.from_numpy(image),
                'keypoints': torch.from_numpy(key_pts)}
对每次的转换,都要进行检查
# test out some of these transforms
rescale = Rescale(100)
crop = RandomCrop(50)
composed = transforms.Compose([Rescale(250),
                               RandomCrop(224)])
print(transforms.__file__)
# apply the transforms to a sample image
test_num = 500
sample = face_dataset[test_num]

fig = plt.figure()
for i, tx in enumerate([rescale, crop, composed]):
    transformed_sample = tx(sample)

    ax = plt.subplot(1, 3, i + 1)
    plt.tight_layout()
    ax.set_title(type(tx).__name__)
    show_keypoints(transformed_sample['image'], transformed_sample['keypoints'])

plt.show()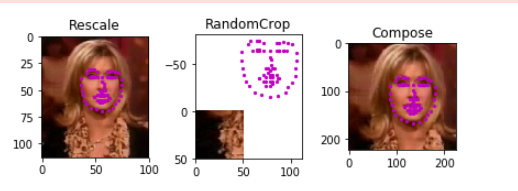
2.3构造训练数据
###构造数据转化
from torch.utils.data import Dataset, DataLoader
from torchvision import transforms, utils

# the dataset we created in Notebook 1 is copied in the helper file `data_load.py`
from data_load import FacialKeypointsDataset
# the transforms we defined in Notebook 1 are in the helper file `data_load.py`
from data_load import Rescale, RandomCrop, Normalize, ToTensor


## TODO: define the data_transform using transforms.Compose([all tx's, . , .])
# order matters! i.e. rescaling should come before a smaller crop
data_transform = transforms.Compose([
    Rescale(100),
    RandomCrop(96),
    Normalize(),
    ToTensor()
])

###读取数据
transformed_dataset = FacialKeypointsDataset(csv_file='/data/training_frames_keypoints.csv',
                                             root_dir='/data/training/',
                                             transform=data_transform)
 ###批处理并加载数据
train_loader = DataLoader(transformed_dataset,
                          batch_size=batch_size,
                          shuffle=True,
                          num_workers=0)
3.建模
import torch.nn.init as I


class Net(nn.Module):

    def __init__(self):
        super(Net, self).__init__()
        self.conv1 = nn.Conv2d(1, 32, 4)
        self.conv2 = nn.Conv2d(32, 64, 3)
        self.conv3 = nn.Conv2d(64, 128, 2)
        self.conv4 = nn.Conv2d(128, 256, 1)
        self.fc1 = nn.Linear(6400, 1000)
        self.fc2 = nn.Linear(1000, 1000)
        self.fc3 = nn.Linear(1000, 136)

    def forward(self, x):
        x = F.max_pool2d(F.elu(self.conv1(x)), (2,2))
        x = F.max_pool2d(F.elu(self.conv2(x)), (2,2))
        x = F.max_pool2d(F.elu(self.conv3(x)), (2,2))
        x = F.max_pool2d(F.elu(self.conv4(x)), (2,2))
        x = x.view(x.size(0),6400)
        x = F.elu(self.fc1(x))
        x = F.elu(self.fc2(x))
        x = self.fc3(x)

        return x
有一个小小的坑:
最开始的网络架构,输入为224,模型结构为conv1(-relu-maxpooling) --- conv2(-relu-maxpooling) --- conv3(-relu-maxpooling) --- conv4(-relu-maxpooling) --- conv5(-relu-maxpooling) --- fc1_2048(relu)--- fc2_1024(relu)--- fc3_512(relu)--- fc4_136(relu) 采用MSEloss,并且SGD进行优化。 我的模型比提供的论文中的模型更加复杂,并且模型的参数也更加多,但是实际上没有进行学习。然后修改学习率,不起效果。然后增加带momunt的SGD,还是不学习。此时个人感觉是模型的问题, 也就是我自己构建的模型,在配合不好的超参数,虽然模型参数很多,但是模型没有进行训练。
第二次,我认真阅读了论文,严格按照论文的模型搭建模型,按照论文的超参数训练模型,效果还不错。(当然,这个时候,我自动舍弃了dropout层,因为我想先训练模型,如果出现过拟合,在加入dropout层。但是实际上,我的模型拟合不严重,因此就没有在加入额外的层了。)
【所以,尽量在原有已经验证的不错的模型的基础上进行微调,从头造轮子,死的很惨】
4.训练
4.1直接使用原始模型直接进行预测,作为basemodel
# test the model on a batch of test images

def net_sample_output(loader):

    # iterate through the test dataset
    for i, sample in enumerate(loader):

        # get sample data: images and ground truth keypoints
        images = sample['image']
        key_pts = sample['keypoints']

        # convert images to FloatTensors
        images = images.type(torch.FloatTensor)

        # forward pass to get net output
        output_pts = net(images)

        # reshape to batch_size x 68 x 2 pts
        output_pts = output_pts.view(output_pts.size()[0], 68, -1)

        # break after first image is tested
        if i == 0:
            return images, output_pts, key_pts
为了可视化,此处需要进行去转换<主要去除关键点的归一化的影响>
 visualize the output
# by default this shows a batch of 10 images
def visualize_output(test_images, test_outputs, gt_pts=None, batch_size=10):

    for i in range(batch_size):
        plt.figure(figsize=(20,10))
        ax = plt.subplot(1, batch_size, i+1)

        # un-transform the image data
        image = test_images[i].data   # get the image from it's Variable wrapper
        image = image.numpy()   # convert to numpy array from a Tensor
        image = np.transpose(image, (1, 2, 0))   # transpose to go from torch to numpy image

        # un-transform the predicted key_pts data
        predicted_key_pts = test_outputs[i].data
        predicted_key_pts = predicted_key_pts.numpy()
        # undo normalization of keypoints
        predicted_key_pts = predicted_key_pts*48.0+48.0
        # plot ground truth points for comparison, if they exist
        ground_truth_pts = None
        if gt_pts is not None:
            ground_truth_pts = gt_pts[i]
            ground_truth_pts = ground_truth_pts*48.0+48.0

        # call show_all_keypoints
        show_all_keypoints(np.squeeze(image), predicted_key_pts, ground_truth_pts)

        plt.axis('off')

    plt.show()

# call it
visualize_output(test_images, test_outputs, gt_pts)
4.2训练
定义损失函数
## TODO: Define the loss and optimization
import torch.optim as optim

criterion = torch.nn.MSELoss()
optimizer = torch.optim.Adam(net.parameters(), lr =  0.001, betas = (0.9, 0.999))
定义训练流程:
def train_net(n_epochs):

    # prepare the net for training
    net.train()
    train_loss = []
    val_loss = []
    for epoch in range(n_epochs):  # loop over the dataset multiple times

        running_loss = 0.0
        # train on batches of data, assumes you already have train_loader
        for batch_i, data in enumerate(train_loader):
            # get the input images and their corresponding labels
            images = data['image']
            key_pts = data['keypoints']

            # flatten pts
            key_pts = key_pts.view(key_pts.size(0), -1)
            # convert variables to floats for regression loss
            key_pts = key_pts.type(torch.FloatTensor)
            images = images.type(torch.FloatTensor)
            # forward pass to get outputs
            output_pts = net(images)
            # calculate the loss between predicted and target keypoints
            loss = criterion(output_pts, key_pts)
            # zero the parameter (weight) gradients
            optimizer.zero_grad()

            # backward pass to calculate the weight gradients
            loss.backward()
            #print('weight:', net.conv1.weight.grad[0])
            # update the weights
            optimizer.step()

            # print loss statistics
            running_loss += loss.item()
            if batch_i % 10 == 9:    # print every 10 batches
                print('train--Epoch: {}, Batch: {}, Avg. Loss: {}'.format(epoch + 1, batch_i+1, running_loss/10))
                train_loss.append(running_loss/10)
                running_loss = 0.0
#                     if batch_i % 10 == 9:
#                         print('train--Epoch: {}, Batch: {}, Avg. Loss: {}'.format(epoch + 1, batch_i+1, running_loss/10))

        running_loss = 0.0
        for batch_i, data in enumerate(test_loader):
            # get the input images and their corresponding labels
            images = data['image']
            key_pts = data['keypoints']

            # flatten pts
            key_pts = key_pts.view(key_pts.size(0), -1)
            # convert variables to floats for regression loss
            key_pts = key_pts.type(torch.FloatTensor)
            images = images.type(torch.FloatTensor)
            # forward pass to get outputs
            output_pts = net(images)
            # calculate the loss between predicted and target keypoints
            loss = criterion(output_pts, key_pts)
            running_loss += loss.item()
            if batch_i % 10 == 9:    # print every 10 batches
                print('test--Epoch: {}, Batch: {}, Avg. Loss: {}'.format(epoch + 1, batch_i+1, running_loss/10))
                val_loss.append(running_loss/10)
                running_loss = 0.0

    print('Finished Training')
    return (train_loss,val_loss)
4.3关于batch_size的影响
我先使用epoch为1大致粗略调试模型,当模型稳定之后,然后增加epoch进行训练。
当batch_size为10时,模型的训练损失波动太大,几乎看不出趋势,于是增加batchsize为64.
4.4特征可视化

4.5特征映射
每个CNN至少包含一个由堆叠滤波器(也称为卷积核)组成的卷积层。CNN在进行训练时,它要学习在卷积内核中包含哪些权重,当这些内核应用于某些输入图像时,它们会产生一组特征映射。因此,特征映射只是过滤图像的集合,它们是通过将卷积核应用于输入图像而产生的图像。这些映射向我们展示了神经网络不同层学习提取的特征。例如,你可以想象一个卷积内核,它可以检测到脸部的垂直边缘,而另一个可以检测到眼角的边缘。通过将这些内核应用于图像,你可以看到每个内核检测到了哪些特征。具体请看以下示例,从它在图像中显示线条的方式,你可以将其表征为边缘检测滤波。

5.应用
5.1检测人脸
选择一张图像。要想检测到所选图像中的所有人脸,接下来,你要用到的是OpenCV预先训练的一个Haar级联分类器,所有这些分类器都可以在detector_architectures/目录中找到。
在下面的代码中,我们要遍历原始图像中的每个人脸,并在原始图像的副本中的每个人脸上绘制一个红色正方形,而原始图像不需要修改。此外,你也可以 新增一项眼睛检测 ,作为使用Haar检测器的一个可选练习。

5.2检测关键点
import torch
from models import Net

net = Net()

## TODO: load the best saved model parameters (by your path name)
## You'll need to un-comment the line below and add the correct name for *your* saved model
net.load_state_dict(torch.load('saved_models/keypoints_model_1.pt'))

## print out your net and prepare it for testing (uncomment the line below)
net.eval()
此处对原始图像检测的人脸图像进行了外扩,为了适应训练集和验证集的区别
【完毕】


 1125
1125


 被折叠的 条评论
为什么被折叠?
被折叠的 条评论
为什么被折叠?
 到【灌水乐园】发言


