


Voxposer
sudo apt-get update
sudo apt update
然后git clone VoxPoser:
git clone https://github.com/huangwl18/VoxPoser.git
这一步把requirements.txt拿到。然后在这个路径下:
pip install -r requirements.txt
装完该装的依赖。
装anaconda3。稳定指路:Ubuntu中使用conda的详细教程-百度开发者中心 (baidu.com)
conda create -n voxposer-env python=3.9
conda activate voxposer-env  #激活voxposer-env环境,这个是以后我们所需要的环境
如果路遇缺少numpy、pandas依赖的情况:
pip install numpy pandas
然后重新执行对应的命令。
RLBench
1. Install
# set env variables(设置环境变量。务必设置好,最好一个窗口做下来)
export COPPELIASIM_ROOT=${HOME}/CoppeliaSim
export LD_LIBRARY_PATH=$LD_LIBRARY_PATH:$COPPELIASIM_ROOT
export QT_QPA_PLATFORM_PLUGIN_PATH=$COPPELIASIM_ROOT

wget https://downloads.coppeliarobotics.com/V4_1_0/CoppeliaSim_Edu_V4_1_0_Ubuntu20_04.tar.xz
mkdir -p $COPPELIASIM_ROOT && tar -xf CoppeliaSim_Edu_V4_1_0_Ubuntu20_04.tar.xz -C $COPPELIASIM_ROOT --strip-components 1
rm -rf CoppeliaSim_Edu_V4_1_0_Ubuntu20_04.tar.xz
2. To install the RLBench python package:
pip install git+https://github.com/stepjam/RLBench.git
遇到的问题(已解决)
mkdir -p $COPPELIASIM_ROOT && tar -xf CoppeliaSim_Edu_V4_1_0_Ubuntu20_04.tar.xz -C $COPPELIASIM_ROOT --strip-components 1
xz: (stdin): Compressed data is corrupt
tar: Unexpected EOF in archive
tar: Unexpected EOF in archive
tar: Error is not recoverable: exiting now
上述报错是解压出错。可能是因为下载时出错,比如说没有下完整,或者引用了下载错误的copperliarrobotics包。
我正常跑完第四条命令就没事了。
error: subprocess-exited-with-error

  × python setup.py egg_info did not run successfully.
  │ exit code: 1
  ╰─> [8 lines of output]
      Traceback (most recent call last):
        File "<string>", line 2, in <module>
        File "<pip-setuptools-caller>", line 34, in <module>
        File "/tmp/pip-install-hjlgg77b/pyrep_7f3848fba37e4c4f94b9afe37551c3a3/setup.py", line 8, in <module>
          import cffi_build.cffi_build as cffi_build
        File "/tmp/pip-install-hjlgg77b/pyrep_7f3848fba37e4c4f94b9afe37551c3a3/cffi_build/cffi_build.py", line 9, in <module>
          raise RuntimeError('COPPELIASIM_ROOT not defined.')
      RuntimeError: COPPELIASIM_ROOT not defined.
      [end of output]

  note: This error originates from a subprocess, and is likely not a problem with pip.
error: metadata-generation-failed

× Encountered error while generating package metadata.
╰─> See above for output.
本来想的是同步把第二步python包也下载好了,但是这里报错:COPPELIASIM_ROOT not defined.证明之前的环境变量没有设置好。
所以还是等第一步的六行命令跑完再做吧。
error: RPC failed; curl 92 HTTP/2 stream 0 was not closed cleanly: CANCEL (err 8)
  fatal: the remote end hung up unexpectedly
  fatal: early EOF
  fatal: index-pack failed
  warning: Clone succeeded, but checkout failed.
  You can inspect what was checked out with 'git status'
  and retry with 'git restore --source=HEAD :/'

  error: subprocess-exited-with-error

  × git clone --filter=blob:none --quiet https://github.com/stepjam/PyRep.git /tmp/pip-install-kzt4h3p1/pyrep_18d83169513a4afa922b50246f302c15 did not run successfully.
  │ exit code: 128
  ╰─> See above for output.

  note: This error originates from a subprocess, and is likely not a problem with pip.
error: subprocess-exited-with-error

× git clone --filter=blob:none --quiet https://github.com/stepjam/PyRep.git /tmp/pip-install-kzt4h3p1/pyrep_18d83169513a4afa922b50246f302c15 did not run successfully.
│ exit code: 128
╰─> See above for output.

note: This error originates from a subprocess, and is likely not a problem with pip.
换个方法,解决git clone不成功的问题。把Pyrep和rlbench全部手动在win上下载,然后文件传输助手过去。或者邮箱超大附件(最后用的邮箱)
先改环境变量:
sudo gedit ~/.bashrc
# 在文件末尾添加这些行(如果之前没添加上的话)

export COPPELIASIM_ROOT=${HOME}/CoppeliaSim
export LD_LIBRARY_PATH=$LD_LIBRARY_PATH:$COPPELIASIM_ROOT
export QT_QPA_PLATFORM_PLUGIN_PATH=$COPPELIASIM_ROOT
一定要保存!
安装两个包(也可以先找到你把包解压到的路径直接开虚拟环境pip install -e.):
conda activate voxposer-env
cd PyRep
pip install -e.
cd RLBench
pip install -e.
# 这一步仍然需要用到git clone,请准备好合适的环境
4.No module named ‘openai.error’
把/src/LMP的头文件改一下,openai.error去掉.error。这个报错的原因是openai在新版本中已经取消了.error包。亲测只需要改这一行头文件,下面不用改,因为没有以openai.error.APIconnector这样的形式写的语句。
5.安装完rlbench之后找不到这个模块
执行conda list发现是完好的。没有进错虚拟环境。尝试重启虚拟机,成功。github有同样的issue未解决,已添加回复。
6.http handshake server disabled
这不是问题,是正常的。
7.setup启动时进程死亡,报错failed to load driver: vmwgfx等
libGL error: MESA-LOADER: failed to open vmwgfx: /usr/lib/dri/vmwgfx_dri.so: cannot open shared object file: No such file or directory (search paths /usr/lib/x86_64-linux-gnu/dri:\$${ORIGIN}/dri:/usr/lib/dri, suffix _dri)
libGL error: failed to load driver: vmwgfx
libGL error: MESA-LOADER: failed to open vmwgfx: /usr/lib/dri/vmwgfx_dri.so: cannot open shared object file: No such file or directory (search paths /usr/lib/x86_64-linux-gnu/dri:\$${ORIGIN}/dri:/usr/lib/dri, suffix _dri)
libGL error: failed to load driver: vmwgfx
libGL error: MESA-LOADER: failed to open swrast: /usr/lib/dri/swrast_dri.so: cannot open shared object file: No such file or directory (search paths /usr/lib/x86_64-linux-gnu/dri:\$${ORIGIN}/dri:/usr/lib/dri, suffix _dri)
libGL error: failed to load driver: swrast
已经可以看到应用图标。但是依然死亡。在网上搜寻相关问题,和mesa相关,推测是ubuntu自带nvidia驱动出了问题。一个解决方案是
Try:
sudo apt install --reinstall libgl1-mesa-dri
Uninstalling NVIDIA drivers provided by Ubuntu
Installing NVIDIA drivers from its website (warning: in rare cases the installer leaves your system in a state where it won't boot to a GUI, make sure you have SSH access so you can restore it to a working state like e.g. running ./installer --uninstall.
By default Ubuntu’s package enables NVIDIA drivers and disables or breaks the Mesa ones; while the official installer keeps Mesa working alongside NVIDIA drivers. This can lead to very different results in use cases like yours.
或最下面的一个回答,指路:nvidia - Ubuntu 20.04 libGL error: failed to load driver: swrast - Ask Ubuntu
按最下面的一篇回答,先执行
sudo apt-get update
再执行其他命令。
执行完所有命令后重启ubuntu,无果。
另一篇国人的解决方案指路:[已解决] libGL error: MESA-LOADER: failed to open swrast_libgl error: mesa-loader: failed to open swrast:-CSDN博客
这是用的软连接的思路。我这里尝试,无果。
慢慢看,找到这一篇issue。指路:Unable to load folders for labeling in napari-dlc · Issue #2338 · DeepLabCut/DeepLabCut · GitHub
亲测成功,推测是ubuntu上没有装好Nvidia驱动的问题。
CUDA:
sudo apt update
wget https://developer.download.nvidia.com/compute/cuda/11.8.0/local_installers/cuda_11.8.0_520.61.05_linux.run --no-check-certificate
sudo sh cuda_11.8.0_520.61.05_linux.run --toolkit --silent --override
export PATH=/usr/local/cuda-11.8/bin${PATH:+:${PATH}}
export LD_LIBRARY_PATH=/usr/local/cuda-11.8/lib64${LD_LIBRARY_PATH:+:${LD_LIBRARY_PATH}}
上两步也可以gedit环境变量。
source ~/.bashrc
CUDNN:
先去这里:https://developer.nvidia.com/rdp/cudnn-archive
需要注册英伟达账号,按提示搞完就行

选对版本。此处用8.7.0,cuda11
cd ~/Downloads
sudo dpkg -i cudnn-local-repo-ubuntu2004-8.7.0.84_1.0-1_amd64.deb
sudo cp /var/cudnn-local-repo-<em>/cudnn-local-</em>-keyring.gpg /usr/share/keyrings/
sudo apt-get update
sudo apt-get install libcudnn8=8.7.0.84-1+cuda11.8
sudo apt-get install libcudnn8-dev=8.7.0.84-1+cuda11.8
sudo apt-get install libcudnn8-samples=8.7.0.84-1+cuda11.8
第三行需要GPGkey,按提示来:

如图示把这条sudo cp …粘贴上去执行就行
接着重启虚拟机。
sudo reboot
# 先进入voxposer-env
pip install "deeplabcut[gui,tf]"
conda install -c conda-forge cudatoolkit=11.8.0
python3 -m pip install nvidia-cudnn-cu11==8.6.0.163 -i https://pypi.tuna.tsinghua.edu.cn/simple/
pip install tensorrt --no-cache-dir
cd $CONDA_PREFIX/lib/python3.9/site-packages/tensorrt_libs
ln -s libnvinfer.so.8 libnvinfer.so.7
ln -s libnvinfer_plugin.so.8 libnvinfer_plugin.so.7
mkdir -p $CONDA_PREFIX/etc/conda/activate.d
echo 'CUDNN_PATH=$(dirname  $(python -c "import nvidia.cudnn;print(nvidia.cudnn.__file__)"))' >> $CONDA_PREFIX/etc/conda/activate.d/env_vars.sh
echo 'export LD_LIBRARY_PATH=$LD_LIBRARY_PATH:$CONDA_PREFIX/lib/:$CUDNN_PATH/lib' >> $CONDA_PREFIX/etc/conda/activate.d/env_vars.sh
echo 'export LD_LIBRARY_PATH=$LD_LIBRARY_PATH:$CONDA_PREFIX/lib/python3.8/site-packages/tensorrt_libs' >> $CONDA_PREFIX/etc/conda/activate.d/env_vars.sh
mkdir -p $CONDA_PREFIX/etc/conda/deactivate.d
echo 'unset LD_LIBRARY_PATH' >> $CONDA_PREFIX/etc/conda/deactivate.d/env_vars.sh
source $CONDA_PREFIX/etc/conda/activate.d/env_vars.sh
- cd $CONDA_PREFIX/lib
- mv libffi.so.7 libffi.so.7.bak
- mv libffi.7.so libffi.7.so.bak
setup步骤终于搞定!
8.接口类型不匹配导致错误
在执行最后一步命令的时候,发现LMP写的有问题,问题出在代码所依赖的openai版本较低,有两种解决方案:重写api接口或将openai的版本降到0.28.0。
我选择将openai的版本降到0.28.0,将LMP.py恢复原样。但遇到如下报错:
ServiceUnavailableError Traceback (most recent call last)
Cell In[4], line 2
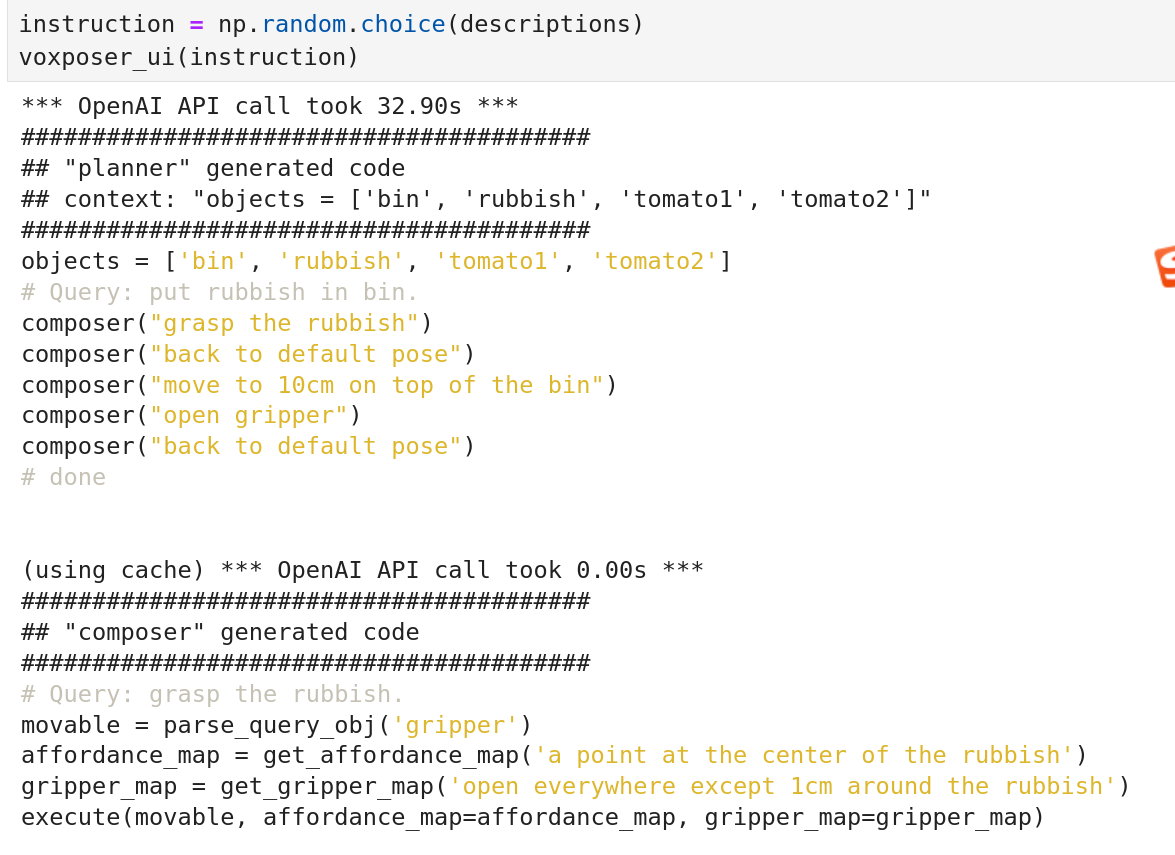
1 instruction = np.random.choice(descriptions)
----> 2 voxposer_ui(instruction)
File ~/VoxPoser-main/src/LMP.py:98, in LMP.__call__(self, query, **kwargs)
96 while True:
97 try:
---> 98 code_str = self._cached_api_call(
99 prompt=prompt,
100 stop=self._stop_tokens,
101 temperature=self._cfg['temperature'],
102 model=self._cfg['model'],
103 max_tokens=self._cfg['max_tokens']
104 )
105 break
106 except (RateLimitError, APIConnectionError) as e:
File ~/VoxPoser-main/src/LMP.py:78, in LMP._cached_api_call(self, **kwargs)
76 return self._cache[kwargs]
77 else:
---> 78 ret = openai.ChatCompletion.create(**kwargs)['choices'][0]['message']['content']
79 # post processing
80 ret = ret.replace('```', '').replace('python', '').strip()
File ~/anaconda3/envs/voxposer-env/lib/python3.9/site-packages/openai/api_resources/chat_completion.py:25, in ChatCompletion.create(cls, *args, **kwargs)
23 while True:
24 try:
---> 25 return super().create(*args, **kwargs)
26 except TryAgain as e:
27 if timeout is not None and time.time() > start + timeout:
File ~/anaconda3/envs/voxposer-env/lib/python3.9/site-packages/openai/api_resources/abstract/engine_api_resource.py:153, in EngineAPIResource.create(cls, api_key, api_base, api_type, request_id, api_version, organization, **params)
127 @classmethod
128 def create(
129 cls,
(...)
136 **params,
137 ):
138 (
139 deployment_id,
140 engine,
(...)
150 api_key, api_base, api_type, api_version, organization, **params
151 )
--> 153 response, _, api_key = requestor.request(
154 "post",
155 url,
156 params=params,
157 headers=headers,
158 stream=stream,
159 request_id=request_id,
160 request_timeout=request_timeout,
161 )
163 if stream:
164 # must be an iterator
165 assert not isinstance(response, OpenAIResponse)
File ~/anaconda3/envs/voxposer-env/lib/python3.9/site-packages/openai/api_requestor.py:298, in APIRequestor.request(self, method, url, params, headers, files, stream, request_id, request_timeout)
277 def request(
278 self,
279 method,
(...)
286 request_timeout: Optional[Union[float, Tuple[float, float]]] = None,
287 ) -> Tuple[Union[OpenAIResponse, Iterator[OpenAIResponse]], bool, str]:
288 result = self.request_raw(
289 method.lower(),
290 url,
(...)
296 request_timeout=request_timeout,
297 )
--> 298 resp, got_stream = self._interpret_response(result, stream)
299 return resp, got_stream, self.api_key
File ~/anaconda3/envs/voxposer-env/lib/python3.9/site-packages/openai/api_requestor.py:700, in APIRequestor._interpret_response(self, result, stream)
692 return (
693 self._interpret_response_line(
694 line, result.status_code, result.headers, stream=True
695 )
696 for line in parse_stream(result.iter_lines())
697 ), True
698 else:
699 return (
--> 700 self._interpret_response_line(
701 result.content.decode("utf-8"),
702 result.status_code,
703 result.headers,
704 stream=False,
705 ),
706 False,
707 )
File ~/anaconda3/envs/voxposer-env/lib/python3.9/site-packages/openai/api_requestor.py:745, in APIRequestor._interpret_response_line(self, rbody, rcode, rheaders, stream)
742 return OpenAIResponse(None, rheaders)
744 if rcode == 503:
--> 745 raise error.ServiceUnavailableError(
746 "The server is overloaded or not ready yet.",
747 rbody,
748 rcode,
749 headers=rheaders,
750 )
751 try:
752 if 'text/plain' in rheaders.get('Content-Type', ''):
ServiceUnavailableError: The server is overloaded or not ready yet.
问题出在api key选了3.5。模型应该指定“gpt-3.5-turbo”或支持4的接口。换用4接口之后,完美运行。


 2096
2096


 被折叠的 条评论
为什么被折叠?
被折叠的 条评论
为什么被折叠?
 到【灌水乐园】发言


