Fixing Texture Seams in zBrush and Photoshop
原文地址:http://landimation.blogspot.com/2011/02/fixing-texture-seams-in-zbrush-and.html
大家好,我是笨笨,笨笨的笨,笨笨的笨,谢谢!水平有限,如有疏漏望海涵,如有译者注会用红色。
我靠后正式开始:
我靠我靠我靠我靠我靠我靠我靠我靠我靠我靠我靠我靠我靠我靠我靠我靠我靠我靠我靠我靠我靠我靠我靠我靠
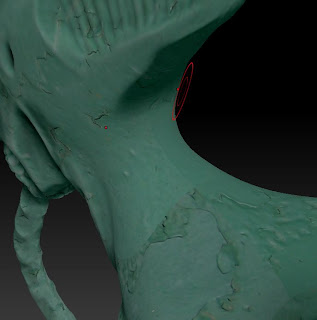
This is a quick little way of fixing texture seams with only using Photoshop and zBrush. It's pretty simple, but that's the beauty of it. I still love working in photoshop for texturing.
这是一个快捷的小技巧,用Photoshop + zBrush的zApplink插件
修复贴图接缝。这招的好处就在于它超简单。我仍然喜欢在Photoshop中做处理贴图的工作。
So, the problem is that after exporting an AO map and bringing it into PS and adding a basic texture over the whole image, there is a visible seam. Now there are multiple ways of fixing this:
- Convert the texture to polypaint and fix the seam using standard brushes and spotlight. This is a good option, but if you don't have enough polygons, you will be losing resolution on your image
- Use PS to manually 'fade' the edges. This is also a valid approach, but can be confusing if you are working with multiple UV islands.
- Use zApplink to bring a screengrab of your tool and fix it there.
问题是这样的,当我创建了AO贴图,并且导入PS中加入了基本的材质,这时发现我靠,有缝!现在有多种方法来处理:
1、(在ZB中)把贴图转成polypaint用标准笔刷在spotlight模式中来修复接缝。这是一个好办法,但如果你没有足够的细分,你的贴图会丢失精度。
2、用 PS 手工处理接缝的边。这也是可以的,但是如果你的UV是N多块那种,你会晕的。
3、使用ZBrush中的zApplink 与把屏幕抓取下来,发送到你的图片编辑工具中去修复它。
I'm going to be using the 3rd option because I find it to be the most intuitive for someone like me. SoFirst align your tool so you can clearly see the seam you want to fix. Then go into document ->zAppLink. If you have photoshop it should use it by default, but you can connect other image editors as well.
我选用第三个方法,因为我发现对于我来说这招最直观。
首先让你要修复的接缝清晰的对着自己,然后去菜单document ->zAppLink。如果你有 photoshop 默认会使用它来编辑,当然你也可以连接到别的图片编辑软件。
Second, PS will open a screen grab of the document.
第二:ZB中的屏幕截图将在PS中打开
Here, I disable the ZShading layer by toggling the viability on that layer. Do NOT edit or delete this layer.
这里,我过转换ZShading层的viability,disable它。不要编辑或删除这层(没搞懂作者调了什么,但意思就是以此达到不编辑ZShading层的目的)
Next, I used the clone stamp to quickly cover the seams. At this point you can do anything you would normally do in photoshop. Just make sure you merge everything back to 'layer 1' when you are finished. If you need more resolution to work with, you can upscale your document in zBrushbefore using zAppLink.
接下来,我用克隆图章工具快速的修好接缝。在这个阶段,你可以执行任何的常规操作。只要确保完成之后,把所有中途添加的层都合并到 layer 1。如果你想要更高的截图分辨率,你应该在zAppLink前在ZB中加大你的document
Then, you Save your document and return to zBrush. It should confront you with a dialog box asking you to 'pick up' the tool.
然后,你保存PS,并回到ZB中去。ZB将显示一个对话框问你是不是要"pick up"接受刚才的处理.
Let it calculate, depending on your computer and your object, this may take a little while. But after that, it should have made your changes. Repeat as necessary. Remember to clone and export this new texture, it didn't actually make any changes to the source file, only the texture buffer in zBrush
让它去运算吧,这取决于你的电脑配置和模型的精度,可能要花一点时间。然后你刚才在PS做的处理会被应用到贴图上。如果有必要,可以重复上面的操作继续完善。记得克隆并导出贴图,因为刚才的操作并不是在你的源贴图上,而是ZB的临时内存数据中进行的。
| Low poly rendered in Marmoset Toolbag, Normal map only 低模 + 法线贴图 在 Marmoset工具包 中的渲染效果 |
Now, this is not as powerful as some of the built in tools of other more dedicated programs like Bodypaint; but it can be just as versatile. The main downside is you cannot rotate your object in PS while texturing, causing more pauses inbetween.
与那些专用软件内置功用相当,这招不是很强大。比如Bodypaint。但是它简便通用,不过最大的缺点在于,你不能在PS里直接转动模型,导致要传来传去。
| Low Poly with old texture 低模 + 旧的贴图 |
But you can also use this technique to fix normal map seams, by simply loading the exported Normal map into the texture slot in zBrush, and repeating the same process.
但你也可以使用这个技巧来修法线贴图,通过简单的把法线贴图贴到ZB的texture中,然后重复上面的过程。
| Low poly with new texture 低模 + 新贴图 |
Hope this helps!
希望能有用!


 1149
1149

 被折叠的 条评论
为什么被折叠?


