1.卷积神经网络构成(CNN)
卷积神经网络主要由卷积层和pooling层组成。
(1)卷积层
在CNN中的卷积层和普通神经网络的区别:
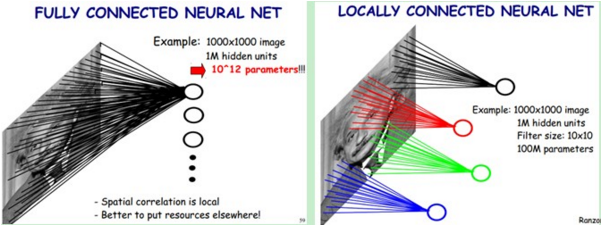
根据生物学上动物视觉上识别事物是通过局部感知野的启发,普通神经网络是下一层的神经元与本层神经元之间是全链接的,而卷积神经网络的下一层神经元只与本层的部分神经元之间有链接。
如下图所示

这样能够极大的减少链接数,即极大的减少网络的参数。
由于图像的不变形,即图像中任意区域的统计特性都是相似的特点,我们用同一个模板对图像进行卷积得到的结果即为该卷积模板对整幅图像的提取特征。因此最终我们训练需要的参数只有模板大小(若模板为10*10,且卷积模板只有一个时,则该层只需要100个参数)
(2)Down-pooling层
该层又被称作池化操作、下采样层。
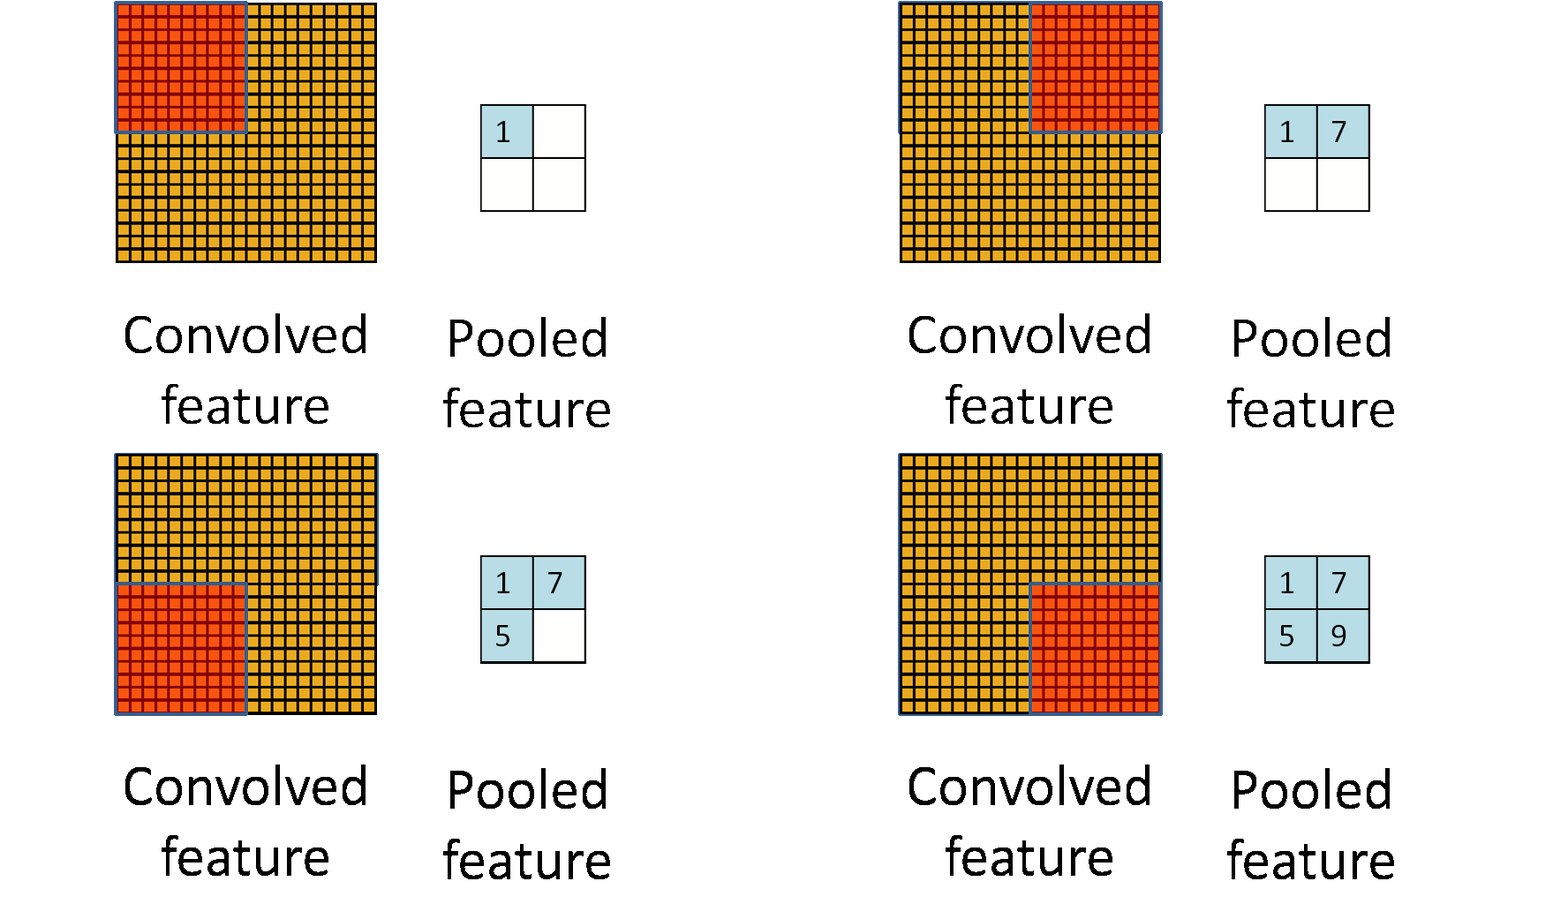
由于模板(即卷积核)在图像上进行平移,由于步长(stride)不会特别大,因此卷积得到的结果仍然会有很多的冗余,因此需要进行pooling操作,pooling操作的形式化表示如下图所示:
2.Tensorflow实现mnist手写体识别算法
具体分析已经写在代码注释中。
下面是训练的代码:
#coding=utf-8
'''
Created on 2016-5-17
训练了一个卷积神经网络,用以识别mnist数据库
batch_size为50,循环运行共2000个batch,最终训练集上测试正确率在90%
@author: hanchao
'''

import input_data
mnist = input_data.read_data_sets('/home/hanchao/mnist', one_hot = True)

import tensorflow as tf

image_size = 784 #28*28
class_num = 10# 0~10

#共训练100000次
total_step = 100000
#每隔10×batch_size步显示一次结果
display_step = 10
#学习率
learning_rate = 0.01
#每次找出50张图片进行训练
batch_size = 50

#image的placeholder
x = tf.placeholder(tf.float32, [None,image_size])
#label的placeholder
y = tf.placeholder(tf.float32, [None,class_num])
#dropout的placeholder
dropoutP = tf.placeholder(tf.float32)

#卷积层定义
def conv2d(image_input,w,b,name):
    return tf.nn.relu(tf.nn.bias_add(tf.nn.conv2d(image_input, w, strides=[1, 1, 1, 1], padding='SAME'),b), name=name)

#下采样层定义
def pooling(featuremaps,kernel_size,name):
    return tf.nn.max_pool(featuremaps, [1,kernel_size,kernel_size,1], [1,kernel_size,kernel_size,1], padding='SAME')

#归一化操作
def normlize(featuremaps,l_size,name):
    return tf.nn.lrn(featuremaps, 4, bias=1, alpha=0.0001, beta=0.75)

#初始化参数
weights = {
           #[3,3,1,64]分别代表3*3*1的kernel,输入层有1个feature maps,输出层共64个feature maps
           'wc1' : tf.Variable(tf.random_normal([3,3,1,64])),
           #[3,3,64,128]分别代表3*3*64的kernel,输入层有64个feature maps,输出层有128个feature maps
           'wc2' : tf.Variable(tf.random_normal([3,3,64,128])),
           'wc3' : tf.Variable(tf.random_normal([3,3,128,256])),
           'wc4' : tf.Variable(tf.random_normal([2,2,256,512])),
           #全连接层的参数个数设定的原则好像是经过卷积层运算以后feature map的大小并没有发生改变
           #发生改变的原因都是pooling层28/2/2/2/2 = 2(7/2可能是为4)
           'wd1' : tf.Variable(tf.random_normal([2*2*512,1024])),
           'wd2' : tf.Variable(tf.random_normal([1024,1024])),
           'out' : tf.Variable(tf.random_normal([1024,10]))
           }
#初始化偏置项
biases = {
          'bc1' : tf.Variable(tf.random_normal([64])),
          'bc2' : tf.Variable(tf.random_normal([128])),
          'bc3' : tf.Variable(tf.random_normal([256])),
          'bc4' : tf.Variable(tf.random_normal([512])),
          'bd1' : tf.Variable(tf.random_normal([1024])),
          'bd2' : tf.Variable(tf.random_normal([1024])),
          'out' : tf.Variable(tf.random_normal([10]))
          }
#构建网络
def constructNet(images,weights,biases,_dropout):
    #首先把图片转为28*28*1的tensor
    images = tf.reshape(images,[-1,28,28,1])

    #第一个卷积层conv1
    conv1 = conv2d(images, weights['wc1'], biases['bc1'], 'conv1')
    print 'conv1: ',conv1.get_shape()
    #卷积层conv1对应下采样层
    pool1 = pooling(conv1, 2, 'pool1')
    print 'pool1: ',pool1.get_shape()
    #归一化
    norm1 = normlize(pool1, l_size=4, name='norm1')
    dropout1 = tf.nn.dropout(norm1, _dropout)

    #第二个卷积层
    conv2 = conv2d(dropout1,weights['wc2'],biases['bc2'],'conv2')
    print 'conv2: ',conv2.get_shape()
    pool2 = pooling(conv2, 2, 'pool2')
    print 'pool2: ',pool2.get_shape()
    norm2 = normlize(pool2, 4, 'norm2')
    dropout2 = tf.nn.dropout(norm2,_dropout)

    #第三个卷积层
    conv3 = conv2d(dropout2, weights['wc3'], biases['bc3'], 'conv3')
    print 'conv3: ',conv3.get_shape()
    pool3 = pooling(conv3, 2, 'pool3')
    print 'pool3: ',pool3.get_shape()
    norm3 = normlize(pool3, 4, 'norm3')
    dropout3 = tf.nn.dropout(norm3,_dropout)

    #第四个卷积层
    conv4 = conv2d(dropout3,weights['wc4'],biases['bc4'],'conv4')
    print 'conv4: ',conv4.get_shape()
    pool4 = pooling(conv4, 2, 'pool4')
    print 'pool4: ',pool4.get_shape()
    norm4 = normlize(pool4, 4, 'norm4')
    print 'norm4: ',norm4.get_shape()
    #全链接层1
    dense1 = tf.reshape(norm4, [-1,weights['wd1'].get_shape().as_list()[0]])
    dense1 = tf.nn.relu(tf.matmul(dense1,weights['wd1']) + biases['bd1'],'fc1')
    #全链接层2
    dense2 = tf.nn.relu(tf.matmul(dense1,weights['wd2']) + biases['bd2'],'fc2')
    #输出层,最后输出层不需要激活函数relu操作
    out = tf.matmul(dense2,weights['out']) + biases['out']
    return out

pred = constructNet(x, weights, biases, dropoutP)
#计算loss
loss = tf.reduce_mean(tf.nn.softmax_cross_entropy_with_logits(pred, y))
#定义操作,用以最小化loss(Adam是一种梯度下降算法)
optimizer = tf.train.AdamOptimizer(learning_rate=learning_rate).minimize(loss)

#tf.arg_max(pred,1)是按行取最大值的下标
#tf.arg_max(y,1)是按列取最大值的下标
correct_pred = tf.equal(tf.arg_max(pred,1), tf.arg_max(y,1))
#先将correct_pred中数据格式转换为float32类型
#求correct_pred中的平均值,因为correct_pred中除了0就是1,因此求平均值即为1的所占比例,即正确率
correct_rate = tf.reduce_mean(tf.cast(correct_pred, tf.float32))

init = tf.initialize_all_variables()
saver = tf.train.Saver()

with tf.Session() as sess:
    sess.run(init)
    step = 1
    while step*batch_size < total_step:
        batchx,batchy = mnist.train.next_batch(batch_size)
        sess.run(optimizer,feed_dict={x:batchx,y:batchy,dropoutP:0.75})
        if(step % display_step == 0):
            accracy = sess.run(correct_rate,feed_dict={x:batchx,y:batchy,dropoutP:1.})
            cost = sess.run(loss,feed_dict={x:batchx,y:batchy,dropoutP:1.})
            print 'Step: ' + str(step*batch_size) + ' cost: ' + str(cost) + ' accracy: ' + str(accracy)
            #保存当前网络的参数,以便测试时读取训练结果
            saver.save(sess, '/home/hanchao/hanchaoNet.netmodel',step)

        step += 1
    print 'train Finished'
下面是测试部分的代码:
#coding=utf-8
'''
Created on 2016-5-17
在上面训练的网络基础上在测试集上进行测试,提取前100个测试图片,正确率在95%
@author: hanchao
'''
import input_data
mnist = input_data.read_data_sets('/home/hanchao/mnist', one_hot=True)

import tensorflow as tf

#构建网络部分,与训练过程构建网络部分相同
……………
#构建网络部分,与训练过程构建网络部分相同
#可以直接导入train中的函数进行使用

saver = tf.train.Saver()

with tf.Session() as sess:
    #读取上面训练好的模型参数
    saver.restore(sess, '/home/hanchao/hanchaoNet.netmodel-1990')
    print 'Testing accary: ',sess.run(correct_rate,feed_dict={x:mnist.test.images[:100],y:mnist.test.labels[:100],dropoutP:1.})


 1万+
1万+

 被折叠的 条评论
为什么被折叠?


