


(转载请注明出处)
一、搭建基于pybullet的gym环境
1.1 基本文件结构
My_Robot_Gym/
    setup.py
    __init__.py              (for register)
    my_robot_gym/
        assets/              (for storing robot model, etc.)
            robot.urdf
        rl_envs/
            __init__.py
            my_robot_gym.py  (for gym env customization python interface)
        robots/
            robot_arm.py     (for loading robot model from assets)
            robot_utils.py   (for basic funcs like frame transformation)
            ur5.py           (for specific robot funcs)
主要分为三个文件夹:
-
assets:存放机器人、工具等模型(文件类型有urdf, sdf, mjdf等)。
-
rl_envs:存放构建gym环境的文件,接口将被算法部分的调用(stable baselines 3)。
-
robots:存放构建机器人接口的文件(包括loading urdf, frame transformation methods, etc.),接口将在构建gym环境时被用到(rl_envs)。
1.2 基本代码
-
my_robot_gym/__init__.py
在my_robot_gym/__init__.py添加以下代码,进行环境的注册。随后当我们导入该包的时候(import my_robot_gym),该文件被执行,此时我们的环境被加入到Gym的registry中,使得我们可以通过标准函数gym.make()来构建我们的自定义环境。
from gym.envs.registration import register
register(
    id='MyRobotEnv-v0',
    entry_point='my_robot_env.rl_envs.my_robot_env:MyRobotGym',
)
在my_robot_gym/rl_envs/__init__.py加入:
from my_robot_gym.rl_envs.my_robot_gym import MyRobotGym1.3 gym环境主要文件 my_robot_gym.py
该文件是构建gym环境的主要文件,因此需要遵循gym的接口标准,其中最普遍用到的是以下三个methods(引用自pybullet wordpress):
-
reset(): called at the beginning of an episode, it returns an observation
-
step(action): called to take an action with the environment, it returns the next observation, the immediate reward, whether the episode is over and additional information
-
render(): which allow to visualize the agent in action. Note that graphical interface does not work on google colab, so we cannot use it directly (we have to rely on `method='rbg_array'` to retrieve an image of the scene
在我们的my_robot_gym/rl_envs/my_robot_gym.py中加入以下代码框架
import gym
import pybullet as pb
import arms.robot
import assets

class MyRobotGym(gym.Env):

    def __init__(self):
        pass

    def connect_pybullet(self):
        pass

    def step(self, action):
        pass

    def reset(self):
        pass

    def render(self):
        pass

    def close(self):
        pass

    def seed(self, seed=None):
        pass
在其中的connect_pybullet函数中加入以下
self._pb = bc.BulletClient(connection_mode=pb.DIRECT)
bc.BulletClient函数类似于pybullet.connect函数,可以返回一个对象,该对象可以关联我们利用pybullet所构建的物理虚拟环境(即上述的robot.py)。因为我们可能同时运行多个虚拟环境,所以需要保存这个对象,以便将urdf加载到正确的环境中。
而使用pb.DIRECT可在训练过程中不启动渲染(render),因此训练可以快速进行(headless)。
其余函数可在本文提供的源码中自行学习。
1.4 机器人接口文件夹 my_robot_gym/robots
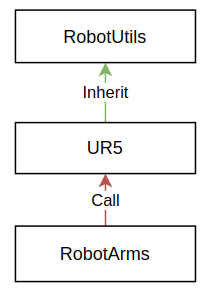
由于机械臂种类众多,这里可以针对机械臂的共用方法抽象出一个RobotArm类放到robot_arm.py文件中。另外避免文件过于冗长,可以把frame transform、joint limit等一些机器人学相关内容写入robot_utils中。本文所用机械臂为ur5,描述ur5的类继承了RobotUtils类。三者关系如下图所示。
-
robot_arm.py (for robot interfaces like loading robot model from assets)
-
robot_utils.py (for basic robotics funcs like frame transform and control funcs like velocity control)
-
ur5.py (specific robot funcs)
其中,在robot_arm.py中加载机器人模型,并设置好初始姿态。
load_robot(self):
        """
        Load the robot arm model into pybullet
        """
        self.base_pos = [0, 0, 0]
        self.base_rpy = [0, 0, 0]
        self.base_orn = self._pb.getQuaternionFromEuler(self.base_rpy)

        robot_urdf = add_assets_path(os.path.join("robot_assets",self.arm_type,"ur5.urdf"))
        robot_id = self._pb.loadURDF(
            robot_urdf, self.base_pos, self.base_orn, useFixedBase=True
        )
        return robot_id
在该文件中另一个重要函数则是apply_action,该函数将在MyRobotGym.step()中被调用
def apply_action(
    self,
    motor_commands,
    control_mode="TCP_velocity_control",
    velocity_action_repeat=1,
    max_steps=100,
):

    if control_mode == "TCP_velocity_control":
        self.arm.tcp_velocity_control(motor_commands)

    if control_mode == "TCP_velocity_control":
        # apply the action for n steps to match control rate
        for i in range(velocity_action_repeat):
            self.step_sim()
其中arm.tcp_velocity_control为RobotUtils中的函数,用于对机器人工具中心点进行速度控制(调用pb.setJointMotorControlArray)。应用action之后,可以通过 MyRobotGym.get_observation()查看state。
其余函数可在本文提供的源码中自行学习。
二、代码结构总结
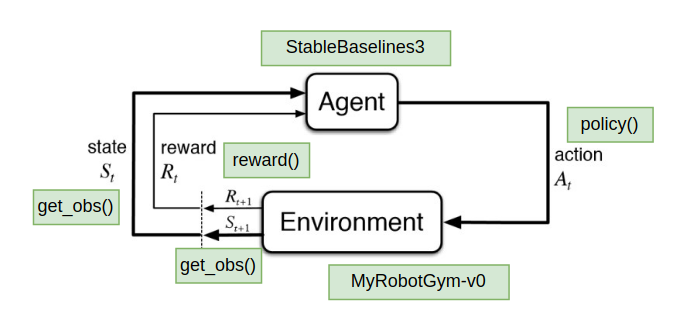
my_robot_gym/rl_envs/my_robot_gym.py是整个环境的核心文件,MyRobotGym.setp()函数应用action到机器人并更新bullet虚拟环境一步,产生新的observation,可通过MyRobotGym.get_observation()来访问bullet环境取得。利用该observation,我们可以通过MyRobotGym.reward()来计算奖励,并通过MyRobotGym.termination()来查看该episode在当前时刻是否结束。这些函数共同构成了强化学习的经典学习闭环(其中agent部分将在下篇博文中讲述):
三、测试
在python中输入:
import gym
import my_robot_gym
env = gym.make("MyRobotGym-v0")
(转载请注明出处)


 7307
7307


 被折叠的 条评论
为什么被折叠?
被折叠的 条评论
为什么被折叠?
 到【灌水乐园】发言


