


Managing Versions of Your Project
Xcode provides several ways to save versions of your project:
-
A snapshot saves the current state of your project or workspace on disk for possible restoration later.
-
Source control repositories keep track of individual changes to files and enable you to merge different versions of a file.
-
An archive packages your products for distribution, either through your own distribution mechanism or for submission to the App Store. See “To create a workspace” for details.
Xcode provides direct support for Git and Subversion repositories, including an option to create a local Git repository when you create a new project. Because it’s so easy to set up a repository to use with your Xcode project, Xcode provides a special editor, called the version editor, that also makes it easy to compare different versions of files saved in repositories.
This chapter assumes that some developers using Xcode are new to repositories. If you’re an experienced repository user, skip over the introductory material in each section and go straight to the descriptions of aspects of Xcode’s repository UI.
Take a Snapshot of Your Project
A snapshot provides an easy way to back up the current version of your project or workspace so that, if something goes wrong with a change or process, you can restore the earlier version. Xcode can create a snapshot automatically before a major change such as refactoring your code or executing a Find and Replace operation. You can change this setting any time in the Snapshots pane of the File > Project Settings or File > Workspace Settings dialog (Figure 9-1).
Figure 9-1 The Snapshots settings dialog
You can also set Xcode to automatically create snapshots in other circumstances, such as before a build, by selecting the Create Snapshot option in the Behaviors pane of Xcode preferences (“Customize Your Build and Run Workflow”).
You can create a snapshot manually whenever you like by choosing File > Create Snapshot. To see where Xcode stores your snapshots, or to change the location, look in the Locations pane of Xcode preferences or the Snapshots pane of the Project (or Workspace) Settings dialog.
Important To use snapshots, you must have selected System Tools in the Xcode installer. This option is selected by default.
To see the snapshots for a project or workspace, click the project in the projects organizer. To restore from a snapshot in Xcode 4.0, select a snapshot in the projects organizer and click the Restore Snapshot button at the bottom of the window.
In Xcode 4.1 and later, to restore a snapshot, choose Restore Snapshot from the File menu and select the snapshot to restore. Xcode displays a preview dialog in which you can review the differences between the current version of the project and the snapshot version. When you click Restore, Xcode replaces the current version of the project with the version in the snapshot. Xcode makes a snapshot of the current version before replacing it.
To restore a snapshot in a new location instead of restoring on top of the current project, select the project in the Projects pane of the Organizer window, choose the snapshot you want to restore, and click the Export Snapshot button at the bottom of the window (Figure 9-2).
Figure 9-2 Snapshots listed in the Organizer window
Because Xcode 4 keeps track of all your projects and displays them in the projects organizer even if they no longer exist, you can restore a deleted project from a snapshot.
Keep Track of Changes with Source Control
When working on a software project, it can be very useful to use software control management (SCM) to keep track of changes in the code and coordinate work groups. An SCM system, also referred to as source control, saves multiple versions of each file on disk, storing metadata about each version of each file in a location known as an SCM repository.
Why Use Source Control?
There are two fundamental reasons for using source control:
-
A source control system helps you reconstruct past versions of the software and the process used to develop it. If you are working on a project by yourself, you can commit a file to your SCM repository each time you make a major change. Then, if you find you’ve introduced bugs, you can compare the new version with a past version that worked correctly to help to locate the source of the trouble. In the worst-case scenario, you can revert to an earlier version and start over from there to reimplement the new feature. If you keep your repository, or a copy of the repository, in another, physically safe location, you can even reconstruct your project if your computer is lost or destroyed.
-
When two or more people are working on the same project, source control helps prevent conflicts and helps resolve conflicts should they arise. By keeping a central repository that holds the canonical copy of the software, the source control system allows each programmer to work on his or her own local copy without any danger of corrupting the canonical version. If you set up a system of checking out a file before working on it, you can ensure that two people are not working on the same code at the same time. If two people do change the same code, the SCM software helps you to merge the two versions. You can also look through past changes to see what they were and who made them, which can be a great help in managing the project and in fixing bugs.
Choose Git or Subversion
Xcode supports two SCM systems: Subversion (often abbreviated svn) and Git. Subversion is always server-based and the server is normally on a remote machine, though it is possible to install one locally. Git can be used purely as a local repository, or you can install a Git server on a remote machine to share files among team members. The Xcode 4 installer installs the Git and Subversion tools when you select System Tools.
If you are working alone, it’s generally easiest to use Git, as you don’t need to set up a server. In fact, Xcode can automatically set up a Git repository for you when you create a new project (see“Create a Git Repository For Your New Project”). For a group project, the choice of Subversion or Git is usually a matter of taste and prior experience.
In so far as is possible, Xcode provides a consistent user interface and workflow for users of either Subversion or Git.
Learn SCM Terminology
In general, you work on a copy of the project (called, appropriately, a working copy). The command to create a working copy is clone for Git and checkout for Subversion. When you have changed one or more files and want to add your changes to the repository, you execute a commit command to the SCM software. The SCM software records the date and time of the commit, any comments you include to help you remember later why you committed this version of the code, your identity (that is, the identity of the person who executed the commit command), and any other information the SCM software needs in order to keep track of the software.
Because Subversion repositories always reside on a server, when you commit changes to your project, Xcode sends those changes back to the server. Because Git repositories can be local or on a server, the situation is a bit different with Git. For Git, your working copy is also a local repository, so once you’ve committed the file, the repository has been updated. Even if you have a remote Git server, committing a file in Git does not automatically send changes to the server. To update the Git repository on a remote server, you use a push command.
To update your working copy with the latest version of the file in a remote repository, you use a pull command (in Git) or update command (in Subversion). For a local Git repository, the pull command is not needed.
The main line of code for development is often referred to as the trunk. To avoid modifying the trunk while developing new features, you can create a new copy of the project referred to as abranch. Eventually, branches are merged back into the trunk. In Git, a branch is simply a working copy of the project. In Subversion, a branch is a copy maintained by the repository. You can check out any number of working copies of a Subversion branch. When you update your local working copy with the update or pull command, and when you merge two branches or merge a branch into the trunk, Xcode displays a dialog that lets you reconcile differences between the versions. You can also use the version editor to compare two versions of a file at any time.
Manage Your Repositories
In Xcode, you configure SCM repositories in the Organizer (Figure 9-3).
Figure 9-3 The repositories pane in the Organizer window
The repositories pane of the Organizer window (referred to hereafter as the repositories organizer) lets you examine the structure of the repository (folders, files, and branches) and your working copy. In addition to the more obvious features provided by the repositories organizer, it lets you assign address-book information to the person who committed each version listed and you can examine the changes to each file for each commit.


View files in a specific commit version to inspect changes that you have made to those files.
-
In the navigation pane of the repositories organizer, select the working copy folder of the project.
-
Click the disclosure triangle next to the commit ID number.
-
Click View Changes.
-
Select a file in the navigation pane.
-
Scroll, if necessary, to view changes in the file.
Clicking the disclosure triangle for a commit version reveals a list of changed files, allowing you to quickly scan for the one you want to inspect.
In the inspection dialog, Xcode displays the changes between the file you have chosen and the previous commit of the same file. For convenience, each change is highlighted in the editor pane and indicated by a red mark in the scroll bar.
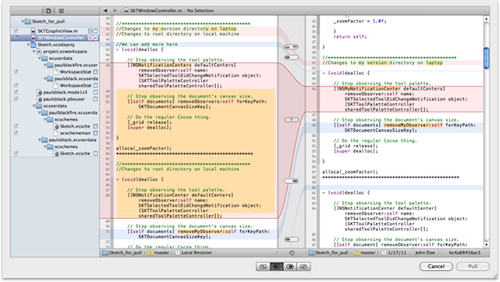
The video shows viewing changes in the SKTLine.h file in the most recent commit version of the Skecth_git_M repository.
Find SCM Commands
SCM commands are located in the main Xcode menu, in the shortcut menu, and in the repositories organizer.
Source control commands are in the Source Control submenu of the File menu (Figure 9-4).
Figure 9-4 The Source Control submenu of the File menu
The project navigator shortcut menu contains a subset of these commands (Figure 9-5).
Figure 9-5 The Source Control submenu of the project navigator shortcut menu
Many SCM commands can be executed by using buttons at the bottom of the repositories organizer. Which buttons are available and active depends on your selection in the navigator pane of the repositories organizer. For example, Figure 9-6 shows the buttons at the bottom of the repositories organizer when a git working copy is selected.
Figure 9-6 Repositories organizer buttons
Update and commit operations are recorded in the log navigator. Select a log to see the individual steps of that operation in the log viewer.
Keep Track of Your Files’ SCM Status
You can keep track of your files’ SCM status in the project navigator. SCM status is shown as a badge next to the file name (Figure 9-7), as follows:

Badges propagate up to the highest container so you can see the source control status of the whole workspace regardless of the disclosure level. Detailed SCM status is shown in the Source Control area of the File inspector in the utility pane.
Work with Git and Subversion
Common source control tasks include setting up a repository, checking files out of and in to a repository, reconciling different versions of a file, and using branches to isolate risky changes to your code.
Set Up Git Version Control When You Create a New Project
As described in “Create a Git Repository For Your New Project,” Xcode creates a Git repository for a new project if you select the Source Control option in the Save As dialog. When you do so, Xcode adds a hidden file (named .git) to the folder containing the project. That file contains all the information Git needs to keep track of the files in the project and the changes made to them. Xcode also performs an initial commit of the files in the folder. Any time you add files to your project or modify any of the files in the project, you need to commit them to add them to the repository (see“Commit Files to Add Them to a Repository”).
Add Git or Subversion Version Control to an Existing Project
You may need to create your own repository if, for example, you want to start managing an existing project under source control. You can use command-line tools to set up a Git or Subversion repository. The necessary tools are installed during Xcode installation, if you select the System Tools package.
Use command-line (shell) commands to set up a Git repository for an existing project.
-
Use the
cdcommand to switch to your project folder, making it the current working directory. -
Enter
git initto create an empty repository. -
Enter
git add .to copy your project files into the repository. -
Enter
git commit -m "Initial commit."to commit all the files.

To set up a repository for an existing project, you have to use the shell. The default bash shell is provided by the Terminal utility, installed as /Applications/Utilities/Terminal.app.
To simplify management of your repository, you can put it in your project folder. For example, if your project is Sketch and its path is /Users/JohnnyAppleseed/Projects/Sketch, you’d enter the following command to switch to your project folder and make it the current working directory:
cd /Users/JohnnyAppleseed/Projects/Sketch
An easy way to do this is to first type the command cd followed by a space and then drag the Sketch folder from the Finder and drop it in the Terminal window at the end of the command.
Once you have established the installation directory, you use Git commands to create and set up your repository:
-
The
git initcommand creates a subdirectory named.gitand the necessary Git files and subdirectories within the.gitsubdirectory. -
The
git add .command copies the contents of your current directory (except for the.gitsubdirectory and its contents) into the newly created repository. Be sure to enter the command exactly as shown; the dot (.) represents the current directory and is required, as is the space before it. -
The
git commit -m "Initial commit"command performs an initial commit operation, which puts the project under source control.The
-m "Initial commit"option specifies that “Initial commit” be used as the commit message. The commit message is optional. If you provide one, you can include almost any comment you wish between the quotation marks. In practice, however, you should enter a message that will be meaningful to anyone using the repository. In fact, your organization may enforce conventions for commit messages.If the commit operation is successful, Git displays summary information and lists all committed files, as shown in the figure.
Use command-line (shell) commands to set up a Subversion repository.
-
Use the
mkdircommand to create a directory with three subdirectories namedbranches,tags, andtrunkto hold a temporary copy of your project. -
Copy your Xcode project into the
trunksubdirectory. -
Use the
svnadmin createcommand to create an empty Subversion repository. -
Use the
svn importcommand to import your project into the new Subversion repository.

To set up a Subversion repository, you have to use the shell. The default bash shell is provided by the Terminal utility, installed as /Applications/Utilities/Terminal.app.
If you don’t have an existing project, use Xcode to create a new project before setting up your repository.
In Step 1, you create a directory structure to hold a temporary copy of the project. The following command, for example, creates a Sketch_svn_tmp directory for this purpose:
-
mkdir /Repo_Master/Sketch_svn_tmp
The mkdir command creates only the last directory in the specified path; in this command, for example, the /Repo_Master directory must already exist.
Tip: The easiest way to get the full pathname of an existing directory into Terminal is to drag the corresponding folder from the Finder and drop it in the appropriate position in the Terminal command line.
By convention, an SVN repository contains three additional subdirectories named branches, tags, and trunk. The following commands create those subdirectories in the Sketch_svn_tmpdirectory:
-
mkdir /Repo_Master/Sketch_svn_tmp/trunk -
mkdir /Repo_Master/Sketch_svn_tmp/branches -
mkdir /Repo_Master/Sketch_svn_tmp/tags
In Step 2, with the temporary structure set up, you put your project into its trunk subdirectory. The following command, for example, copies the Sketch project folder and its contents from the /Library/MyProjects/ folder:
-
cp -R /Library/MyProjects/Sketch /Repo_Master/Sketch_svn_tmp/trunk
In Step 3, you create an empty Subversion repository. For example, if you want a repository named Sketch_svn in the existing location /Repo_Master, you would enter the following svnadmincommand:
svnadmin create /Repo_Master/Sketch_svn
The create command creates only the last directory in the specified path; in this command, for example, the /Repo_Master directory must already exist.
In Step 4, you import your project from the temporary structure into the new repository and place it under Subversion source control. The following command accomplishes this:
-
svn import /Users/myUserName/Projects/Sketch_tmp \ -
file:///Users/myUserName/Repositories/Sketch_svn -m "Initial import"
Notes:
-
The backslash at the end of the first line indicates that the command is continued on the next line. You can omit the backslash and type the entire command on one line. If you do use the backslash, be sure there are no spaces following it before you press Return.
-
There are three forward slashes in the string
file:///. -
If you type the entire command on one line, be sure there is a space before
file:///. -
You can include any comment you want in the quotation marks, but be sure your comment will be meaningful to anyone using the repository.
If the import command is successful, the imported project files are listed, as shown in the figure.
The illustration shows creating the Sketch_svn Subversion repository and importing the Sketch project into it. Successfully imported project files are listed, as shown.
Clone or Check Out a Copy of a Project to Use Locally
If you or your work group have a Subversion server or a master copy of a Git repository shared on a file server, you can create a local working copy by checking out (Subversion) or cloning (Git) a copy of the master. You can then use the source control commands in Xcode to commit changes to your local copy, update your local copy from the master copy, and push your changes up to the master copy (for Git). Note that it is not necessary to clone a copy of a local Git repository, as in this case the master copy is also your working copy.
Check out or clone a repository to create a copy on your local system.
-
In the repositories organizer, click the Add button and choose Checkout or Clone Repository.
-
Enter the pathname or URL for the file.
-
When the “Host is reachable” indicator turns green, click the Next button.
-
Enter a local name for the repository and click Clone (or Checkout) to copy it.
-
Choose a location and click the highlighted Clone (or Checkout) button to save the local repository.
By abstracting common repository operations, Xcode supports both Git and Subversion (SVN) repositories with a single, unified graphical user interface and workflow. Depending on your choice, this one operation checks out (for SVN) or clones (for Git) the repository and integrates it with your project.
Cloning a Git repository in Xcode sets up a complete repository on your local system and integrates that repository with your workspace so that you can quickly start using it. This approach gives you the benefits of distributed version control, including full commit rights, whether you’re online or not.
An SVN checkout operation does not create a local repository. You must have a network connection to the repository server to be able to commit changes.
For SVN, you must also provide the relative paths to the trunk, branches, and tags directories. To do so, click the name of the new repository in the repositories organizer and fill in the associated fields. If your SVN server requires authentication, fill in the user name and password as well.
The video shows cloning a Git repository for the Sketch sample code project.
Add an Existing SCM Working Copy of a Project to Xcode
If you have a working copy of a project that was checked out of Subversion or cloned from Git using the command line or another tool, you can add it to your Xcode SCM repository support. To do so, click the Add button (+) at the bottom of the navigation pane in the repository organizer and choose Add Working Copy.
Create a Branch to Isolate Risky Changes
After you’ve been working on a project for a while, you are likely to have a body of reliable, stable code. Although a repository enables you to revert to an earlier version if you destabilize your program while attempting to add a new feature, you might want to be able to work on the new feature while still maintaining your stable body of code. That way, one of the members of your team can (for example) work on refining the user interface or fixing minor bugs while another team member works on a risky new feature. In order to implement such a scheme, most source control systems (including Git and Subversion) allow you to create a branch, which is another copy of your code that you can modify independently of the original body of code (or of any other branches). You can base a branch on the trunk or on any other branch.
Subversion keeps all the information about branches, submissions, updates, and so forth on the server. You need to be connected to the server to see any of this information in Xcode. In Git, when you clone a repository, you get a copy of all of the metadata associated with the repository as well as copies of all the existing branches. To see the structure of a Subversion repository without checking out a working copy, or to see the branches of a remote Git repository so you can clone an individual branch, use the Add Repository menu item (see “Clone a Specific Branch”).
Create a branch in a repository to isolate specific aspects of your software development efforts and to work in parallel with other developers.
-
In the repositories organizer, select the appropriate Branches directory in the navigator pane and click the Add Branch button.
-
Enter a name for the new branch.
-
From the pop-up menu, choose an existing branch to serve as the starting point for this new branch.
-
If appropriate, select the option to automatically switch to the new branch.
-
Click Create.
Git creates the new branch in your local repository. To make the branch available to others on a remote Git repository, you need to use the Push command.
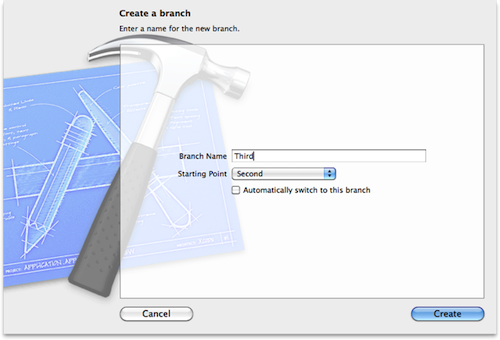
The illustration shows adding a branch named Third, using the branch named Second as a starting point.
Create a branch in a repository to isolate specific aspects of your software development efforts and to work in parallel with other developers.
-
In the repositories organizer, select the appropriate Branches directory in the navigator pane and click the Add Branch button.
-
Enter a name for the new branch.
-
From the pop-up menu, choose an existing branch to serve as the starting point for this new branch.
-
Enter a log message if you wish.
-
If appropriate, select the option to automatically check out the new branch.
-
Click Create.
Subversion creates the new branch in the remote repository; to work on it locally, you must first check it out. Selecting the “Automatically checkout this branch” option causes Xcode to check it out for you. If you select this option, Xcode opens a Save As dialog so you can specify the name and location for the working copy of the new branch. If you do not select this option, you have to check out the branch before you can work with it.
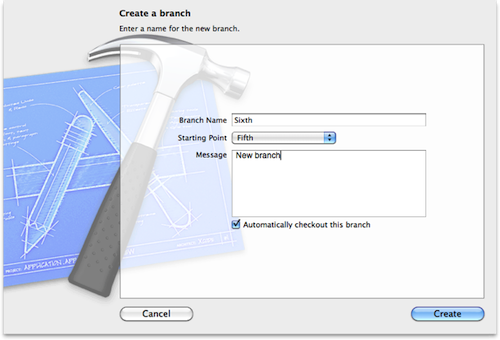
The illustration shows adding a branch named Sixth, using the branch named Fifth as a starting point.
Switch to another branch of a repository to work on a different line of code development or to prepare for a branch merge.
-
In the navigation pane of the repositories organizer, click the working copy folder for the repository.
-
Click the Switch Branch button at the bottom of the Organizer window.
-
In the Select a Branch dialog, choose the branch you want to use from the pop-up menu.
-
Click OK to confirm the switch.
When the working copy of a branch is selected in the navigation pane, the name and location of the current branch display at the top of the organizer pane. When the switching operation is successful, this designation updates to reflect the new current branch.
The video shows switching from the Henchley_01 branch to the Cardiff_02 branch of the Sketch svn_M repository.
Clone a Specific Branch
Rather than clone an entire remote repository, you might want to clone only a specific branch. Use the Add Repository command for this purpose. You can also use the Add Repository command to browse a Subversion repository without creating a working copy.


Add a Folder to a Subversion Repository
When you select a folder such as Trunk for a Subversion repository in the navigation pane of the repositories organizer, or any folder in the outline view of a Subversion repository, a New Directory button is available at the bottom of the window. This button creates a new directory, represented as a folder in the organizer. If no folder is selected in the outline view, the folder is created at the same level as the top-level folders in the outline view. If a folder in the outline view is selected, the new folder is created inside that folder.
Tip Xcode provides the New Directory button in the repositories organizer to help you administer your Subversion directory. It’s not intended for modifying your Xcode project. To add a folder to a project, use the project navigator in the workspace window.
Once you create a new Subversion directory, you can add files to it.
Add nonproject files to a repository folder created with the repositories organizer.
-
In the repositories organizer, select the folder to which the files will be added.
-
Click the Import button at the lower right corner of the window.
-
Locate and select the desired file or folder.
-
Click Import.
-
Enter a commit message and click Import.
The repositories organizer supports creating a folder in a subversion repository for maintaining and administering the repository. For example, you might want to include documents that provide details for a specific branch or that specify any deviations from your organization’s branching and merging protocols. To add folders and files to a project, use the project navigator in the workspace window.
Alternative: You can drag files to the folder from the Finder. If you use this approach, an Import dialog appears in which you can add an import message and confirm the operation.
The video shows adding the file Branching_conventions_and_protocols.txt to the Admin_Docs Subversion directory.
Commit Files to Add Them to a Repository
When you edit a file, it is changed locally but the changes are not included in the source control repository. To add the changes to the repository, you must commit the file. You must save the file before you can commit it, but note that saving a file is not the same as committing it to source control—you must explicitly commit the file. To see which files have been modified locally but not committed, look for the M badge next to the filename in the project navigator. (New files that have never been committed to source control have the A badge. Files that are not under source control have a question mark badge.) You can use the SCM status filter at the bottom of the project navigator to display only files with SCM status.
Commit changed files to ensure that those changes are preserved and managed as part of a repository.
-
Ensure that you have saved all file changes.
-
Choose File > Source Control > Commit.
-
In the confirmation dialog, deselect any files that you do not wish to commit.
-
Review and edit (as appropriate) any changes to be committed.
-
Enter a commit comment.
-
Click Commit.
You can use the confirmation dialog to compare your new version with any past version and to make any necessary edits in the current version. Any changes you make as you review a file are included in the committed file and saved in your project.
If you’re using Subversion, a commit operation copies the changes from selected files into the remote Subversion repository. Therefore, you must be connected to the repository before you can commit changes. (For details, see your repository administrator.)
If you’re using Git, the commit operation adds your changes to your local working copy. If you're using a remote Git repository, you have to perform a push operation to add your committed changes to the shared repository.
A commit comment is required; the Commit button is disabled until you enter one. Good comments are specific, but concise; suggested content includes a brief description of the changes, what they are meant to accomplish, and URLs or ID numbers of any relevant bugs. The version editor displays the affected code together with your name and commit comment, so you can omit information that’s in code comments or that’s obvious from looking at the line of code.
The video shows committing changes in four files in the Sketch project to a local Git repository.
Reconcile Different Branches
When you’re ready to merge the code in a separate branch back into the main branch, or when you want to combine the code in any two branches, you can use the merge facility of your source control system to reconcile differences between the branches.
Merge two branches to combine the code in them and reconcile differences between them.
-
With the workspace window active, choose File > Source Control > Merge.
-
From the pop-up menu, choose the branch to merge into the current branch and click Choose.
-
Select a difference or conflict.
-
Use the left and right buttons to specify which file’s contents should be used.
-
After resolving all differences and conflicts, click Merge.
Before merging, save and commit any unsaved changes in both branches. The Merge command merges a branch that you choose into the current branch, so you may also need to switch the current branch before the merge operation.
The left pane of the merge dialog shows what the merged file will look like. The right pane shows the file with the changes to be merged in. For each difference between the files, an indicator in the center points to the file taking precedence. To select a difference, click its indicator. You use the buttons at the bottom to set the direction of the merge.
For example, if the difference is a line of code on the right that’s missing from the file on the left (your working copy) click the Right button (which sets the indicator to the right) to specify that the line of code be included in the working copy when the merge is complete. Note that because the left pane shows what the merged file will look like, you then see this line of code in both panes.
If a line of code has been changed in both versions of the file being merged, the differences are considered a conflict and are shown in red. There are two additional buttons for reconciling conflicts by taking the code lines from both files, either listing the ones in the left file first and those in the right file second, or vice versa.
To reconcile any differences not handled by the four button choices, you can edit the file in the working copy.
Update Your Working Copy from a Remote Repository
When two or more people are working on a automater project, from time to time you need to synchronize your working copy with changes made in the remote repository. You use the Pull command in Git or the Update command in Subversion to do so.
Use a pull operation to update local files with changes from a shared or remote Git repository to ensure that your local repository is up to date.
-
Choose File > Source Control > Pull.
-
In the Pull dialog, select a file in the navigation pane.
-
Select a difference to reconcile by clicking its indicator.
-
Use the left and right buttons to specify how the difference is to be reconciled.
-
After reconciling all differences, click Pull to complete the operation.
Before you can push changes in your local repository to a shared repository, Git requires a pull operation, in which you reconcile differences between the two repositories. This reconciliation helps prevent your accidentally modifying or undoing other developers’ changes.
You need to save changes you’ve made and commit them to your local repository before pulling changes from the shared repository.
In the Pull dialog, you select a difference by clicking the indicator between the two files. You then click one of the four buttons at the bottom to choose how that difference is to be reconciled. The indicator updates to reflect your choice.
A difference in which a line of code has been changed in both versions of the file is considered a conflict, and its indicator is a question mark. You can’t complete the pull operation until you specify how to resolve all conflicts.
If you wish, you can edit the local revision of the file in the Pull dialog to reconcile any differences not handled by the four button choices.
In busy times , multiple developers may attempt to submit changes to the shared repository at the same time. If another developer’s submission completes before yours, Xcode informs you that you must first perform a new pull operation. In larger organizations, particularly just prior to a product release, you may find that you have to pull changes more than once.
After the pull operation, you have to commit the changes files in your local repository that are updated by the pull operation.
The illustration shows the Pull dialog, with a conflict selected.
Update your local working copy with changes from a shared or remote Subversion repository to ensure that your local copy is up to date.
-
Choose File > Source Control > Update.
-
In the Update dialog, select a difference to reconcile.
-
Use the left and right buttons to specify which file’s contents should be used.
-
After reconciling all differences, click Update to complete the operation.
With a shared repository, there is a potential for one developer’s changes to undo or overwrite those of another developer. To prevent this problem, Subversion requires that you update your local copy with the changes already submitted to the shared repository.
You need to save changes you’ve made and commit them to your local repository before updating files with changes from the shared repository.
In the update dialog, you select a difference by clicking the indicator between the two files. You then click one of the four buttons at the bottom to choose how that difference is to be reconciled. The indicator updates to reflect your choice.
A difference in which a line of code has been changed in both versions of the file is considered a conflict, and its indicator is a question mark. You can’t complete the update operation until you specify how to resolve all conflicts.
If you wish, you can edit the local revision of the file in the update dialog to reconcile any differences not handled by the four button choices.
In busy times , multiple developers may attempt to submit changes to the shared repository at the same time. If another developer’s submission completes before yours, Xcode informs you that you must first perform a new update operation. In larger organizations, particularly just prior to a product release, you may find that you have to update more than once.
After the update, you have to commit the changes files in your local repository that are updated by the update.
The illustration shows the dialog for reconciling diferences, with a conflict selected.
Send Your Working Copy to the Remote Git Repository
If you’re using a remote Git repository, when you’re ready to share your work with the other members of your team, you can push your files back to the remote repository. (If you’re using Subversion, the commit command updates the remote repository.) If you cloned your working copy from a repository, you should see the remote repository in the repository organizer. Before performing a push, you have to save and commit all changes and execute the Pull command to reconcile any differences between your version and the one on the server. Then, choose File > Source Control > Push.
Save Internal Project Files in Repositories
In Xcode 4.1 and later, you can use repositories to view internal project files (for example, schemes and user interface settings) when looking at SCM details in the SCM commit and update workflows. You can use this facility to save and keep track of versions of project files in the same way as you save and keep track of source files. Figure 9-8 shows a commit dialog displaying two versions of a scheme.
Figure 9-8 A scheme in the commit dialog
Compare Revisions
You use the Xcode version editor to compare revisions. To compare any two versions of a file under source control in a side-by-side view, select the file in the project navigator and click the version editor button (![]() ). Use the jump bar underneath either editor pane to select the version of the file to compare with the one in the other pane (Figure 9-9). You can select any committed version of that file in any branch.
). Use the jump bar underneath either editor pane to select the version of the file to compare with the one in the other pane (Figure 9-9). You can select any committed version of that file in any branch.
Buttons under the version editor (![]() ) allow you to show a file comparison and timeline, change logs for the file, or individual change annotations (“blame”) for each line of the file.
) allow you to show a file comparison and timeline, change logs for the file, or individual change annotations (“blame”) for each line of the file.

You can edit the current working copy of the file in the version editor and you can copy code from an older version and paste it into the current version.
Select Specific Revisions
Click the timeline icon (![]() ) in the center column to show a visual timeline of all repository versions; use the sliders to control which version is displayed on each side.
) in the center column to show a visual timeline of all repository versions; use the sliders to control which version is displayed on each side.
Use the version timeline to choose file versions based on their chronological order.
-
With a source file open in the version editor, click the Comparison button.
-
Click the timeline viewer icon.
-
Browse the timeline with your pointer to reach the version you want to compare.
-
Click the right triangular indicator to open that version in the right editing pane.
The version timeline is available in the comparison view. Clicking the timeline viewer icon displays the timeline between the two editing panes.
You move the pointer (cursor) up or down through the timeline to browse the available versions. Versions are listed chronologically, with a line for each version; newer versions are at the bottom of the timeline. Each major division in the timeline groups revisions submitted within a twenty-four hour period.
As you reach each version in the timeline, additional information for that version is displayed in an annotation.
When you find the version you want, click the left or right indicator triangle to display that version in the corresponding editor pane. For example, the video shows choosing an older version of a file from the repository (for display on the right) to compare it with the newer local version of that file (displayed on the left).
Clicking the left indicator triangle allows you to compare another version in the left pane with the version in the right.
Review Individual Changes
In blame mode, the current revision of the file is displayed along with the last revision that modified each line of the file.

View All Revisions Chronologically
To review all revisions to a file listed in chronological order, use Log mode. Each change is listed individually, and you can click the arrow next to the log entry to see the change displayed in Comparison mode.

Tip You can view all the commits for a project, listed by file, in the Organizer window. See “Why Use Source Control?” for details.
Distribute Your Program
Archives package your products for distribution. Use archives to distribute your program through your own distribution mechanism or to submit an application to iTunes Connect for inclusion in the iOS or Mac app store. To build your project and save the resulting application or a disk image of the set of build products, choose Product > Archive. Xcode creates an archive of your project using the build configuration and name you specified in the Archive pane of the scheme editor (“Create an Archive for Sharing or Submitting Your Program”) and saves the archive in the location specified in the Locations pane of Xcode preferences.
To see the archives for your project, open the archives organizer (Figure 9-10). You can add a comment by clicking in the text field in the Comment column.
Figure 9-10 The archives organizer
For details on how to use archives to distribute your products, see “Distributing Applications.”


 5604
5604

 被折叠的 条评论
为什么被折叠?
被折叠的 条评论
为什么被折叠?
 到【灌水乐园】发言


