


前言
1.介绍
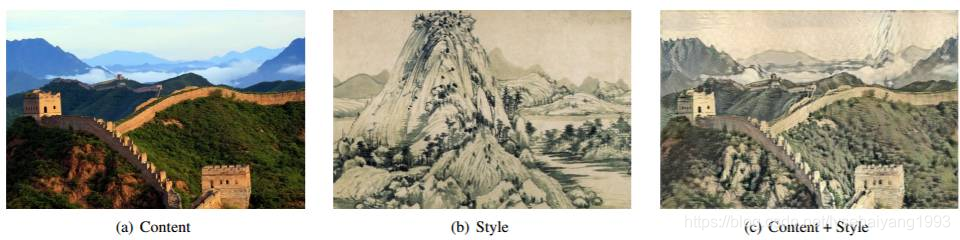
本教程主要讲解如何实现由Leon A. Gatys,Alexander S. Ecker和Matthias Bethge提出的 Neural-Style 算法。Neural-Style或者叫Neural-Transfer,可以让你运用新的风格将你指定的图片进行重构。这个算法将使用两张图片,一张图片作为风格提供者,一张图片作为内容提供者,另外生成一张图片内容与内容图片相似,但图片风格的和风格图片相似的新图片。
2. 基本原理
其实现原理非常特别,展现了人类思维的巧妙性,
我们定义两个优化指标:
1,一个用于内容D_C;
2,一个用于风格D_S。
D_C度量两张图片内容上的区别,而D_S用来测量两张图片风格的区别。
然后,我们生成第三张图片,并优化这张图片,使其与内容图片的内容差别和风格图片的风格差别最小化。
现在,原理讲完了,开始实现吧,首先,我们导入必要的包。
3 准备工作
首先是导入以下的包:
- torch, torch.nn(使用PyTorch进行风格转换必不可少的包)
- numpy (矩阵处理必须用)
- torch.optim (高效的梯度下降)
- PIL, PIL.Image, matplotlib.pyplot (加载和展示图片)
- torchvision.transforms (将PIL图片转换成张量)
- torchvision.models (训练或加载预训练模型)
- copy (对模型进行深度拷贝;系统包)
import torch
import torch.nn as nn
import torch.nn.functional as F
import torch.optim as optim
from PIL import Image
import matplotlib.pyplot as plt
import torchvision.transforms as transforms
import torchvision.models as models
import copy
import warnings
warnings.filterwarnings("ignore")
接着是一个比较关键的步骤,确定是GPU还是CPU来运行神经网络。虽然,在GPU上运行可以加速,但有的电脑上没有GPU。
我们可以使用torch.cuda.is_available()来判断是否有可用的GPU。
if torch,cuda.is_available():
	device=torch.device("cuda")
else:
	device=torch.device("cpu")
4 加载素材
接下来是导入提供风格和内容的图片。
导入图片也意味着对图片进行预处理,原始的PIL图片的属性值介于0到255之间,但是当转换成torch张量时,它们的值被压缩到0到1之间,另外,图片分辨率也会被调整到520。一个重要的细节是,注意torch库中的神经网络用来训练的张量的值为0到1之间。如果你尝试将0到255的张量图片加载到神经网络,然后激活的特征映射将不能侦测到目标内容和风格。然而,Caffe库中的预训练网络用来训练的张量值为0到255之间的图片。
这是一个下载本教程需要用到的图片的链接: picasso.jpg 和 dancing.jpg。下载这两张图片并且将它们添加到你当前工作目录。
如果嫌麻烦,可以关注公众号,

发送neuralstyle,自动推送资源集成包。
设置图片预处理程序
# desired size of the output image
imsize = 512 if torch.cuda.is_available() else 128  # use small size if no gpu

loader = transforms.Compose([
    transforms.Resize(imsize),  # scale imported image
    transforms.ToTensor()])  # transform it into a torch tensor

def image_loader(image_name):
    image = Image.open(image_name)
    # fake batch dimension required to fit network's input dimensions
    image = loader(image).unsqueeze(0) #添加一个0维度 batch 适应网络输入
    return image.to(device, torch.float)

style_img = image_loader("picasso.jpg")
content_img = image_loader("dancing.jpg")

assert style_img.size() == content_img.size(), \
    "we need to import style and content images of the same size"
因为tensor是四维的不能直接展示,所以,我们创建一个imshow函数,重新将图片转换成标准三维数据来展示,这样也可以让我们确认图像是否被正确加载。
unloader = transforms.ToPILImage() # reconvert into PIL image
plt.ion()
def imshow(tensor, title=None):
image = tensor.cpu().clone() # we clone the tensor to not do changes on it
image = image.squeeze(0) # remove the fake batch dimension 去掉0维度
image = unloader(image)
plt.imshow(image)
if title is not None:
plt.title(title)
plt.pause(0.001) # pause a bit so that plots are updated
plt.figure()
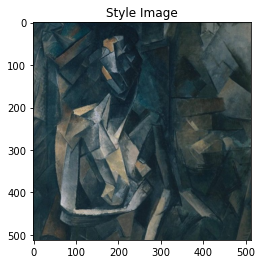
imshow(style_img, title='Style Image')
plt.figure()
imshow(content_img, title='Content Image')
正确加载的话,运行到这里,可以看到这个。


 1144
1144


 被折叠的 条评论
为什么被折叠?
被折叠的 条评论
为什么被折叠?
 到【灌水乐园】发言


