


最近在做3DGS方向,整理了一下Blender生成自己的数据集。
1 Introduction
在Blender中构建场景(light, object, camera),利用Blender的python脚本对其渲染,导出多视角下渲染出的RGB图和depth map,并将transform.json转为COLMAP格式,以便直接用于SfM初始化高斯点云。
2 Python script of Blender for generating RGB and depth map
利用如下python脚本,生成一组400*400的RGB图和detph map。
import os
import os.path as osp
import bpy
import numpy as np
import json
from mathutils import Vector, Matrix, Euler
from math import radians


W = 400
H = 400
NUM_OBJ = 5
OBJ_NAMES = {
    1: 'xxx',
    2: 'xxx',
}

# save path
RESULTS_PATH = 'xxx'
os.makedirs(RESULTS_PATH, exist_ok=True)

def listify_matrix(matrix):
    matrix_list = []
    for row in matrix:
        matrix_list.append(list(row))
    return matrix_list

def parent_obj_to_camera(b_camera):
    origin = (0, 0, 0.4)
    b_empty = bpy.data.objects.new("Empty", None)
    b_empty.location = origin
    b_camera.parent = b_empty  # setup parenting

    scn = bpy.context.scene
    scn.collection.objects.link(b_empty)
    bpy.context.view_layer.objects.active = b_empty
    return b_empty

scene = bpy.context.scene
scene.use_nodes = True
tree = scene.node_tree
links = tree.links
# Empty the node tree and initialize
for n in tree.nodes:
    tree.nodes.remove(n)
render_layers = tree.nodes.new('CompositorNodeRLayers')

# Set up rendering of depth map
depth_file_output = tree.nodes.new(type="CompositorNodeOutputFile")
depth_file_output.base_path = ''
depth_file_output.format.file_format = 'OPEN_EXR'
depth_file_output.format.color_depth = '32'
links.new(render_layers.outputs['Depth'], depth_file_output.inputs[0])

# Background
scene.render.dither_intensity = 0.0
scene.render.film_transparent = True

cam = scene.objects['Camera']
cam.location = (0.0, -3.6, -1.0)
cam_constraint = cam.constraints.new(type='TRACK_TO')
cam_constraint.track_axis = 'TRACK_NEGATIVE_Z'
cam_constraint.up_axis = 'UP_Y'
b_empty = parent_obj_to_camera(cam)
cam_constraint.target = b_empty

# Meta data to store in JSON file
meta_data = {
    'camera_angle_x': cam.data.angle_x,
    'img_h': H,
    'img_w': W
}
meta_data['frames'] = {}

# Render with multi-camera
N_VIEW_X = 2
X_ANGLE_START = 0
X_ANGLE_END = -60
N_VIEW_Z = 15
Z_ANGLE_START = 0
Z_ANGLE_END = 360 # 337

b_empty.rotation_euler = (X_ANGLE_START, 0, Z_ANGLE_START)
x_stepsize = (X_ANGLE_END - X_ANGLE_START) / N_VIEW_X
z_stepsize = (Z_ANGLE_END - Z_ANGLE_START) / N_VIEW_Z

meta_data['transform_matrix'] = {}
for vid_x in range(N_VIEW_X):
    b_empty.rotation_euler[0] += radians(x_stepsize)
    b_empty.rotation_euler[2] = Z_ANGLE_START

    for vid_z in range(N_VIEW_Z):
        b_empty.rotation_euler[2] += radians(z_stepsize)

        img_path = osp.join(RESULTS_PATH, 'images')
        os.makedirs(img_path, exist_ok=True)
        vid = vid_x * N_VIEW_Z + vid_z

        # Render
        scene.render.filepath = osp.join(img_path, 'color', 'image_%04d.png'%(vid))
        depth_file_output.base_path = osp.join(img_path, 'depth')
        depth_file_output.file_slots[0].path = 'image_%04d'%(vid)
        bpy.ops.render.render(write_still=True)

        print((vid_x, vid_z), cam.matrix_world)
        meta_data['transform_matrix'][f'camera_{vid :04d}'] = listify_matrix(cam.matrix_world)

# save camera params
with open(osp.join(RESULTS_PATH, 'transforms.json'), 'w') as fw:
    json.dump(meta_data, fw, indent=4)
3 Read Depth map (.exr)
import os
os.environ["OPENCV_IO_ENABLE_OPENEXR"]="1"
import cv2
import numpy as np
import matplotlib.pyplot as plt
import pandas as pd

depth_dir = 'D:\BlenderWorkplace\darkroom\source\output\images\depth'
for depth_name in os.listdir(depth_dir):
    depth = cv2.imread(depth_dir+'\\'+depth_name, cv2.IMREAD_UNCHANGED)[:, :, 0]
    print(depth_name, max(depth.flatten()), min(depth.flatten()))
4 Blender2COLMAP (transform.json->images.txt and cameras.txt)
Refer to https://blog.csdn.net/qq_38677322/article/details/126269726
将Blender生成的相机参数transform.json转为COLMAP格式的cameras.txt(内参)和images.txt(外参).
import numpy as np
import json
import os
import imageio
import math
blender2opencv = np.array([[1, 0, 0, 0], [0, -1, 0, 0], [0, 0, -1, 0], [0, 0, 0, 1]])
# 注意:最后输出的图片名字要按自然字典序排列,例:0, 1, 100, 101, 102, 2, 3...因为colmap内部是这么排序的
fnames = list(sorted(os.listdir('output/images/color')))
print(fnames)
fname2pose = {}
uni_pose = None
with open('output/transforms.json', 'r') as f:
meta = json.load(f)
fx = 0.5 * W / np.tan(0.5 * meta['camera_angle_x']) # original focal length
if 'camera_angle_y' in meta:
fy = 0.5 * H / np.tan(0.5 * meta['camera_angle_y']) # original focal length
else:
fy = fx
if 'cx' in meta:
cx, cy = meta['cx'], meta['cy']
else:
cx = 0.5 * W
cy = 0.5 * H
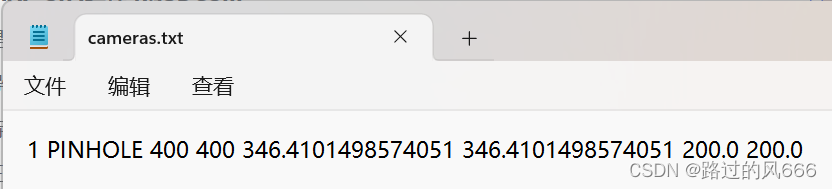
with open('created/sparse_/cameras.txt', 'w') as f:
f.write(f'1 PINHOLE {W} {H} {fx} {fy} {cx} {cy}')
idx = 1
for cam, mat in meta['transform_matrix'].items():
# print(cam, mat)
fname = "image_"+cam.split('_')[1]+".png"
pose = np.array(mat) @ blender2opencv
fname2pose[fname] = pose
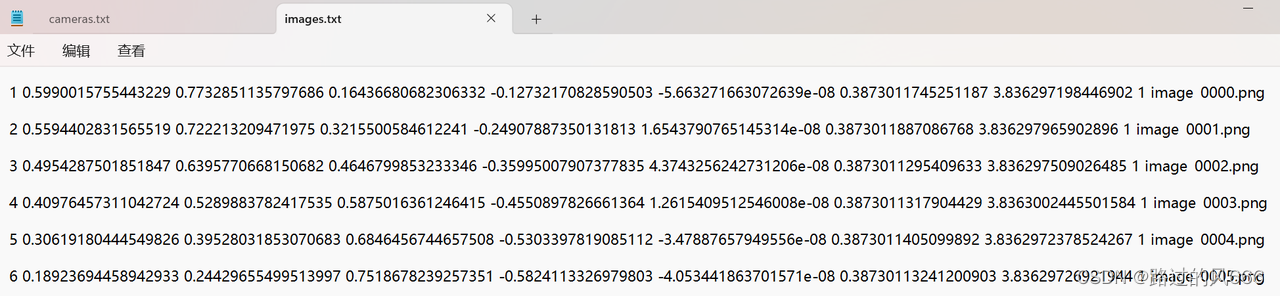
with open('created/sparse_/images.txt', 'w') as f:
for fname in fnames:
pose = fname2pose[fname]
R = np.linalg.inv(pose[:3, :3])
T = -np.matmul(R, pose[:3, 3])
q0 = 0.5 * math.sqrt(1 + R[0, 0] + R[1, 1] + R[2, 2])
q1 = (R[2, 1] - R[1, 2]) / (4 * q0)
q2 = (R[0, 2] - R[2, 0]) / (4 * q0)
q3 = (R[1, 0] - R[0, 1]) / (4 * q0)
f.write(f'{idx} {q0} {q1} {q2} {q3} {T[0]} {T[1]} {T[2]} 1 {fname}\n\n')
idx += 1
with open('created/sparse_/points3D.txt', 'w') as f:
f.write('')
结果如下:
5 COLMAP-SfM过程 (对3DGS初始化)
5.1 提取图像特征
Input: source/output/images/color(渲染出的RGB图像路径)
Output: initial database.db
colmap feature_extractor --database_path database.db --image_path source/output/images/color
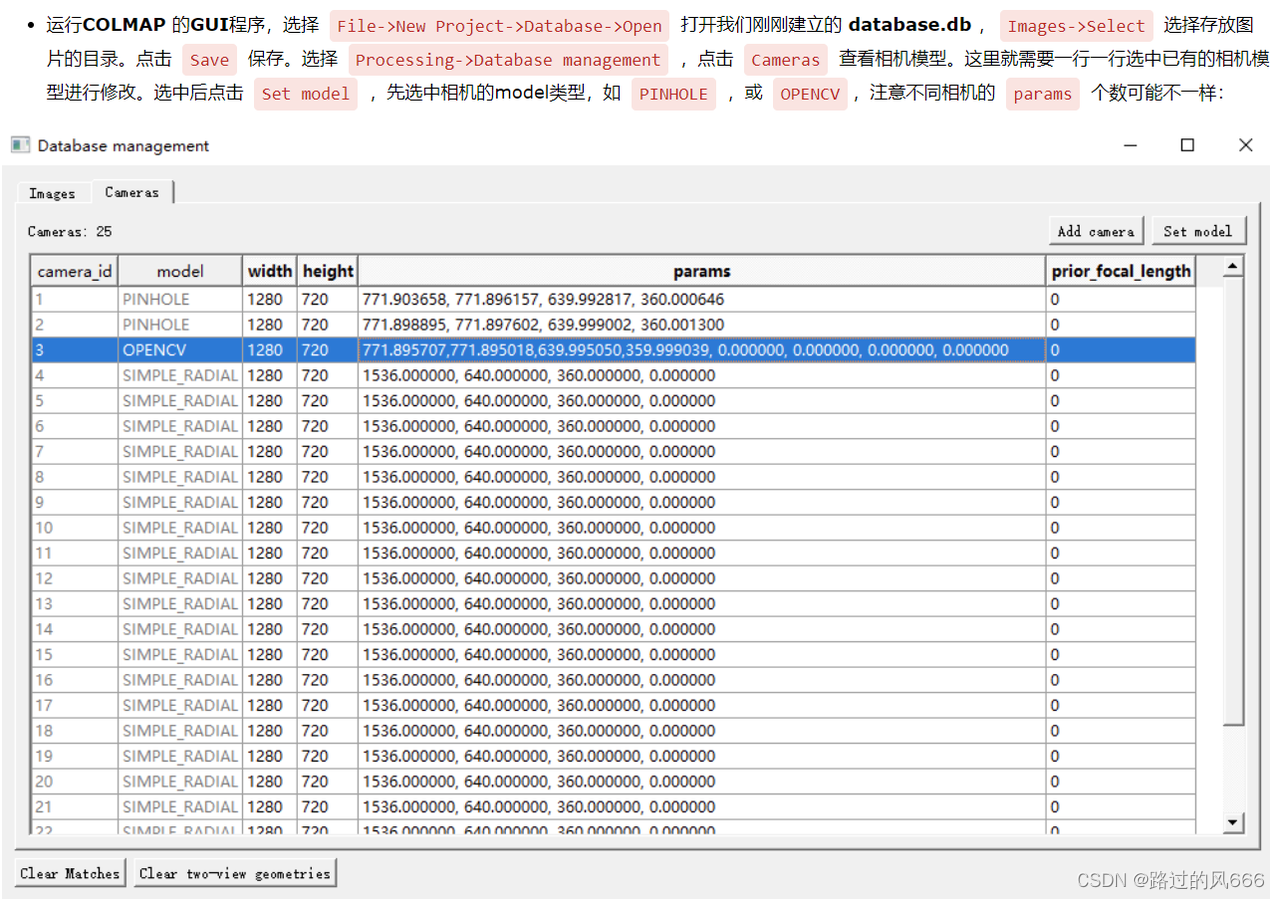
5.2 导入相机内参
Refer to https://www.cnblogs.com/li-minghao/p/11865794.html
由于我们的相机内参只有一组,无需脚本导入,只需打开colmap界面操作。
5.3 特征匹配
colmap exhaustive_matcher --database_path database.db
5.4 三角测量
colmap point_triangulator --database_path database.db --image_path source/output/images/color --input_path source/created/sparse --output_path source/triangulated/sparse
由此,输出的结果为cameras.bin, images.bin, points3D.bin,存放在source/triangulated/sparse(以上述代码为例)。


 117
117

 被折叠的 条评论
为什么被折叠?
被折叠的 条评论
为什么被折叠?
 到【灌水乐园】发言


