


数据类型:
Pytorch支持的数据类型有如下类型:
| 名称 | dtype | 说明 |
|---|---|---|
| int8 unsigned | torch.uint8 | Unsigned 8 bit int, value in [0:255] |
| int8 signed | torch.int8 | signed 8 bit int, value in [-127:127] |
| int16 signed | torch.int16 or torch.short | 16 bit signed integer |
| int32/int | torch.int32 or torch.int | 32 bit signed integer |
| int64 | torch.int64 or torch.long | 64 bit signed integer |
| float16 | torch.float16 or torch.half | 16-bit float. 1-bit sign, 5 bit exponent. 10-bit fraction. |
| bf16 | torch.bfloat16 | 16-bit float. 1-bit sign, 8 bit exponent. 7-bit fraction. |
| float32/float | torch.float or torch.float32 | 32-bit float. 1 bit sign, 8 bit exponent. 23-bit fraction. |
| float64/double | torch.double or torch.float64 | 64-bit float. 1 bit sign, 11 bit exponent. 52-bit fraction. |
| Boolean | torch.bool | Boolean: True or False 0 or 1. |
| Q-uint8 | torch.quint8 | Quantized 8-bit integer (unsigned) |
| Q-int8 | torch.qint8 | Quantized 8-bit integer (signed) |
| Q-int32 | torch.qint32 | Quantized 32-bit integer (signed) |
| Q-int4 | torch.quint4x2 | Quantized 4-bit integer (unsigned) |
创建不同数据类型的Tensor
从内置数据类型创建
import torch

size = [32, 32, 3] # 即将要创建的tensor size

t_example = torch.tensor(size, dtype=torch.int32)
print(f"Created t_example is: {t_example}")

## output is:
Created t_example is: tensor([32, 32,  3], dtype=torch.int32)
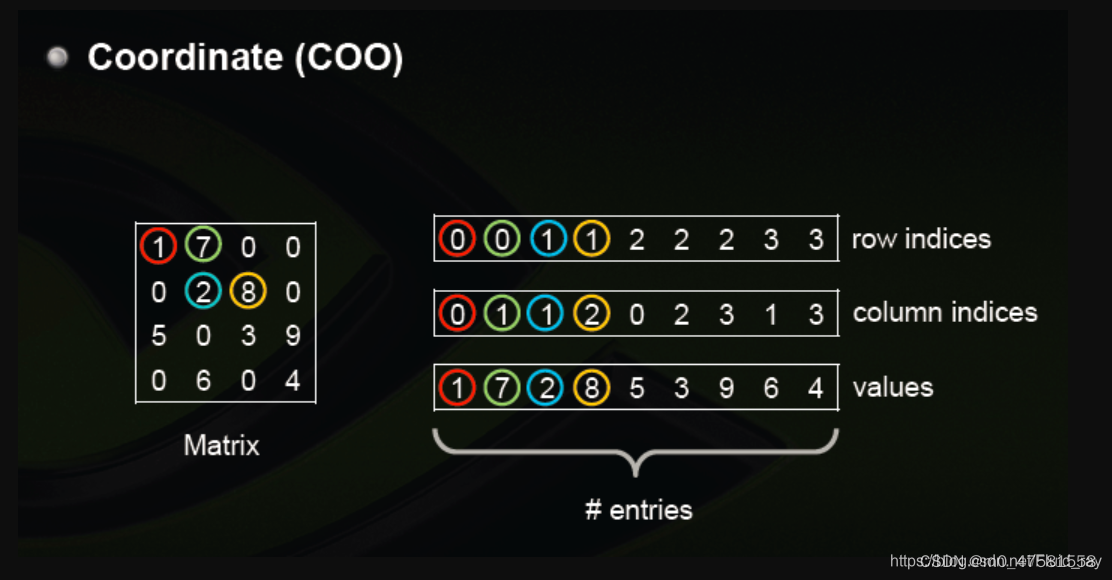
创建稀疏矩阵
By COO (Rdinate)
COO是一种很直观的稀疏矩阵描述方式,通过直接定义(行,列)坐标对,表示哪些(行,列)的坐标是有数值的,并且数值的value定义在values array里面,
下面的示意图很好的解释了Rdinate方式的稀疏矩阵创建方式。
Pytorch参考代码,
## spase tensor
import torch
i = torch.tensor([[0, 1, 1], [2, 0, 2]]) # 创建的稀疏矩阵,坐标索引为(0, 2), (1, 0), (1, 2) 的位置有值,其他位置为0
v = torch.tensor([3, 4, 5], dtype=torch.float32) # 值分别为3, 4, 5, 类型为float32
a= torch.sparse_coo_tensor(i, v, [2, 4]) # 创建稀疏矩阵,size为[2, 4]

print(f"{a}")
#-----------------------------------------------------

# 代码输出:
tensor(indices=tensor([[0, 1, 1],
                       [2, 0, 2]]),
       values=tensor([3., 4., 5.]),
       size=(2, 4), nnz=3, layout=torch.sparse_coo)
By CSR (Compressed Sparse Row)
COO方式描述的稀疏矩阵,每一行/列,坐标对都需要一一对应。假设对于二维数组size(m, n),需要存储空间最大为m*n,此种方式对于有效元素非常少的二维sparse Tensor来说,其需要的存储空间小。但是如果又要元素较多,worst case需要的存储是m*n。
CSR从Row方向上压缩了Row需要的存储大小。以如下array为例,

COO的描述方式为:
import torch

i = [[0, 0, 1, 1, 1, 2, 2, 2, 3, 3, 3, 3, 4, 4, 4, 4, 5, 5, 5],
        [0, 4, 0, 1, 5, 1, 2, 3, 0, 2, 3, 4, 1, 3, 4, 5, 1, 4, 5]]
value = [10, -2, 3, 9, 3, 7, 8, 7, 3, 8, 7, 5, 8, 9, 9, 13, 4, 2, -1]

size = [6, 6]

array = torch.sparse_coo_tensor(i, v, size)
Array[i] element 数量为: 19*2。即如果有效元素是19个,需要一个1x19的行矩阵和一个1x19的列矩阵来存储19个元素的(行,列)坐标对。nnz表示有效元素的个数的话,需要的存储空间为3*nnz.
CSR的方式Column array和COO方式一样,对于上图的稀疏矩阵,col_ptr array一模一样[0, 4, 0, 1, 5, 1, 2, 3, 0, 2, 3, 4, 1, 3, 4, 5, 1, 4, 5]。
上面的稀疏矩阵的value array,从element_ind来看,共计从0到18,共计有19个有效元素,
从col_ind_array的规律来看,0,4,0,1,5.。。。第一个0表示第0行的第0列元素,第二个0其实表示下一行(第一行)的第0列是有效元素。从这里我们可以看出,行矩阵不需要保存每一个有效元素的行id,其实只需要保存列矩阵里面哪个位置是“下一行”就可以了。
按照上面的array为例来看,element_ind表示元素的整体索引(递增),从0到18,共计19个元素,row_ptr[0]是0,表示从element_id0开始是第一行的,row_ptr[1]为2,表示element_ind为2的位置是下一行(第二行的第一个有效元素的列坐标),row_ptr[2]是5,表示element_ind为5的位置是再下一行(也就是第三行的第一个有效元素的列坐标),以此类推。row_ptr的最后一个元素表示“矩阵中共计多少个non-zero元素”

以上面的稀疏矩阵为例,需要的存储空间为,len(col_ind_array) = nnz, size of (value) = nnz, len(row_ptr) = n (line-no), 加上row_ptr的最后一个元素。共计需要存储空间 2* nnz + n + 1。相比于COO方式,节约了存储消耗。
By CSC (Comressed Sparse Column)
类似于CSR,此种方式压缩column数据。
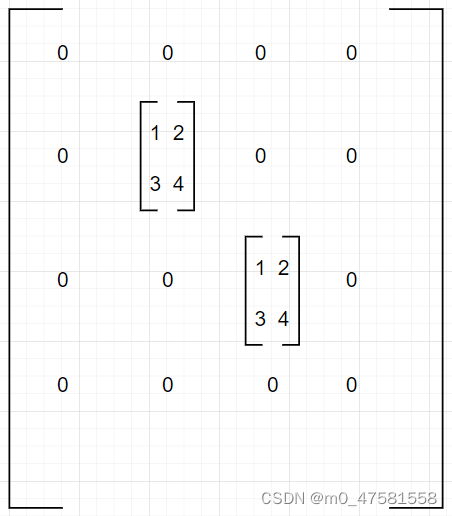
By BSR (Block Compressed Sparse Row)
行坐标压缩和CSR一样,唯一的区别是data element的每个元素由0维变成了多维。类似于下图矩阵:
By BSC (Block Compressed Sparse Column)
跟BSR一样,压缩方向是列Block压缩。
numpy.array创建
#-----------------------------------------------------
import numpy as np
import torch
size = [32, 32, 3] # 即将要创建的tensor size
t_np_example = np.array(size)
t_example = torch.from_numpy(t_np_example)
print(f"Created t_example is: {t_example}")
#-----------------------------------------------------
Created t_example is: tensor([32, 32,  3], dtype=torch.int32)
From Others
asarray:
功能介绍:从其他“对象”或“类型”的数据创建tensor,典型用法是:
函数原型:array = torch.asarray(obj, *, dtype=None)
参数定义:参数obj可以是:tensor, numpy array或者scalar,DLPack,buffer,scalar,scalar序列,,etc.
Pytorch 的官方例程很好的说明了使用方法,参考如下:
Example:
>>> a = torch.tensor([1, 2, 3])
>>> # Shares memory with tensor 'a'
>>> b = torch.asarray(a)
>>> a.data_ptr() == b.data_ptr()
True
>>> # Forces memory copy
>>> c = torch.asarray(a, copy=True)
>>> a.data_ptr() == c.data_ptr()
False>>> a = torch.tensor([1., 2., 3.], requires_grad=True)
>>> b = a + 2
>>> b
tensor([3., 4., 5.], grad_fn=<AddBackward0>)
>>> # Shares memory with tensor 'b', with no grad
>>> c = torch.asarray(b)
>>> c
tensor([3., 4., 5.])
>>> # Shares memory with tensor 'b', retaining autograd history
>>> d = torch.asarray(b, requires_grad=True)
>>> d
tensor([3., 4., 5.], grad_fn=<AddBackward0>)>>> array = numpy.array([1, 2, 3])
>>> # Shares memory with array 'array'
>>> t1 = torch.asarray(array)
>>> array.__array_interface__['data'][0] == t1.data_ptr()
True
>>> # Copies memory due to dtype mismatch
>>> t2 = torch.asarray(array, dtype=torch.float32)
>>> array.__array_interface__['data'][0] == t2.data_ptr()
False>>> scalar = numpy.float64(0.5)
>>> torch.asarray(scalar)
tensor(0.5000, dtype=torch.float64)
as_tensor:
功能介绍:从一个tensor复制成另一个tensor,
函数原型:torch.as_tensor(data, dtype=None, device=None)
参数定义:
data:如果data已经是tensor,并且数据类型和dtype匹配,则函数直接返回data tensor,如果数据类型不一致,则此函数先将数据类型转换成dtype并copy成一个新的tensor并返回。
如果data是 numpy,则此函数直接call tensor.from_numpy生成并返回tensor。
Example:
>>> a = numpy.array([1, 2, 3])
>>> t = torch.as_tensor(a)
>>> t
tensor([ 1,  2,  3])
>>> t[0] = -1
>>> a
array([-1,  2,  3])

>>> a = numpy.array([1, 2, 3])
>>> t = torch.as_tensor(a, device=torch.device('cuda'))
>>> t
tensor([ 1,  2,  3])
>>> t[0] = -1
>>> a
array([1,  2,  3])
as_strided
功能介绍:从一个tensor按照定义的size和stride创建新的tensor,对应的value和原tensor保持一致。
函数原型:torch.as_strided(input, size, stride, storage_offset=None)
参数定义: input: 输入的原tensor;size:output tensor size;stride:output tensor的stride。
Example:
>>> x = torch.randn(3, 3)
>>> x
tensor([[ 0.9039,  0.6291,  1.0795],
        [ 0.1586,  2.1939, -0.4900],
        [-0.1909, -0.7503,  1.9355]])
>>> t = torch.as_strided(x, (2, 2), (1, 2))
>>> t
tensor([[0.9039, 1.0795],
        [0.6291, 0.1586]])
>>> t = torch.as_strided(x, (2, 2), (1, 2), 1)
tensor([[0.6291, 0.1586],
        [1.0795, 2.1939]])
from_numpy
功能介绍:从numpy.ndarray创建tensor,注意:返回的tensor和ndarray公用同一块memory。改变tensor某个位置的element值也会改变ndarray的对应位置元素的值。同样,改变ndarray内某个位置的value,tensor对应的位置value也会被修改。
函数原型: torch.from_numpy(ndarray)
参数定义:ndarray: numpy.array;
Example:
>>> a = numpy.array([1, 2, 3])
>>> t = torch.from_numpy(a)
>>> t
tensor([ 1,  2,  3])
>>> t[0] = -1
>>> a
array([-1,  2,  3])
from_dlpack
功能介绍:从符合dlpack协议的external library创建tensor。需要注意,用户需注意原library的数据属性,比如只读等属性可能会导致未期望的问题等。
函数原型:torch.from_dlpack(ext_tensor)
参数定义:ext_tensor: 具备__dlpack__ 属性或者DLPack封装的对象。
Example:
>>> import torch.utils.dlpack
>>> t = torch.arange(4)

# Convert a tensor directly (supported in PyTorch >= 1.10)
>>> t2 = torch.from_dlpack(t)
>>> t2[:2] = -1  # show that memory is shared
>>> t2
tensor([-1, -1,  2,  3])
>>> t
tensor([-1, -1,  2,  3])

# The old-style DLPack usage, with an intermediate capsule object
>>> capsule = torch.utils.dlpack.to_dlpack(t)
>>> capsule
<capsule object "dltensor" at ...>
>>> t3 = torch.from_dlpack(capsule)
>>> t3
tensor([-1, -1,  2,  3])
>>> t3[0] = -9  # now we're sharing memory between 3 tensors
>>> t3
tensor([-9, -1,  2,  3])
>>> t2
tensor([-9, -1,  2,  3])
>>> t
tensor([-9, -1,  2,  3])
frombuffer
功能介绍:从一段python buffer数据生成1维 tensor。
函数原型:torch.frombuffer(buffer, *, dtype, count=-1, offset=0, requires_grad=False)
参数定义:
- buffer: python buffer;
- dtype: 生成的Tensor的数据类型;
- count:表示1维tensor的元素个数,为正数表示从offset开始,创建多少个tensor元素。为负数表示从offset开始的整个buffer能创建的最大tensor元素个数,即 length/sizeof(dtype);
- offset:表示从buffer的第offset个bytes开始创建tensor。
注意:
- 和前几个函数一样,生成的Tensor和buffer共享memory空间。
- 此函数处理的buffer数据不在CPU上会导致发生异常segmentation fault。
- 此函数不会转换数据类型,指定的dtype数据类型必须和原始输入的buffer的数据类型一致。
Example:
>>> import array
>>> a = array.array('i', [1, 2, 3])
>>> t = torch.frombuffer(a, dtype=torch.int32)
>>> t
tensor([ 1,  2,  3])
>>> t[0] = -1
>>> a
array([-1,  2,  3])

>>> # Interprets the signed char bytes as 32-bit integers.
>>> # Each 4 signed char elements will be interpreted as
>>> # 1 signed 32-bit integer.
>>> import array
>>> a = array.array('b', [-1, 0, 0, 0])
>>> torch.frombuffer(a, dtype=torch.int32)
tensor([255], dtype=torch.int32)
Tensor数据初始化
zeros
功能介绍:Tensor数据全部初始化为0
函数原型:torch.zeros(*size, *, out=None, dtype=None, layout=torch.strided, device=None)
参数定义:
- 必选:size: tensor的大小和维度。
- 可选:
- out: 输出tensor。
- dtype: 数据类型。
- layout: 输出tensor的layout。
- device: CPU or CUDA.
Example:
>>> torch.zeros(2, 3)
tensor([[ 0.,  0.,  0.],
        [ 0.,  0.,  0.]])

>>> torch.zeros(5)
tensor([ 0.,  0.,  0.,  0.,  0.])
zeros_like
功能介绍:从已知tensor创建输出tensor,并初始化数据为全0
函数原型:torch.zeros_like(input, *, dtype=None, layout, device=None, ,,)
参数定义:
input: 输入tensor
dtype:数据类型
Example:
>>> input = torch.empty(2, 3)
>>> torch.zeros_like(input)
tensor([[ 0.,  0.,  0.],
        [ 0.,  0.,  0.]])
ones:
功能介绍:等同于zeros,唯一的区别是将tensor所有数据初始化为全1.
Example:
>>> torch.ones(2, 3)
tensor([[ 1.,  1.,  1.],
        [ 1.,  1.,  1.]])

>>> torch.ones(5)
tensor([ 1.,  1.,  1.,  1.,  1.])
ones_like
功能介绍: 等同于zeros_like, 区别同ones和zeros。
Example:
>>> input = torch.empty(2, 3)
>>> torch.ones_like(input)
tensor([[ 1.,  1.,  1.],
        [ 1.,  1.,  1.]])
arange
功能介绍:生成一个元素的值从start开始,到end(不包含)结束,size=(end-start)/step的1维tensor.
函数原型:torch.arange(start=0, end, step=1, *, out=None, dtype=None,,,)
关键参数定义:
start: 开始的值。
end:结束值
step:递增步进值。
注意:step必须是int类型。
Example:
>>> torch.arange(5)
tensor([ 0,  1,  2,  3,  4])
>>> torch.arange(1, 4)
tensor([ 1,  2,  3])
>>> torch.arange(1, 2.5, 0.5)
tensor([ 1.0000,  1.5000,  2.0000])
range
注意:Pytorch备注此函数将被废弃。
linspace
功能介绍:生成Tensor,其值为从start到end的线性数据(等差数列)。即
start, start + (end-start)/(steps-1), ,,,, start + (steps - 2) * (end - start) / (steps - 1), end.
函数原型:torch.linspace(start, end, steps, *, out=None, dtype=None,,,)
关键参数定义:
start: 开始的值。
end:结束值
step:递增步进值。
注意:step必须是int类型。
Example:
>>> torch.linspace(3, 10, steps=5)
tensor([  3.0000,   4.7500,   6.5000,   8.2500,  10.0000])
>>> torch.linspace(-10, 10, steps=5)
tensor([-10.,  -5.,   0.,   5.,  10.])
>>> torch.linspace(start=-10, end=10, steps=5)
tensor([-10.,  -5.,   0.,   5.,  10.])
>>> torch.linspace(start=-10, end=10, steps=1)
tensor([-10.])
logspace
功能介绍:生成Tensor,其值为从以base为底的start到end的幂指数排列。即
函数原型:torch.logspace(start, end, steps, base=10.0, *, out=None, dtype=None,,,)
关键参数定义:
start: 开始的值。
end:结束值
step:递增步进值。
base: Log的底。
注意:step必须是int类型。
Example:
>>> torch.logspace(start=-10, end=10, steps=5)
tensor([ 1.0000e-10,  1.0000e-05,  1.0000e+00,  1.0000e+05,  1.0000e+10])
>>> torch.logspace(start=0.1, end=1.0, steps=5)
tensor([  1.2589,   2.1135,   3.5481,   5.9566,  10.0000])
>>> torch.logspace(start=0.1, end=1.0, steps=1)
tensor([1.2589])
>>> torch.logspace(start=2, end=2, steps=1, base=2)
tensor([4.0])
eye
功能介绍:生成对角线矩阵,对角线上的值为0,其他位置为0。
函数原型:torch.eye(*size, *, out=None, dtype=None,,,)
Example:
>>> torch.eye(3)
tensor([[ 1.,  0.,  0.],
        [ 0.,  1.,  0.],
        [ 0.,  0.,  1.]])
empty
功能介绍:生成Tensor,其数据未初始化。注意:未初始化不是0或者1的意思。
函数原型:torch.empty(*size, *, out=None, dtype=None,,,)
Example:
>>> torch.empty((2,3), dtype=torch.int64)
tensor([[ 9.4064e+13,  2.8000e+01,  9.3493e+13],
        [ 7.5751e+18,  7.1428e+18,  7.5955e+18]])
empty_like
功能介绍:和empty一样,只是需要提供一个参考输入tensor,此函数获取input tensor size,并产生一个empty的tensor返回。
函数原型:torch.empty_like(input, *, out=None, dtype=None,,,)
Example:
>>> a=torch.empty((2,3), dtype=torch.int32, device = 'cuda')
>>> torch.empty_like(a)
tensor([[0, 0, 0],
        [0, 0, 0]], device='cuda:0', dtype=torch.int32)
empty_strided
功能介绍:生成一个大小为size,指定stride的Tensor,数据未初始化。
函数原型:torch.empty_strided(size, stride, *, dtype=None,,,,)
Example:
>>> a = torch.empty_strided((2, 3), (1, 2))
>>> a
tensor([[8.9683e-44, 4.4842e-44, 5.1239e+07],
        [0.0000e+00, 0.0000e+00, 3.0705e-41]])
>>> a.stride()
(1, 2)
>>> a.size()
torch.Size([2, 3])
full
功能介绍:创建一个符合参数size,值为指定的fill_value的Tensor。
函数原型:torch.full(size, fill_value, *, out=None, dtype=None,,,)
Example:
>>> torch.full((2, 3), 3.141592)
tensor([[ 3.1416,  3.1416,  3.1416],
        [ 3.1416,  3.1416,  3.1416]])
full_like
功能介绍:功能和full一样,输入的参数由size换成输入tensor。此函数创建的Tensor,size和input tensor一样,其他功能和full函数一致。
函数原型:torch.full_like(input, fill_value, *, out=None, dtype=None,,,)
Tensor数据类型转换
quantize_per_tensor
功能介绍:将Tensor内的元素“量化”操作成dtype类型(quint8, qint8, uint32)的数据。基本计算方式为:
output[i] = (input[i] / scale) + zero_point
函数原型:torch.quantize_per_tensor(input, scale, zero_point, dtype)
Example:
>>> torch.quantize_per_tensor(torch.tensor([-1.0, 0.0, 1.0, 2.0]), 0.1, 10, torch.quint8)
tensor([-1.,  0.,  1.,  2.], size=(4,), dtype=torch.quint8,
       quantization_scheme=torch.per_tensor_affine, scale=0.1, zero_point=10)
>>> torch.quantize_per_tensor(torch.tensor([-1.0, 0.0, 1.0, 2.0]), 0.1, 10, torch.quint8).int_repr()
tensor([ 0, 10, 20, 30], dtype=torch.uint8)
>>> torch.quantize_per_tensor([torch.tensor([-1.0, 0.0]), torch.tensor([-2.0, 2.0])],
>>> torch.tensor([0.1, 0.2]), torch.tensor([10, 20]), torch.quint8)
(tensor([-1.,  0.], size=(2,), dtype=torch.quint8,
    quantization_scheme=torch.per_tensor_affine, scale=0.1, zero_point=10),
    tensor([-2.,  2.], size=(2,), dtype=torch.quint8,
    quantization_scheme=torch.per_tensor_affine, scale=0.2, zero_point=20))
>>> torch.quantize_per_tensor(torch.tensor([-1.0, 0.0, 1.0, 2.0]), torch.tensor(0.1), torch.tensor(10), torch.quint8)
tensor([-1.,  0.,  1.,  2.], size=(4,), dtype=torch.quint8,
   quantization_scheme=torch.per_tensor_affine, scale=0.10, zero_point=10)
quantize_per_channel
- 功能介绍:将Tensor内的元素“量化”操作成dtype类型(quint8, qint8, qint32)的数据。和per tensor的区别是,此函数的scale和zero_point是1维数组,每个元素代表每个channel;基本计算方式为:
- output[i] = (input[i] / scale[c]) + zero_point[c]
- 函数原型:torch.quantize_per_channel(input, scale, zero_point, axis, dtype)
- input: 要被量化的原始Float tensor.
- scale:量化的Scale,Per channel的1维数组。
- zero_points:量化参数zero-points,Per channel的1维数组。
- axis:Per-channel quantize的channel方向(0: 坐标轴X方向,1:坐标轴Y方向,2:坐标轴C方向,,以此类推tensor的维度,或者(WHC...)
Example:
>>> x = torch.tensor([[-1.0, 0.0], [1.0, 2.0]])
>>> torch.quantize_per_channel(x, torch.tensor([0.1, 0.01]), torch.tensor([10, 0]), 0, torch.quint8)
tensor([[-1.,  0.],
        [ 1.,  2.]], size=(2, 2), dtype=torch.quint8,
       quantization_scheme=torch.per_channel_affine,
       scale=tensor([0.1000, 0.0100], dtype=torch.float64),
       zero_point=tensor([10,  0]), axis=0)
>>> torch.quantize_per_channel(x, torch.tensor([0.1, 0.01]), torch.tensor([10, 0]), 0, torch.quint8).int_repr()
tensor([[  0,  10],
        [100, 200]], dtype=torch.uint8)
dequantize
- 功能介绍:将经过量化之后的Tensor,反量化成fp32.
- 函数原型:torch.dequantize(tensor)
complex
- 功能介绍:根据输入的实部和虚部tensor,创建复数tensor。
- 函数原型:torch.complex(real, imag, *, out=None)
- 关键参数定义:
- real:实部Tensor。dtype只能是:half/float/double
- imag:虚部Tensor。dtype需要和real tensor保持一致。
- out:如果input dtype是float32, 则output dtype必须是:complex64;如果input 的type是float64, 则output dtype必须是:complex128
- Example:
>>> real = torch.tensor([1, 2], dtype=torch.float32)
>>> imag = torch.tensor([3, 4], dtype=torch.float32)
>>> z = torch.complex(real, imag)
>>> z
tensor([(1.+3.j), (2.+4.j)])
>>> z.dtype
torch.complex64
polar
- 功能介绍:创建极坐标系表述的复数Tensor
- 函数原型:torch.polar(abs, angle, *, out=None)
- out = abs * cos(angle) + abs * sin(angle) * j
- Example:
>>> import numpy as np
>>> abs = torch.tensor([1, 2], dtype=torch.float64)
>>> angle = torch.tensor([np.pi / 2, 5 * np.pi / 4], dtype=torch.float64)
>>> z = torch.polar(abs, angle)
>>> z
tensor([(0.0000+1.0000j), (-1.4142-1.4142j)], dtype=torch.complex128)
heaviside
- 功能介绍:计算阶跃函数(赫维赛德函数)
- 函数原型:torch.heaviside(input, values, *, out=None)
- Example:
>>> input = torch.tensor([-1.5, 0, 2.0])
>>> values = torch.tensor([0.5])
>>> torch.heaviside(input, values)
tensor([0.0000, 0.5000, 1.0000])
>>> values = torch.tensor([1.2, -2.0, 3.5])
>>> torch.heaviside(input, values)
tensor([0., -2., 1.])
本篇结束


 1万+
1万+


 被折叠的 条评论
为什么被折叠?
被折叠的 条评论
为什么被折叠?
 到【灌水乐园】发言


