


快速入门
利用虚幻动态图形UI设计器(Unreal Motion Graphics,UMG)实现VR项目中一些基本的前端菜单。
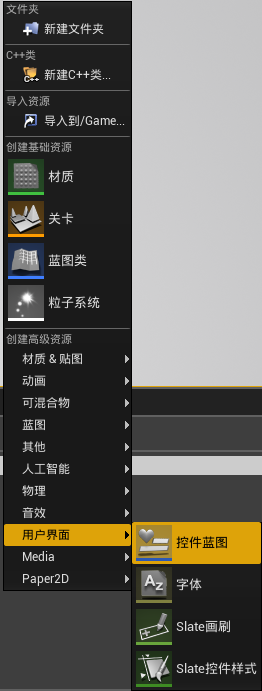
Step 1 在内容浏览器的空白处右击,打开添加新内容菜单,然后在用户界面下选择控件蓝图并命名。
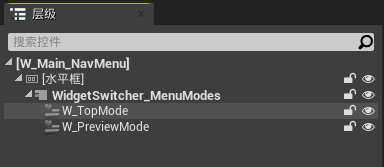
Step 2 打开控件蓝图,访问控件蓝图编辑器(designer),设计一个将在场景关卡中显示的菜单面板,注意选中层级中的“边界”对象后,按中Ctrl的同时选中锚点下拉中的选项可以平铺开。使用控件切换器(switcher)可以很容易地实现菜单的切换。使用枚举可以很好地实现基础控件的复用,如给文本赋值。


Step 3 设计的菜单面板在VR场景关卡中显示需要将控件蓝图添加到一个Actor类蓝图的widget组件中。此外,为了与场景中的3D菜单面板交互,需要添加WidgetInteraction组件。使用鼠标进行交互时需要将组件细节面板中的交互源选为鼠标,使用射线进行交互时交互源则选为自定义。


Step 4 在Actor类蓝图中添加以下逻辑,使得菜单面板始终面向PlayerPawn(若希望面板在场景中保持静止,忽略此步骤即可),注意部分节点的返回值是结构体变量,引脚是可以分离的,分离后方便分别获得三个坐标的值。


Step 5 将Actor类蓝图放置到VR场景关卡中的合适位置,显示的效果如下

使用UMG的用户接口
通过UE4C++来使用UMG
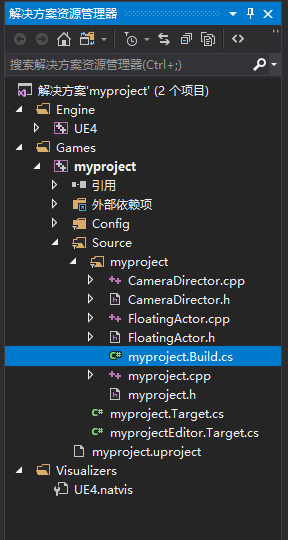
Step 1 修改"<项目名>.Buid.CS"
添加“UMG”到包括了公共模块的列表:
PublicDependencyModuleNames.AddRange(new string[] { "Core", "CoreUObject", "Engine", "InputCore","UMG" });
把“Slate”和“SlateCore”添加到包含了2私有模块的列表中:
PrivateDependencyModuleNames.AddRange(new string[] { "Slate", "SlateCore" });
提供完整的源代码以供检查:
// Fill out your copyright notice in the Description page of Project Settings.

using UnrealBuildTool;

public class myproject : ModuleRules
{
	public myproject(ReadOnlyTargetRules Target) : base(Target)
	{
		PCHUsage = PCHUsageMode.UseExplicitOrSharedPCHs;

		PublicDependencyModuleNames.AddRange(new string[] { "Core", "CoreUObject", "Engine", "InputCore","UMG" });

		PrivateDependencyModuleNames.AddRange(new string[] {  });

		// Uncomment if you are using Slate UI
		PrivateDependencyModuleNames.AddRange(new string[] { "Slate", "SlateCore" });

		// Uncomment if you are using online features
		// PrivateDependencyModuleNames.Add("OnlineSubsystem");

		// To include OnlineSubsystemSteam, add it to the plugins section in your uproject file with the Enabled attribute set to true
	}
}
Step 2 建立自定义的GameMode类,扩展游戏模式

MyGameModeBase.h
// Fill out your copyright notice in the Description page of Project Settings.

#pragma once

#include "Blueprint/UserWidget.h"
#include "CoreMinimal.h"
#include "GameFramework/GameModeBase.h"
#include "MyGameModeBase.generated.h"

/**
 *
 */
UCLASS()
class MYPROJECT_API AMyGameModeBase : public AGameModeBase
{
	//GENERATED_BODY()的行位置变动时会报错,需要在"MyGameModeBase.generated.h"中将"MyGameModeBase_h_<初始行>"替换为"MyGameModeBase_h_<当前行>"
	GENERATED_BODY()

public:
	//在游戏开始时调用
	virtual void BeginPlay() override;

	//移除当前菜单控件并且如果可能,从指定类中创建新控件
	UFUNCTION(BlueprintCallable, Category = "UMG Game")
	void ChangeMenuWidget(TSubclassOf<UUserWidget>NewWidgetClass);

protected:
	//在游戏开始时我们将作为菜单使用的控件类
	UPROPERTY(EditAnywhere,BlueprintReadOnly,Category = "UMG Game")
	TSubclassOf<UUserWidget> StartingWidgetClass;

	//用作为菜单的2控件实例
	UPROPERTY()
	UUserWidget* CurrentWidget;
};
MyGameModeBase.cpp
// Fill out your copyright notice in the Description page of Project Settings.

#include "MyGameModeBase.h"

void AMyGameModeBase::BeginPlay()
{
	//从父类中覆盖函数(由Super子符引用)
	Super::BeginPlay();
	ChangeMenuWidget(StartingWidgetClass);
}

void AMyGameModeBase::ChangeMenuWidget(TSubclassOf<UUserWidget>NewWidgetClass)
{
	if (CurrentWidget != nullptr)
	{
		CurrentWidget->RemoveFromParent();
		CurrentWidget = nullptr;
	}
	if (NewWidgetClass != nullptr)
	{
		CurrentWidget = CreateWidget<UUserWidget>(GetWorld(), NewWidgetClass);
		if (CurrentWidget != nullptr)
		{
			CurrentWidget->AddToViewport();
		}
	}
}
Step 3 新建一个控件蓝图并命名为NewGameMenu(命名可随意,不影响运行结果),在其它蓝图中可以通过以下逻辑调用新建的控件蓝图

参考自:
[1]:https://www.jianshu.com/p/b8c696e371bb
[2]:https://www.52vr.com/extDoc/ue4/CHN/Engine/UMG/HowTo/CreatingWidgets/index.html
[3]:UrealEngin4学习总动员—C++编程


 4153
4153


 被折叠的 条评论
为什么被折叠?
被折叠的 条评论
为什么被折叠?
 到【灌水乐园】发言


