


一、项目介绍
摘要
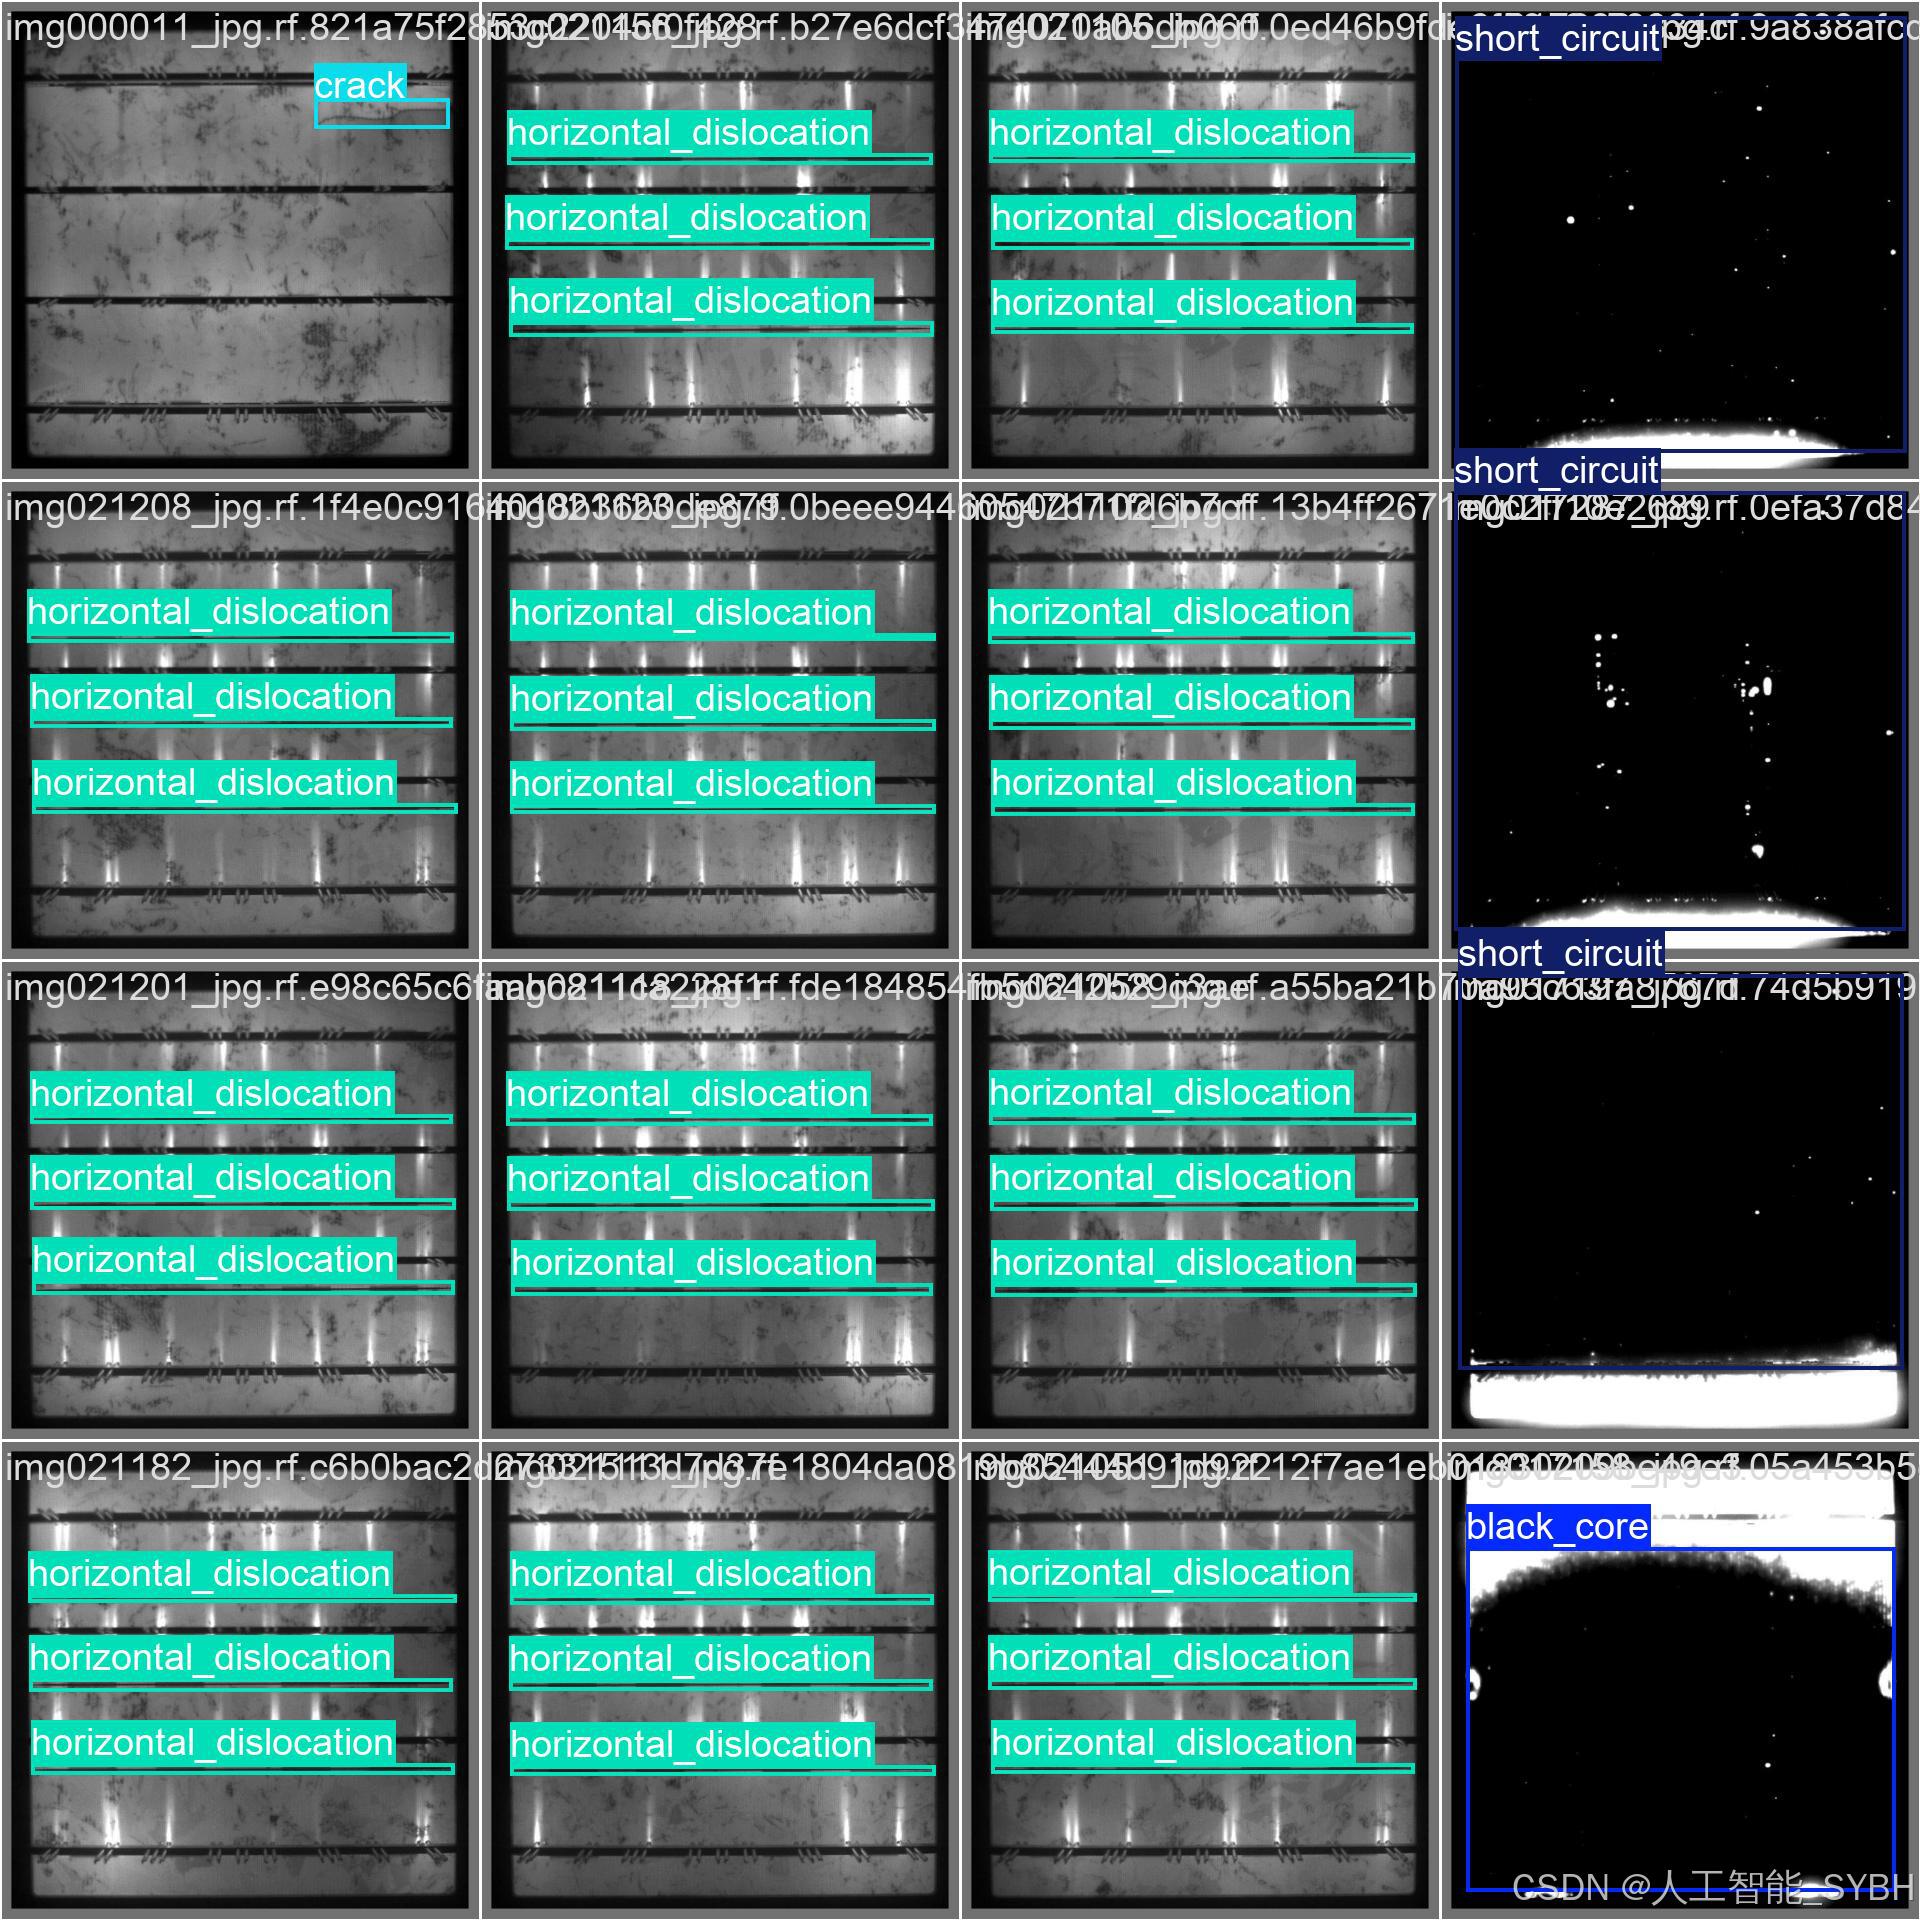
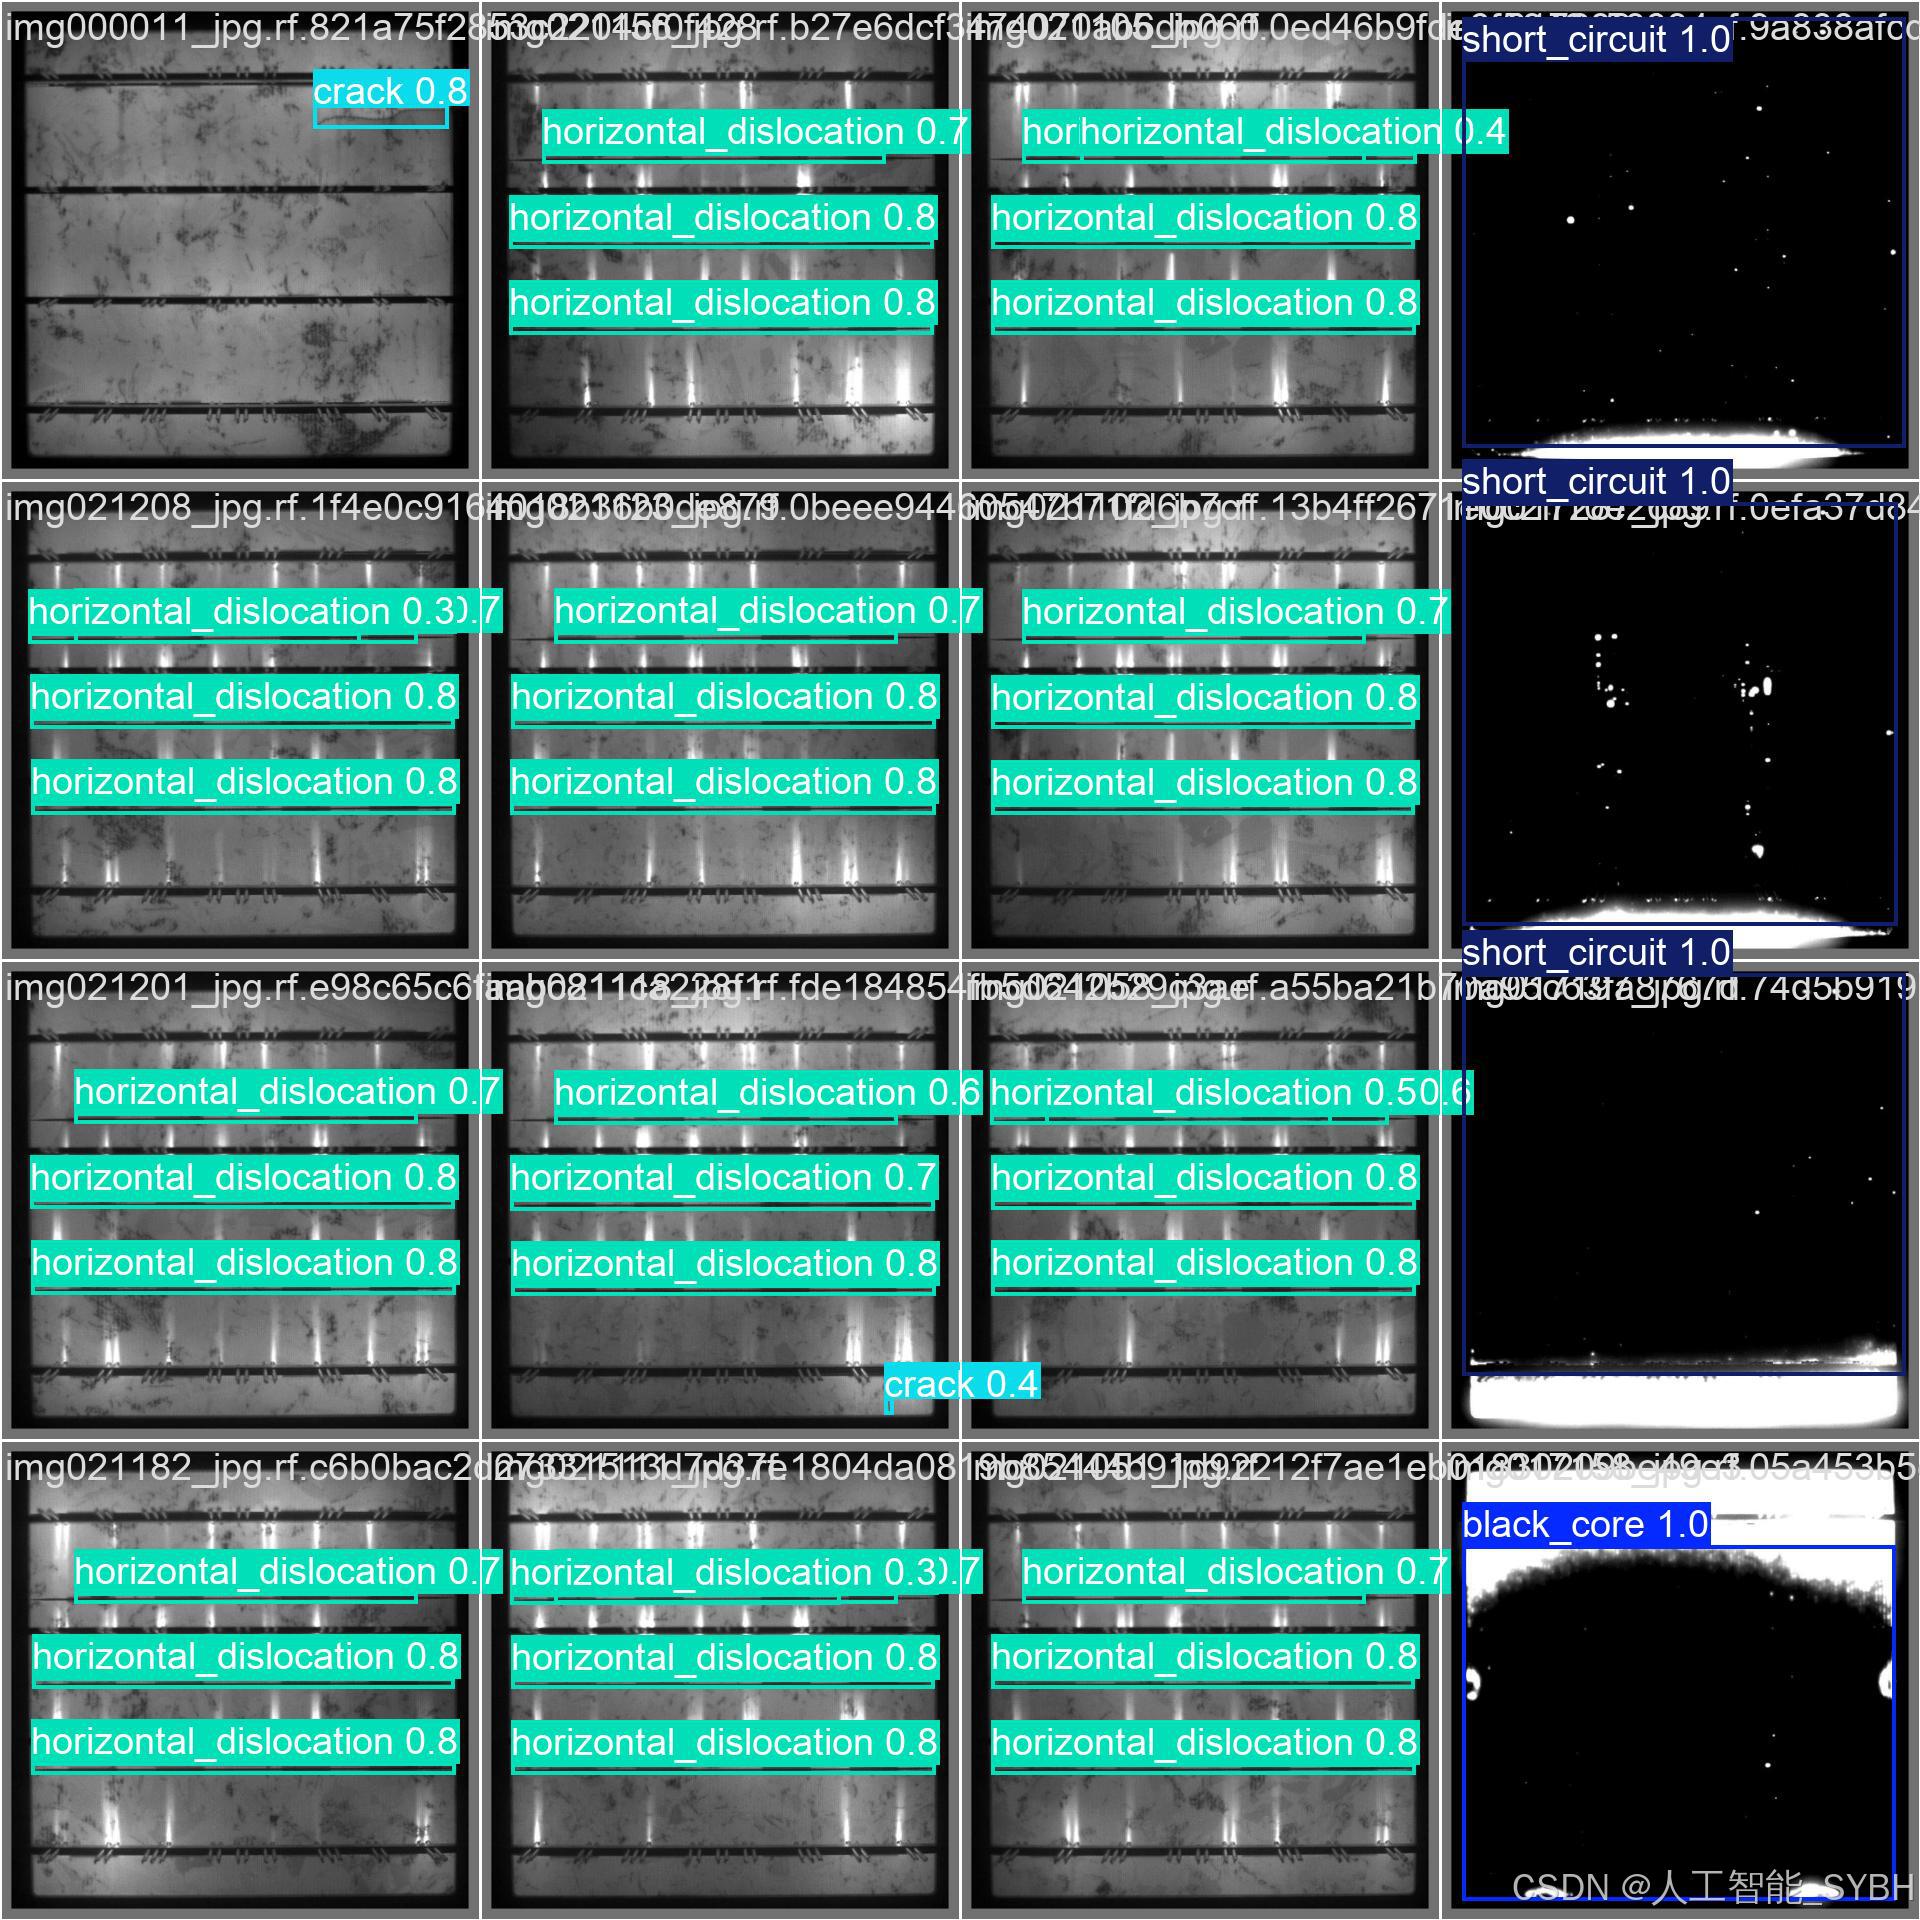
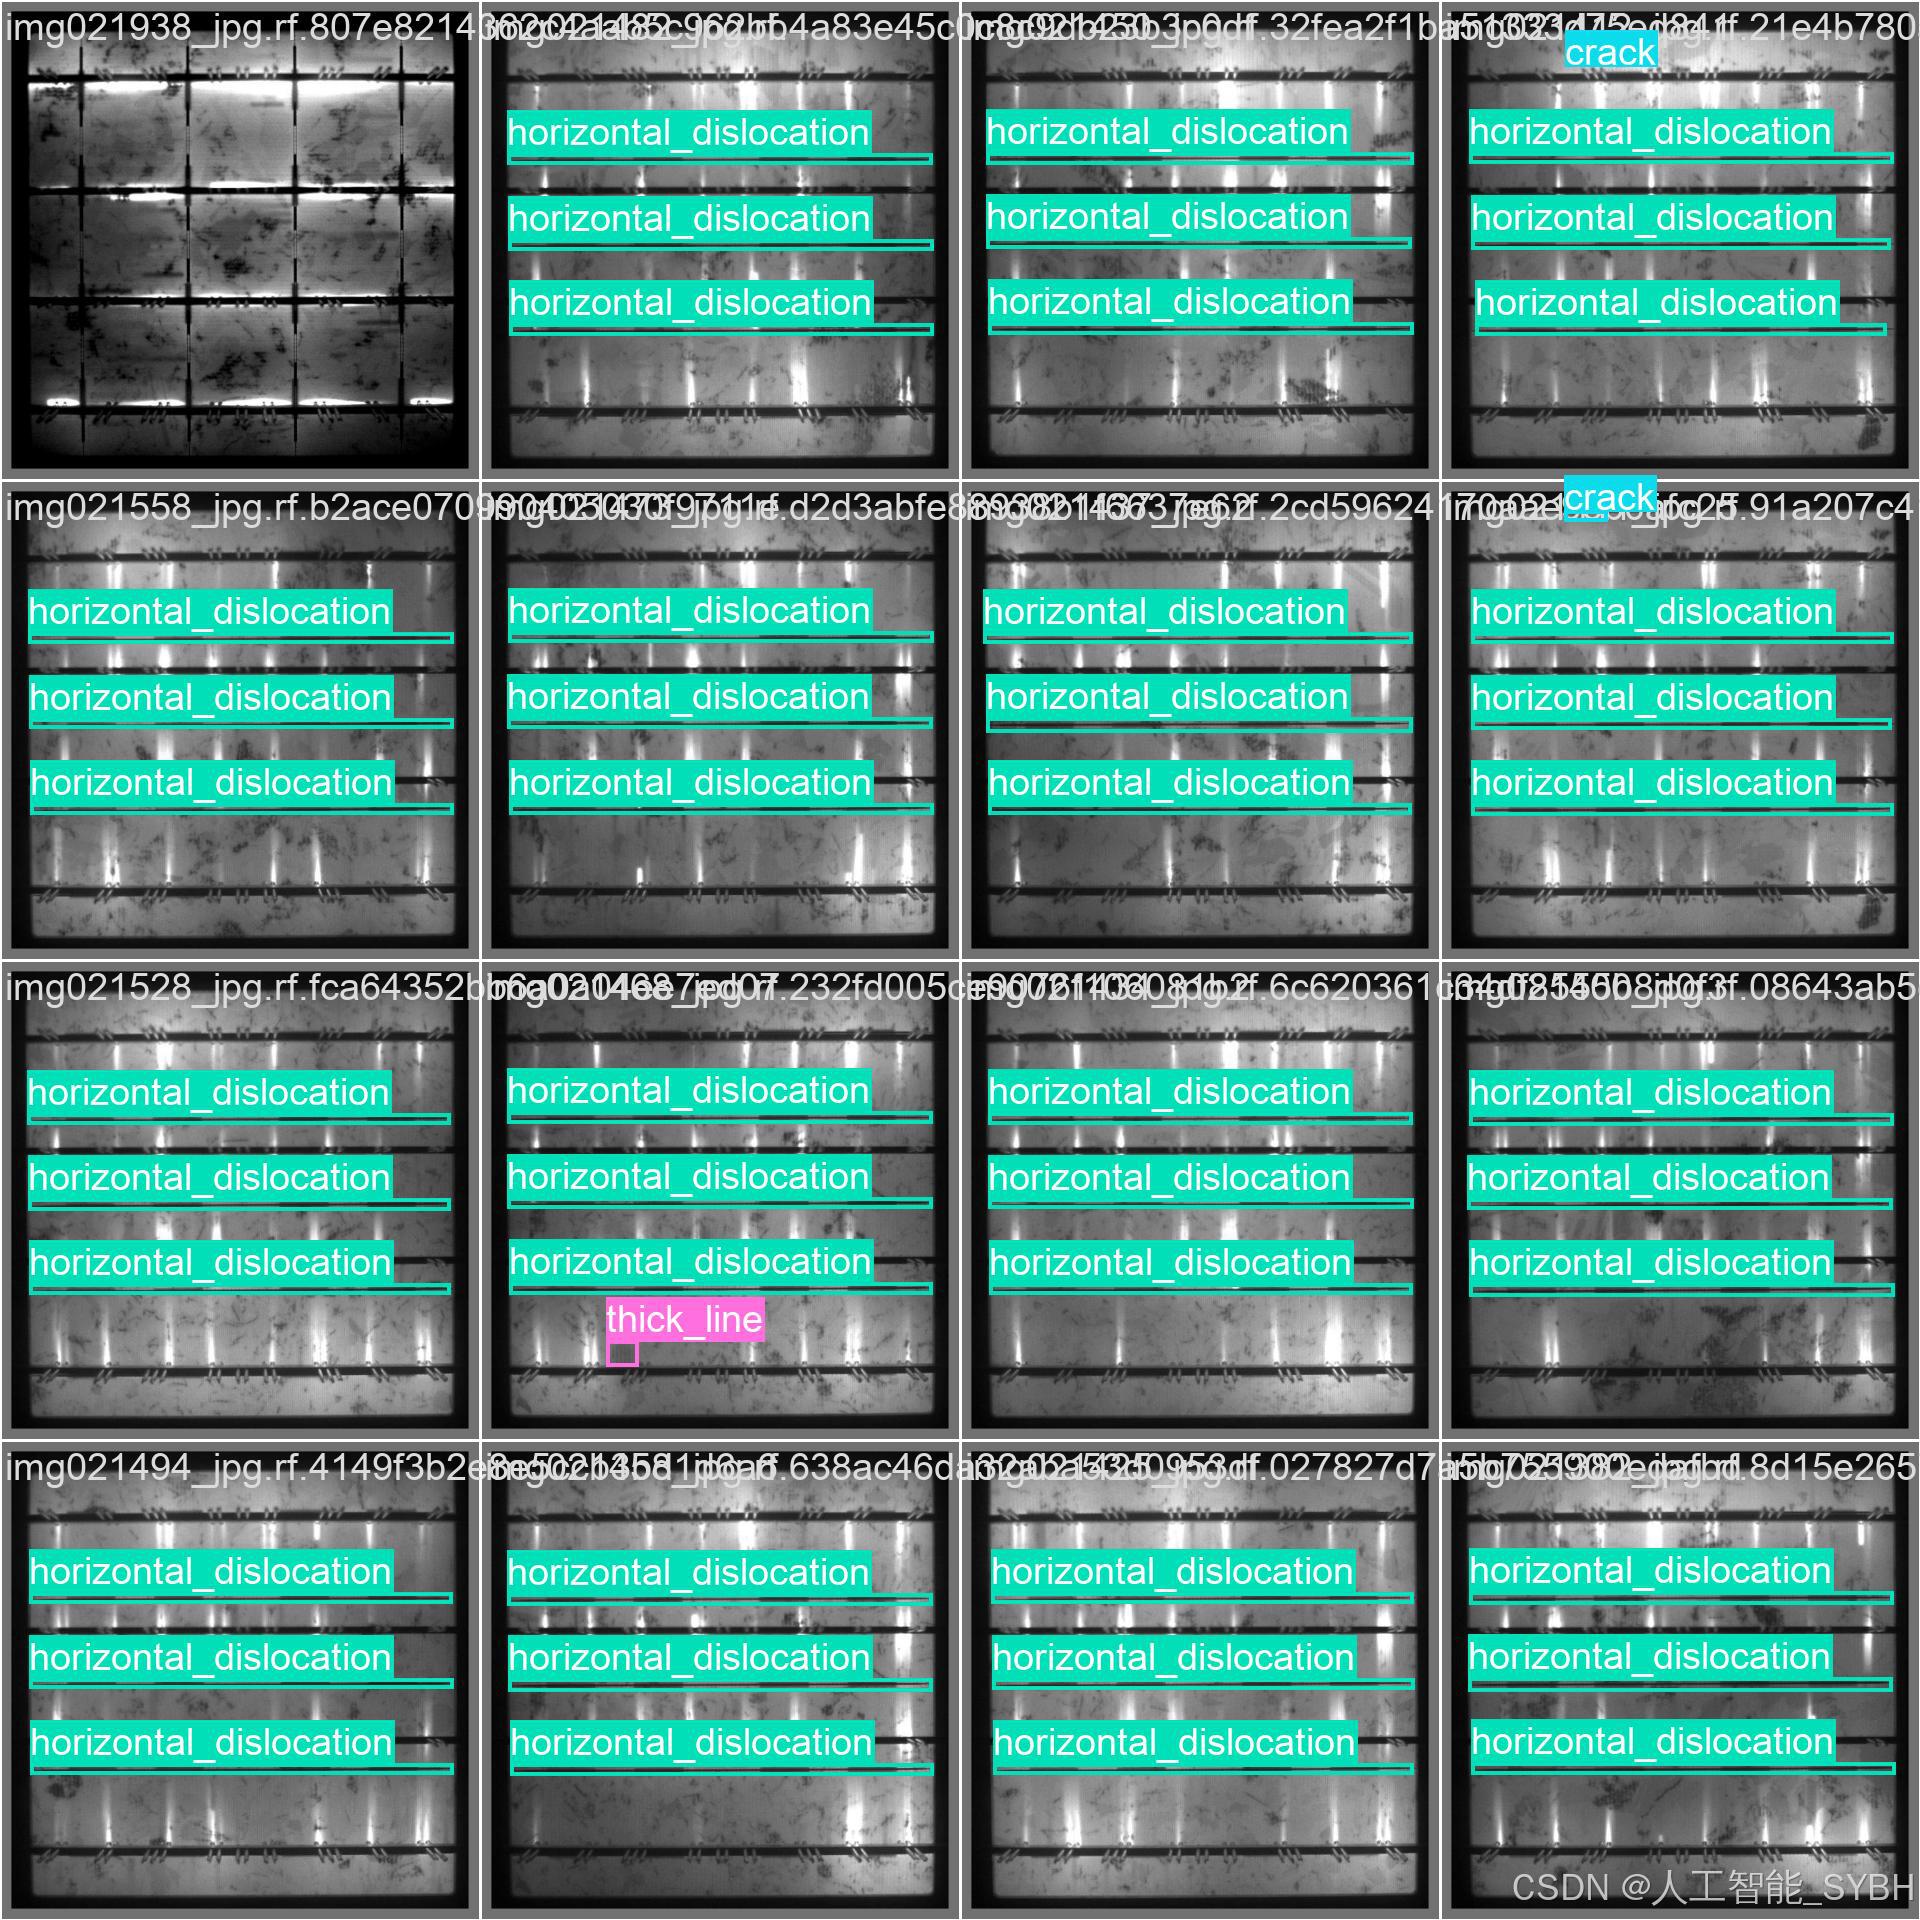
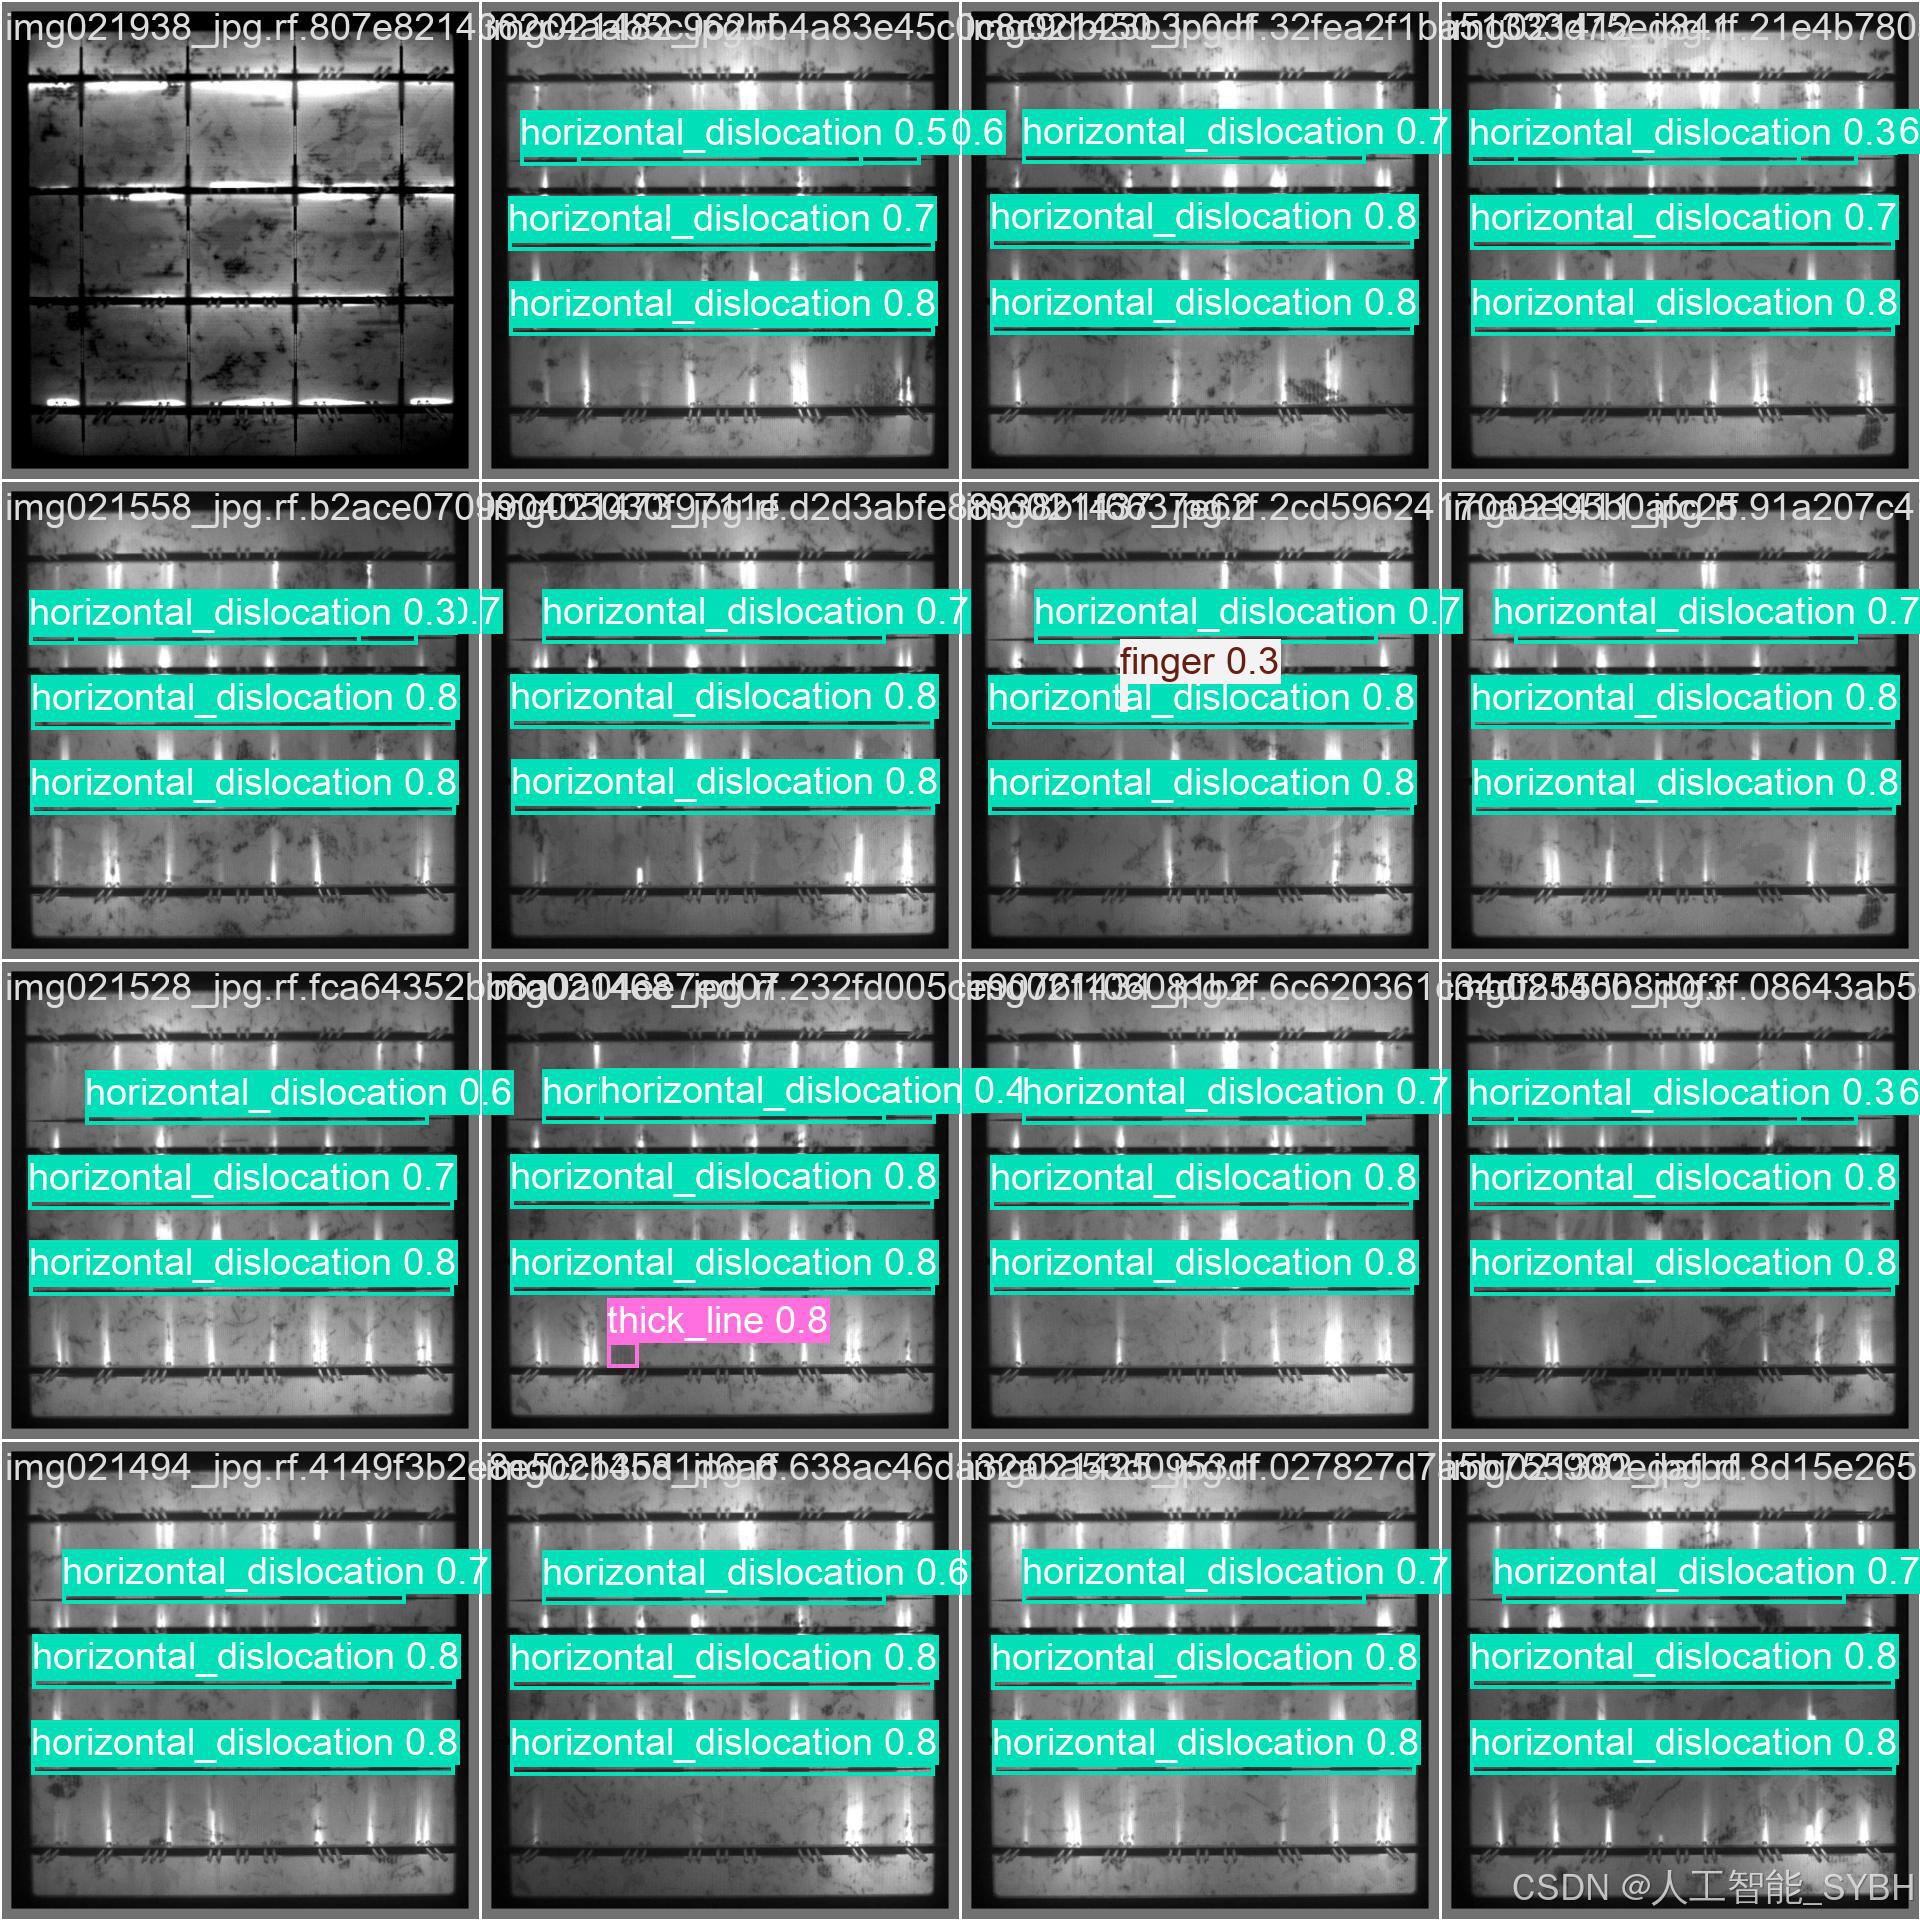
本项目基于YOLOv8深度学习目标检测算法,开发了一套高效、精准的太阳能电池板缺陷自动检测系统,可识别6类常见缺陷,包括:黑芯(black_core)、裂纹(crack)、指状缺陷(finger)、水平错位(horizontal_dislocation)、短路(short_circuit)和粗线(thick_line)。
系统采用高质量标注数据集进行训练和验证,其中训练集3512张、验证集502张、测试集1002张,确保模型具备较高的泛化能力和检测精度。该系统可应用于太阳能电池板生产质检、运维检测等场景,实现自动化缺陷识别,大幅提高检测效率,降低人工成本,助力光伏行业智能化升级。
项目意义
1. 光伏行业的质量控制需求
太阳能电池板作为可再生能源的核心组件,其质量直接影响发电效率和使用寿命。传统人工检测方式存在效率低、漏检率高、主观性强等问题,而自动化缺陷检测系统能够:
-
提高检测速度(毫秒级识别)
-
提升检测精度(减少漏检和误检)
-
降低人工成本(减少对专业质检人员的依赖)
2. 技术创新与工业应用价值
本项目采用YOLOv8这一先进的深度学习模型,相比传统机器视觉方法具有以下优势:
-
端到端检测:直接输入图像,输出缺陷类别和位置,无需复杂预处理
-
高精度与实时性:适用于产线高速检测,满足工业级应用需求
-
多缺陷同时检测:支持6类缺陷的并行识别,提高检测覆盖率
-
适应复杂背景:对光照变化、电池板纹理等干扰具有较强鲁棒性
3. 经济效益分析
-
减少废品率:早期缺陷检测可避免不良品流入市场,降低售后维修成本
-
提高生产效率:自动化检测比人工检测快数倍以上,适用于大规模产线
-
延长电池板寿命:运维阶段及时发现缺陷,避免发电效率下降,提升投资回报率(ROI)
4. 行业与社会价值
-
推动智能制造:符合工业4.0趋势,促进光伏行业智能化升级
-
助力绿色能源发展:提高太阳能电池板可靠性,增强可再生能源竞争力
-
标准化检测流程:减少人为误差,建立可复制的智能质检方案
5. 未来拓展方向
本系统可进一步优化并应用于:
-
无人机巡检(光伏电站大规模缺陷筛查)
-
边缘计算部署(嵌入式设备实时检测)
-
缺陷预测分析(结合历史数据优化生产工艺)
结论
本项目开发的YOLOv8太阳能电池板缺陷检测系统,在生产效率、质量控制、成本优化等方面具有显著价值,可广泛应用于光伏制造、运维检测等领域,推动行业向智能化、自动化方向发展,为清洁能源的可持续发展提供技术支撑。
目录
七、项目源码(视频简介内)
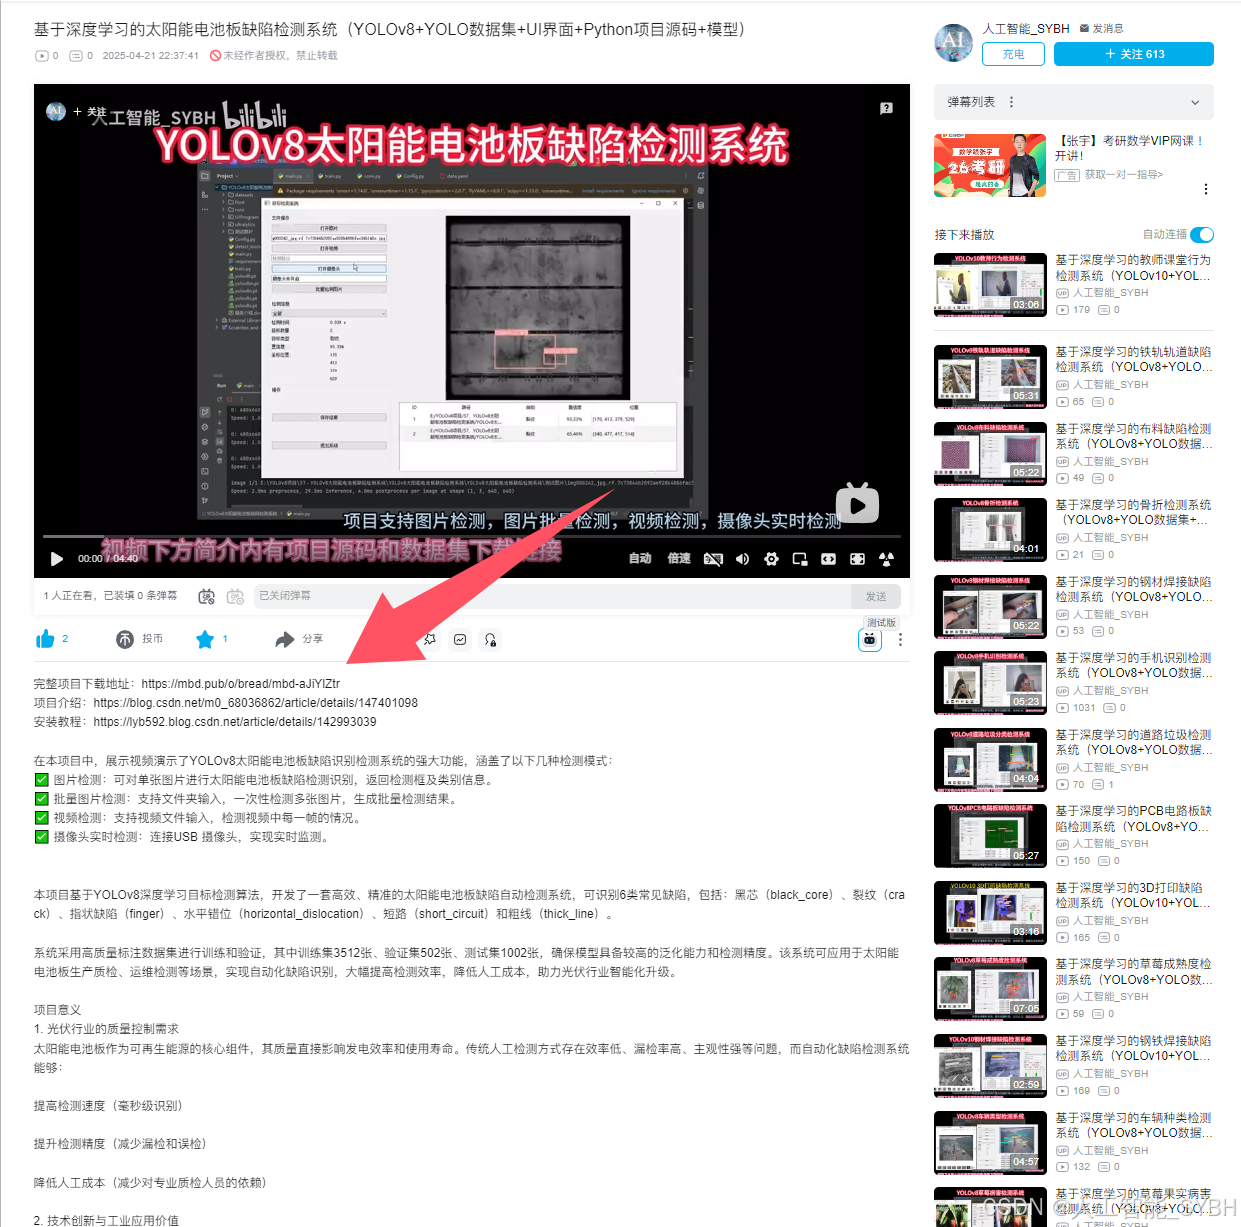
基于深度学习的太阳能电池板缺陷检测系统(YOLOv8+YOLO数据集+UI界面+Python项目源码+模型)_哔哩哔哩_bilibili
基于深度学习的太阳能电池板缺陷检测系统(YOLOv8+YOLO数据集+UI界面+Python项目源码+模型)
二、项目功能展示
系统功能
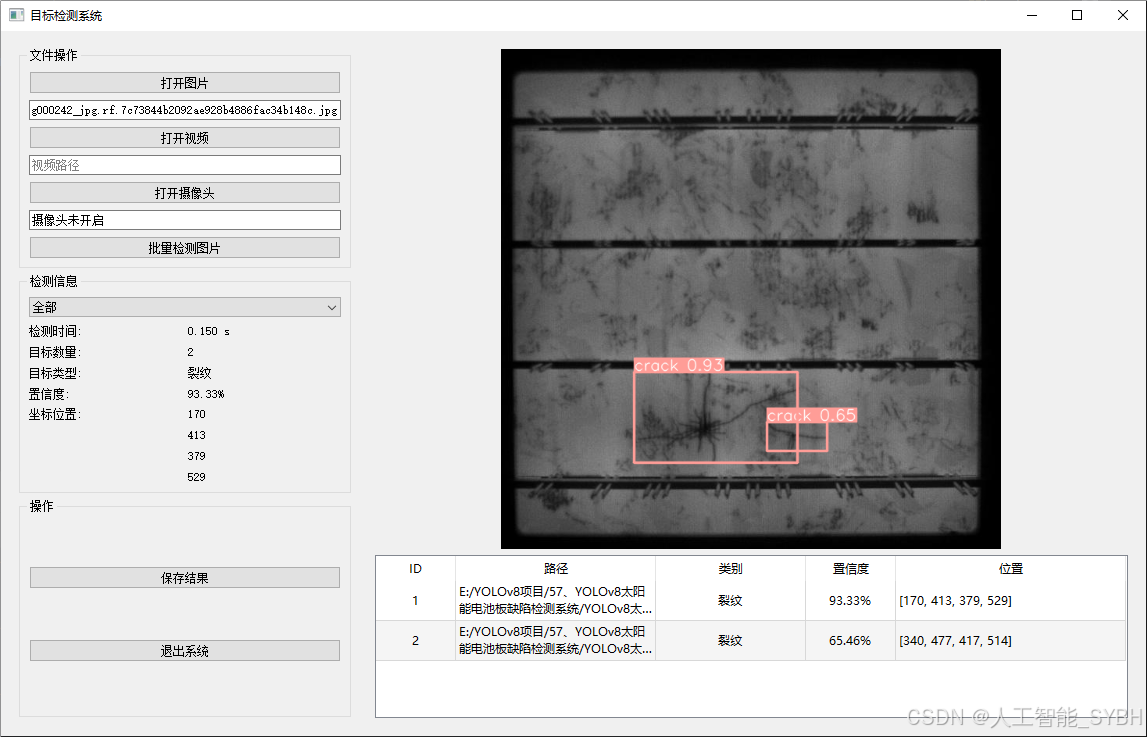
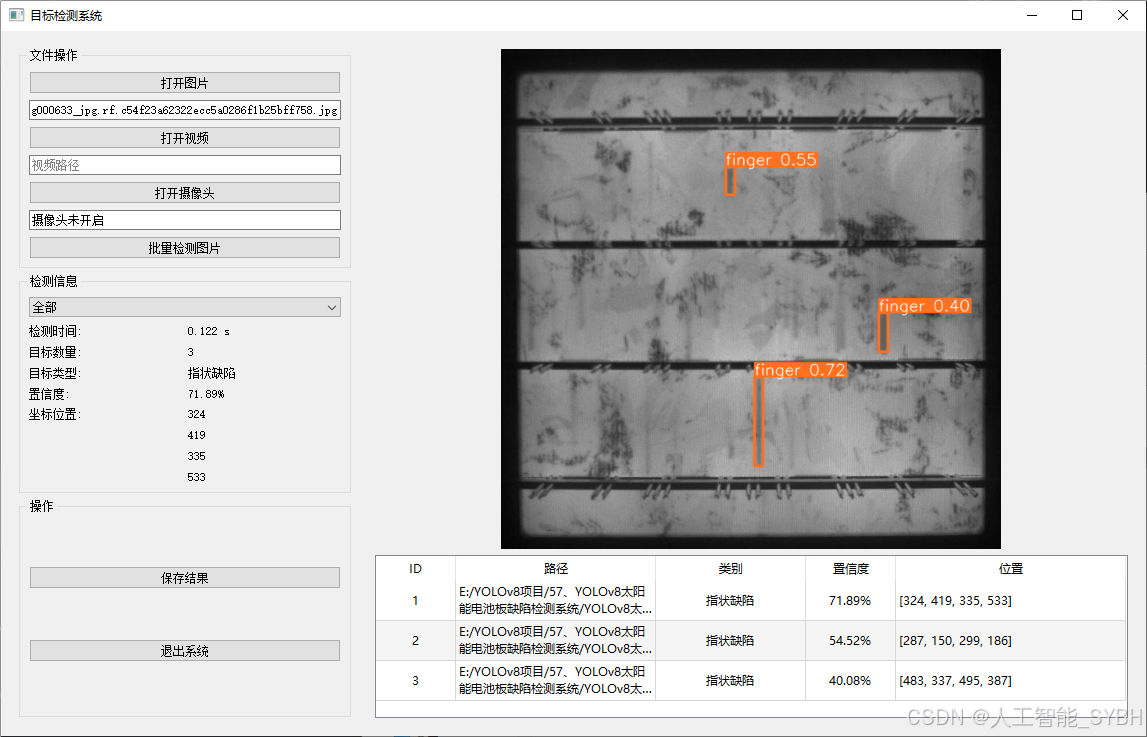
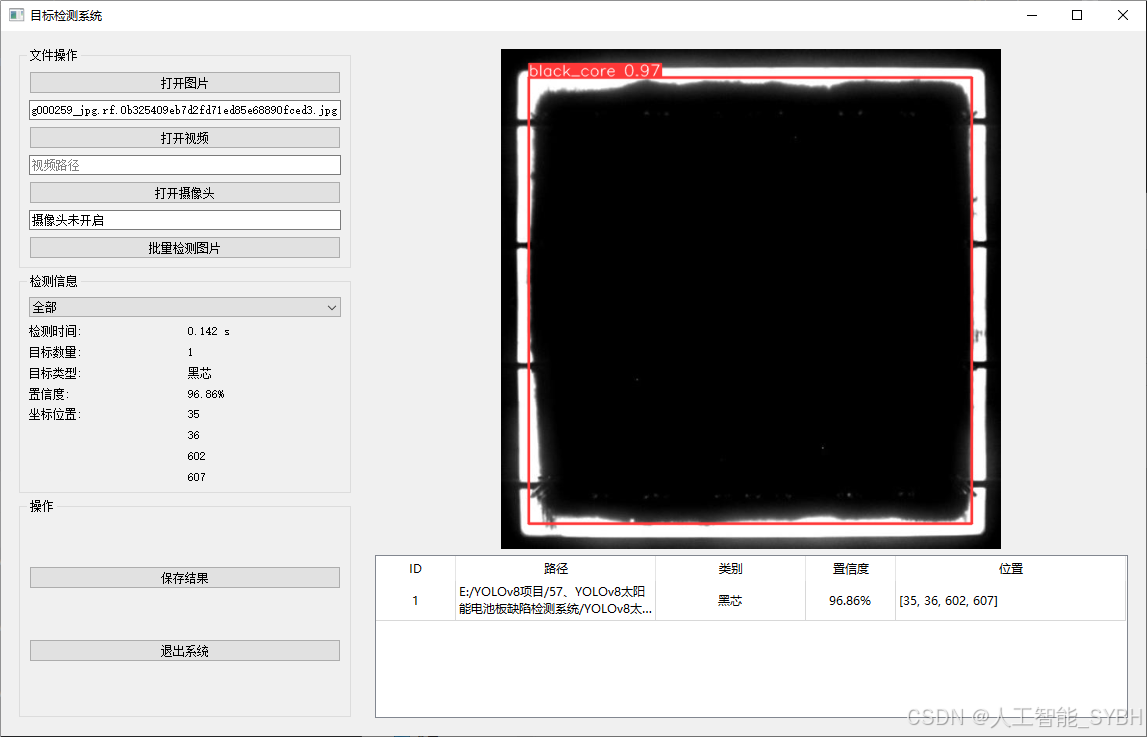
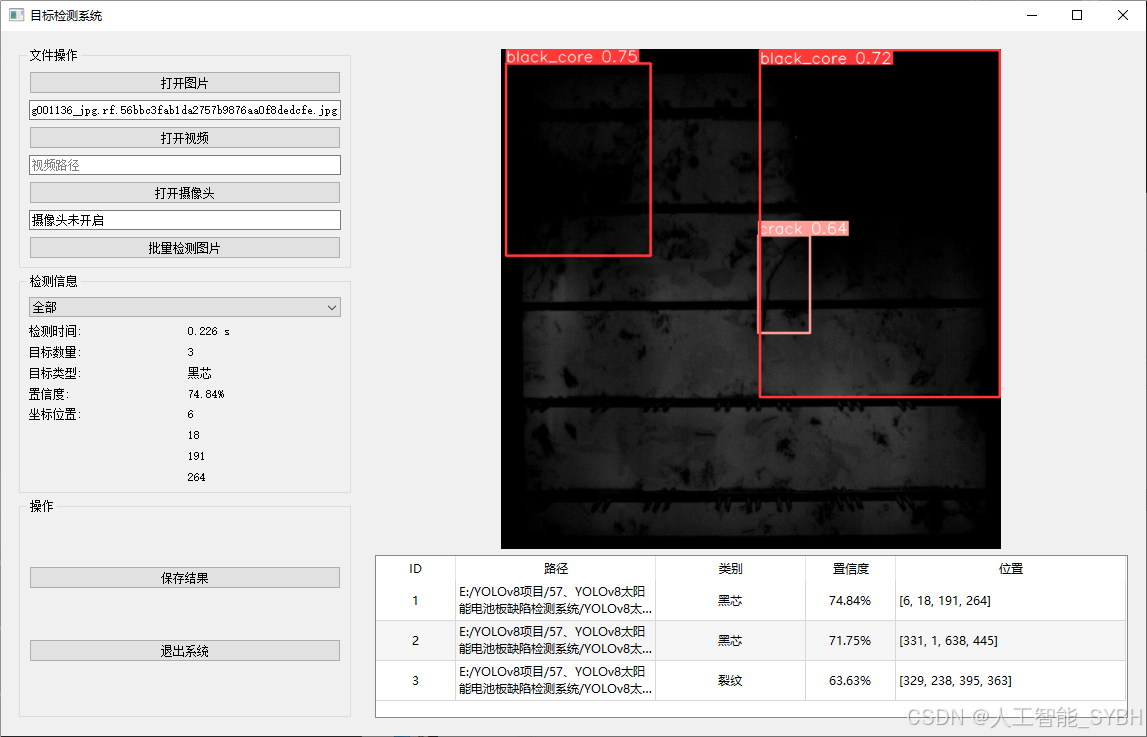
✅ 图片检测:可对单张图片进行检测,返回检测框及类别信息。
✅ 批量图片检测:支持文件夹输入,一次性检测多张图片,生成批量检测结果。
✅ 视频检测:支持视频文件输入,检测视频中每一帧的情况。
✅ 摄像头实时检测:连接USB 摄像头,实现实时监测,

-
图片检测
该功能允许用户通过单张图片进行目标检测。输入一张图片后,YOLO模型会实时分析图像,识别出其中的目标,并在图像中框出检测到的目标,输出带有目标框的图像。批量图片检测
用户可以一次性上传多个图片进行批量处理。该功能支持对多个图像文件进行并行处理,并返回每张图像的目标检测结果,适用于需要大规模处理图像数据的应用场景。
-
视频检测
视频检测功能允许用户将视频文件作为输入。YOLO模型将逐帧分析视频,并在每一帧中标记出检测到的目标。最终结果可以是带有目标框的视频文件或实时展示,适用于视频监控和分析等场景。
-
摄像头实时检测
该功能支持通过连接摄像头进行实时目标检测。YOLO模型能够在摄像头拍摄的实时视频流中进行目标检测,实时识别并显示检测结果。此功能非常适用于安防监控、无人驾驶、智能交通等应用,提供即时反馈。
核心特点:
- 高精度:基于YOLO模型,提供精确的目标检测能力,适用于不同类型的图像和视频。
- 实时性:特别优化的算法使得实时目标检测成为可能,无论是在视频还是摄像头实时检测中,响应速度都非常快。
- 批量处理:支持高效的批量图像和视频处理,适合大规模数据分析。
三、数据集介绍
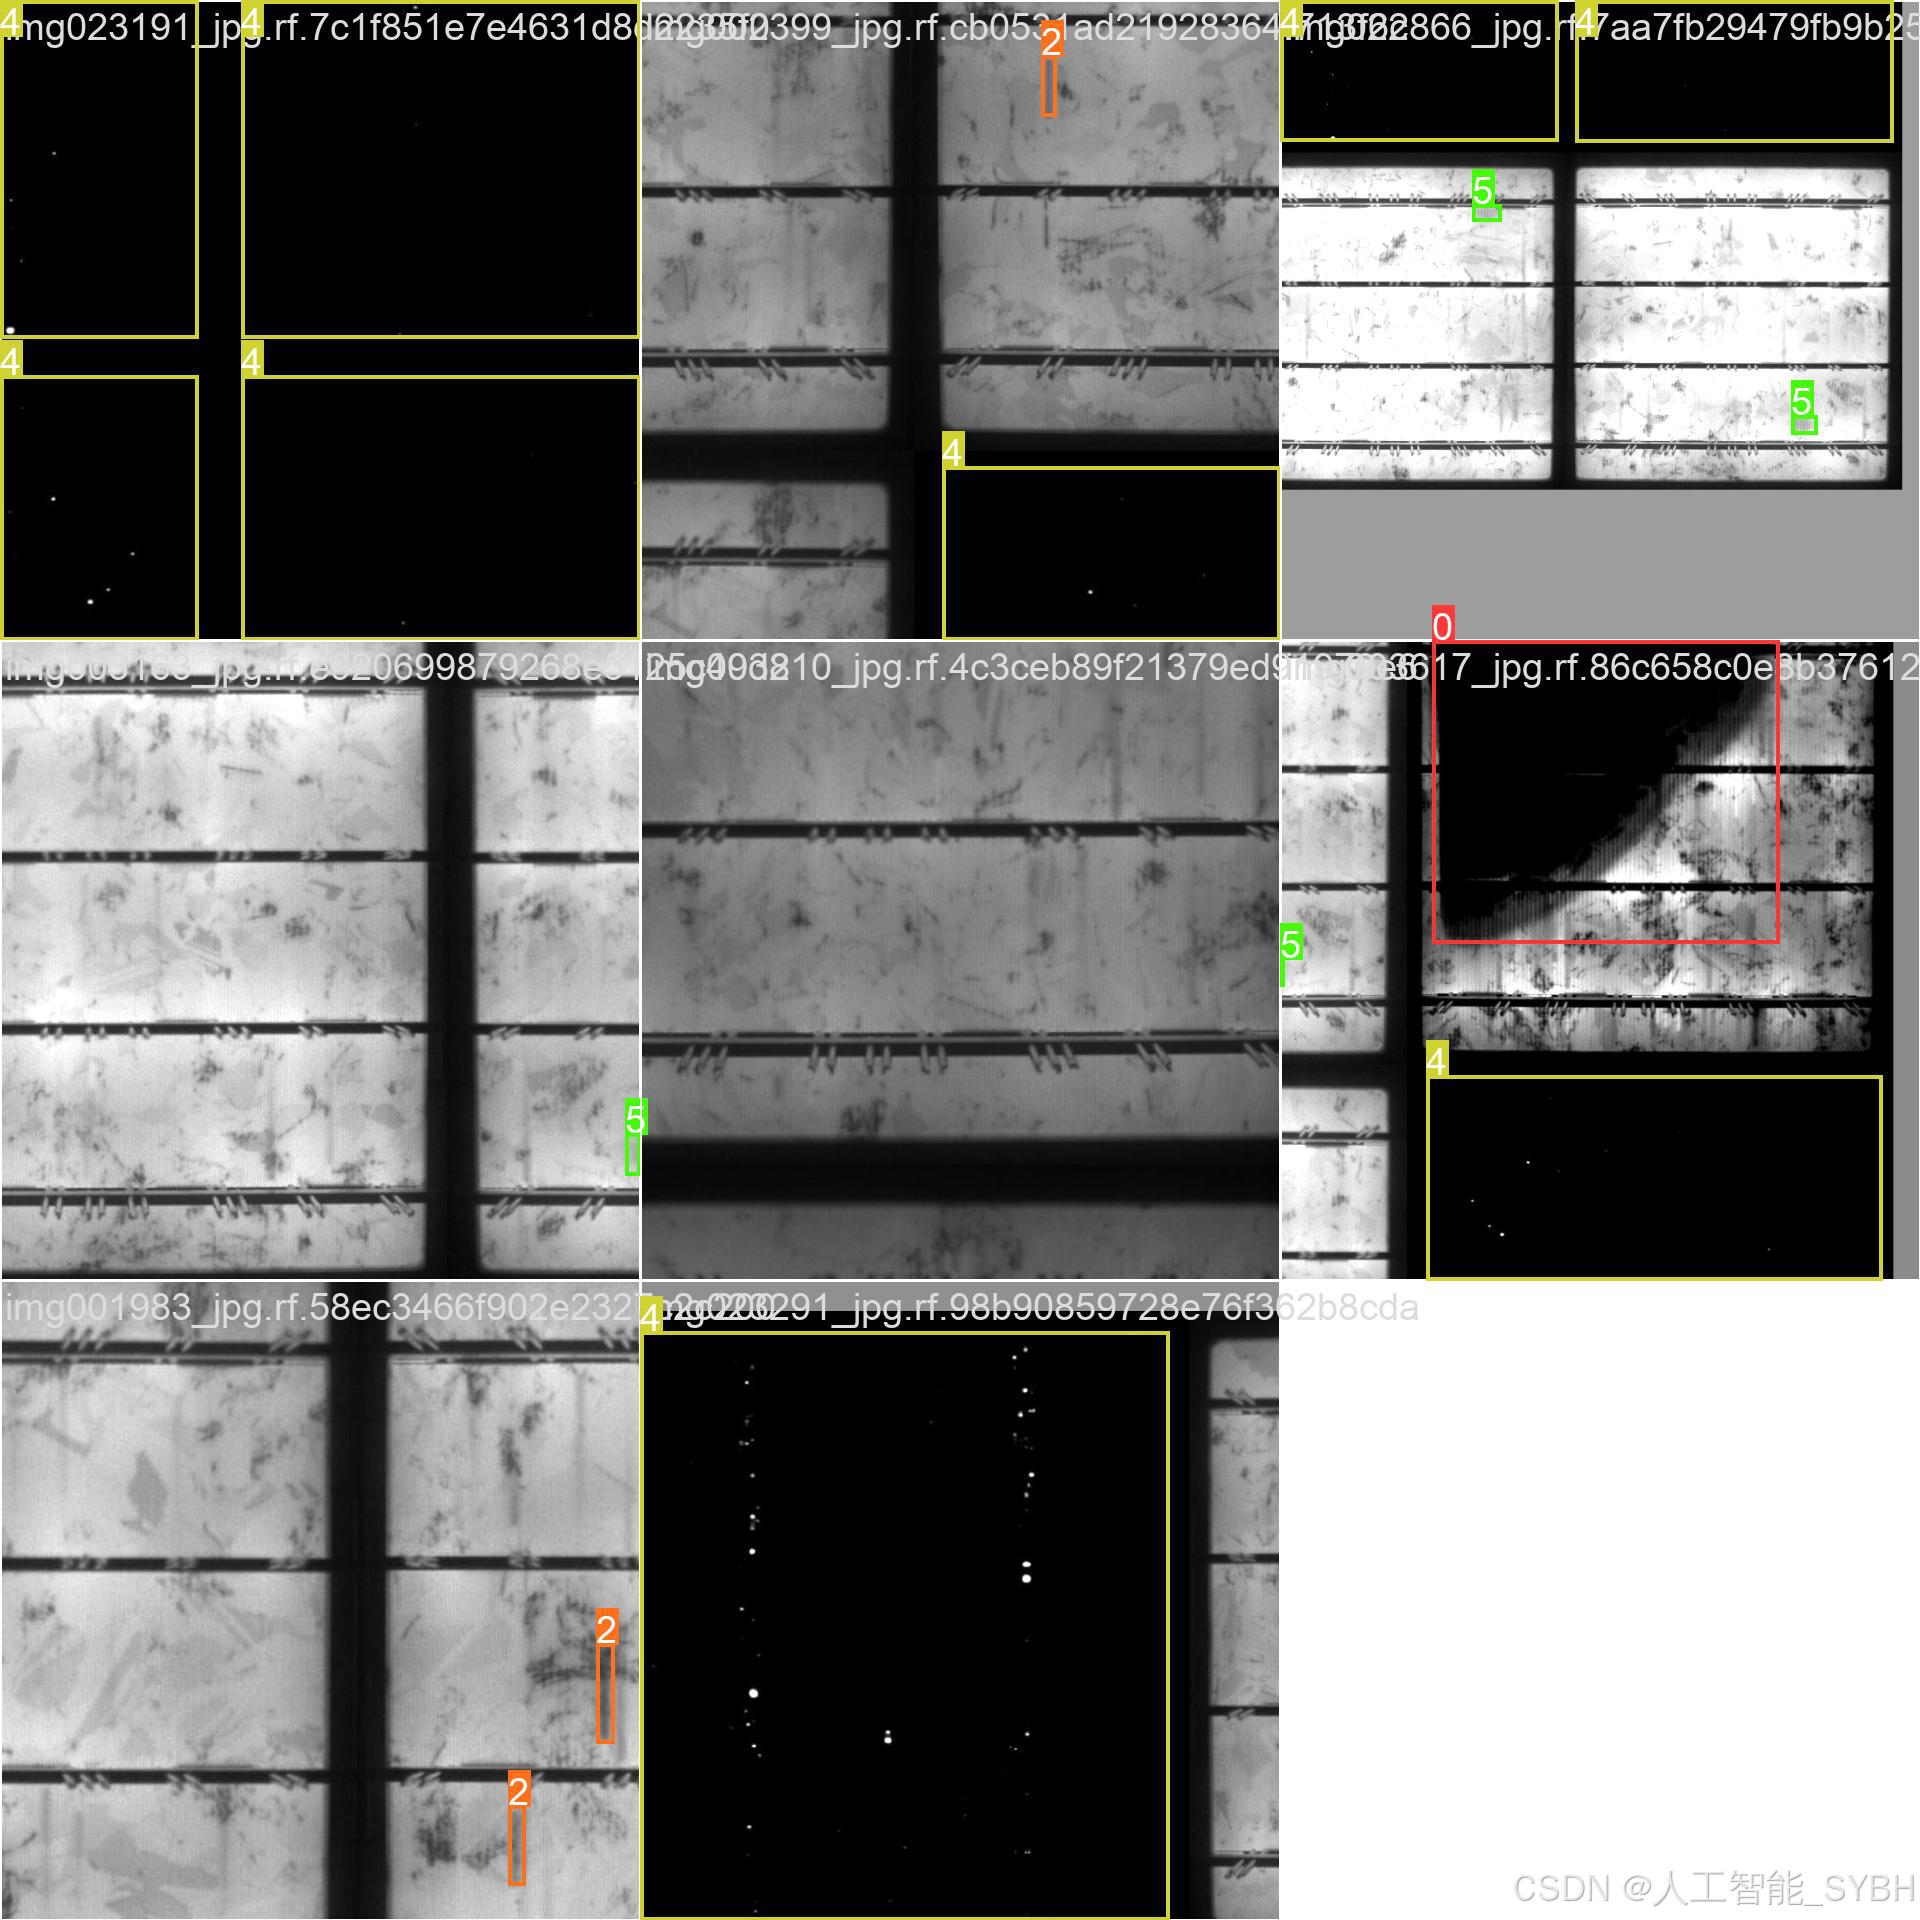
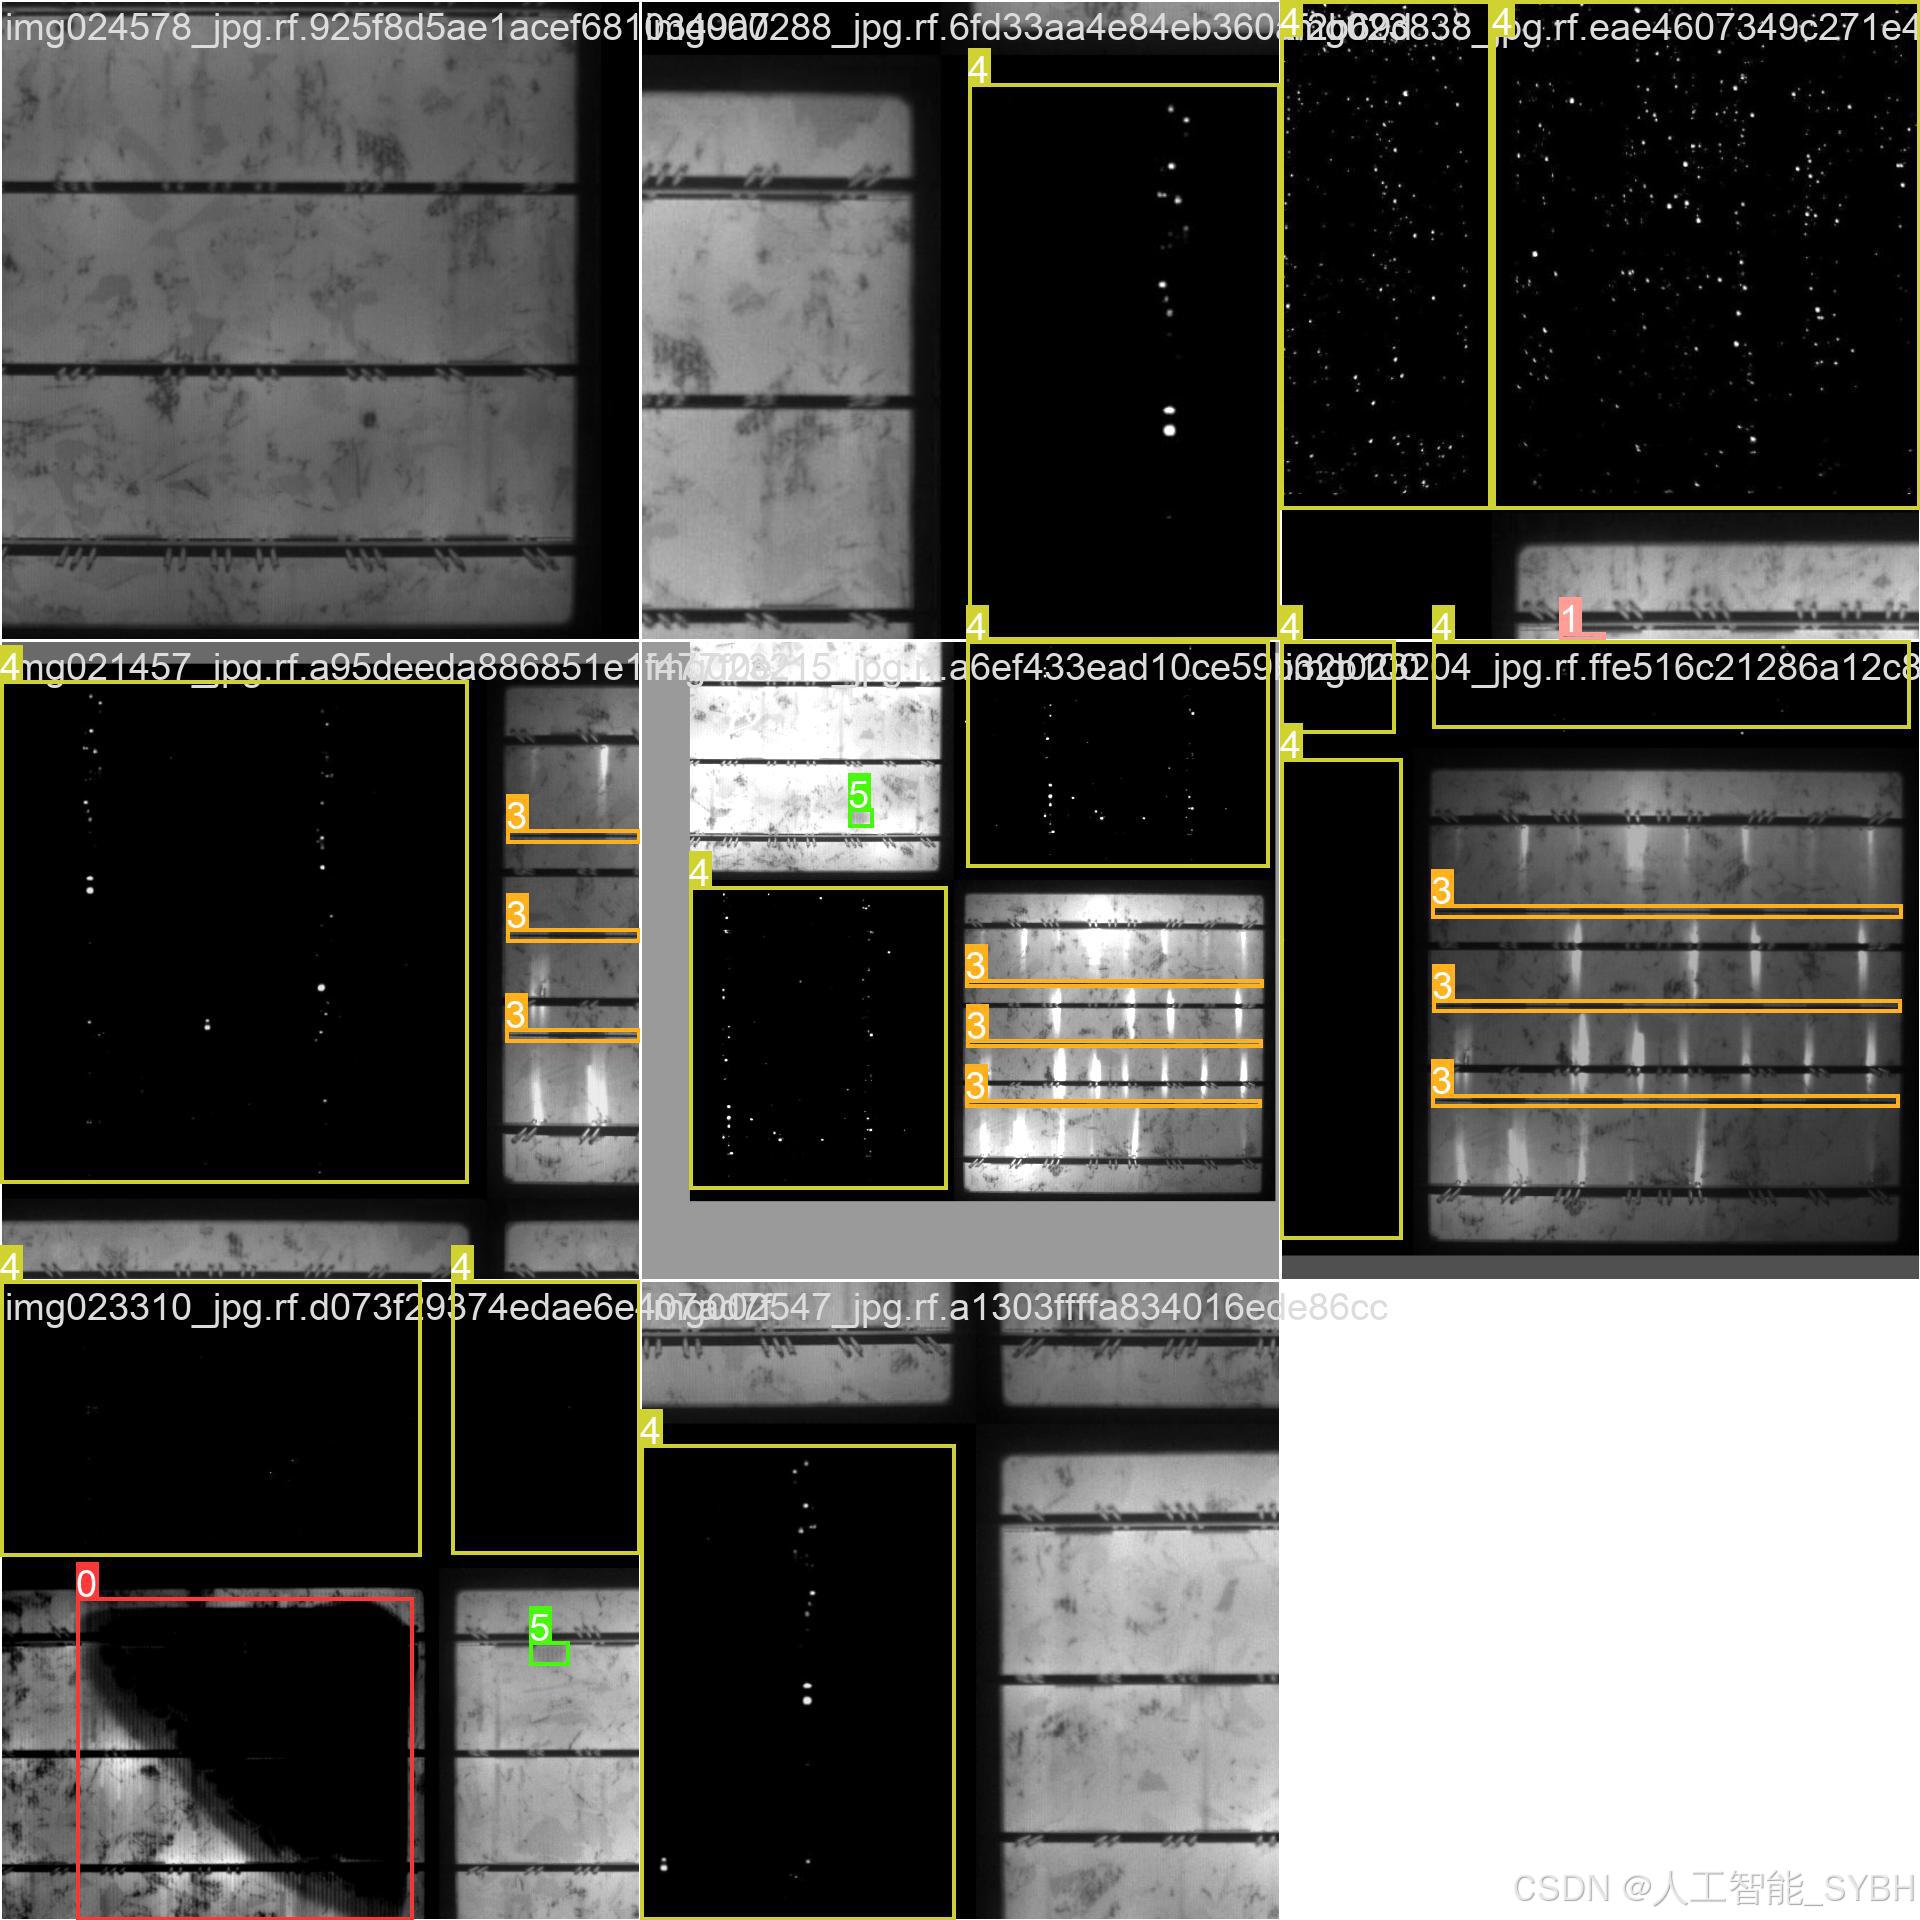
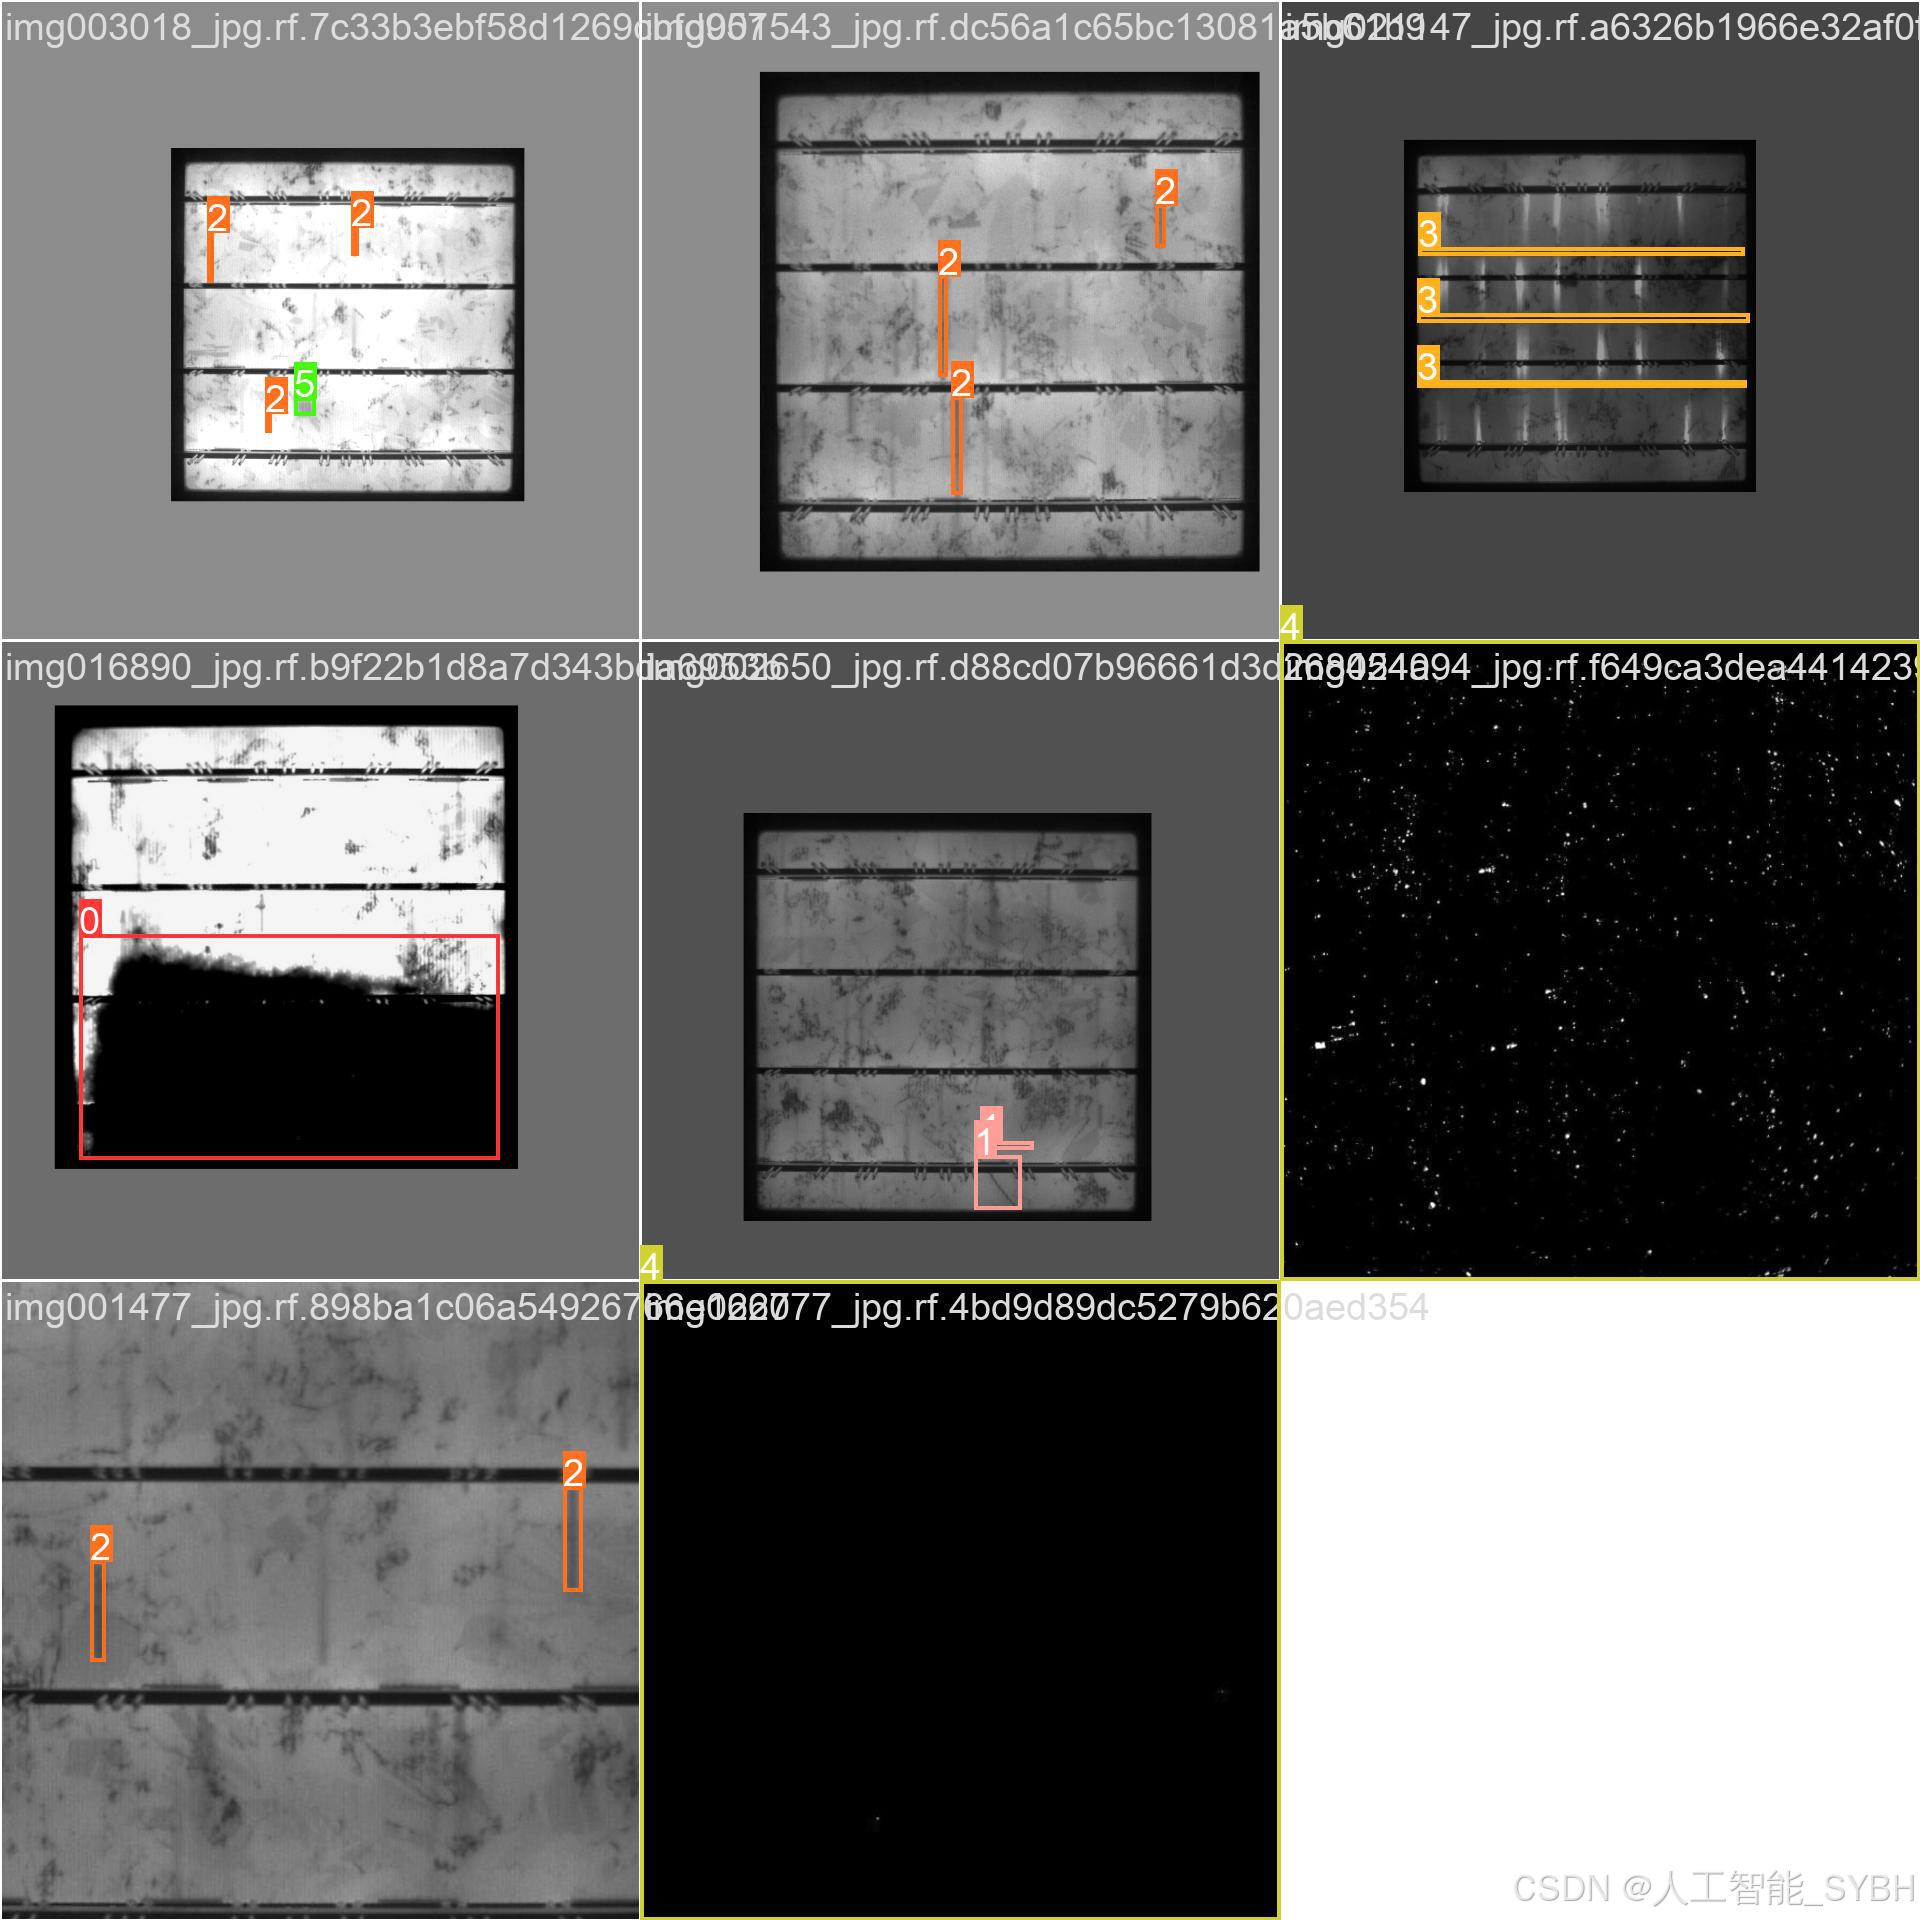
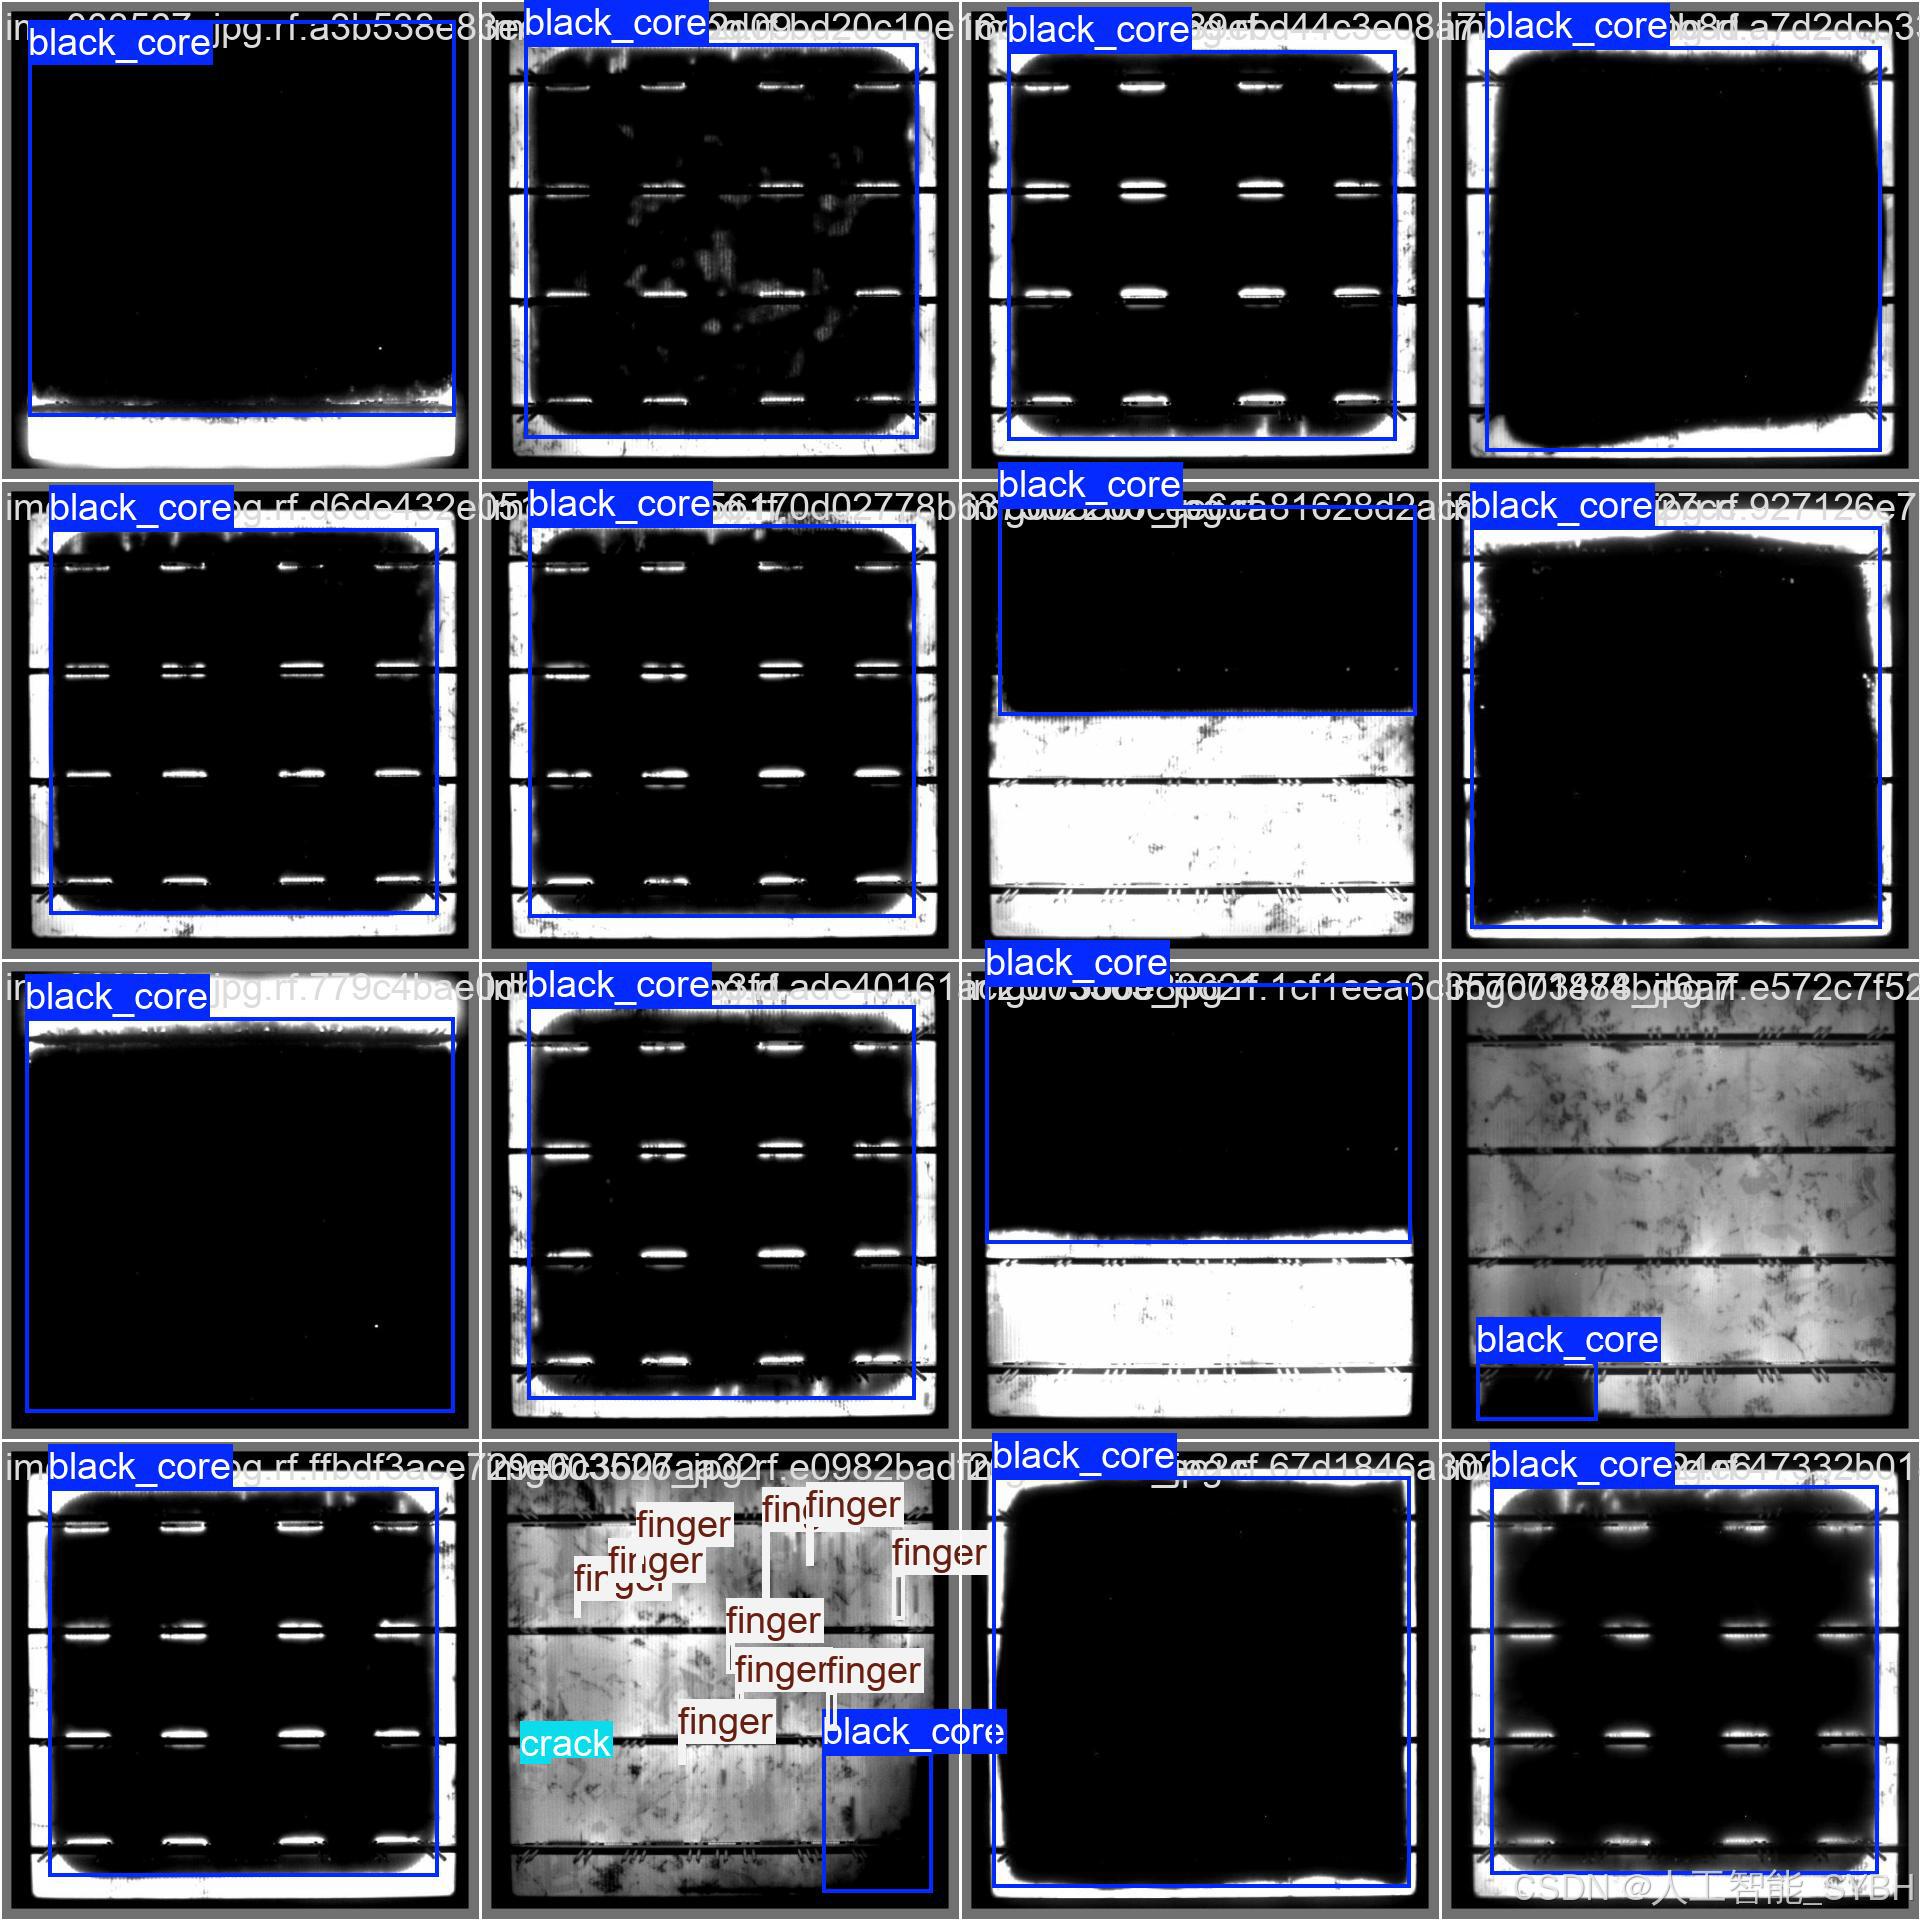
数据集概述:
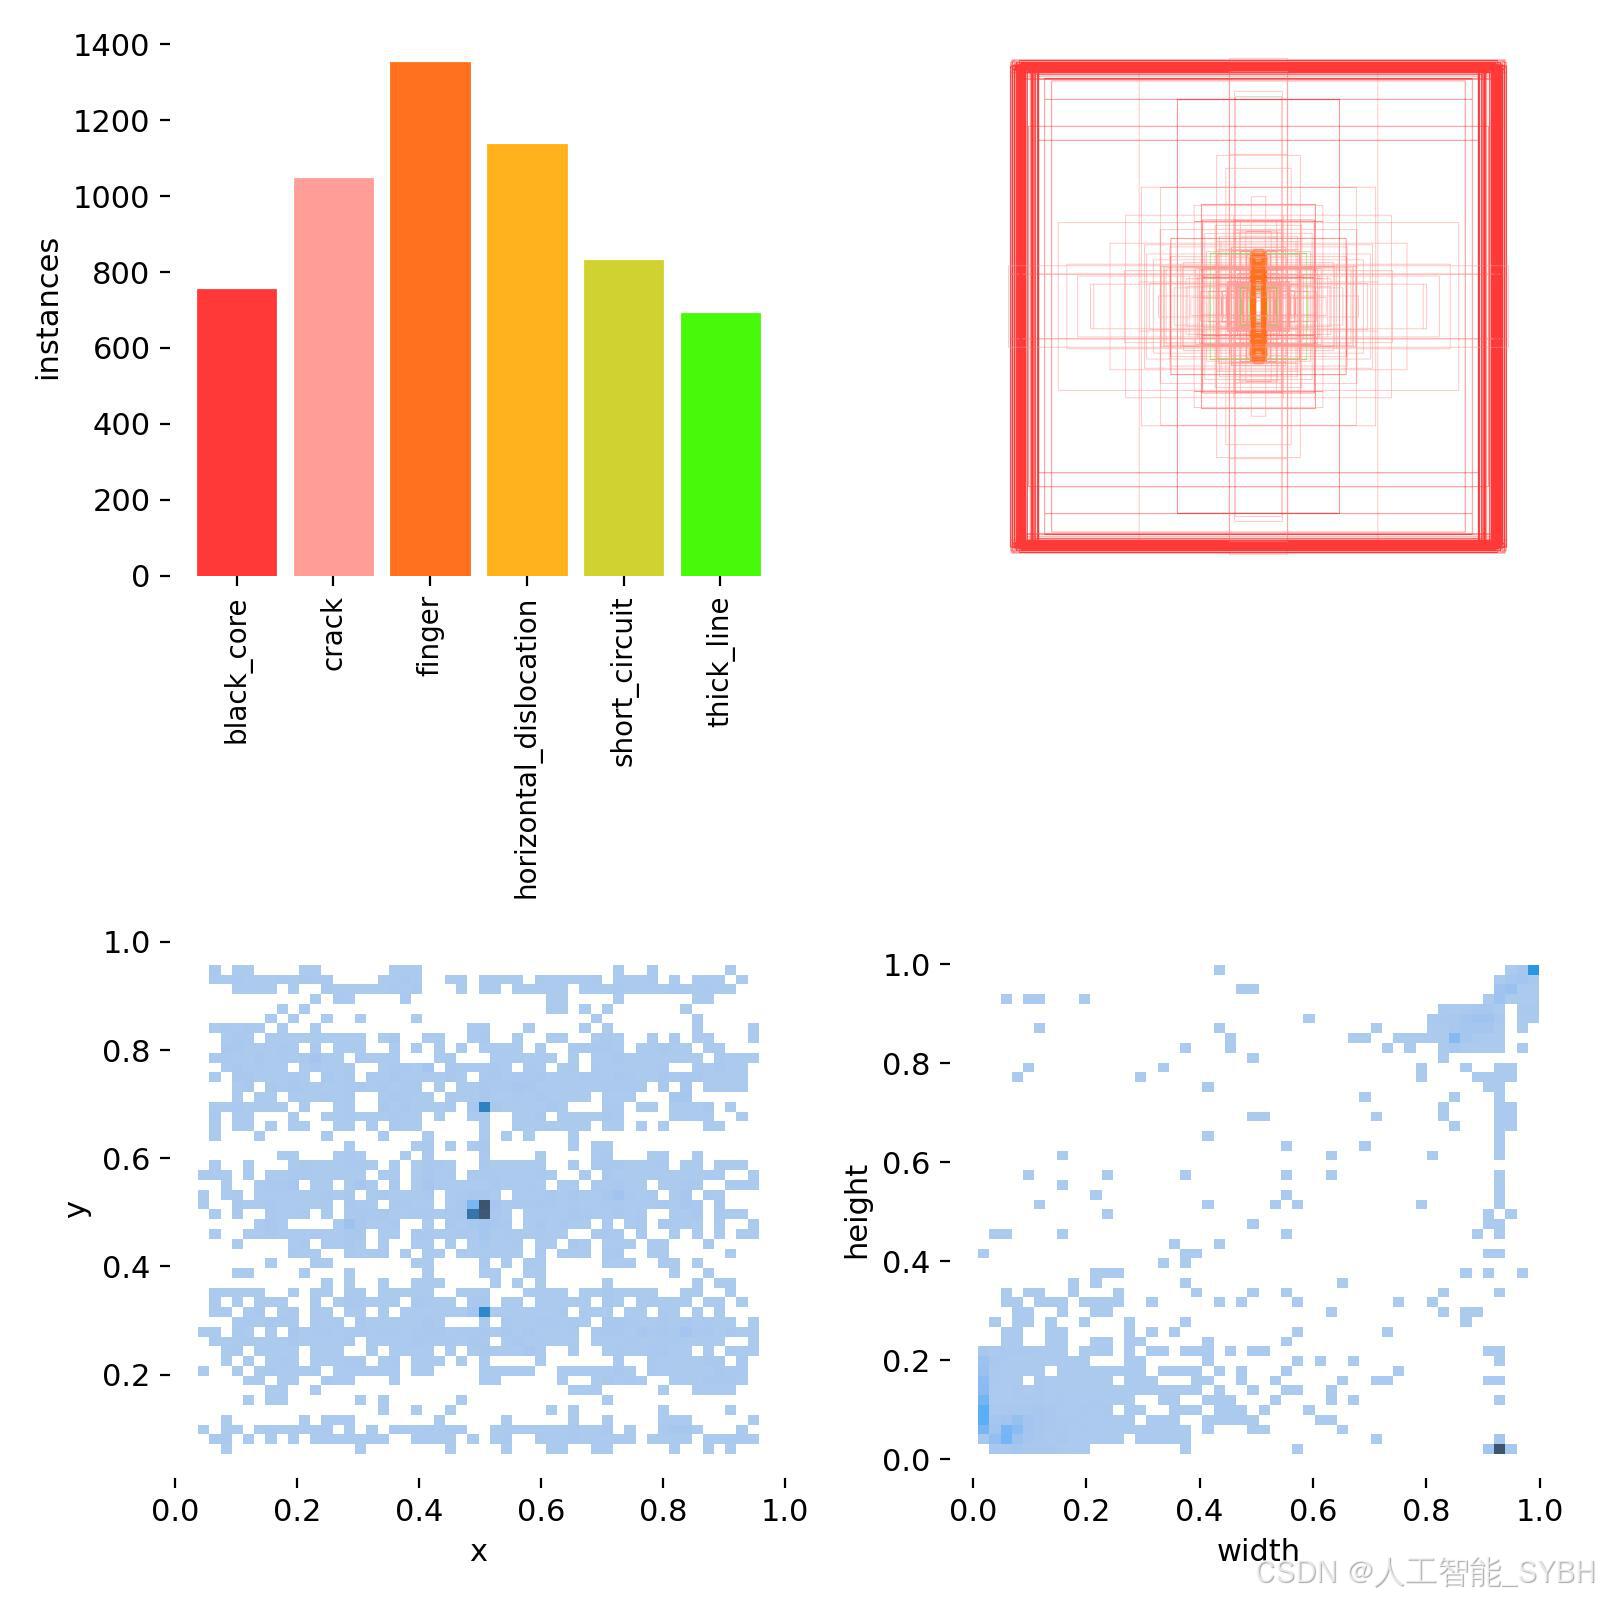
本项目的数据集包含6类缺陷标签:black_core(黑芯)、crack(裂纹)、finger(指状缺陷)、horizontal_dislocation(水平错位)、short_circuit(短路)、thick_line(粗线)。数据集分为训练集、验证集和测试集,具体数量如下:
-
训练集:3512张图像
-
验证集:502张图像
-
测试集:1002张图像
数据集结构:
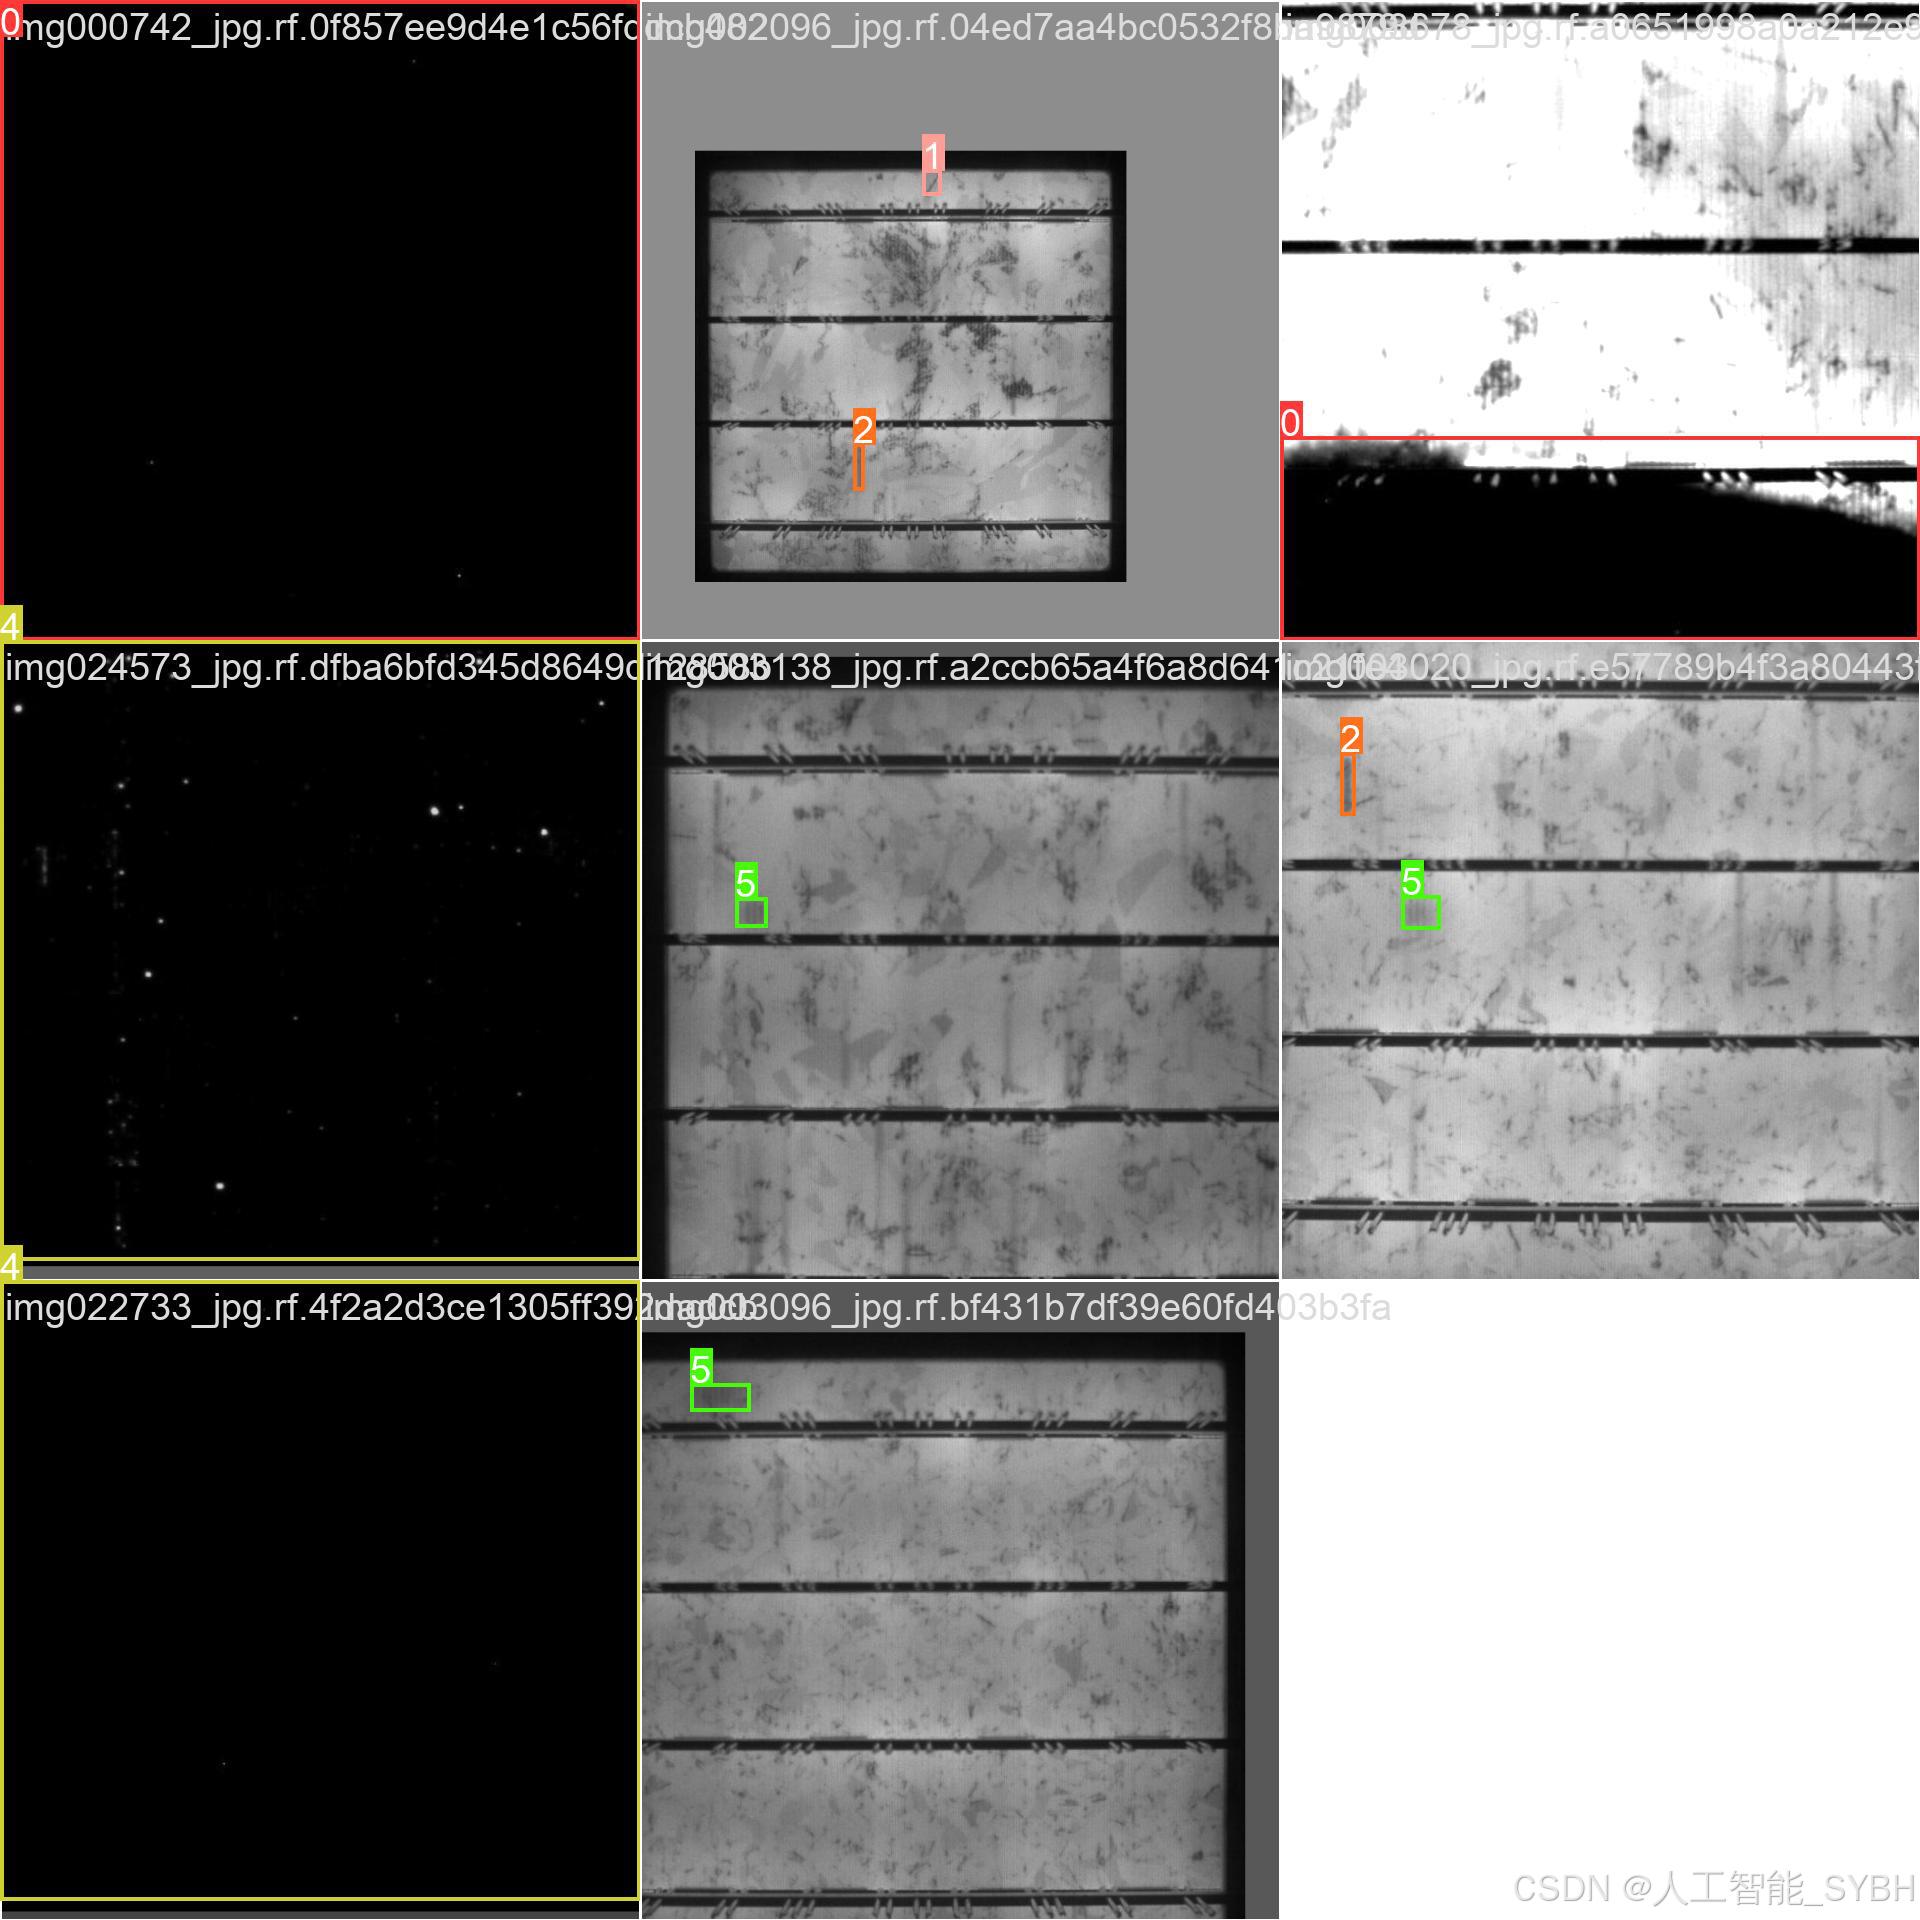
数据集中的每张图像都经过标注,标注信息包括:
-
类别标签:black_core、crack、finger、horizontal_dislocation、short_circuit、thick_line
-
边界框坐标:缺陷区域的位置信息(x_min, y_min, x_max, y_max)
数据来源:
数据集来源于公开的太阳能电池板图像数据库或合作生产单位提供的检测数据。所有数据均经过专业人员的标注和审核,确保标注的准确性。
数据预处理:
-
图像增强:为了提升模型的泛化能力,对训练集进行了数据增强操作,包括随机旋转、翻转、缩放、亮度调整等。
-
归一化:将所有图像归一化到相同的尺寸(如640x640),以适应YOLOv8的输入要求。
-
标注格式转换:将标注信息转换为YOLOv8所需的格式(类别索引、归一化的边界框坐标)。
数据集特点:
-
类别多样性:数据集涵盖了6种常见的太阳能电池板缺陷,能够满足实际生产和检测需求。
-
高质量标注:所有标注均由专业人员完成,确保标注的准确性和可靠性。
-
样本分布:训练集、验证集和测试集的划分合理,确保模型训练和评估的科学性。
数据集划分:
-
训练集:用于训练YOLOv8模型,优化模型参数。
-
验证集:用于调整超参数和评估模型在训练过程中的表现,防止过拟合。
-
测试集:用于最终评估模型的性能,确保模型在未见数据上的泛化能力。

数据集配置文件data.yaml
train: .\datasets\images\train
val: .\datasets\images\val
test: .\datasets\images\test


nc: 6
names: ['black_core', 'crack', 'finger', 'horizontal_dislocation', 'short_circuit', 'thick_line']
数据集制作流程
-
标注数据:使用标注工具(如LabelImg、CVAT等)对图像中的目标进行标注。每个目标需要标出边界框,并且标注类别。
-
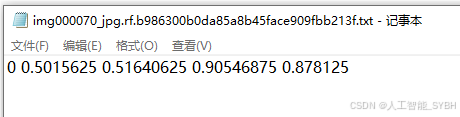
转换格式:将标注的数据转换为YOLO格式。YOLO标注格式为每行:
<object-class> <x_center> <y_center> <width> <height>,这些坐标是相对于图像尺寸的比例。 -
分割数据集:将数据集分为训练集、验证集和测试集,通常的比例是80%训练集、10%验证集和10%测试集。
-
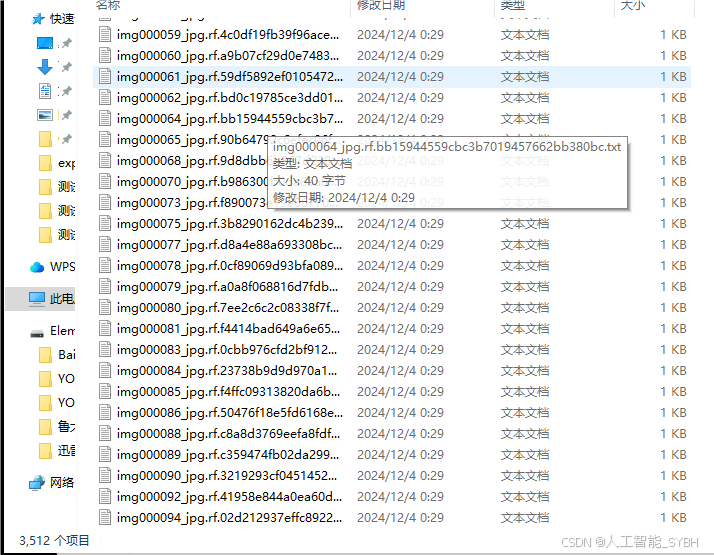
准备标签文件:为每张图片生成一个对应的标签文件,确保标签文件与图片的命名一致。
-
调整图像尺寸:根据YOLO网络要求,统一调整所有图像的尺寸(如416x416或608x608)。


四、项目环境配置
创建虚拟环境
首先新建一个Anaconda环境,每个项目用不同的环境,这样项目中所用的依赖包互不干扰。
终端输入
conda create -n yolov8 python==3.9

激活虚拟环境
conda activate yolov8

安装cpu版本pytorch
pip install torch torchvision torchaudio

pycharm中配置anaconda


安装所需要库
pip install -r requirements.txt

五、模型训练
训练代码
from ultralytics import YOLO

model_path = 'yolov8s.pt'
data_path = 'datasets/data.yaml'

if __name__ == '__main__':
    model = YOLO(model_path)
    results = model.train(data=data_path,
                          epochs=500,
                          batch=64,
                          device='0',
                          workers=0,
                          project='runs/detect',
                          name='exp',
                          )
根据实际情况更换模型 yolov8n.yaml (nano):轻量化模型,适合嵌入式设备,速度快但精度略低。 yolov8s.yaml (small):小模型,适合实时任务。 yolov8m.yaml (medium):中等大小模型,兼顾速度和精度。 yolov8b.yaml (base):基本版模型,适合大部分应用场景。 yolov8l.yaml (large):大型模型,适合对精度要求高的任务。
--batch 64:每批次64张图像。--epochs 500:训练500轮。--datasets/data.yaml:数据集配置文件。--weights yolov8s.pt:初始化模型权重,yolov8s.pt是预训练的轻量级YOLO模型。
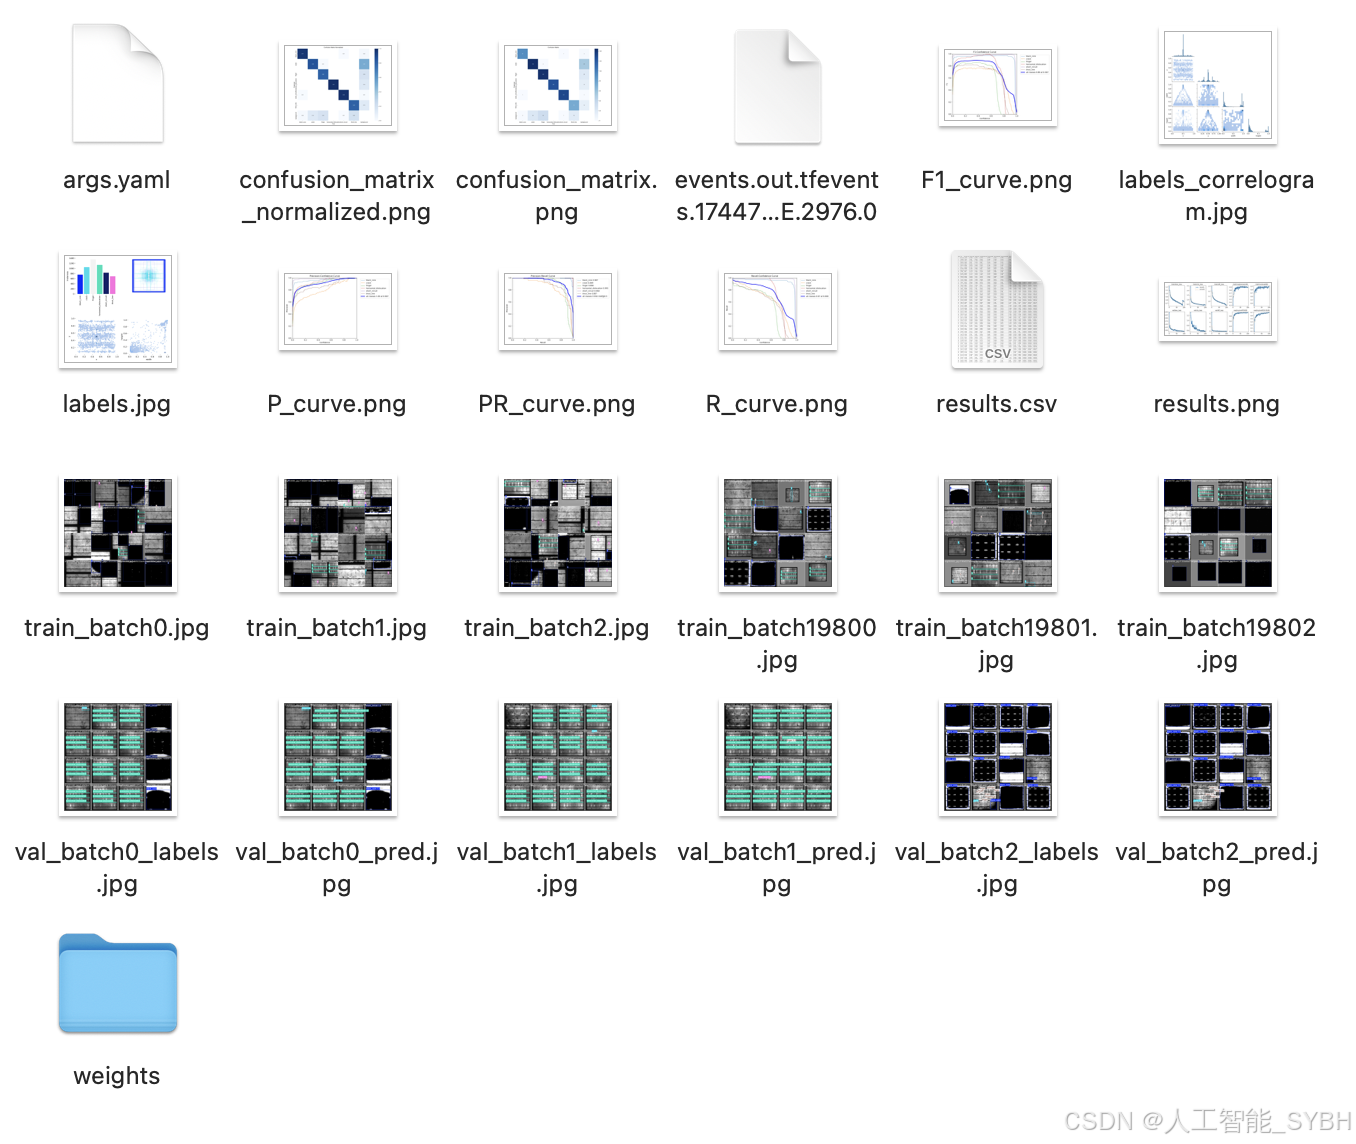
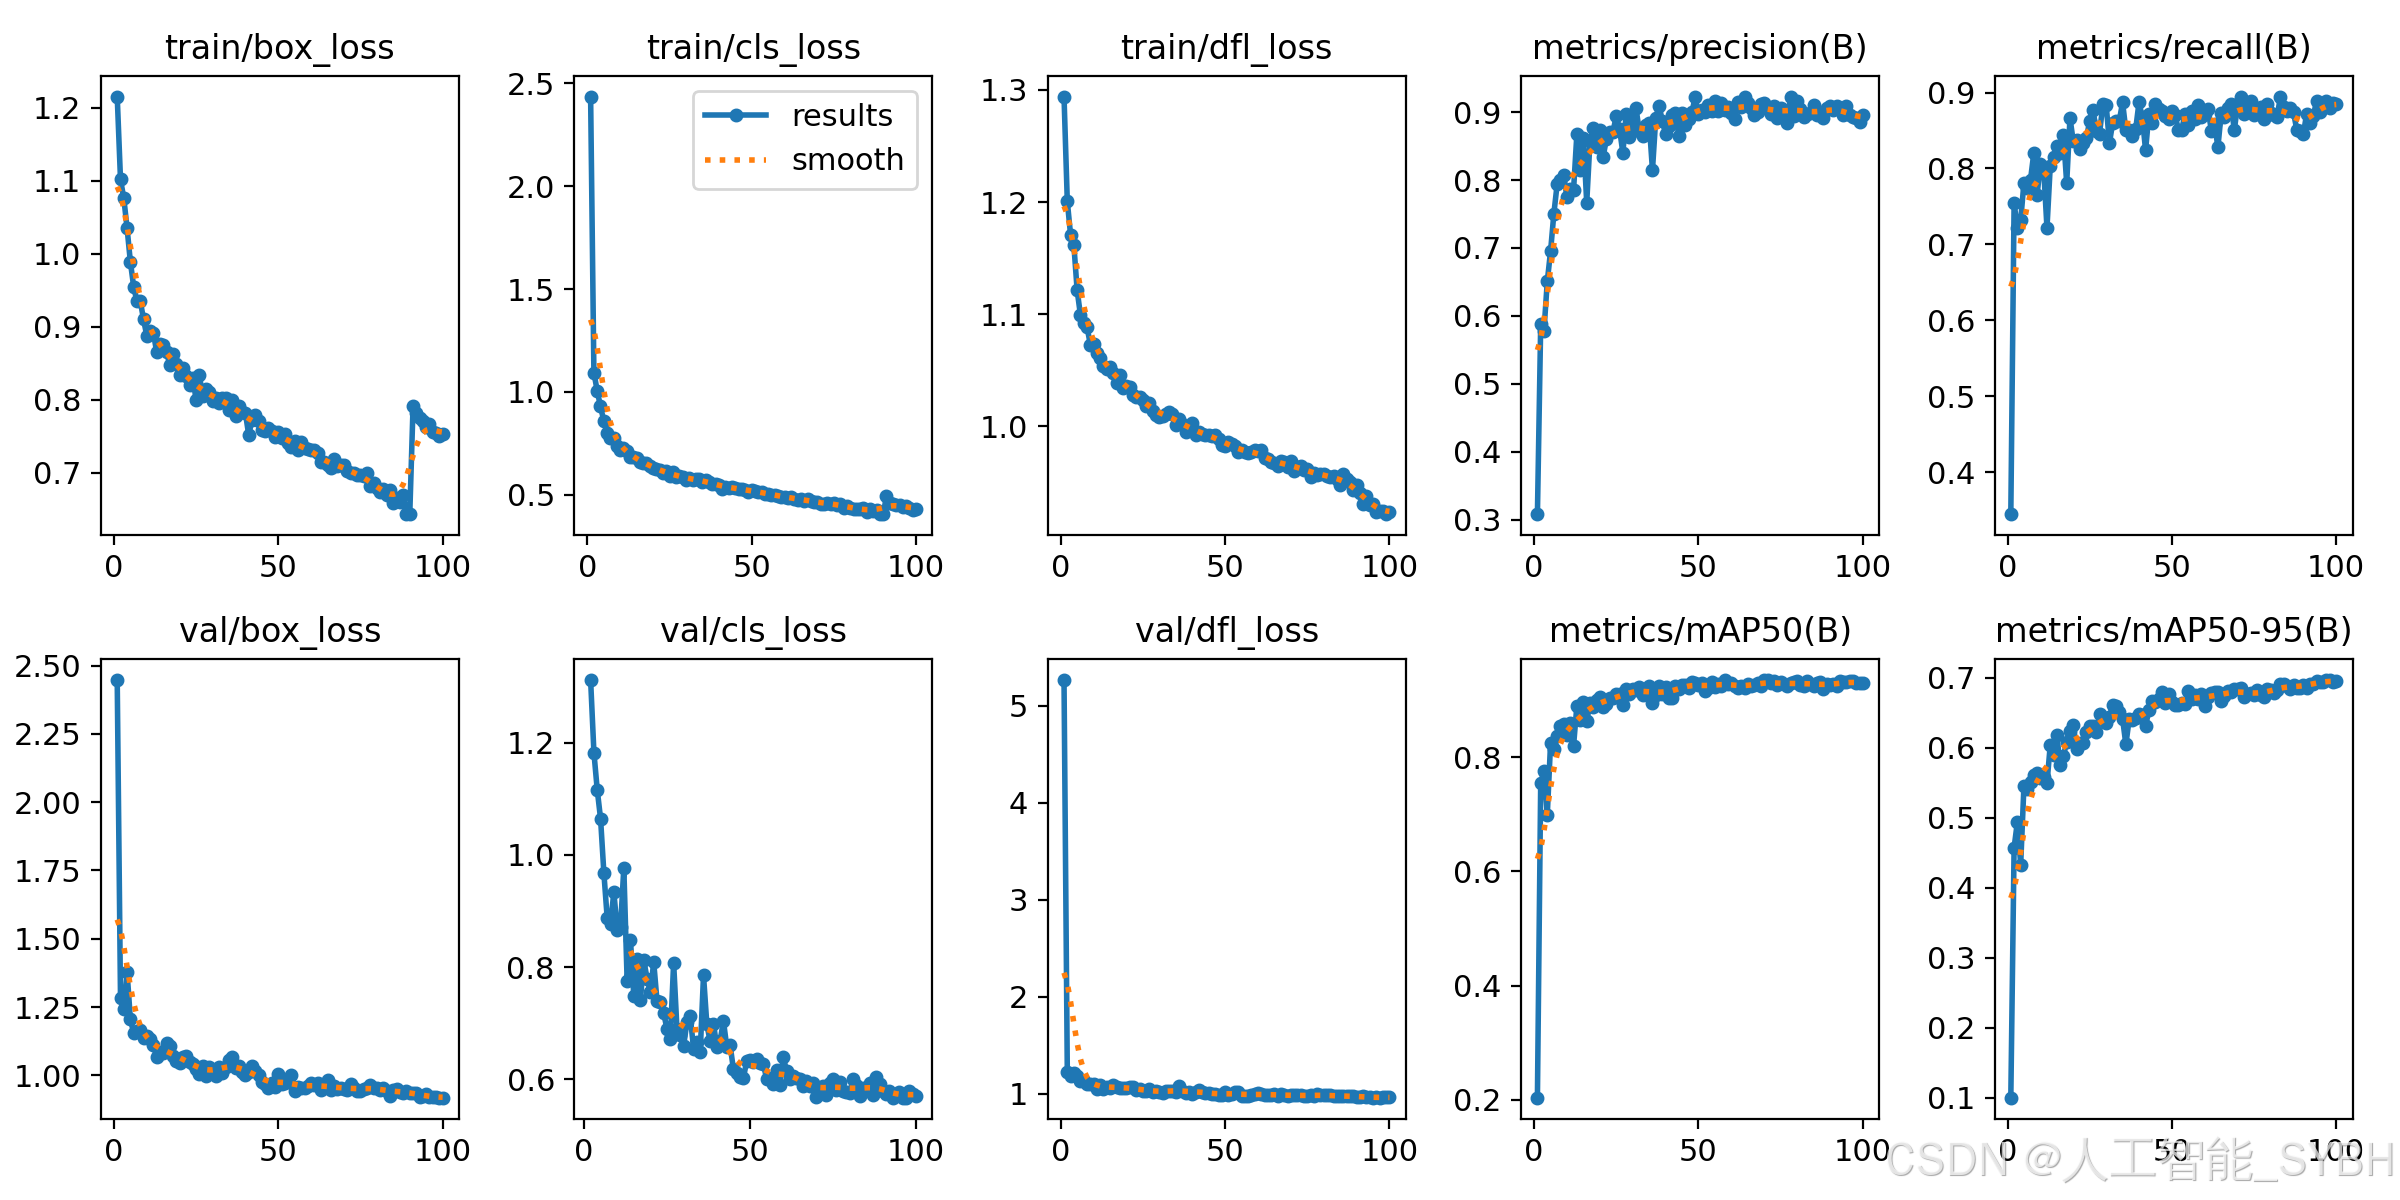
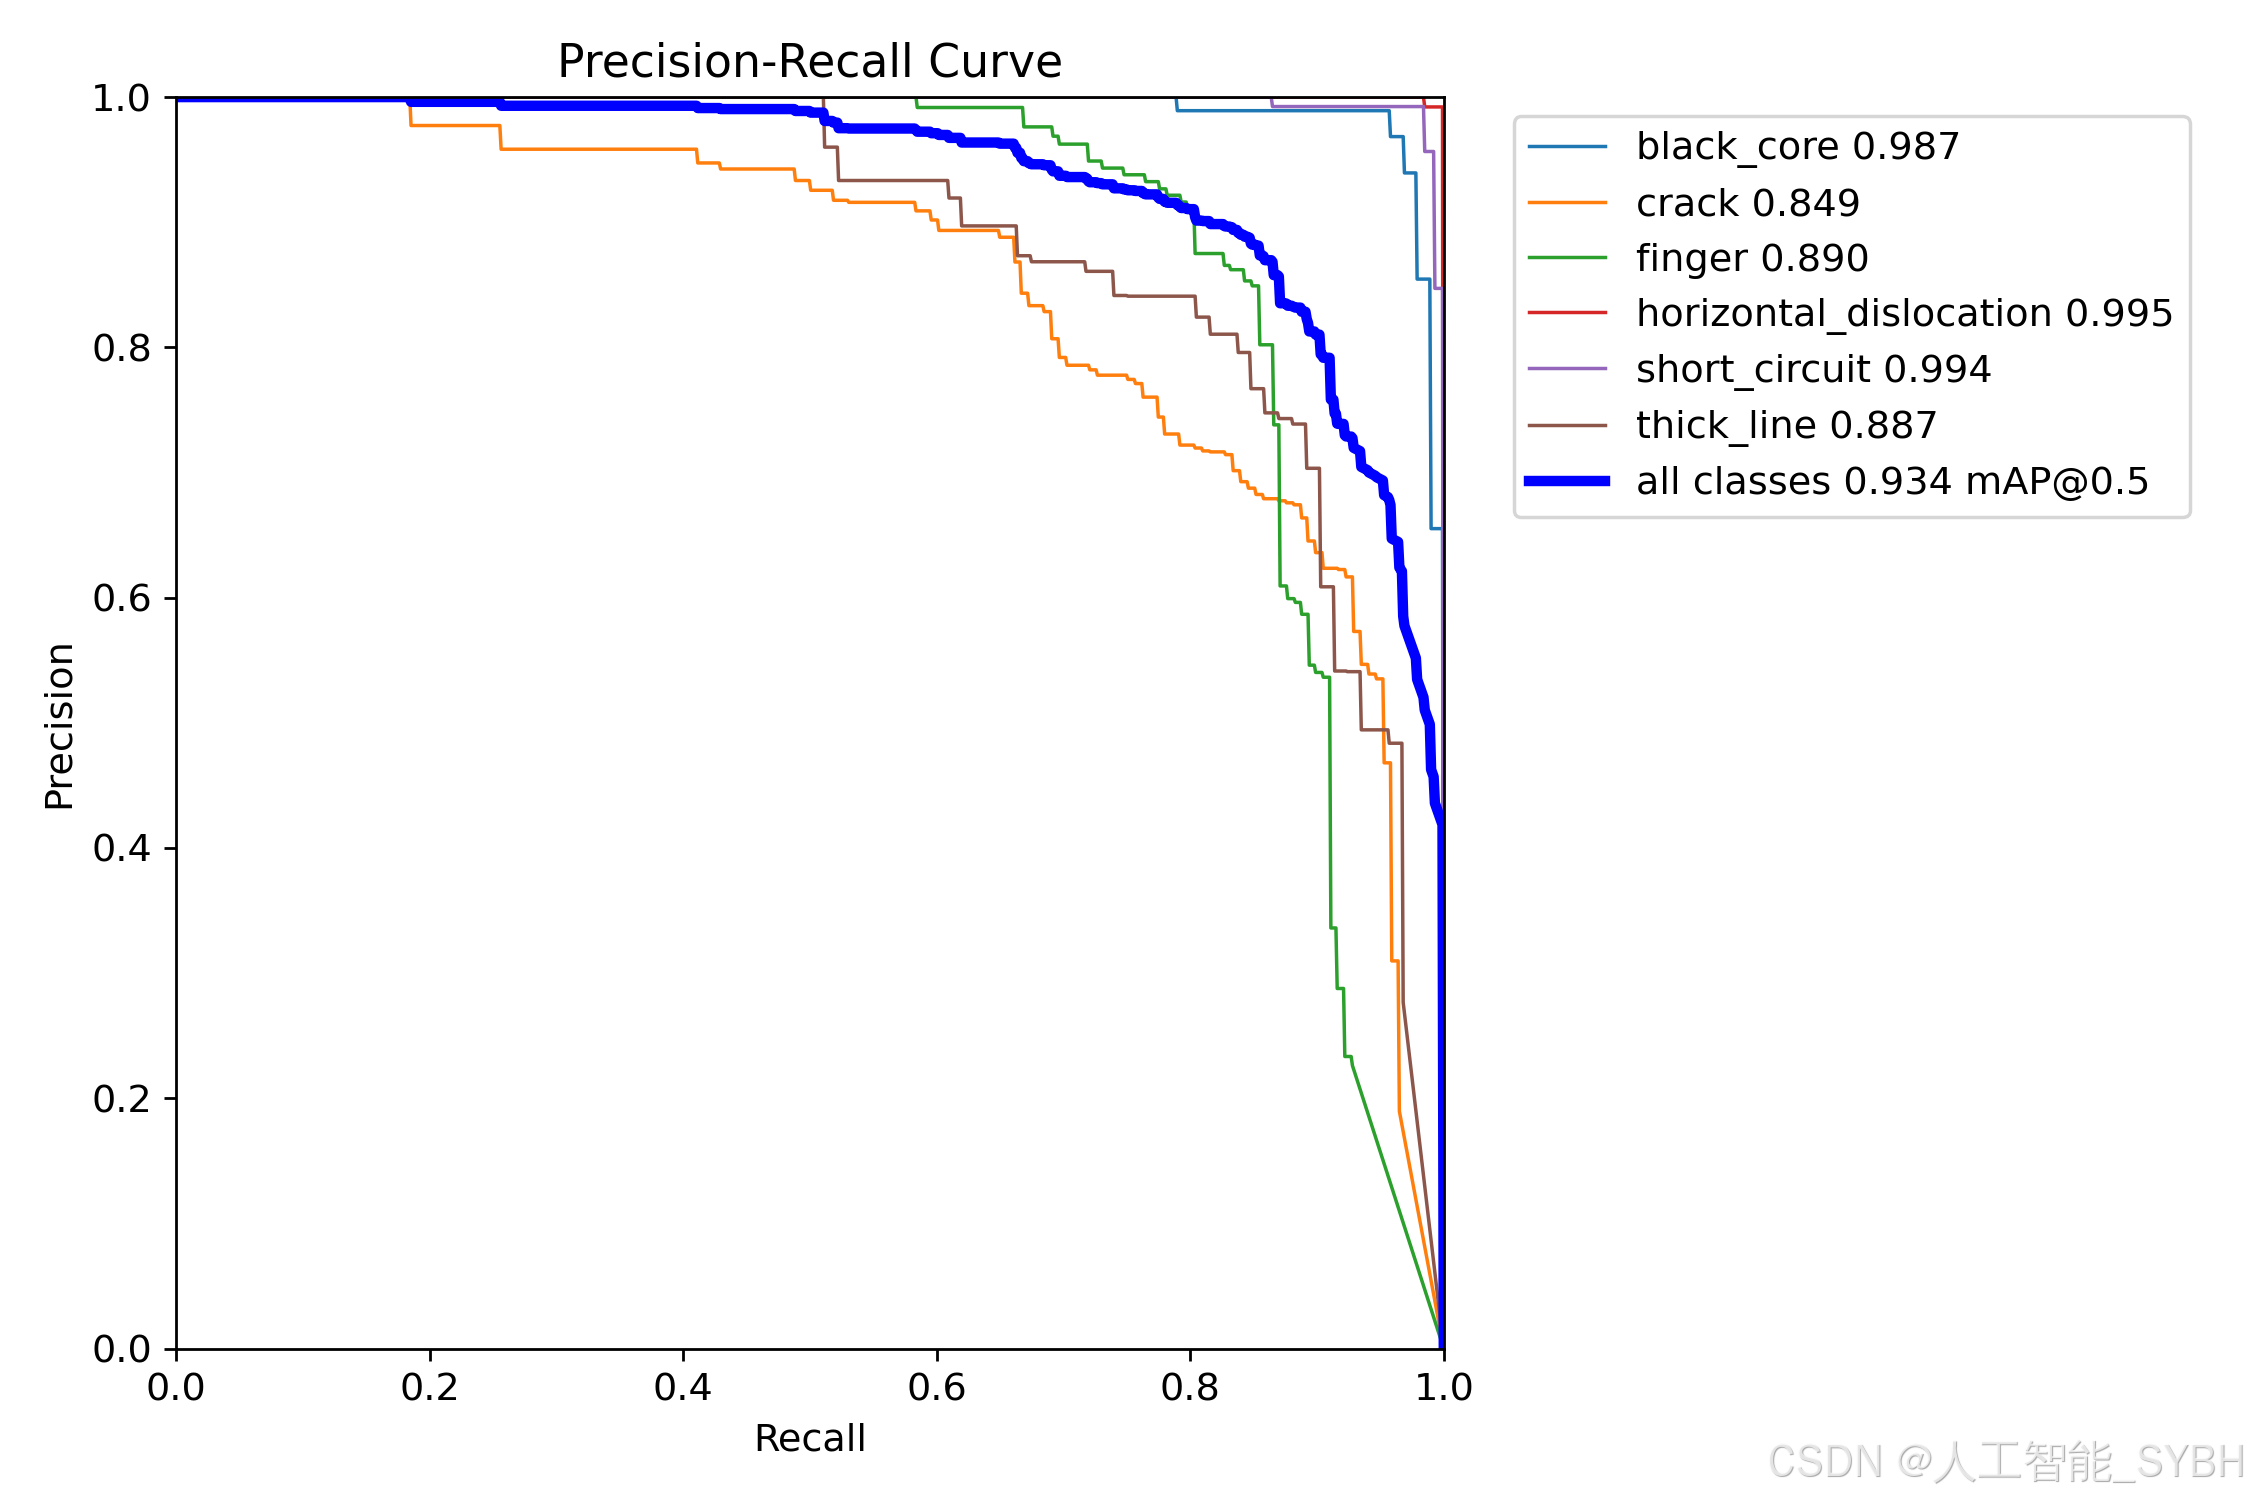
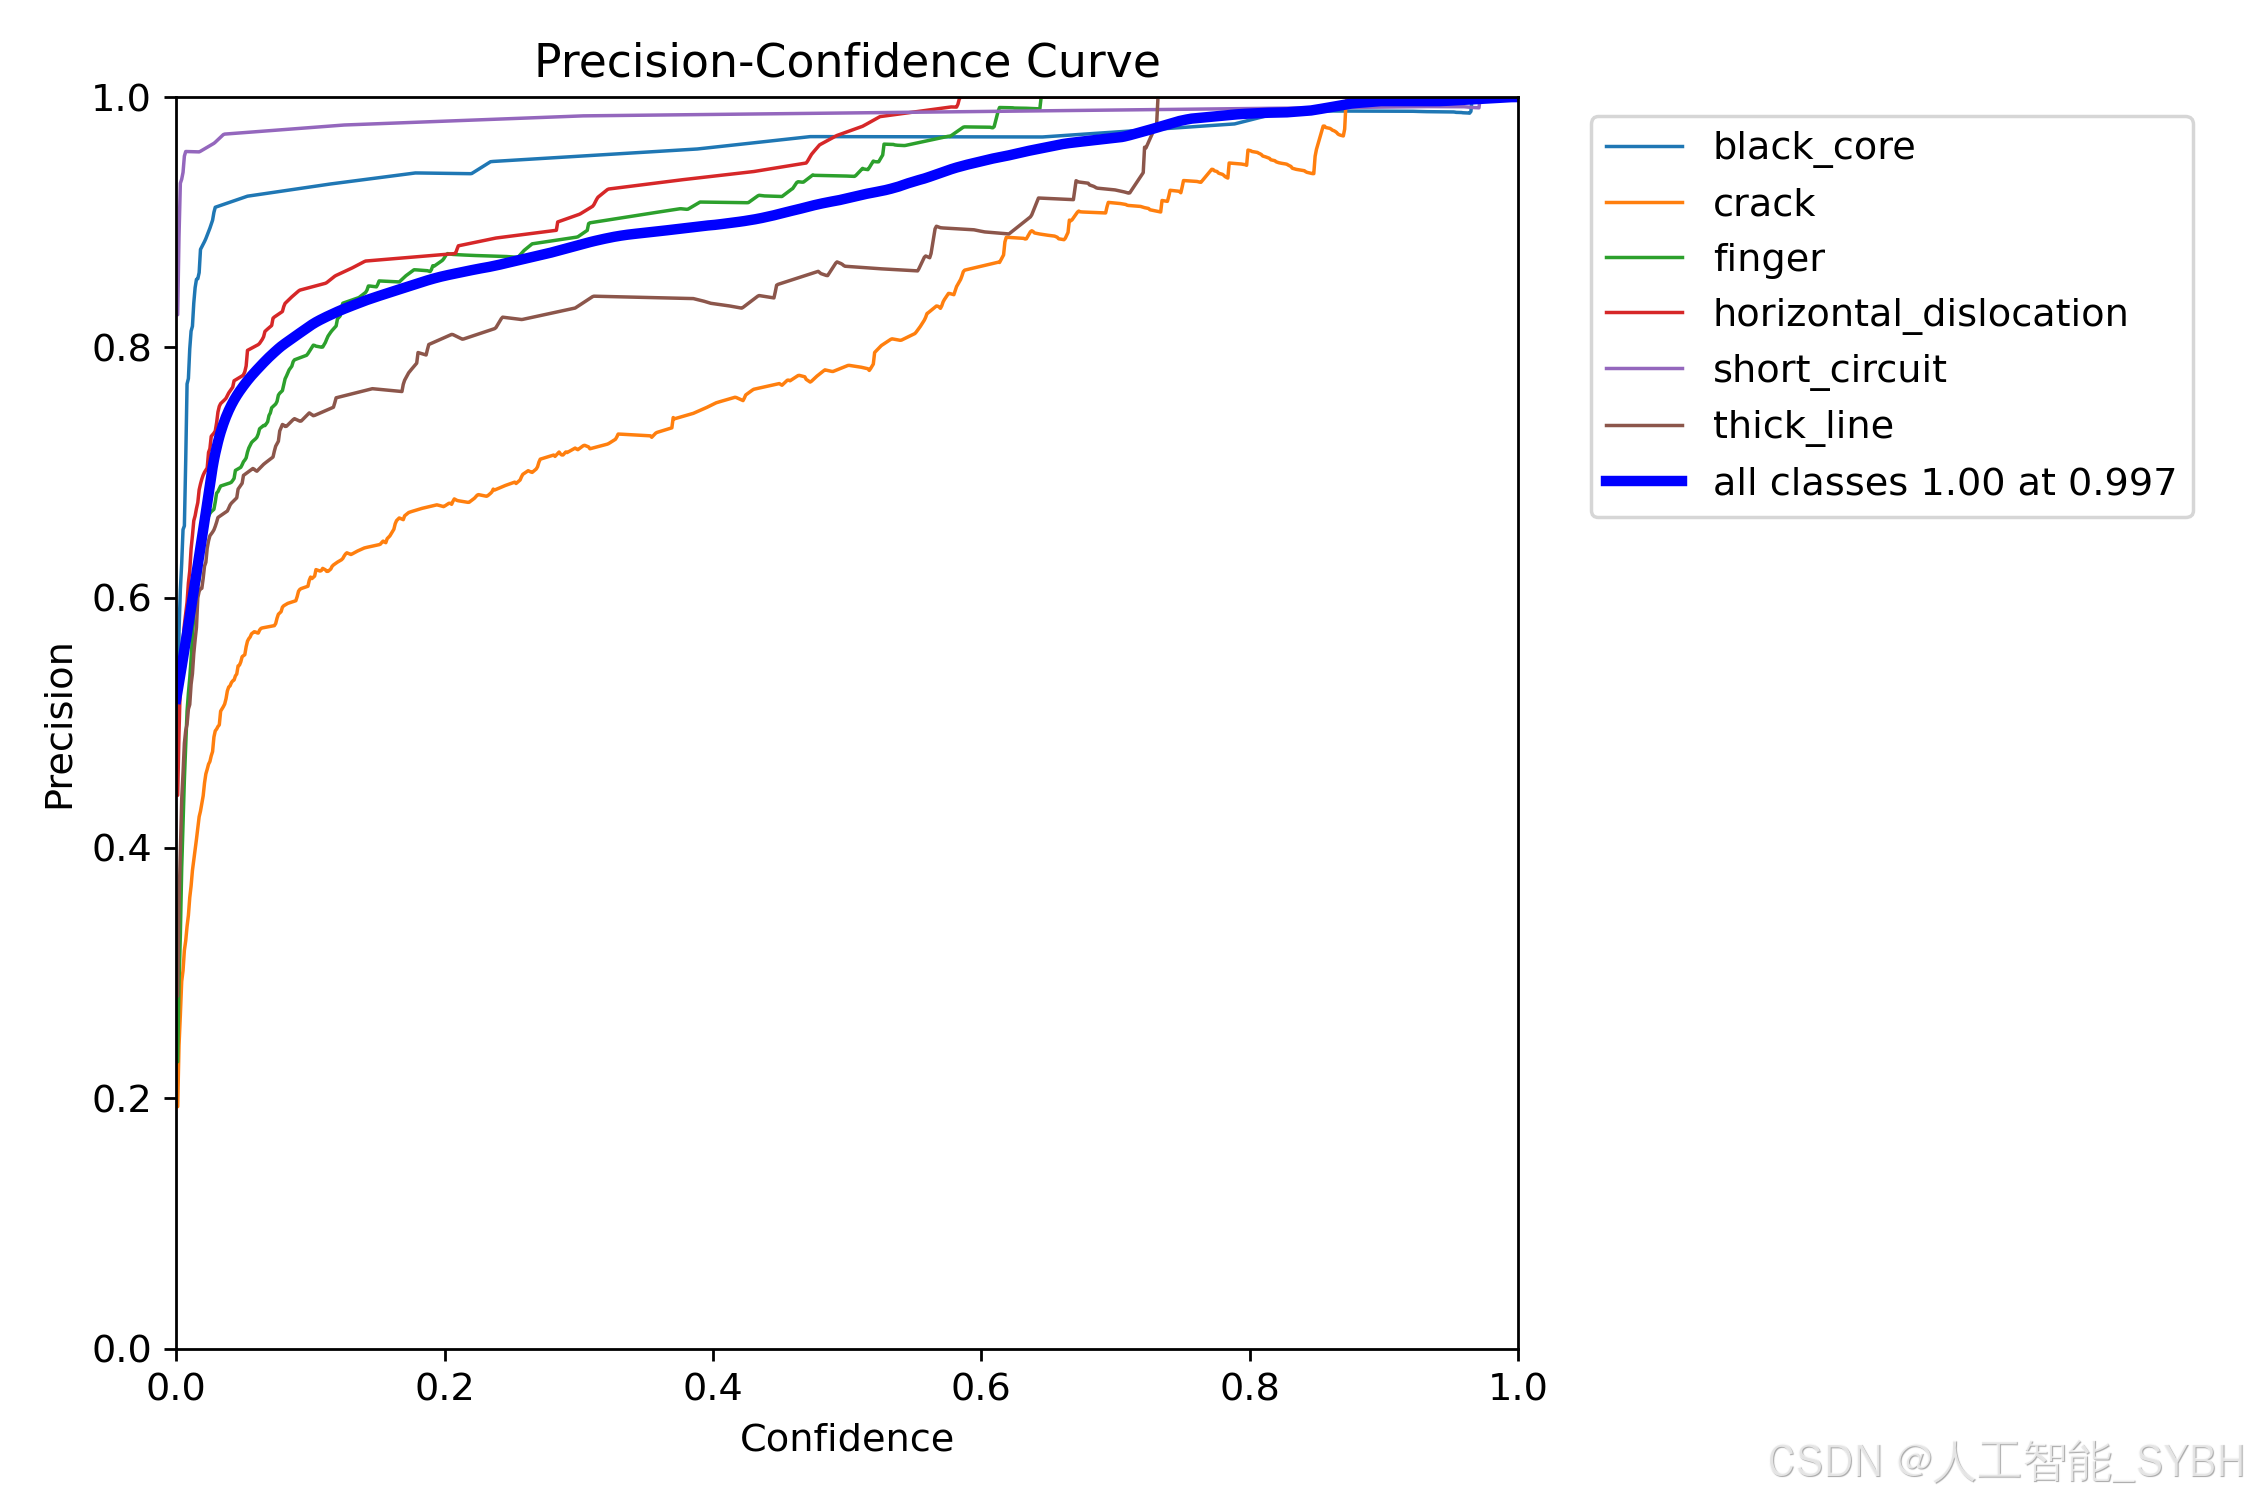
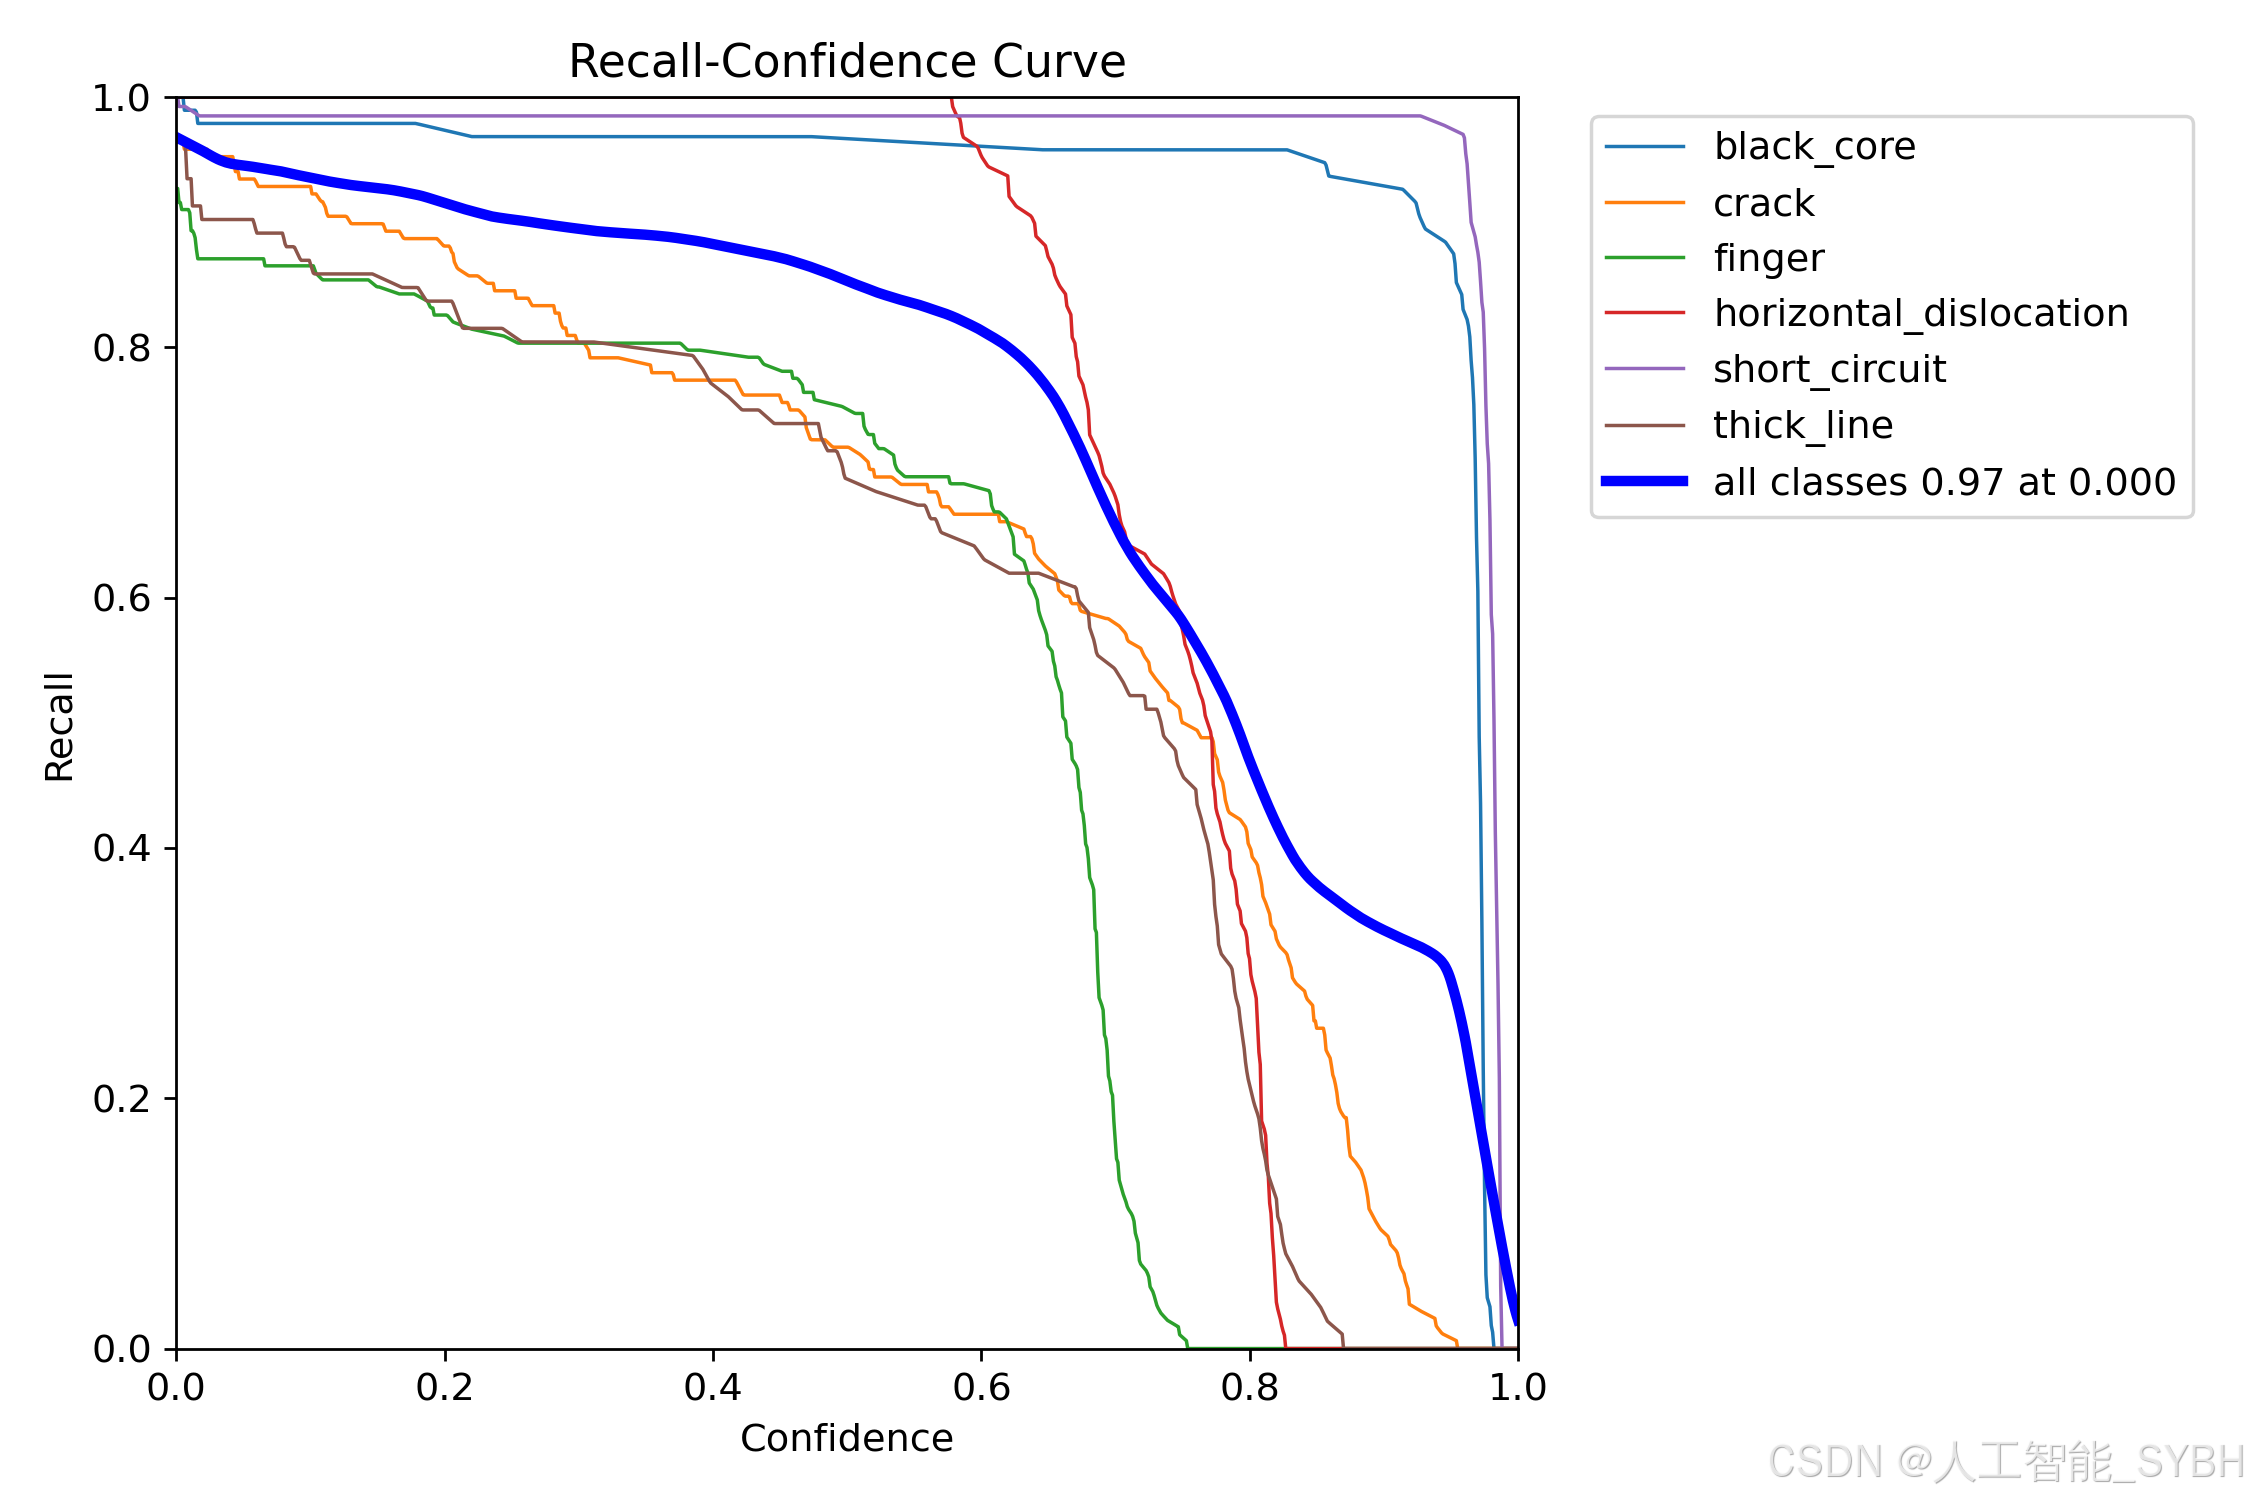
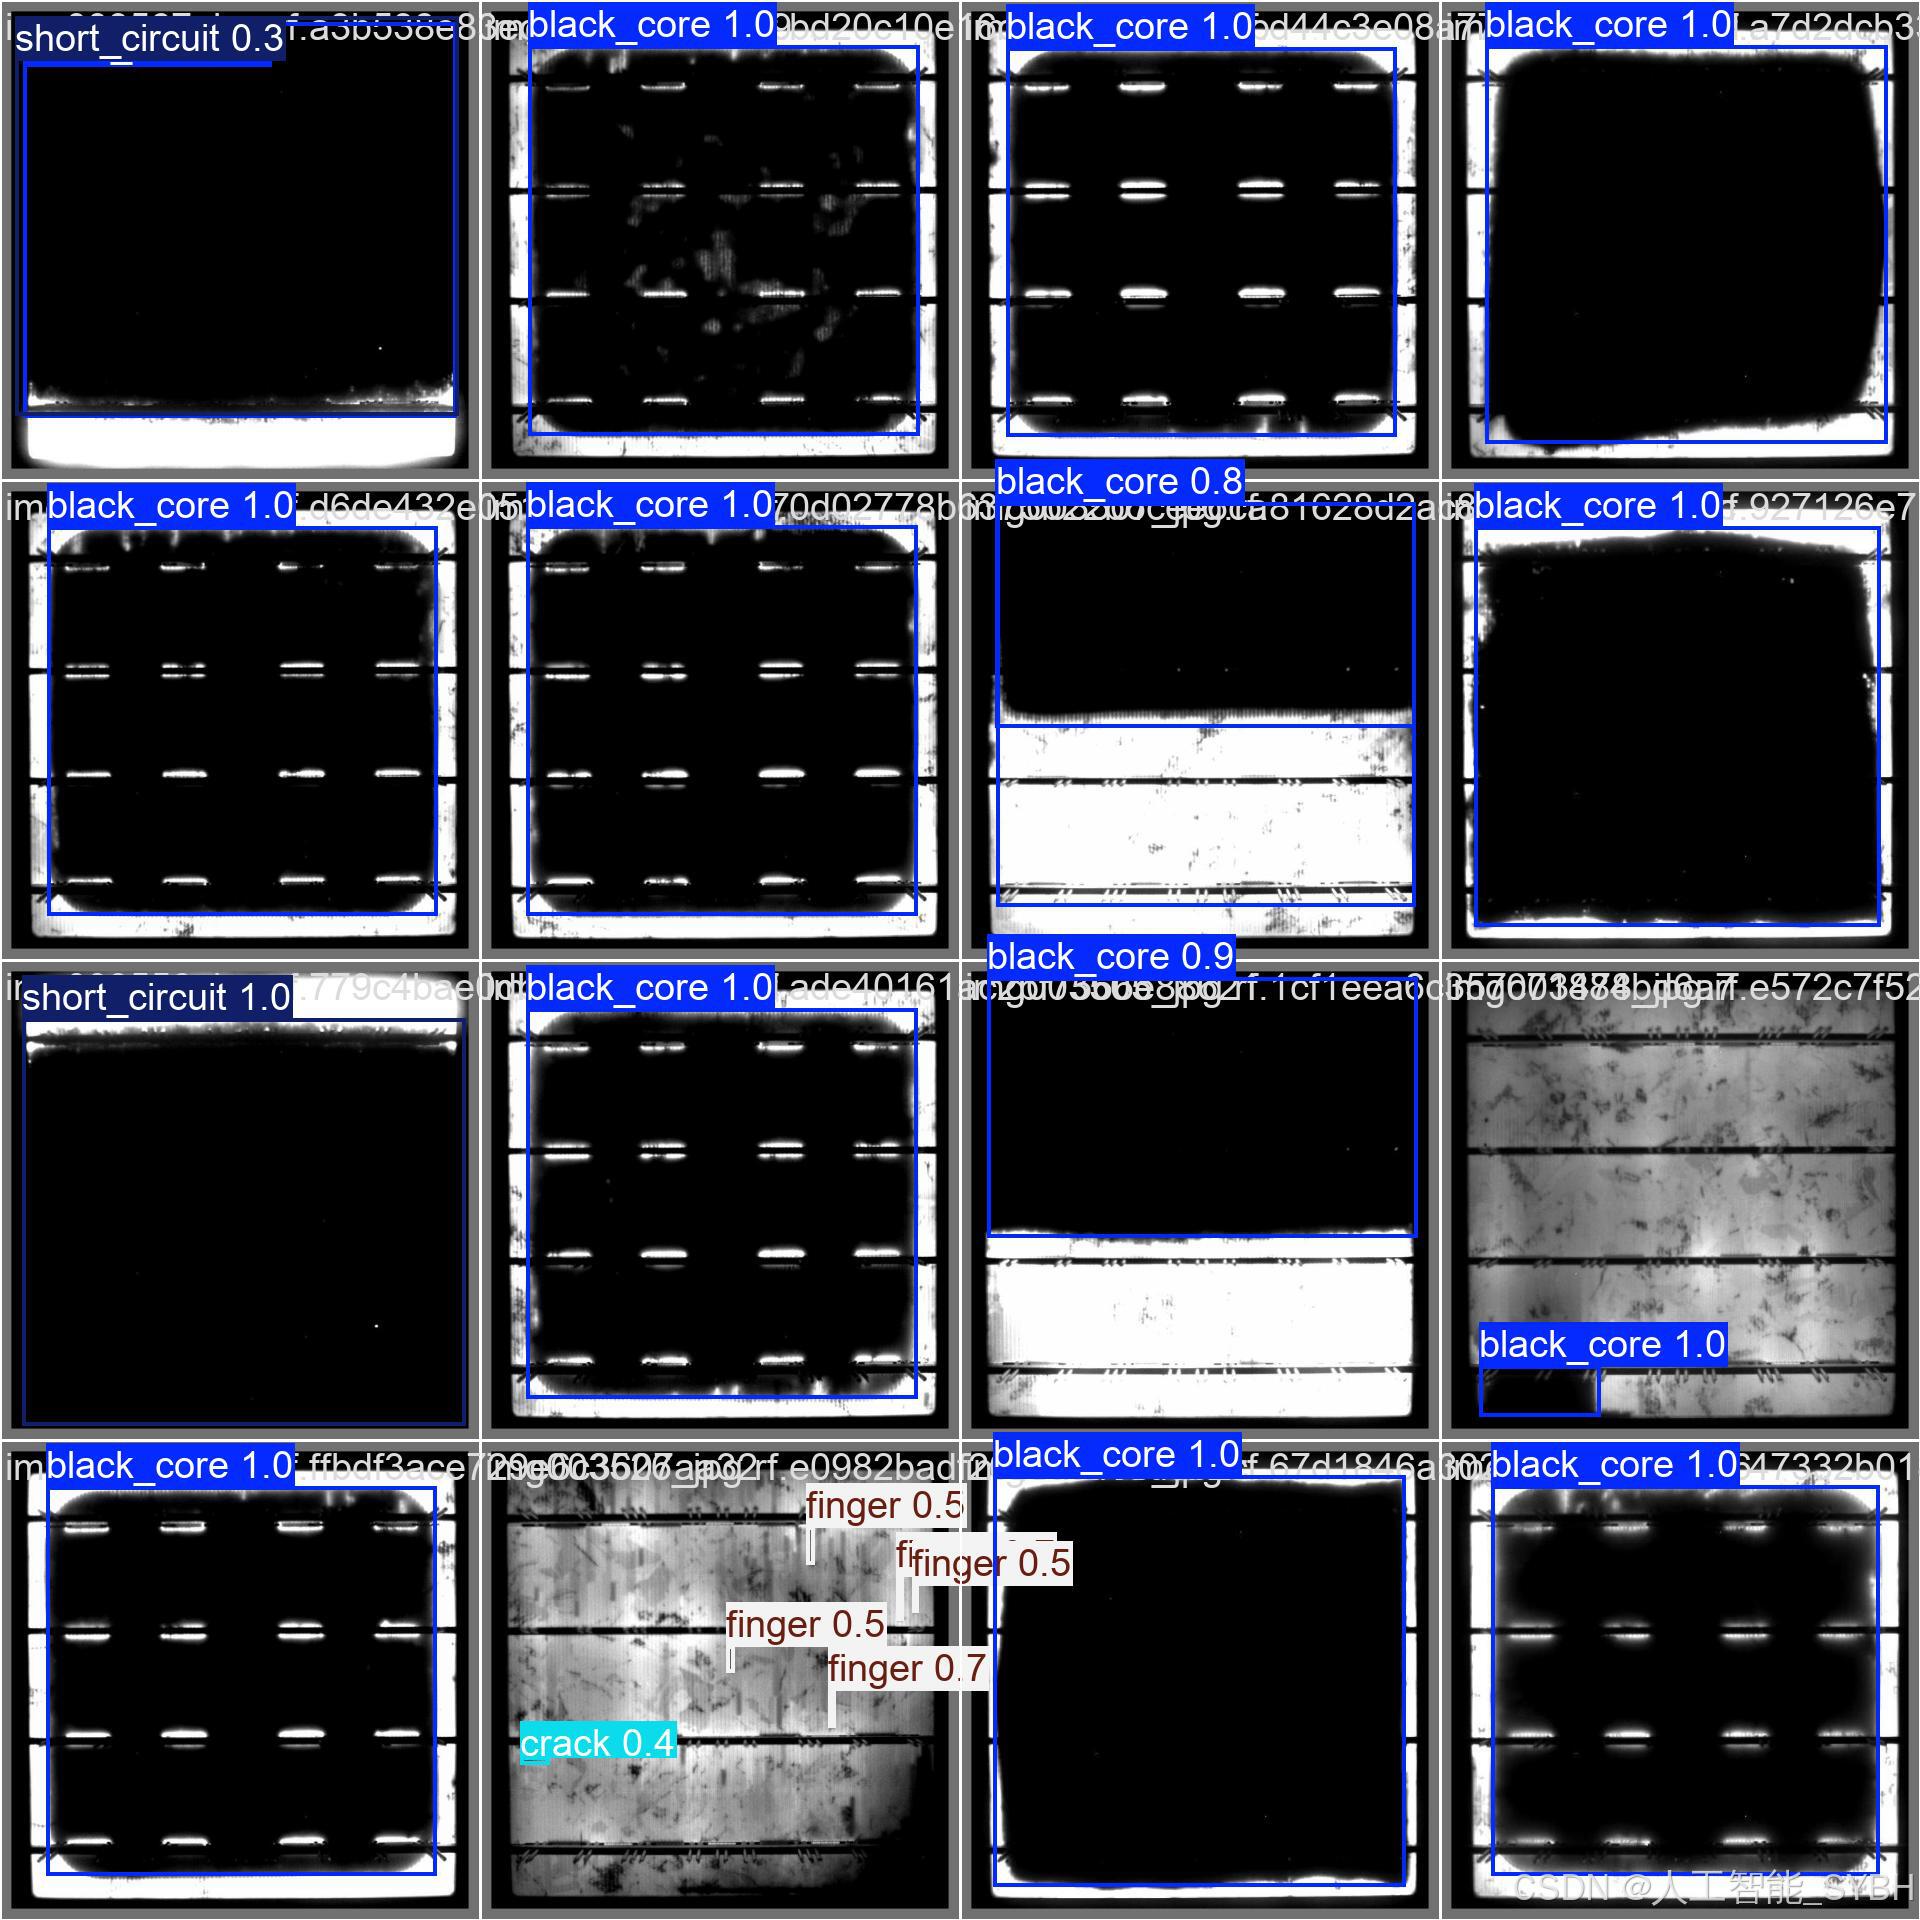
训练结果
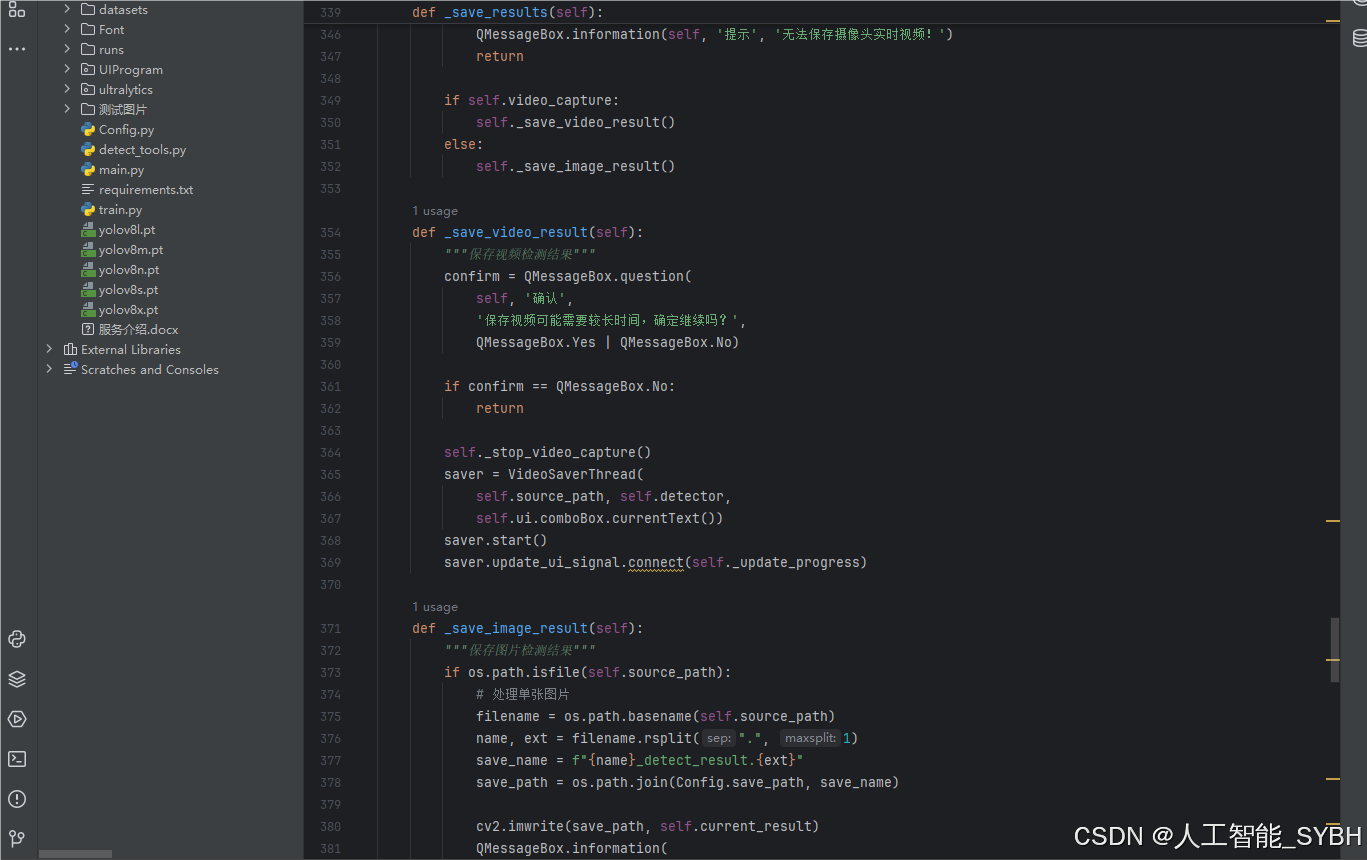
六、核心代码
# -*- coding: utf-8 -*-
import os
import sys
import time
import cv2
import numpy as np
from PIL import ImageFont
from PyQt5.QtCore import Qt, QTimer, QThread, pyqtSignal, QCoreApplication
from PyQt5.QtWidgets import (QApplication, QMainWindow, QFileDialog,
                             QMessageBox, QWidget, QHeaderView,
                             QTableWidgetItem, QAbstractItemView)
from ultralytics import YOLO

# 自定义模块导入
sys.path.append('UIProgram')
from UIProgram.UiMain import Ui_MainWindow
from UIProgram.QssLoader import QSSLoader
from UIProgram.precess_bar import ProgressBar
import detect_tools as tools
import Config


class DetectionApp(QMainWindow):
    def __init__(self, parent=None):
        super().__init__(parent)
        self.ui = Ui_MainWindow()
        self.ui.setupUi(self)

        # 初始化应用
        self._setup_ui()
        self._connect_signals()
        self._load_stylesheet()

        # 模型和资源初始化
        self._init_detection_resources()

    def _setup_ui(self):
        """初始化UI界面设置"""
        self.display_width = 700
        self.display_height = 500
        self.source_path = None
        self.camera_active = False
        self.video_capture = None

        # 配置表格控件
        table = self.ui.tableWidget
        table.verticalHeader().setSectionResizeMode(QHeaderView.Fixed)
        table.verticalHeader().setDefaultSectionSize(40)
        table.setColumnWidth(0, 80)  # ID列
        table.setColumnWidth(1, 200)  # 路径列
        table.setColumnWidth(2, 150)  # 类别列
        table.setColumnWidth(3, 90)  # 置信度列
        table.setColumnWidth(4, 230)  # 位置列
        table.setSelectionBehavior(QAbstractItemView.SelectRows)
        table.verticalHeader().setVisible(False)
        table.setAlternatingRowColors(True)

    def _connect_signals(self):
        """连接按钮信号与槽函数"""
        self.ui.PicBtn.clicked.connect(self._handle_image_input)
        self.ui.comboBox.activated.connect(self._update_selection)
        self.ui.VideoBtn.clicked.connect(self._handle_video_input)
        self.ui.CapBtn.clicked.connect(self._toggle_camera)
        self.ui.SaveBtn.clicked.connect(self._save_results)
        self.ui.ExitBtn.clicked.connect(QCoreApplication.quit)
        self.ui.FilesBtn.clicked.connect(self._process_image_batch)

    def _load_stylesheet(self):
        """加载CSS样式表"""
        style_file = 'UIProgram/style.css'
        qss = QSSLoader.read_qss_file(style_file)
        self.setStyleSheet(qss)

    def _init_detection_resources(self):
        """初始化检测相关资源"""
        # 加载YOLOv8模型
        self.detector = YOLO('runs/detect/exp/weights/best.pt', task='detect')
        self.detector(np.zeros((48, 48, 3)))  # 预热模型

        # 初始化字体和颜色
        self.detection_font = ImageFont.truetype("Font/platech.ttf", 25, 0)
        self.color_palette = tools.Colors()

        # 初始化定时器
        self.frame_timer = QTimer()
        self.save_timer = QTimer()

    def _handle_image_input(self):
        """处理单张图片输入"""
        self._stop_video_capture()

        file_path, _ = QFileDialog.getOpenFileName(
            self, '选择图片', './', "图片文件 (*.jpg *.jpeg *.png)")
        if not file_path:
            return

        self._process_single_image(file_path)

    def _process_single_image(self, image_path):
        """处理并显示单张图片的检测结果"""
        self.source_path = image_path
        self.ui.comboBox.setEnabled(True)

        # 读取并检测图片
        start_time = time.time()
        detection_results = self.detector(image_path)[0]
        processing_time = time.time() - start_time

        # 解析检测结果
        boxes = detection_results.boxes.xyxy.tolist()
        self.detection_boxes = [list(map(int, box)) for box in boxes]
        self.detection_classes = detection_results.boxes.cls.int().tolist()
        confidences = detection_results.boxes.conf.tolist()
        self.confidence_scores = [f'{score * 100:.2f}%' for score in confidences]

        # 更新UI显示
        self._update_detection_display(detection_results, processing_time)
        self._update_object_selection()
        self._show_detection_details()
        self._display_results_table(image_path)

    def _update_detection_display(self, results, process_time):
        """更新检测结果显示"""
        # 显示处理时间
        self.ui.time_lb.setText(f'{process_time:.3f} s')

        # 获取带标注的图像
        annotated_img = results.plot()
        self.current_result = annotated_img

        # 调整并显示图像
        width, height = self._calculate_display_size(annotated_img)
        resized_img = cv2.resize(annotated_img, (width, height))
        qimage = tools.cvimg_to_qpiximg(resized_img)

        self.ui.label_show.setPixmap(qimage)
        self.ui.label_show.setAlignment(Qt.AlignCenter)
        self.ui.PiclineEdit.setText(self.source_path)

        # 更新检测数量
        self.ui.label_nums.setText(str(len(self.detection_classes)))

    def _calculate_display_size(self, image):
        """计算适合显示的图像尺寸"""
        img_height, img_width = image.shape[:2]
        aspect_ratio = img_width / img_height

        if aspect_ratio >= self.display_width / self.display_height:
            width = self.display_width
            height = int(width / aspect_ratio)
        else:
            height = self.display_height
            width = int(height * aspect_ratio)

        return width, height

    def _update_object_selection(self):
        """更新目标选择下拉框"""
        options = ['全部']
        target_labels = [
            f'{Config.names[cls_id]}_{idx}'
            for idx, cls_id in enumerate(self.detection_classes)
        ]
        options.extend(target_labels)

        self.ui.comboBox.clear()
        self.ui.comboBox.addItems(options)

    def _show_detection_details(self, index=0):
        """显示检测目标的详细信息"""
        if not self.detection_boxes:
            self._clear_detection_details()
            return

        box = self.detection_boxes[index]
        self.ui.type_lb.setText(Config.CH_names[self.detection_classes[index]])
        self.ui.label_conf.setText(self.confidence_scores[index])
        self.ui.label_xmin.setText(str(box[0]))
        self.ui.label_ymin.setText(str(box[1]))
        self.ui.label_xmax.setText(str(box[2]))
        self.ui.label_ymax.setText(str(box[3]))

    def _clear_detection_details(self):
        """清空检测详情显示"""
        self.ui.type_lb.setText('')
        self.ui.label_conf.setText('')
        self.ui.label_xmin.setText('')
        self.ui.label_ymin.setText('')
        self.ui.label_xmax.setText('')
        self.ui.label_ymax.setText('')

    def _display_results_table(self, source_path):
        """在表格中显示检测结果"""
        table = self.ui.tableWidget
        table.setRowCount(0)
        table.clearContents()

        for idx, (box, cls_id, conf) in enumerate(zip(
                self.detection_boxes, self.detection_classes, self.confidence_scores)):

            row = table.rowCount()
            table.insertRow(row)

            # 添加表格项
            items = [
                QTableWidgetItem(str(row + 1)),  # ID
                QTableWidgetItem(source_path),  # 路径
                QTableWidgetItem(Config.CH_names[cls_id]),  # 类别
                QTableWidgetItem(conf),  # 置信度
                QTableWidgetItem(str(box))  # 位置坐标
            ]

            # 设置文本居中
            for item in [items[0], items[2], items[3]]:
                item.setTextAlignment(Qt.AlignCenter)

            # 添加到表格
            for col, item in enumerate(items):
                table.setItem(row, col, item)

        table.scrollToBottom()

    def _process_image_batch(self):
        """批量处理图片"""
        self._stop_video_capture()

        folder = QFileDialog.getExistingDirectory(self, "选择图片文件夹", "./")
        if not folder:
            return

        self.source_path = folder
        valid_extensions = {'jpg', 'png', 'jpeg', 'bmp'}

        for filename in os.listdir(folder):
            filepath = os.path.join(folder, filename)
            if (os.path.isfile(filepath) and
                    filename.split('.')[-1].lower() in valid_extensions):
                self._process_single_image(filepath)
                QApplication.processEvents()  # 保持UI响应

    def _update_selection(self):
        """更新用户选择的检测目标显示"""
        selection = self.ui.comboBox.currentText()

        if selection == '全部':
            boxes = self.detection_boxes
            display_img = self.current_result
            self._show_detection_details(0)
        else:
            idx = int(selection.split('_')[-1])
            boxes = [self.detection_boxes[idx]]
            display_img = self.detector(self.source_path)[0][idx].plot()
            self._show_detection_details(idx)

        # 更新显示
        width, height = self._calculate_display_size(display_img)
        resized_img = cv2.resize(display_img, (width, height))
        qimage = tools.cvimg_to_qpiximg(resized_img)

        self.ui.label_show.clear()
        self.ui.label_show.setPixmap(qimage)
        self.ui.label_show.setAlignment(Qt.AlignCenter)

    def _handle_video_input(self):
        """处理视频输入"""
        if self.camera_active:
            self._toggle_camera()

        video_path = self._get_video_path()
        if not video_path:
            return

        self._start_video_processing(video_path)
        self.ui.comboBox.setEnabled(False)

    def _get_video_path(self):
        """获取视频文件路径"""
        path, _ = QFileDialog.getOpenFileName(
            self, '选择视频', './', "视频文件 (*.avi *.mp4)")

        if path:
            self.source_path = path
            self.ui.VideolineEdit.setText(path)
            return path
        return None

    def _start_video_processing(self, video_path):
        """开始处理视频流"""
        self.video_capture = cv2.VideoCapture(video_path)
        self.frame_timer.start(1)
        self.frame_timer.timeout.connect(self._process_video_frame)

    def _stop_video_capture(self):
        """停止视频捕获"""
        if self.video_capture:
            self.video_capture.release()
            self.frame_timer.stop()
            self.camera_active = False
            self.ui.CaplineEdit.setText('摄像头未开启')
            self.video_capture = None

    def _process_video_frame(self):
        """处理视频帧"""
        ret, frame = self.video_capture.read()
        if not ret:
            self._stop_video_capture()
            return

        # 执行目标检测
        start_time = time.time()
        results = self.detector(frame)[0]
        processing_time = time.time() - start_time

        # 解析结果
        self.detection_boxes = results.boxes.xyxy.int().tolist()
        self.detection_classes = results.boxes.cls.int().tolist()
        self.confidence_scores = [f'{conf * 100:.2f}%' for conf in results.boxes.conf.tolist()]

        # 更新显示
        self._update_detection_display(results, processing_time)
        self._update_object_selection()
        self._show_detection_details()
        self._display_results_table(self.source_path)

    def _toggle_camera(self):
        """切换摄像头状态"""
        self.camera_active = not self.camera_active

        if self.camera_active:
            self.ui.CaplineEdit.setText('摄像头开启')
            self.video_capture = cv2.VideoCapture(0)
            self._start_video_processing(0)
            self.ui.comboBox.setEnabled(False)
        else:
            self.ui.CaplineEdit.setText('摄像头未开启')
            self.ui.label_show.clear()
            self._stop_video_capture()

    def _save_results(self):
        """保存检测结果"""
        if not self.video_capture and not self.source_path:
            QMessageBox.information(self, '提示', '没有可保存的内容,请先打开图片或视频!')
            return

        if self.camera_active:
            QMessageBox.information(self, '提示', '无法保存摄像头实时视频!')
            return

        if self.video_capture:
            self._save_video_result()
        else:
            self._save_image_result()

    def _save_video_result(self):
        """保存视频检测结果"""
        confirm = QMessageBox.question(
            self, '确认',
            '保存视频可能需要较长时间,确定继续吗?',
            QMessageBox.Yes | QMessageBox.No)

        if confirm == QMessageBox.No:
            return

        self._stop_video_capture()
        saver = VideoSaverThread(
            self.source_path, self.detector,
            self.ui.comboBox.currentText())
        saver.start()
        saver.update_ui_signal.connect(self._update_progress)

    def _save_image_result(self):
        """保存图片检测结果"""
        if os.path.isfile(self.source_path):
            # 处理单张图片
            filename = os.path.basename(self.source_path)
            name, ext = filename.rsplit(".", 1)
            save_name = f"{name}_detect_result.{ext}"
            save_path = os.path.join(Config.save_path, save_name)

            cv2.imwrite(save_path, self.current_result)
            QMessageBox.information(
                self, '完成',
                f'图片已保存至: {save_path}')
        else:
            # 处理文件夹中的图片
            valid_exts = {'jpg', 'png', 'jpeg', 'bmp'}
            for filename in os.listdir(self.source_path):
                if filename.split('.')[-1].lower() in valid_exts:
                    filepath = os.path.join(self.source_path, filename)
                    name, ext = filename.rsplit(".", 1)
                    save_name = f"{name}_detect_result.{ext}"
                    save_path = os.path.join(Config.save_path, save_name)

                    results = self.detector(filepath)[0]
                    cv2.imwrite(save_path, results.plot())

            QMessageBox.information(
                self, '完成',
                f'所有图片已保存至: {Config.save_path}')

    def _update_progress(self, current, total):
        """更新保存进度"""
        if current == 1:
            self.progress_dialog = ProgressBar(self)
            self.progress_dialog.show()

        if current >= total:
            self.progress_dialog.close()
            QMessageBox.information(
                self, '完成',
                f'视频已保存至: {Config.save_path}')
            return

        if not self.progress_dialog.isVisible():
            return

        percent = int(current / total * 100)
        self.progress_dialog.setValue(current, total, percent)
        QApplication.processEvents()


class VideoSaverThread(QThread):
    """视频保存线程"""
    update_ui_signal = pyqtSignal(int, int)

    def __init__(self, video_path, model, selection):
        super().__init__()
        self.video_path = video_path
        self.detector = model
        self.selection = selection
        self.active = True
        self.colors = tools.Colors()

    def run(self):
        """执行视频保存"""
        cap = cv2.VideoCapture(self.video_path)
        fourcc = cv2.VideoWriter_fourcc(*'XVID')
        fps = cap.get(cv2.CAP_PROP_FPS)
        size = (
            int(cap.get(cv2.CAP_PROP_FRAME_WIDTH)),
            int(cap.get(cv2.CAP_PROP_FRAME_HEIGHT)))

        filename = os.path.basename(self.video_path)
        name, _ = filename.split('.')
        save_path = os.path.join(
            Config.save_path,
            f"{name}_detect_result.avi")

        writer = cv2.VideoWriter(save_path, fourcc, fps, size)
        total_frames = int(cap.get(cv2.CAP_PROP_FRAME_COUNT))
        current_frame = 0

        while cap.isOpened() and self.active:
            current_frame += 1
            ret, frame = cap.read()

            if not ret:
                break

            # 执行检测
            results = self.detector(frame)[0]
            frame = results.plot()
            writer.write(frame)
            self.update_ui_signal.emit(current_frame, total_frames)

        # 释放资源
        cap.release()
        writer.release()

    def stop(self):
        """停止保存过程"""
        self.active = False


if __name__ == "__main__":
    app = QApplication(sys.argv)
    window = DetectionApp()
    window.show()
    sys.exit(app.exec_())
七、项目源码(视频简介内)
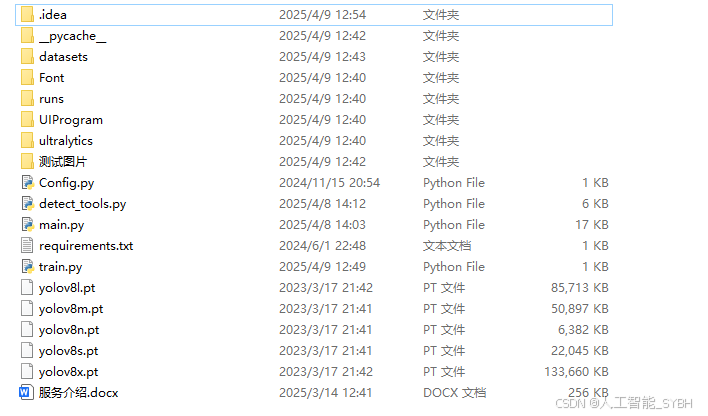
完整全部资源文件(包括测试图片、视频,py文件,训练数据集、训练代码、界面代码等),这里已打包上传至博主的面包多平台,见可参考博客与视频,已将所有涉及的文件同时打包到里面,点击即可运行,完整文件截图如下:
演示与介绍视频:
基于深度学习的太阳能电池板缺陷检测系统(YOLOv8+YOLO数据集+UI界面+Python项目源码+模型)_哔哩哔哩_bilibili
基于深度学习的太阳能电池板缺陷检测系统(YOLOv8+YOLO数据集+UI界面+Python项目源码+模型)


 被折叠的 条评论
为什么被折叠?
被折叠的 条评论
为什么被折叠?
 到【灌水乐园】发言


