


一、安装显卡驱动
参考:ubuntu18.04安装nvidia驱动,3种方式图文详解+卸载教程_ubuntu18.04安装nvidia显卡驱动-CSDN博客
解决问题:ubuntu18.04安装nvidia显卡驱动-CSDN博客
二、安装cmake
参考:ubuntu18.04安装Autoware1.14---GPU版 最全环境配置说明_autoware1.14安装教程-CSDN博客
其中cmake安装部分为:
1| wget https://cmake.org/files/v3.12/cmake-3.12.2-Linux-x86_64.tar.gz
2| tar zxvf cmake-3.12.2-Linux-x86_64.tar.gz #解压
3| sudo ln -sf /home/hb-wgl/cmake-3.12.2-Linux-x86_64/bin/* /usr/bin/  #注意自己的cmake安装路径
但是软链接一直有问题。
参考:linux安装指定版本的cmake_linux安装cmake指定版本-CSDN博客
使用:
sudo vim ~/.bashrc
export PATH=$PATH:/home/q/cmake/cmake-3.12.2-Linux-x86_64/bin
成功输出路径并输出cmake版本
$PATH
bash: /usr/local/sbin:/usr/local/bin:/usr/sbin:/usr/bin:/sbin:/bin:/usr/games:/usr/local/games:/snap/bin:/home/q/cmake/cmake-3.12.2-Linux-x86_64/bin: No such file or directory
cmake --version
cmake version 3.12.2
三、eigen3.3.7
参考:
ubuntu18.04安装Autoware1.14---GPU版 最全环境配置说明_autoware1.14安装教程-CSDN博客
ln一直报错
参考:【环境搭建】ubuntu18.04安装Eigen3_ubuntu18.04 eigen3-CSDN博客
Eigen下载地址:Releases · libeigen / eigen · GitLab下载eigen3.37的压缩包
解压并进如安装包目录
mkdir build
cd build
cmake ..
sudo make install
但cmake编译文件时报错
Tell CMake where to find the compiler by setting either the environment
variable “CXX” or the CMake cache entry CMAKE_CXX_COMPILER to the full path
to the compiler, or to the compiler name if it is in the PATH.参考:cmake:Tell CMake where to find the compiler by setting either the environment...-CSDN博客
apt-get update
apt-get install -y build-essential
重新编译安装 ,软件默认安装在/usr/local/include,需要将文件链接到/usr/include下。
sudo ln -s  /usr/local/include/eigen3 /usr/include
sudo ln -s  /usr/local/include/eigen3/Eigen /usr/include/Eigen
不加sudo会报错,执行完之后可以在/usr/include下看到链接文件。
查看版本:
gedit /usr/include/eigen3/Eigen/src/Core/util/Macros.h 版本号:3.3.7,竖着排列的3 3 7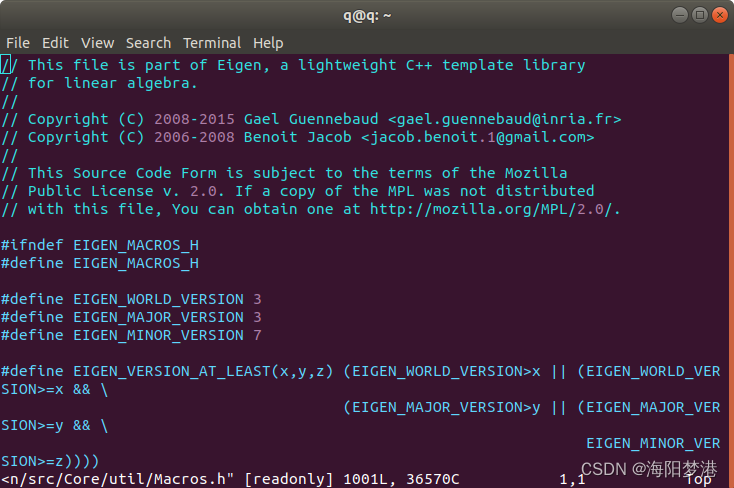
四、CUDA-10.0安装
参考:ubuntu18.04安装Autoware1.14---GPU版 最全环境配置说明_autoware1.14安装教程-CSDN博客
下载时Installer Type选runfile,上面链接截图给错了,这里补丁没下载,应该没事。
安装时一定要参考:Ubuntu18.04安装cuda10.0_ubuntu安装cuda10.0-CSDN博客
配置环境变量:
echo "export PATH=$PATH:/usr/local/cuda-10.0/bin/" >> ~/.bashrc
echo "export CUDA_HOME=$CUDA_HOME:/usr/local/cuda-10.0" >> ~/.bashrc
source ~/.bashrc
查版本:
cat /usr/local/cuda/version.txt
CUDA Version 10.0.130五、cudnn7.5.0
参考:ubuntu18.04安装Autoware1.14---GPU版 最全环境配置说明_autoware1.14安装教程-CSDN博客
下载cudnn:cuDNN Archive | NVIDIA Developer

对于ubuntu18.04来说有不同版本的cudnn,需要注意cudnn的版本。下载选项中
cuDNN Library for Linux是cudnn-10.0-linux-x64-v7.5.0.56.tgz,这一个安装包即可完成安装。
cuDNN Runtime Library for Ubuntu18.04 (Deb)
cuDNN Developer Library for Ubuntu18.04 (Deb)
cuDNN Code Samples and User Guide for Ubuntu18.04 (Deb)
这三个安装包对应的第二种安装方法,第二种方法在参考链接中有,这里由于第一种安装方法直接成功就没尝试第二种。
第一种方法参考:
安装cudnn_如何安装cudnn-CSDN博客
tar vxf cudnn-10.0-linux-x64-v7.5.0.56.tgz
sudo cp include/cudnn.h  /usr/local/cuda/include/
sudo cp -r -d ./lib64/*  /usr/local/cuda/lib64/   #-d如果源文件为软链接(对硬链接无效),则复制出的目标文件也为软链接;
sudo chmod a+r /usr/local/cuda/include/cudnn.h
sudo chmod a+r /usr/local/cuda/lib64/libcudnn*
echo "export LD_LIBRARY_PATH=$LD_LIBRARY_PATH:/usr/local/cuda/lib64" >> ~/.bashrc
source ~/.bashrc
查版本:
cat /usr/local/cuda/include/cudnn.h | grep CUDNN_MAJOR -A 2#define CUDNN_MAJOR 7
#define CUDNN_MINOR 5
#define CUDNN_PATCHLEVEL 0
--
#define CUDNN_VERSION (CUDNN_MAJOR * 1000 + CUDNN_MINOR * 100 + CUDNN_PATCHLEVEL)
#include "driver_types.h"
六、opencv3.4.5安装
下载:网页输入URL自动下载
https://github.com/opencv/opencv/archive/3.4.5.zipunzip opencv-3.4.5.zip
cd opencv-3.4.5
sudo apt-get install build-essential libgtk2.0-dev libavcodec-dev libavformat-dev libjpeg.dev libtiff4.dev libswscale-dev libjasper-dev
报错:
Reading package lists... Done
Building dependency tree
Reading state information... Done
Note, selecting 'libjpeg-dev' for regex 'libjpeg.dev'
Note, selecting 'libtiff4-dev' for regex 'libtiff4.dev'
E: Unable to locate package libjasper-dev
解决:
sudo add-apt-repository "deb http://security.ubuntu.com/ubuntu xenial-security main"
sudo apt update
sudo apt install libjasper1 libjasper-dev
编译安装:
mkdir build && cd build
cmake ..
make -j8 // nproc是读取CPU的核心数量
sudo make install
环境配置添加库路径:
sudo /bin/bash -c 'echo "/usr/local/lib" > /etc/ld.so.conf.d/opencv.conf'
##更新库
sudo ldconfig
配置bash,执行如下命令:
sudo gedit /etc/bash.bashrc
//在末尾添加
PKG_CONFIG_PATH=$PKG_CONFIG_PATH:/usr/local/lib/pkgconfig
export PKG_CONFIG_PATH
保存退出,然后执行如下命令使得配置生效:
source /etc/bash.bashrc  #加sudo会报错,sudo: source: command not found,猜是root下面没有source
sudo updatedb
查版本:
pkg-config --modversion opencv
3.4.5
安装pkg-config
sudo apt install pkg-config七、安装Qt 5.14.2
参考:ubuntu18.04安装Autoware1.14---GPU版 最全环境配置说明_autoware1.14安装教程-CSDN博客
下载:qt-opensource-linux-x64-5.14.2.run

安装:
chmod a+x ./qt-opensource-linux-x64-5.14.2.run
./qt-opensource-linux-x64-5.14.2.run
进入程序安装界面,参考:Ubuntu18.04 qt5.14安装_ubuntu18.04安装qt-CSDN博客
邮箱验证完之后,需要手动点安装界面的next进行下一步,qt组件这里全选。
安装完成之后,有的文章还需要配置环境,但原文没配置,所以这里没配置。
八.Autoware1.14源码安装
参考:ubuntu18.04安装Autoware1.14---GPU版 最全环境配置说明_autoware1.14安装教程-CSDN博客
原文,执行下面代码会报错找不到包:
sudo apt update
sudo apt install -y python-catkin-pkg python-rosdep ros-$ROS_DISTRO-catkin
sudo apt install -y python3-pip python3-colcon-common-extensions python3-setuptools python3-vcstool
pip3 install -U setuptools
报错:
sudo apt install -y python-catkin-pkg python-rosdep ros-$ROS_DISTRO-catkin
Reading package lists... Done
Building dependency tree
Reading state information... Done
Note, selecting 'python-rosdep2' instead of 'python-rosdep'
E: Unable to locate package ros--catkin
#########################################
sudo apt install ros-melodic-catkin
Reading package lists... Done
Building dependency tree
Reading state information... Done
E: Unable to locate package ros-melodic-catkin
第一次成功安装采用的方法是,rosdep用鱼香ros安装(终端执行wget http://fishros.com/install -O fishros && bash fishros),在安装过程中更新源,难道是这个缘故?也尝试用鱼香安装ros,不知道为啥报错,但也更新了源。
之后直接执行下面代码就可以,或许是网络波动?(环境中没有$ROS_DISTRO)
sudo apt update
sudo apt install -y python-catkin-pkg python-rosdep ros-melodic-catkin
sudo apt install -y python3-pip python3-colcon-common-extensions python3-setuptools python3-vcstool
pip3 install -U setuptools
安装ROS
鱼香安装报错:source 什么文件不存在
apt安装报错:Some packages could not be installed. This may mean that you have requested
源错误,修改
sudo gedit /etc/apt/sources.list
#添加阿里源
deb http://mirrors.aliyun.com/ubuntu/ bionic main restricted universe multiverse
deb http://mirrors.aliyun.com/ubuntu/ bionic-security main restricted universe multiverse
deb http://mirrors.aliyun.com/ubuntu/ bionic-updates main restricted universe multiverse
deb http://mirrors.aliyun.com/ubuntu/ bionic-proposed main restricted universe multiverse
deb http://mirrors.aliyun.com/ubuntu/ bionic-backports main restricted universe multiverse

#中科大源
deb https://mirrors.ustc.edu.cn/ubuntu/ bionic main restricted universe multiverse
deb https://mirrors.ustc.edu.cn/ubuntu/ bionic-updates main restricted universe multiverse
deb https://mirrors.ustc.edu.cn/ubuntu/ bionic-backports main restricted universe multiverse
deb https://mirrors.ustc.edu.cn/ubuntu/ bionic-security main restricted universe multiverse
deb https://mirrors.ustc.edu.cn/ubuntu/ bionic-proposed main restricted universe multiverse

#163源
deb http://mirrors.163.com/ubuntu/ bionic main restricted universe multiverse
deb http://mirrors.163.com/ubuntu/ bionic-security main restricted universe multiverse
deb http://mirrors.163.com/ubuntu/ bionic-updates main restricted universe multiverse
deb http://mirrors.163.com/ubuntu/ bionic-proposed main restricted universe multiverse
deb http://mirrors.163.com/ubuntu/ bionic-backports main restricted universe multiverse

#清华源
deb https://mirrors.tuna.tsinghua.edu.cn/ubuntu/ bionic main restricted universe multiverse
deb https://mirrors.tuna.tsinghua.edu.cn/ubuntu/ bionic-updates main restricted universe multiverse
deb https://mirrors.tuna.tsinghua.edu.cn/ubuntu/ bionic-backports main restricted universe multiverse
deb https://mirrors.tuna.tsinghua.edu.cn/ubuntu/ bionic-security main restricted universe multiverse
deb https://mirrors.tuna.tsinghua.edu.cn/ubuntu/ bionic-proposed main restricted universe multiverse
之后可以选择鱼香ROS安装,也可以自己安装。
安装ros依赖,虽然rosdep可以通过鱼香安装好,但rosdep update一直报错,放这里不管了。
rosdep update
rosdep install -y --from-paths src --ignore-src --rosdistro $ROS_DISTRO
编译环境
AUTOWARE_COMPILE_WITH_CUDA=1 colcon build --cmake-args -DCMAKE_BUILD_TYPE=Release
报错:
CMake Error at /opt/ros/melodic/share/catkin/cmake/catkinConfig.cmake:83 (find_package):
  Could not find a package configuration file provided by
  "jsk_recognition_msgs" with any of the following names:

    jsk_recognition_msgsConfig.cmake
    jsk_recognition_msgs-config.cmake

  Add the installation prefix of "jsk_recognition_msgs" to CMAKE_PREFIX_PATH
  or set "jsk_recognition_msgs_DIR" to a directory containing one of the
  above files.  If "jsk_recognition_msgs" provides a separate development
  package or SDK, be sure it has been installed.
Call Stack (most recent call first):
  CMakeLists.txt:4 (find_package)


---
Failed   <<< autoware_msgs [1.33s, exited with code 1]
修改:
sudo apt-get install ros-melodic-jsk-recognition-msgs
报错:
CMake Error at /opt/ros/melodic/share/catkin/cmake/catkinConfig.cmake:83 (find_package):
  Could not find a package configuration file provided by "jsk_rviz_plugins"
  with any of the following names:

    jsk_rviz_pluginsConfig.cmake
    jsk_rviz_plugins-config.cmake

  Add the installation prefix of "jsk_rviz_plugins" to CMAKE_PREFIX_PATH or
  set "jsk_rviz_plugins_DIR" to a directory containing one of the above
  files.  If "jsk_rviz_plugins" provides a separate development package or
  SDK, be sure it has been installed.
Call Stack (most recent call first):
  CMakeLists.txt:6 (find_package)
修改:
sudo apt-get install ros-melodic-jsk-rviz-plugins报错:
/usr/include/eigen3/Eigen/Core:42:14: fatal error: math_functions.hpp: No such file or directory修改:
将 /usr/include/eigen3/Eigen/Core的42行中的 math_functions.hpp改为cuda_runtime.h
报错:ntd_gpu
/usr/local/include/eigen3/Eigen/src/Core/arch/CUDA/PacketMathHalf.h(102): error: more than one conversion function from "const __half" to a built-in type applies:修改:检查eigen版本参考:Autoware 安装(源码)过程 与 踩坑记录(Ubuntu18.04)_autoware源码-CSDN博客
报错:
CMake Error at /usr/share/cmake-3.10/Modules/FindPackageHandleStandardArgs.cmake:137 (message):
Could NOT find GLEW (missing: GLEW_INCLUDE_DIR GLEW_LIBRARY)修改:参考:Autoware学习笔记_at /usr/share/cmake-3.10/modules/findpackagehandle-CSDN博客
sudo apt install libglew-dev报错:
  Could NOT find GeographicLib (missing: GeographicLib_LIBRARIES
  GeographicLib_INCLUDE_DIRS)
修理:
sudo apt-get install libgeographic-dev报错:
  Could not find a package configuration file provided by "nmea_msgs" with
  any of the following names:

    nmea_msgsConfig.cmake
    nmea_msgs-config.cmake
修改:
suds apt-get install ros-melodic-nmea-msgs报错:
  Could not find a package configuration file provided by
  "nmea_navsat_driver" with any of the following names:

    nmea_navsat_driverConfig.cmake
    nmea_navsat_driver-config.cmake
修理:
sudo apt-get install ros-melodic-nmea-navsat-driver报错:
CMake Error at /opt/ros/melodic/share/catkin/cmake/catkinConfig.cmake:83 (find_package):
  Could not find a package configuration file provided by
  "automotive_navigation_msgs" with any of the following names:

    automotive_navigation_msgsConfig.cmake
    automotive_navigation_msgs-config.cmake
修理:
sudo apt-get install ros-melodic-automotive-navigation-msgs报错:
  Could not find a package configuration file provided by "grid_map_msgs"
  with any of the following names:

    grid_map_msgsConfig.cmake
    grid_map_msgs-config.cmake
修理:
sudo apt-get install ros-melodic-grid-map-msgs报错:
  Could not find a package configuration file provided by
  "automotive_platform_msgs" with any of the following names:

    automotive_platform_msgsConfig.cmake
    automotive_platform_msgs-config.cmake
修理:
sudo apt-get install ros-melodic-automotive-platform-msgs报错:
  Could not find a package configuration file provided by "grid_map_ros" with
  any of the following names:

    grid_map_rosConfig.cmake
    grid_map_ros-config.cmake
修理:
sudo apt-get install ros-melodic-grid-map-ros报错:
--- stderr: calibration_publisher
CMakeFiles/calibration_publisher.dir/src/calibration_publisher.cpp.o: In function `main':
calibration_publisher.cpp:(.text.startup+0xb8e): undefined reference to `cv::read(cv::FileNode const&, std::__cxx11::basic_string<char, std::char_traits<char>, std::allocator<char> >&, std::__cxx11::basic_string<char, std::char_traits<char>, std::allocator<char> > const&)'
修理;autoware解决报错:calibration_publisher.cpp:(.text+0x26): undefined reference to `cv::Mat::Mat()‘-CSDN博客
报错:
  Could not find a package configuration file provided by
  "velodyne_pointcloud" with any of the following names:

    velodyne_pointcloudConfig.cmake
    velodyne_pointcloud-config.cmake
修理:
sudo apt-get install ros-melodic-velodyne-pointcloud
报错:
CMake Error at /opt/ros/melodic/share/catkin/cmake/catkinConfig.cmake:83 (find_package):
  Could not find a package configuration file provided by "gps_common" with
  any of the following names:

    gps_commonConfig.cmake
    gps_common-config.cmake
修理:
sudo apt-get install ros-melodic-gps-common报错:
  Could not find a package configuration file provided by "qpoases_vendor"
  with any of the following names:

    qpoases_vendorConfig.cmake
    qpoases_vendor-config.cmake
修理:
sudo apt-get install ros-melodic-qpoases-vendor
报错:
CMake Error at /opt/ros/melodic/share/catkin/cmake/catkinConfig.cmake:83 (find_package):
  Could not find a package configuration file provided by "geodesy" with any
  of the following names:

    geodesyConfig.cmake
    geodesy-config.cmake
修理:
sudo apt-get install ros-melodic-geodesy
报错:
--- stderr: waypoint_maker
/home/q/Autoware/autoware.ai/install/lanelet2_routing/lib/liblanelet2_routing.so: undefined reference to `lanelet::LaneletMap::LaneletMap()'
/home/q/Autoware/autoware.ai/install/lanelet2_validation/lib/liblanelet2_validation.so: undefined reference to `lanelet::LaneletMap::~LaneletMap()'
collect2: error: ld returned 1 exit status
修理:
sudo vim /.bashrc
export LIBRARY_PATH=/usr/local/lib:$LIBRARY_PATH
报错:
--- stderr: waypoint_maker
/home/q/Autoware/autoware.ai/install/lanelet2_routing/lib/liblanelet2_routing.so: undefined reference to `lanelet::LaneletMap::LaneletMap()'
/home/q/Autoware/autoware.ai/install/lanelet2_validation/lib/liblanelet2_validation.so: undefined reference to `lanelet::LaneletMap::~LaneletMap()'
collect2: error: ld returned 1 exit status
make[2]: *** [devel/lib/waypoint_maker/waypoint_clicker] Error 1
make[1]: *** [CMakeFiles/waypoint_clicker.dir/all] Error 2
修理:修改waypoint_maker功能包对应的Cmakelists.txt
find_package(lanelet2 REQUIRED)
include_directories(${lanelet2_INCLUDE_DIRS})
target_link_libraries(your_target_name ${lanelet2_LIBRARIES})
报错:
  Could not find a package configuration file provided by "lanelet2" with any
  of the following names:

    lanelet2Config.cmake
    lanelet2-config.cmake
修理:
sudo apt-get install ros-melodic-lanelet2当时并没有直接成功,尝试了很多方法都失败了,但将文件还原后重新编译居然成功了。
下面是尝试的方法:
ubuntu20.04 ad_with_lanelet2 编译问题解决-CSDN博客
至此编译完成,下图为编译成功。


 1294
1294


 被折叠的 条评论
为什么被折叠?
被折叠的 条评论
为什么被折叠?
 到【灌水乐园】发言


