


Apollo6.0点云模型的训练, 基于ROS和TensorRT进行推理
三维点云目标检测
深度学习三维点云模型推理,
为啥需要学习三维点云, 因为可用很好探测三维空间,特别是自动驾驶领域越来越多,
为啥又需要深度学习三维点云,可以更好的分类,基于SVM等点云分类方法,也许只能达到80%的准确率, 深度学习只会高些;
三维点云目标检测思路之一:
如下图所示,先进行点云编码,检测网络,后处理;
CNN包括(backbone、head、neck,loss)
那么PointPillars可如下图所示:
点云编码:前处理和点云特征学习;
检测网络:2D CNN和Head SSD;
后处理:

1: apollo检测模型简介
根据apllo6.0的代码 , 分成4步对 Lidar 核心逻辑流程进行叙述。
1.1 点云编码
a. 点云前处理, 分柱子
把俯视图分成 H × W个小方格子,再沿着z轴向上拉就成了柱体
每个网格所对应的柱子中的每一个点取:
x, 每个点的真实位置坐标
y, 每个点的真实位置坐标
z, 每个点的真实位置坐标
r, 每个点的真实反射率
x_c,点相对于柱子中心的偏差
y_c,点相对于柱子中心的偏差
z_c,点相对于柱子中心的偏差
x_p,点相对于网格中心的偏差
y_p,点相对于网格中心的偏差
但是,这样完全没有对点云进行编码,需要进一步学习
    def forward(self, pillar_x, pillar_y, pillar_z, pillar_i, num_voxels, x_sub_shaped, y_sub_shaped, mask):
        pillar_xyz =  torch.cat((pillar_x, pillar_y, pillar_z), 1)
        points_mean = pillar_xyz.sum(dim=3, keepdim=True) / num_voxels.view(1, 1, -1, 1)
        f_cluster = pillar_xyz - points_mean
        f_center_offset_0 = pillar_x - x_sub_shaped
        f_center_offset_1 = pillar_y - y_sub_shaped
        f_center_concat = torch.cat((f_center_offset_0, f_center_offset_1), 1)
        pillar_xyzi = torch.cat((pillar_x, pillar_y, pillar_z, pillar_i), 1)
        features_list = [pillar_xyzi, f_cluster, f_center_concat]
        features = torch.cat(features_list, dim=1)
        masked_features = features * mask
        pillar_feature = self.pfn_layers[0](masked_features)
        return pillar_feature
b. 点云前处理, 点云编码
一个简化的PointNet从D维中学出C个channel来最终可以展开成一个伪图像形式,H,W为宽高,C为通道数。
前处理网络思路:
每个柱子中点多于N的进行采样,少于N的进行填充0。于是就形成了(D,P,N)D=9, N为每个pillar的采样点数(设定值),P为pillar总数目,H*W。这样点云数据就表达成了一个(D,P,N)的Tensor.然后卷积,得到一个(C,P,N)的Tensor.在N这个维度上做max operation.得到(C,P)的tensor.变形得(C,H,W)tensor.
至此,
用一个(C,H,W)的tensor完成了点云数据的表达.
也是后续检测网络的前处理部分,
同时移植TensorRT也可生成onnx模型;

如下简化了VoxelNet的点云编码方式:
采用PFE方式

由于代码基于VoxelNet修改的,所以onnx输入为 pillar_x, pillar_y, pillar_z, pillar_i,
num_voxels, x_sub_shaped, y_sub_shaped, mask;
最后再转换为pointpillars的输入
    def forward(self, pillar_x, pillar_y, pillar_z, pillar_i, num_voxels, x_sub_shaped, y_sub_shaped, mask):
        pillar_xyz =  torch.cat((pillar_x, pillar_y, pillar_z), 1)
        points_mean = pillar_xyz.sum(dim=3, keepdim=True) / num_voxels.view(1, 1, -1, 1)
        f_cluster = pillar_xyz - points_mean
        f_center_offset_0 = pillar_x - x_sub_shaped
        f_center_offset_1 = pillar_y - y_sub_shaped
        f_center_concat = torch.cat((f_center_offset_0, f_center_offset_1), 1)
        pillar_xyzi = torch.cat((pillar_x, pillar_y, pillar_z, pillar_i), 1)
        features_list = [pillar_xyzi, f_cluster, f_center_concat]
        features = torch.cat(features_list, dim=1)
        masked_features = features * mask
        pillar_feature = self.pfn_layers[0](masked_features)
        return pillar_feature


class PFNLayer(nn.Module):
    def __init__(self,
                 in_channels,
                 out_channels,
                 use_norm=True,
                 last_layer=False):
        super().__init__()
        self.name = 'PFNLayer'
        self.last_vfe = last_layer
        if not self.last_vfe:
            out_channels = out_channels // 2
        self.units = out_channels
        self.in_channels = in_channels

        self.linear= nn.Linear(self.in_channels, self.units, bias = False)
        self.norm = nn.BatchNorm2d(self.units, eps=1e-3, momentum=0.01)

        self.conv1 = nn.Conv2d(in_channels=self.in_channels, out_channels=self.units, kernel_size=1, stride=1)
        self.conv2 = nn.Conv2d(in_channels=100, out_channels=1, kernel_size=1, stride=1)

        self.t_conv = nn.ConvTranspose2d(100, 1, (1,8), stride=(1,7))
        self.conv3 = nn.Conv2d(64, 64, kernel_size=(1, 34), stride=(1, 1), dilation=(1,3))

    def forward(self, input):
        x = self.conv1(input)
        x = self.norm(x)
        x = F.relu(x)
        x = self.conv3(x)
        return x
1.2 检测网络backbone和head
包含两个子网络
1、top-down网络,
2、second网络
其中top-down网络结构为了捕获不同尺度下的特征信息,主要是由卷积层、归一化、非线性层构成的。
second网络用于将不同尺度特征信息融合,主要有反卷积来实现。
经过Scatter处理,转化为1×64×496×432数据结构,再经过如下网络,最后由head进行预测


模型输出包括:
rpn_box_output, 回归损失
// boxes ([N, 7] Tensor): normal boxes: x, y, z, w, l, h, r
rpn_cls_output,分类损失
// float score = 1/(1+expf(-cls_preds[tid]));
rpn_dir_outpu,方向预测损失
由于有0°和90°两种anchor,所以7×2,1×2,2×2
t
 改进以后,multi-head

1.3 检测网络Loss
loss设计:
3d box由(x,y,z,w,l,h,theta)确定.
box由(x,y,w,h)确定, 3dbox多了一个z方向的数据,以及一个角度,用以预计3d box的朝向(绕z轴的角度).
loss由3部分组成
定位loss,衡量3d box
分类loss,衡量box内的物体类别
direction loss.定位loss虽说已经考虑了角度,但是不能区分flipped box.即比如一个3d box内的车,朝着正南和朝着正北走,标出来的3d box都是一样的.
不同于图像领域的anchor:
以voxelnet为例,需要人为设定anchor的大小,可以直接回归真实的目标大小,因此anchor也可以根据真实目标大小设定,对于每种anchor,设置了θa=0°和90°两种角度。由于目标有各种角度,因此为了得到更准确的角度回归,anchor的角度设置可以在[0°,180°)进行等间隔采样,获得更多不同角度的anchor,提高回归精度。
一个分类向量(car, pedestrian, cyclist等),
一个7维的回归向量(x, y, z, l, w, h, theta),
一个方向二分类向量用于预测的角度值跟实际方向重合还是相反

apollo/modules/perception/lidar/lib/detection/lidar_point_pillars/
2: apollo检测模型 ROS环境移植
可将代码迁移到ROS环境, 实现和视觉图像的简单融合算法,
同时订阅topic, 进行推理即可
#include <chrono>
#include <cmath>

#include <pcl_conversions/pcl_conversions.h>
#include <pcl/PCLPointCloud2.h>
#include <pcl_ros/transforms.h>
#include <tf/transform_datatypes.h>
#include <visualization_msgs/Marker.h>
#include <visualization_msgs/MarkerArray.h>

#include "point_pillars_ros.h"
#include "utils.h"
#include "timer.h"

utils utils_box;
PointPillarsROS::PointPillar()
{
  private_nh_.param<std::string>("pfe_onnx_file", pfe_onnx_file_, "");
  private_nh_.param<std::string>("rpn_onnx_file", rpn_onnx_file_, "");
  point_pillars_ptr_.reset(new PointPillars(reproduce_result_mode_, score_threshold_, nms_overlap_threshold_,                                            pfe_onnx_file_, rpn_onnx_file_));
}

void PointPillarsROS::createROSPubSub()
{
  sub_points_ = nh_.subscribe<sensor_msgs::PointCloud2>("/points_raw", 1, &PointPillarsROS::pointsCallback, this);
  pub_points_objects_ = nh_.advertise<visualization_msgs::MarkerArray>("/dl/objects", 1, true);
  pub_points_ = nh_.advertise<sensor_msgs::PointCloud2>("/dl/points", 1);
}

turn out_pose.pose;
}

void PointPillarsROS::pubDetectedObject_rviz(const std::vector<float> &detections, const std_msgs::Header &in_header)
{
  int num_objects = detections.size() / OUTPUT_NUM_BOX_FEATURE_;
  std::cout << "*******rviz_msgs********" << std::endl;
  std::cout << "num_objects:" << num_objects << std::endl;
  std::vector<tracker> objects_;
  for (size_t i = 0; i < num_objects; i++)
  {
    tracker out_obj;
    std::cout << "Center,x,y,z:" << out_obj.geometry_center[0] << "," << out_obj.geometry_center[1] << "," << out_obj.geometry_center[2] << std::endl;
    float dimensions_x = detections[i * OUTPUT_NUM_BOX_FEATURE_ + 3];
    float dimensions_y = detections[i * OUTPUT_NUM_BOX_FEATURE_ + 4];
    float dimensions_z = detections[i * OUTPUT_NUM_BOX_FEATURE_ + 5];
    out_obj.size.x = dimensions_x;
    out_obj.size.y = dimensions_y;
    out_obj.size.z = dimensions_z;
    out_obj.dimensions.x = dimensions_x;
    out_obj.dimensions.x = dimensions_y;
    out_obj.dimensions.x = dimensions_z;
    ************
    ************
    float yaw = detections[i * OUTPUT_NUM_BOX_FEATURE_ + 6];
    yaw += M_PI / 2;
    yaw = std::atan2(std::sin(yaw), std::cos(yaw));
    geometry_msgs::Quaternion q = tf::createQuaternionMsgFromYaw(-yaw);
    out_obj.q = q;
    for (int i = 0; i < 4; ++i)
    {
      out_obj.corners[i] = cv::Point3f(corners[i].x, corners[i].y,
                                       min_pt[2]);
      out_obj.corners[i + 4] =
          cv::Point3f(corners[i].x, corners[i].y, max_pt[2]);
    }
    objects_.push_back(out_obj);
  }
  //double frame_time = in_header.stamp.toSec();
  visualization_msgs::MarkerArray markers;
  utils_box.VisualBox(objects_, markers);
  pub_points_objects_.publish(markers);
}


void PointPillarsROS::pclToArray(const pcl::PointCloud<pcl::PointXYZI>::Ptr &in_pcl_pc_ptr, float *out_points_array,
                                 const float offset_z)
{
  for (size_t i = 0; i < in_pcl_pc_ptr->size(); i++)
  {
    pcl::PointXYZI point = in_pcl_pc_ptr->at(i);
    out_points_array[i * NUM_POINT_FEATURE_ + 0] = point.x;
    out_points_array[i * NUM_POINT_FEATURE_ + 1] = point.y;
    out_points_array[i * NUM_POINT_FEATURE_ + 2] = point.z + offset_z;
    out_points_array[i * NUM_POINT_FEATURE_ + 3] = float(point.intensity / NORMALIZING_INTENSITY_VALUE_);
  }
}

void PointPillarsROS::pointsCallback(const sensor_msgs::PointCloud2::ConstPtr &msg)
{
  pcl::PointCloud<pcl::PointXYZI>::Ptr pcl_pc_ptr(new pcl::PointCloud<pcl::PointXYZI>);
  const sensor_msgs::PointCloud2 output = *msg;
  msg_to_pointcloud(output, pcl_pc_ptr);
  tm.start("transformPointCloud");
  float *points_array = new float[pcl_pc_ptr->size() * NUM_POINT_FEATURE_];
  pclToArray(pcl_pc_ptr, points_array);
  tm.start("doInference");
  std::vector<float> out_detection;
  point_pillars_ptr_->doInference(points_array, pcl_pc_ptr->size(), out_detection);
  delete[] points_array;
  std::cout << "out_detection.size:" << out_detection.size() << std::endl;
  pubDetectedObject_rviz(out_detection, msg->header);
}

void PointPillarsROS::msg_to_pointcloud(const sensor_msgs::PointCloud2 &in_msg,
                                        pcl::PointCloud<pcl::PointXYZI>::Ptr out_cloud)
{
}


#include <iostream>
#include "point_pillars_ros.h"

int main(int argc, char** argv)
{
  ros::init(argc, argv, "lidar_point_pillars");
  PointPillars dec;
  dec.createPubSub();
  ros::spin();
  return 0;
}
void doInference(float* in_points_array)
{
  preprocess(in_points_array, in_num_points);
  anchor_mask_cuda_ptr_->doAnchorMaskCuda();
  cudaStream_t stream;
  GPU_CHECK(cudaStreamCreate(&stream));
  GPU_CHECK(cudaMemcpyAsync(pfe_buffers_[0], dev_pillar_x_, MAX_NUM_PILLARS_ * MAX_NUM_POINTS_PER_PILLAR_ * sizeof(float), cudaMemcpyDeviceToDevice, stream));
  GPU_CHECK(cudaMemcpyAsync(pfe_buffers_[1], dev_pillar_y_, MAX_NUM_PILLARS_ * MAX_NUM_POINTS_PER_PILLAR_ * sizeof(float), cudaMemcpyDeviceToDevice, stream));
  GPU_CHECK(cudaMemcpyAsync(pfe_buffers_[2], dev_pillar_z_, MAX_NUM_PILLARS_ * MAX_NUM_POINTS_PER_PILLAR_ * sizeof(float), cudaMemcpyDeviceToDevice, stream));
  GPU_CHECK(cudaMemcpyAsync(pfe_buffers_[3], dev_pillar_i_, MAX_NUM_PILLARS_ * MAX_NUM_POINTS_PER_PILLAR_ * sizeof(float), cudaMemcpyDeviceToDevice, stream));
  GPU_CHECK(cudaMemcpyAsync(pfe_buffers_[4], dev_num_points_per_pillar_, MAX_NUM_PILLARS_ * sizeof(float), cudaMemcpyDeviceToDevice, stream));
  GPU_CHECK(cudaMemcpyAsync(pfe_buffers_[5], dev_x_coors_for_sub_shaped_, MAX_NUM_PILLARS_ * MAX_NUM_POINTS_PER_PILLAR_ * sizeof(float), cudaMemcpyDeviceToDevice, stream));
  GPU_CHECK(cudaMemcpyAsync(pfe_buffers_[6], dev_y_coors_for_sub_shaped_, MAX_NUM_PILLARS_ * MAX_NUM_POINTS_PER_PILLAR_ * sizeof(float), cudaMemcpyDeviceToDevice, stream));
  GPU_CHECK(cudaMemcpyAsync(pfe_buffers_[7], dev_pillar_feature_mask_, MAX_NUM_PILLARS_ * MAX_NUM_POINTS_PER_PILLAR_ * sizeof(float), cudaMemcpyDeviceToDevice, stream));
  pfe_context_->enqueue(BATCH_SIZE_, pfe_buffers_, stream, nullptr);
  *******
  rpn_context_->enqueue(BATCH_SIZE_, rpn_buffers_, stream, nullptr);
  postprocess_cuda_ptr_->doPostprocessCuda()
  *******
}
移植ROS环境,需要两个onnx模型,PFE和RPN;
如下逻辑:

3: apollo检测模型的torch环境训练
训练环境:
torch1.3.0 torchvision-0.4.1 cuda-10.0.130 python3.7
由于torch1.3.0需要cuda10.1的环境,如不安装10.1,
则按照如下方式安装环境:
wget https://download.pytorch.org/whl/cu100/torch-1.3.0%2Bcu100-cp37-cp37m-linux_x86_64.whl
wget https://download.pytorch.org/whl/cu100/torchvision-0.4.1%2Bcu100-cp37-cp37m-linux_x86_64.whl
pip install torch-1.3.0+cu100-cp36-cp36m-linux_x86_64.whl torchvision-0.4.1+cu100-cp36-cp36m-linux_x86_64.whl
>>import torch
>>print(torch.version.cuda)
>>10.0.1
a.数据集准备
可用按照kitti数据集,将每帧数据转换为bin文件
每个bin文件格式,存放点云数据个数如下
例如:x,y,z,intensity,label,x,y,z,intensity,label,x,y…
图像和激光对应文件按照如下存储:

└── KITTI_DATASET_ROOT
       ├── training    <-- train data
       |   ├── image_2 <-- visualization
       |   ├── calib
       |   ├── label_2
       |   ├── velodyne
       |   └── velodyne_reduced <-- empty directory
       └── testing     <-- test data
           ├── image_2 <--  visualization
           ├── calib
           ├── velodyne
           └── velodyne_reduced <-- empty directory
KITTI转换数据后,会打印info:

b.模型训练
参照second的方式进行
export PYTHONPATH=/home/py3torch/second.pytorch:$PYTHONPATH
转onnx
https://github.com/nutonomy/second.pytorch
训multi-object
https://github.com/traveller59/second.pytorch
pytorch模型将会生成ONNX
导出为pfe.onnx与rpn.onnx文件即可
https://github.com/traveller59/second.pytorch (second作者。额外添加了pointpillars)
https://github.com/nutonomy/second.pytorch (pointpillars的作者,继承了second的代码)
https://github.com/SmallMunich/nutonomy_pointpillars (修改了pointpillars作者代码,生成onnx)
在运行pytorch模型导出为onnx模型之前,你需要将工程second/pytorch/models/voxelnet.py
文件中的rows: 686 这行代码取消注释,让其返回voxel_features的特征;取消注释之后,下面运行如下命令:
python pytorch/train.py onnx_model_generate
–config_path= configs/pointpillars/car/xyres_16.proto --model_dir=/path/to/model_dir
//83520.tckpt
Evaluation official
Car AP(Average Precision)@0.70, 0.70, 0.70:
bbox AP:90.39, 80.90, 80.42
bev  AP:90.06, 80.61, 79.29
3d   AP:77.24, 66.15, 59.49
aos  AP:0.89, 2.53, 3.66
Car AP(Average Precision)@0.70, 0.50, 0.50:
bbox AP:90.39, 80.90, 80.42
bev  AP:90.79, 89.62, 88.97
3d   AP:90.78, 89.33, 88.33
aos  AP:0.89, 2.53, 3.66
Evaluation coco
Car coco AP@0.50:0.05:0.95:
bbox AP:66.47, 61.51, 60.47
bev  AP:67.39, 63.02, 60.89
3d   AP:52.20, 47.21, 45.51
aos  AP:0.63, 2.07, 2.98
     def forward(self, example):
        """module's forward should always accept dict and return loss.
        """
        # training input [0:pillar_x, 1:pillar_y, 2:pillar_z, 3:pillar_i,
        #                 4:num_points_per_pillar, 5:x_sub_shaped, 6:y_sub_shaped, 7:mask, 8:coors
        #                 9:anchors, 10:labels, 11:reg_targets]

        pillar_x = example[0]
        pillar_y = example[1]
        pillar_z = example[2]
        pillar_i = example[3]
        num_points = example[4]
        x_sub_shaped = example[5]
        y_sub_shaped = example[6]
        mask = example[7]

        voxel_features = self.voxel_feature_extractor(pillar_x, pillar_y, pillar_z, pillar_i,
                                                      num_points, x_sub_shaped, y_sub_shaped, mask)    def forward(self, example):
        """module's forward should always accept dict and return loss.
        """
        # training input [0:pillar_x, 1:pillar_y, 2:pillar_z, 3:pillar_i,
        #                 4:num_points_per_pillar, 5:x_sub_shaped, 6:y_sub_shaped, 7:mask, 8:coors
        #                 9:anchors, 10:labels, 11:reg_targets]

        pillar_x = example[0]
        pillar_y = example[1]
        pillar_z = example[2]
        pillar_i = example[3]
        num_points = example[4]
        x_sub_shaped = example[5]
        y_sub_shaped = example[6]
        mask = example[7]

        voxel_features = self.voxel_feature_extractor(pillar_x, pillar_y, pillar_z, pillar_i,
                                                      num_points, x_sub_shaped, y_sub_shaped, mask)
       return voxel_features ### onnx voxel_features export
        # return voxel_features ### onnx voxel_features export
        # middle_feature_extractor for trim shape
        voxel_features = voxel_features.squeeze()
        voxel_features = voxel_features.permute(1, 0)
        coors = example[8]
        spatial_features = self.middle_feature_extractor(voxel_features, coors)
        # spatial_features input size is : [1, 64, 496, 432]
        preds_dict = self.rpn(spatial_features)
        # return preds_dict
        box_preds = preds_dict[0]
        cls_preds = preds_dict[1]
        if self.training:
            #labels = example['labels']
            #reg_targets = example['reg_targets']
            anchors = example[9]
            labels = example[10]
            reg_targets = example[11]
            batch_size_dev = anchors.shape[0]

            cls_weights, reg_weights, cared = prepare_loss_weights(
                labels,
                pos_cls_weight=self._pos_cls_weight,
                neg_cls_weight=self._neg_cls_weight,
                loss_norm_type=self._loss_norm_type,
                dtype=pillar_x.dtype) # voxels.dtype
            cls_targets = labels * cared.type_as(labels)
            cls_targets = cls_targets.unsqueeze(-1)
自训练检测模型及效果
本次方法是基于Apollo6.0 分割模型进行复现,
如需要完整训练和推理代码,
可留言沟通,一起交流学习 !
kittiviewer设置如下:
python ./kittiviewer/backend/main.py main
 python -m http.server

KITTI效果如下:


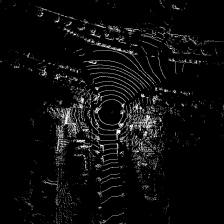
16线velodyne效果如下:

另一篇blog
https://blog.csdn.net/nh54zyt/article/details/110671838
如上链接可查看Apollo3.0
点云分割模型详细训练方法,
及TensorRT,和ROS环境的部署.
https://github.com/traveller59/second.pytorch
(second作者。添加了pointpillars)https://github.com/nutonomy/second.pytorch
(pointpillars的作者,继承了second的代码)https://github.com/SmallMunich/nutonomy_pointpillars
(修改了pointpillars作者代码,生成onnx)


 3397
3397

 被折叠的 条评论
为什么被折叠?
被折叠的 条评论
为什么被折叠?
 到【灌水乐园】发言


