


目录
4、问题4:模型测试时,报错assert torch.cuda.is_available
<<<<<项目环境建议:纯Linux或双系统的Linux环境,慎用虚拟机的Linux环境>>>>>
《项目简介》
进入 full tutorial for SO-100,按照流程操作

《环境配置》
git clone https://github.com/huggingface/lerobot.git ~/lerobotconda create -y -n lerobot python=3.10conda activate lerobotcd lerobot && pip install -e ".[feetech]"conda install -y -c conda-forge ffmpeg
pip uninstall -y opencv-python
conda install -y -c conda-forge "opencv>=4.10.0"注:项目更新后,原项目会报错缺少lerobot的模块,需重新更新环境
cd lerobot && pip install -e .sudo apt-get install git-lfs
git lfs install一、B站视频参考(推荐)
强力推荐UP主:黑狗木
lerobot aloha 采集数据并且训练![]() https://www.bilibili.com/video/BV1aSUFYJE4P/?spm_id_from=333.999.0.0&vd_source=27c7aca66453fbf427614cc52d0f156alerobot aloha 如何用AutoDL平台租用服务器进行训练数据
https://www.bilibili.com/video/BV1aSUFYJE4P/?spm_id_from=333.999.0.0&vd_source=27c7aca66453fbf427614cc52d0f156alerobot aloha 如何用AutoDL平台租用服务器进行训练数据![]() https://www.bilibili.com/video/BV1C3UxY3Eq6/?spm_id_from=333.999.0.0&vd_source=27c7aca66453fbf427614cc52d0f156a
https://www.bilibili.com/video/BV1C3UxY3Eq6/?spm_id_from=333.999.0.0&vd_source=27c7aca66453fbf427614cc52d0f156a
二、模型训练(在线采集数据)
1、前提准备
(1)激活环境
conda activate lerobotcd lerobot(2)登录huggingface
开启clash,再设置linux命令行代理
解决Linux<云服务器>访问HuggingFace的问题(操作记录)
export http_proxy=http://127.0.0.1:7890
export https_proxy=http://127.0.0.1:7890
用个人申请的Access Tokens代替${HUGGINGFACE_TOKEN}
huggingface-cli login --token ${HUGGINGFACE_TOKEN} --add-to-git-credentialHF_USER=$(huggingface-cli whoami | head -n 1)
echo $HF_USER2、设置硬件权限并进行测试
sudo chmod 777 /dev/ttyACM0
sudo chmod 777 /dev/ttyACM1
python lerobot/scripts/control_robot.py teleoperate \
--robot-path lerobot/configs/robot/so100.yaml测试硬件连接没问题就可以关掉 control_robot.py
3、采集数据(新的采集命令、新的数据集ID)
注:需将本地数据集上传1次,保证huggingface新建有该数据集ID
--resume 0表示创建一个新的空数据集或加载已有的数据集,重新录制。
--resume 1表示加载现有的数据集,在现有数据集上继续录制。现有的数据集来源有两处,local_files_only 0会从远程仓库获取数据集,local_files_only 1只会使用本地数据集
--push-to-hub 0表示数据不上传
--push-to-hub 1表示数据上传
首先,新建一个叫“My1208_test”的本地数据集,并将该数据集上传到huggingface(第一次操作即可)
python lerobot/scripts/control_robot.py record \
    --robot-path lerobot/configs/robot/so100.yaml \
    --fps 30 \
    --root data \
    --repo-id ${HF_USER}/My1208_test \
    --tags so100 tutorial \
    --warmup-time-s 5 \
    --episode-time-s 40 \
    --reset-time-s 10 \
    --num-episodes 1 \
    --single-task "Pick up the white toy tiger and place it into the plate." \
    --resume 0 \
    --push-to-hub 1
然后,在现有的本地数据集上继续录制,并将数据集也同步上传到huggingface(后续操作)
python lerobot/scripts/control_robot.py record \
    --robot-path lerobot/configs/robot/so100.yaml \
    --fps 30 \
    --root data \
    --repo-id ${HF_USER}/My1208_test \
    --tags so100 tutorial \
    --warmup-time-s 5 \
    --episode-time-s 40 \
    --reset-time-s 10 \
    --num-episodes 4 \
    --single-task "Pick up the white toy tiger and place it into the plate." \
    --resume 1 \
    --local-files-only 1 \
    --push-to-hub 1
至此,就在huggingface上新建了一个数据集My1208_test,且数据集存有5组数据

4、加载huggingface数据进行模型训练
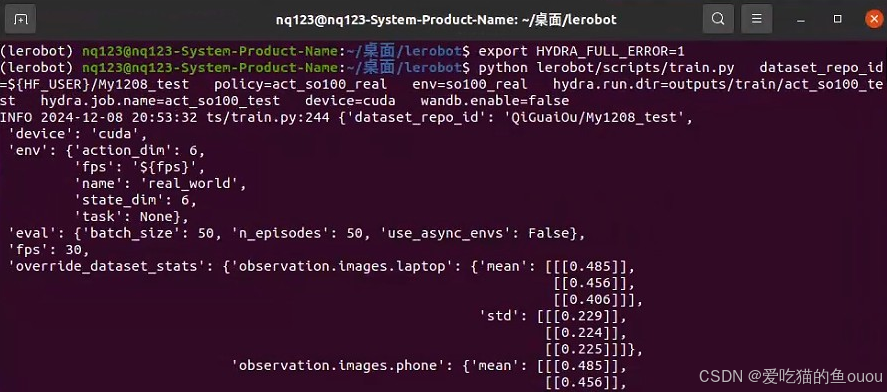
export HYDRA_FULL_ERROR=1python lerobot/scripts/train.py dataset_repo_id=${HF_USER}/My1208_test policy=act_so100_real env=so100_real hydra.run.dir=outputs/train/act_so100_test hydra.job.name=act_so100_test device=cuda wandb.enable=false模型训练权重保存在outputs/train/act_so100_test
三、模型测试
1、前提准备
(1)激活环境
conda activate lerobotcd lerobot(2)登录huggingface
开启clash,再设置linux命令行代理
解决Linux<云服务器>访问HuggingFace的问题(操作记录)
export http_proxy=http://127.0.0.1:7890
export https_proxy=http://127.0.0.1:7890
huggingface-cli login --token ${HUGGINGFACE_TOKEN} --add-to-git-credentialHF_USER=$(huggingface-cli whoami | head -n 1)
echo $HF_USER2、设置硬件权限并进行测试
sudo chmod 777 /dev/ttyACM0
sudo chmod 777 /dev/ttyACM1
python lerobot/scripts/control_robot.py teleoperate \
--robot-path lerobot/configs/robot/so100.yaml测试硬件连接没问题就可以关掉 control_robot.py
3、加载权重进行模型测试
模型训练完毕后,就会在outputs/train/act_so100_test 得到checkpoints文件
模型测试的代码与之前用于记录训练数据集的命令几乎相同,有两处不同:
1、有一个额外的--pretrained-policy-name-or-path参数,以指示策略检查点路径( --pretrained-policy-name-or-path outputs/train/eval_so100_test/checkpoints/last/pretrained_model )
2、数据集名称以 eval 开头,反映正在运行推理( --repo-id ${HF_USER}/eval_act_so100_test )
首先,新建一个叫“eval_act_so100_test”的本地推理数据集,并将该数据集上传到huggingface(第一次操作即可)
python lerobot/scripts/control_robot.py record \
  --robot-path lerobot/configs/robot/so100.yaml \
  --fps 30 \
  --repo-id ${HF_USER}/eval_act_so100_test \
  --tags so100 tutorial eval \
  --warmup-time-s 5 \
  --episode-time-s 40 \
  --reset-time-s 10 \
  --num-episodes 1 \
  --single-task "Pick up the white toy tiger and place it into the plate." \
  --resume 0 \
  --push-to-hub 1 \
--pretrained-policy-name-or-path outputs/train/act_so100_test/checkpoints/last/pretrained_model然后,在现有的本地推理数据集上继续录制,并将数据集也同步上传到huggingface(后续操作)
python lerobot/scripts/control_robot.py record \
  --robot-path lerobot/configs/robot/so100.yaml \
  --fps 30 \
  --repo-id ${HF_USER}/eval_act_so100_test \
  --tags so100 tutorial eval \
  --warmup-time-s 5 \
  --episode-time-s 40 \
  --reset-time-s 10 \
  --num-episodes 4 \
  --single-task "Pick up the white toy tiger and place it into the plate." \
  --resume 1 \
  --local-files-only 1 \
  --push-to-hub 1 \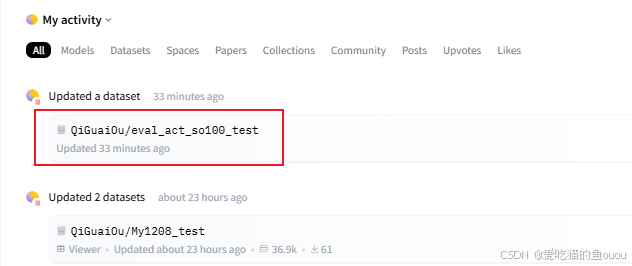
--pretrained-policy-name-or-path outputs/train/act_so100_test/checkpoints/last/pretrained_model至此,就在huggingface上新建了一个推理数据集eval_act_so100_test,且数据集存有5组数据
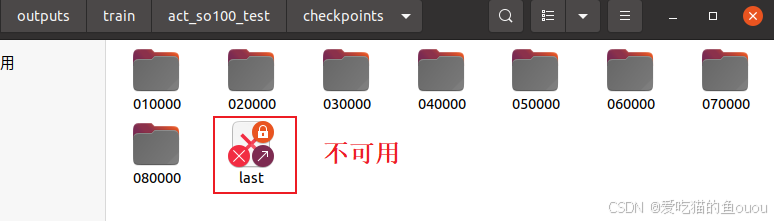
注:last不可用的话,可用checkpoints里的其他文件来替代。 --pretrained-policy-name-or-path outputs/train/act_so100_test/checkpoints/080000/pretrained_model
四、遇到问题(项目更新带来的一系列问题)
1、问题1:采集数据时,提示缺少lerobot
- 问题:旧项目的旧采集方式会报错
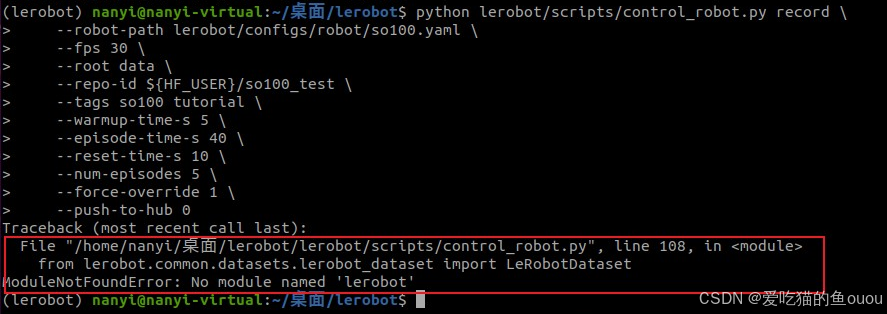
- 解决:重新更新环境
pip install -e .2、问题2:模型训练时,训练命令错误
- 问题:复制粘贴了项目的原代码指令,执行时命令不完整

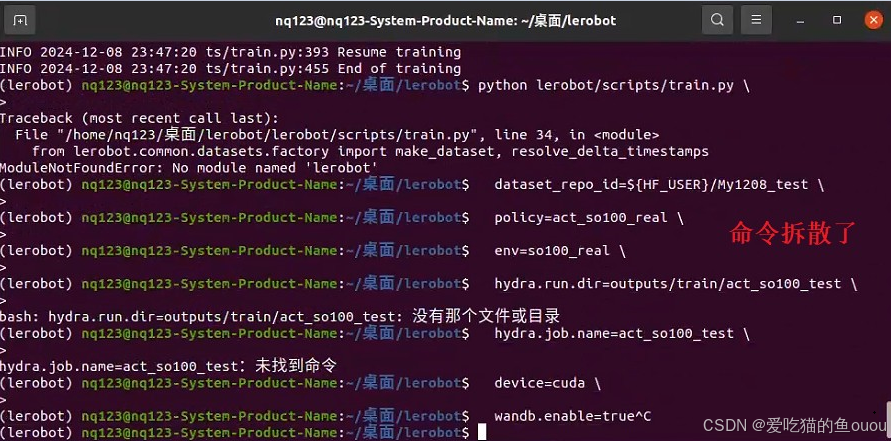
- 解决:重新编排格式,正确命令格式见《3、加载huggingface数据进行模型训练》
3、问题3:模型训练时,提示数据不兼容
- 问题:模型训练,数据不兼容,照着提示来修改,还是没有解决
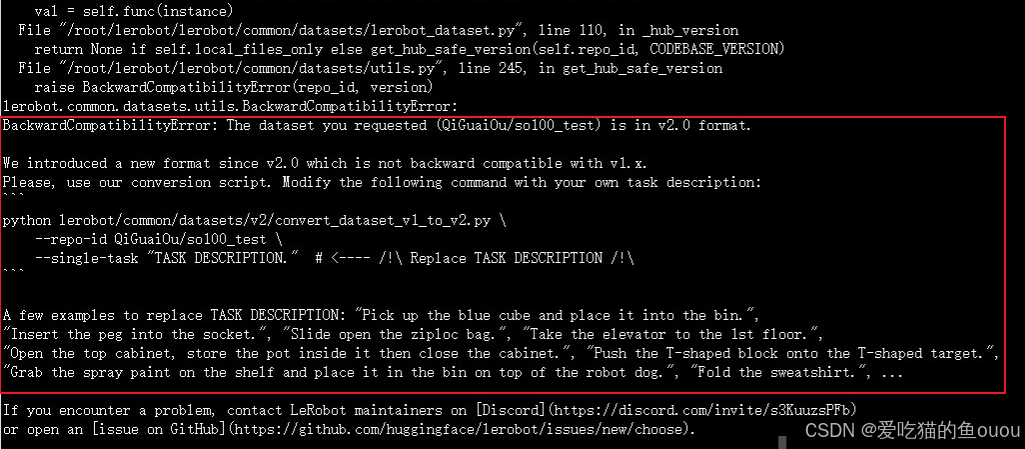
- 解决:重新下载新的项目,重新用新的采集指令,重新创建新的数据集 (不可新旧数据混用)
4、问题4:模型测试时,报错assert torch.cuda.is_available
- 问题:Windows虚拟机VMware创建的Linux环境,无法使用显卡,导致报错

- 解决:换系统,采用纯Linux系统或双系统的Linux即可解决该问题,慎用虚拟机Linux环境
5、问题5:模型测试时,模型路径报错
- 问题:last已断开,导致报错
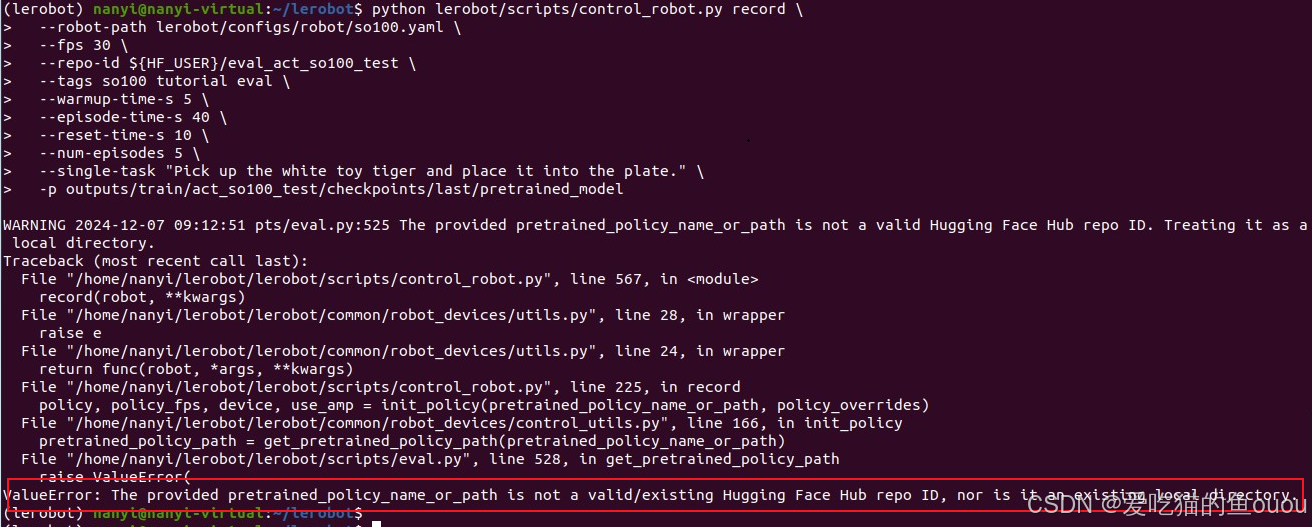

- 解决:直接用具体文件代替,命令中的last可用checkpoints里的其他文件来替代。--pretrained-policy-name-or-path outputs/train/act_so100_test/checkpoints/080000/pretrained_model


 769
769

 被折叠的 条评论
为什么被折叠?
被折叠的 条评论
为什么被折叠?
 到【灌水乐园】发言


