


Create your own urdf file
Create your own urdf file
Description: In this tutorial you start creating your own urdf robot description file.
Create the tree structure
In this tutorial we’ll create the URDF description of the “robot” shown in the image below.
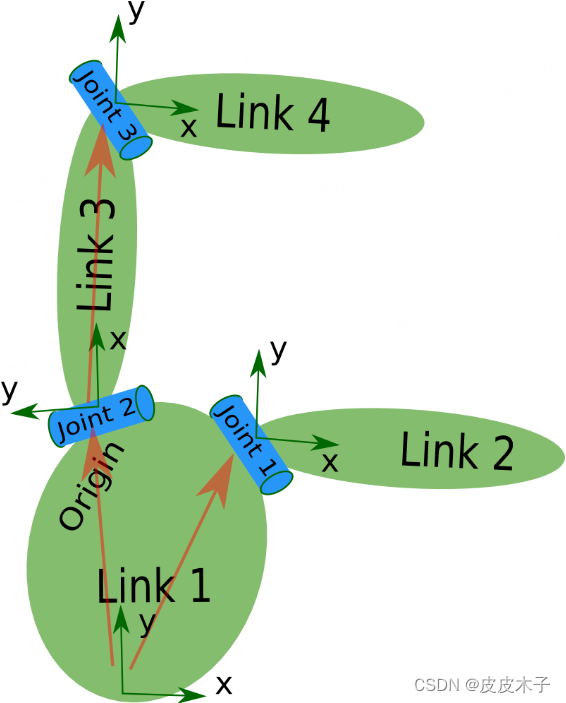
The robot in the image is a tree structure. Let’s start very simple, and create a description of that tree structure, without worrying about the dimensions etc.
Fire up your favorite text editor, and create a file called my_robot.urdf:
<robot name="test_robot">
  <link name="link1" />
  <link name="link2" />
  <link name="link3" />
  <link name="link4" />

  <joint name="joint1" type="continuous">
    <parent link="link1"/>
    <child link="link2"/>
  </joint>

  <joint name="joint2" type="continuous">
    <parent link="link1"/>
    <child link="link3"/>
  </joint>

  <joint name="joint3" type="continuous">
    <parent link="link3"/>
    <child link="link4"/>
  </joint>
</robot>
So, just creating the structure is very simple! Now let’s see if we can get this urdf file parsed. There is a simple command line tool that will parse a urdf file for you, and tell you if the syntax is correct:
You might need to install, urdfdom as an upstream, ROS independent package:
$ sudo apt-get install liburdfdom-tools
Now run the check command:
$ rosmake urdfdom_model              # only needed if installed from source
$ check_urdf my_robot.urdf                    # hydro and later
$
$ # for older ROS distros, use the following commands
$ (see footnote at bottom of page for why above commands are different)
$ rosrun urdfdom check_urdf my_robot.urdf     # groovy
$ rosrun urdf_parser check_urdf my_robot.urdf # electric and fuerte
$ rosrun urdf check_urdf my_robot.urdf        # diamondback and earlier
If everything works correctly, the output should look like this:
robot name is: test_robot
---------- Successfully Parsed XML ---------------
root Link: link1 has 2 child(ren)
    child(1):  link2
    child(2):  link3
        child(1):  link4
Add the dimensions
So now that we have the basic tree structure, let’s add the appropriate dimensions. As you notice in the robot image, the reference frame of each link (in green) is located at the bottom of the link, and is identical to the reference frame of the joint. So, to add dimensions to our tree, all we have to specify is the offset from a link to the joint(s) of its children. To accomplish this, we will add the field to each of the joints.
Let’s look at the second joint. Joint2 is offset in the Y-direction from link1, a little offset in the negative X-direction from link1, and it is rotated 90 degrees around the Z-axis. So, we need to add the following element:
<origin xyz="-2 5 0" rpy="0 0 1.57" />
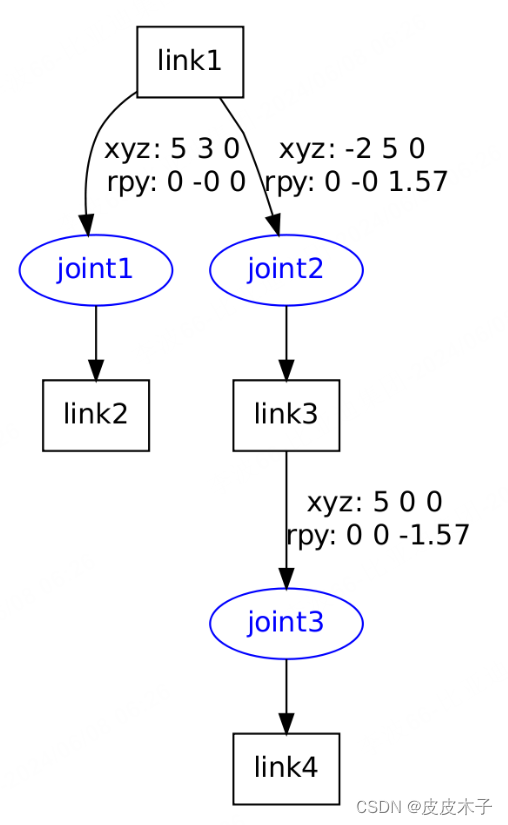
If you repeat this for all the elements our URDF will look like this:
<robot name="test_robot">
  <link name="link1" />
  <link name="link2" />
  <link name="link3" />
  <link name="link4" />


  <joint name="joint1" type="continuous">
    <parent link="link1"/>
    <child link="link2"/>
    <origin xyz="5 3 0" rpy="0 0 0" />
  </joint>

  <joint name="joint2" type="continuous">
    <parent link="link1"/>
    <child link="link3"/>
    <origin xyz="-2 5 0" rpy="0 0 1.57" />
  </joint>

  <joint name="joint3" type="continuous">
    <parent link="link3"/>
    <child link="link4"/>
    <origin xyz="5 0 0" rpy="0 0 -1.57" />
  </joint>
</robot>
Update your file my_robot.urdf and run it through the parser:3
$ check_urdf my_robot.urdf
If it all looks good, you can move to the next step.
Completing the Kinematics
What we didn’t specify yet is around which axis the joints rotate. Once we add that, we actually have a full kinematic model of this robot! All we need to do is add the element to each joint. The axis specifies the rotational axis in the local frame.
So, if you look at joint2, you see it rotates around the positive Y-axis. So, simple add the following xml to the joint element:
<axis xyz="0 1 0" />
Similarly, joint1 is rotating around the following axis:
<axis xyz="-0.707 0.707 0" />
Note that it is a good idea to normalize the axis.
If we add this to all the joints of the robot, our URDF looks like this:
<robot name="test_robot">
  <link name="link1" />
  <link name="link2" />
  <link name="link3" />
  <link name="link4" />

  <joint name="joint1" type="continuous">
    <parent link="link1"/>
    <child link="link2"/>
    <origin xyz="5 3 0" rpy="0 0 0" />
    <axis xyz="-0.9 0.15 0" />
  </joint>

  <joint name="joint2" type="continuous">
    <parent link="link1"/>
    <child link="link3"/>
    <origin xyz="-2 5 0" rpy="0 0 1.57" />
    <axis xyz="-0.707 0.707 0" />
  </joint>

  <joint name="joint3" type="continuous">
    <parent link="link3"/>
    <child link="link4"/>
    <origin xyz="5 0 0" rpy="0 0 -1.57" />
    <axis xyz="0.707 -0.707 0" />
  </joint>
</robot>
Update your file my_robot.urdf and run it through the parser:4
$ check_urdf my_robot.urdf
That’s it, you created your first URDF robot description! Now you can try to visualize the URDF using graphiz:
$ urdf_to_graphiz my_robot.urdf
and open the generated file with your favorite pdf viewer:
$ evince test_robot.pdf
Parse a urdf file
Description: This tutorial teaches you how to use the urdf parser
This tutorial starts off where the previous one ended. You should still have your my_robot.urdf file with a description of the robot shown below.

Let’s first create a package with a dependency on the urdf parser in our sandbox:
  $ cd ~/catkin_ws/src
  $ catkin_create_pkg testbot_description urdf
  $ cd testbot_description
Now create a /urdf folder to store the urdf file we just created:
mkdir urdf
cd urdf
This follows the convention of always storing your robot’s URDF file in a ROS package named MYROBOT_description and within a subfolder named /urdf. Other standard subfolders of your robot’s description package include /meshes, /media and /cad, like so:
/MYROBOT_description
  package.xml
  CMakeLists.txt
  /urdf
  /meshes
  /materials
  /cad
Next, copy your my_robot.urdf file to the package and folder we just created:
$ cp /path/to/.../testbot_description/urdf/my_robot.urdf .
Create a folder src/ and fire up your editor to create a file called src/parser.cpp:
#include <urdf/model.h>
#include "ros/ros.h"

int main(int argc, char** argv){
  ros::init(argc, argv, "my_parser");
  if (argc != 2){
    ROS_ERROR("Need a urdf file as argument");
    return -1;
  }
  std::string urdf_file = argv[1];

  urdf::Model model;
  if (!model.initFile(urdf_file)){
    ROS_ERROR("Failed to parse urdf file");
    return -1;
  }
  ROS_INFO("Successfully parsed urdf file");
  return 0;
}
Here we create a parser object, and initialize it from a file by providing the filename. The initFile method returns true if the URDF file was parsed successfully.
Now let’s try to run this code. First add the following lines to your CMakeList.txt file:
 add_executable(parser src/parser.cpp)
 target_link_libraries(parser ${catkin_LIBRARIES})
build your package, and run it.
$ cd ~/catkin_ws
$ catkin_make
$ .<path>/parser <path>my_robot.urdf
# Example: ./devel/lib/testbot_description/parser ./src/testbot_description/urdf/my_robot.urdf
The output should look something like this:
[ INFO] 1254520129.560927000: Successfully parsed urdf file
Now take a look at the code API to see how to start using the URDF model you just created. A good example of the URDF model class in action is Robot::load() in RViz, in the file src/rviz/robot/robot.cpp.
Start using the KDL parser
Description: This tutorial teaches you how to create a KDL Tree from a URDF file
Kinematics and Dynamics Library (KDL)
- 3D frame and vector transformations: KDL includes excellent support to work with vectors, points, frame transformations, etc. You can calculate a vector product, transform a point into a different reference frame, or even change the reference point of a 6d twist. For more information take a look at the geometry documentation on the KDL homepage.
- Kinematics and Dynamics of kinematic chains: You can represent a kinematic chain by a KDL Chain object, and use KDL solvers to compute anything from forward position kinematics, to inverse dynamics. For more information take a look at the chain documentation on the KDL homepage.The kdl_parser includes support to construct a KDL chain from a XML Robot Description Format (URDF) file.
- Kinematics of kinematic trees: You can represent a kinematic chain by a KDL Chain object, and use KDL solvers to compute forward position kinematics. Currently no other solvers are provided.
Building the KDL parser
$ rosdep install kdl_parser
This will install all the external dependencies for the kdl_parser. To build the package, run:
$ rosmake kdl_parser
Using in your code
First, add the KDL parser as a dependency to your package.xml (in ROS fuerte or earlier it’s manifest.xml) file:
  <package>
    ...
    <build_depend package="kdl_parser" />
    ...
    <run_depend package="kdl_parser" />
    ...
  </package>
To start using the KDL parser in your C++ code, include the following file:
#include <kdl_parser/kdl_parser.hpp>
Now there are different ways to proceed. You can construct a KDL tree from a urdf in various forms:
From a file
   KDL::Tree my_tree;
   if (!kdl_parser::treeFromFile("filename", my_tree)){
      ROS_ERROR("Failed to construct kdl tree");
      return false;
   }
To create the PR2 URDF file, run the following command:
$ rosrun xacro xacro.py `rospack find pr2_description`/robots/pr2.urdf.xacro > pr2.urdf
From the parameter server
   KDL::Tree my_tree;
   ros::NodeHandle node;
   std::string robot_desc_string;
   node.param("robot_description", robot_desc_string, std::string());
   if (!kdl_parser::treeFromString(robot_desc_string, my_tree)){
      ROS_ERROR("Failed to construct kdl tree");
      return false;
   }
From an xml element
   KDL::Tree my_tree;
   TiXmlDocument xml_doc;
   xml_doc.Parse(xml_string.c_str());
   xml_root = xml_doc.FirstChildElement("robot");
   if (!xml_root){
      ROS_ERROR("Failed to get robot from xml document");
      return false;
   }
   if (!kdl_parser::treeFromXml(xml_root, my_tree)){
      ROS_ERROR("Failed to construct kdl tree");
      return false;
   }
From a URDF model
   KDL::Tree my_tree;
   urdf::Model my_model;
   if (!my_model.initXml(....)){
      ROS_ERROR("Failed to parse urdf robot model");
      return false;
   }
   if (!kdl_parser::treeFromUrdfModel(my_model, my_tree)){
      ROS_ERROR("Failed to construct kdl tree");
      return false;
   }
For more details, take a look at the API documentation.


 449
449

 被折叠的 条评论
为什么被折叠?
被折叠的 条评论
为什么被折叠?
 到【灌水乐园】发言


