


本文实践自 Ray Wenderlich、Tony Dahbura 的文章《
How to Use Animations and Sprite Sheets in Cocos2D 2.X》,文中使用Cocos2D,我在这里使用Cocos2D-x 2.1.2进行学习和移植。在这篇文章,将会学习到如何创建一个简单的熊行走动画,如何使用精灵表单,如何改变熊行走的方向等等。
步骤如下:
1.新建Cocos2d-win32工程,工程名为" AnimBear";
2.下载本游戏所需的资源;
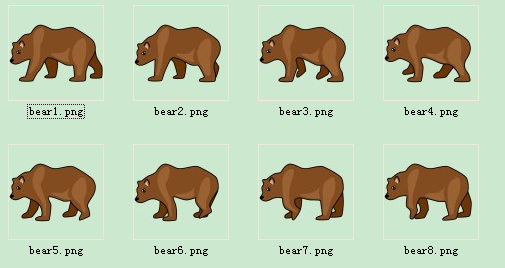
![]()
这些图像的尺寸是最大分辨率所需的尺寸,将以这些图像来创建不同分辨率所需的尺寸。
3.下载 Texture Packer工具,当前为3.1.2版本。拖动资源图片文件到Texture Packer的右边窗口,将会自动加载文件。左边窗口中的 Geometry面板,调整 Max size为4096x4096,因为默认尺寸不够满足大小。 Layout面板,设置 Trim mode为None,不需要移除透明像素。完成之后,如下图所示:

![]()
在” Resources“目录下新建文件夹” HDR“。确定 Output面板中 Data Format选中 cocos2d, Data filename定位到” ...\AnimBear\Resources\HDR“路径,文件名为 AnimBear.plist。保存之后, Texture file将会自动填充文件名。然后,点击 AutoSD设置按钮,下拉选择 Presets项为” cocos2d-x HDR/HD/SD“,点击” Apply“按钮,这使得在发布时能够自动创建和保存多种规则的精灵表单,如下图所示:

![]()
最后,点击工具栏按钮” Publish“,将会自动生成精灵表单和纹理文件,如下图所示:

![]()
可以用 plist Editor Pro打开 AnimBear.plist文件,可以看到它由两部分组成——帧和元数据。在帧部分,每一个图像都有一个属性,用来描述位于精灵表单中的包围框。如下图所示:

![]()
3.一个简单的动画。打开 HelloWorldScene.h文件,添加如下代码:
步骤如下:
1.新建Cocos2d-win32工程,工程名为" AnimBear";
2.下载本游戏所需的资源;
这些图像的尺寸是最大分辨率所需的尺寸,将以这些图像来创建不同分辨率所需的尺寸。
3.下载 Texture Packer工具,当前为3.1.2版本。拖动资源图片文件到Texture Packer的右边窗口,将会自动加载文件。左边窗口中的 Geometry面板,调整 Max size为4096x4096,因为默认尺寸不够满足大小。 Layout面板,设置 Trim mode为None,不需要移除透明像素。完成之后,如下图所示:
在” Resources“目录下新建文件夹” HDR“。确定 Output面板中 Data Format选中 cocos2d, Data filename定位到” ...\AnimBear\Resources\HDR“路径,文件名为 AnimBear.plist。保存之后, Texture file将会自动填充文件名。然后,点击 AutoSD设置按钮,下拉选择 Presets项为” cocos2d-x HDR/HD/SD“,点击” Apply“按钮,这使得在发布时能够自动创建和保存多种规则的精灵表单,如下图所示:
最后,点击工具栏按钮” Publish“,将会自动生成精灵表单和纹理文件,如下图所示:
可以用 plist Editor Pro打开 AnimBear.plist文件,可以看到它由两部分组成——帧和元数据。在帧部分,每一个图像都有一个属性,用来描述位于精灵表单中的包围框。如下图所示:
3.一个简单的动画。打开 HelloWorldScene.h文件,添加如下代码:
|
1
2 3 4 5 6 |
CC_SYNTHESIZE_RETAIN(cocos2d::CCSprite*, _bear, Bear);
CC_SYNTHESIZE_RETAIN(cocos2d::CCAction*, _walkAction, WalkAction); CC_SYNTHESIZE_RETAIN(cocos2d::CCAction*, _moveAction, MoveAction); private: bool _bearMoving; |
打开
HelloWorldScene.cpp文件,在构造函数里面,添加如下代码:
|
1
2 3 4 5 6 7 |
HelloWorld::HelloWorld()
{ _bear = NULL; _walkAction = NULL; _moveAction = NULL; _bearMoving = false; } |
修改
init函数,为如下代码:
|
1
2 3 4 5 6 7 8 9 10 11 12 13 14 15 16 17 18 19 20 21 22 23 24 25 26 27 28 29 30 31 32 33 34 35 36 37 |
bool HelloWorld::init()
{ bool bRet = false; do { CC_BREAK_IF(!CCLayer::init()); //1) Cache the sprite frames and texture CCSpriteFrameCache::sharedSpriteFrameCache()->addSpriteFramesWithFile( "AnimBear.plist"); //2) Create a sprite batch node CCSpriteBatchNode *spriteSheet = CCSpriteBatchNode::create( "AnimBear.png"); this->addChild(spriteSheet); //3) Gather the list of frames CCArray *walkAnimFrames = CCArray::create(); for ( int i = 1; i <= 8; ++i) { walkAnimFrames->addObject(CCSpriteFrameCache::sharedSpriteFrameCache()->spriteFrameByName( CCString::createWithFormat( "bear%d.png", i)->getCString())); } //4) Create the animation object CCAnimation *walkAnim = CCAnimation::createWithSpriteFrames(walkAnimFrames, 0.1f); //5) Create the sprite and run the animation action CCSize winSize = CCDirector::sharedDirector()->getWinSize(); this->setBear(CCSprite::createWithSpriteFrameName( "bear1.png")); this->getBear()->setPosition(ccp(winSize.width / 2, winSize.height / 2)); this->setWalkAction(CCRepeatForever::create(CCAnimate::create(walkAnim))); this->getBear()->runAction( this->getWalkAction()); spriteSheet->addChild( this->getBear()); bRet = true; } while ( 0); return bRet; } |
以上各个步骤说明如下:
①.缓存精灵帧和纹理。调用CCSpriteFrameCache的addSpriteFramesWithFile方法,传入之前生成的属性列表文件名称。这个方法做了如下事情:
④.创建动画对象。通过传入精灵帧列表,创建CCAnimation对象,并指定动画的播放速度。这里使用0.1秒作为帧之间的延迟时间。
⑤.创建精灵和运行动画动作。以某一帧来创建精灵(即熊),放置在屏幕中心。传入CCAnimation对象,创建CCAnimate对象,并让熊运行这个动作。最后,将熊添加到精灵表单里。注意,如果没有添加到精灵表单里,而是添加到层里的话,就不会得到性能的优化。
为了能在不同分辨率下,加载不同的资源,需要先设置下分辨率适配,打开 AppDelegate.cpp文件,在 applicationDidFinishLaunching函数里面,最上面代码修改为:
①.缓存精灵帧和纹理。调用CCSpriteFrameCache的addSpriteFramesWithFile方法,传入之前生成的属性列表文件名称。这个方法做了如下事情:
- 从属性列表文件的元数据部分,取出textureFileName的值,作为纹理文件的文件名,在这里为AnimBear.png,载入文件到CCTextureCache纹理缓存中。注意,这里会根据设定的资源搜索路径来自动寻找正确的文件。
- 解析属性列表文件,使用CCSpriteFrame对象来内部地跟踪所有精灵的信息。
- 创建CCSpriteBatchNode对象,传入包含所有精灵的图像文件的名称,将这个对象添加到场景里面。
- 现在,任何时候创建来自这个精灵表单的精灵,都应当将这个精灵添加到这个CCSpriteBatchNode对象里。只要精灵是来自这个精灵表单的,那么就会正常工作,否则会报错。
- CCSpriteBatchNode代码智能地将CCSprite孩子对象在一次的OpenGL ES调用中进行绘制,而不是多次调用,而这会使得速度快得多。
④.创建动画对象。通过传入精灵帧列表,创建CCAnimation对象,并指定动画的播放速度。这里使用0.1秒作为帧之间的延迟时间。
⑤.创建精灵和运行动画动作。以某一帧来创建精灵(即熊),放置在屏幕中心。传入CCAnimation对象,创建CCAnimate对象,并让熊运行这个动作。最后,将熊添加到精灵表单里。注意,如果没有添加到精灵表单里,而是添加到层里的话,就不会得到性能的优化。
为了能在不同分辨率下,加载不同的资源,需要先设置下分辨率适配,打开 AppDelegate.cpp文件,在 applicationDidFinishLaunching函数里面,最上面代码修改为:
|
1
2 3 4 5 6 7 8 9 10 11 12 13 14 15 16 17 18 19 20 21 22 23 24 25 26 27 28 |
// initialize director CCDirector *pDirector = CCDirector::sharedDirector(); pDirector->setOpenGLView(CCEGLView::sharedOpenGLView()); CCSize screenSize = CCEGLView::sharedOpenGLView()->getFrameSize(); CCSize designSize = CCSizeMake( 480, 320); CCEGLView::sharedOpenGLView()->setDesignResolutionSize(designSize.width, designSize.height, kResolutionNoBorder); CCSize frameSize = CCEGLView::sharedOpenGLView()->getFrameSize(); CCSize resourceSize; std::vector<std::string> searchPath; if (frameSize.height > 768) { searchPath.push_back( "HDR"); resourceSize = CCSizeMake( 2048, 1536); } else if (frameSize.height > 320) { searchPath.push_back( "HD"); resourceSize = CCSizeMake( 1024, 768); } else { searchPath.push_back( "SD"); resourceSize = CCSizeMake( 480, 320); } pDirector->setContentScaleFactor(resourceSize.height / designSize.height); CCFileUtils::sharedFileUtils()->setSearchPaths(searchPath); |
编译运行,可以看到熊愉快地漫步在屏幕上,如下图所示:
![]()
4.更改熊行走的方向。通过触摸屏幕,来控制熊的移动。打开 HelloWorldScene.cpp文件,在 init函数里面,注释掉代码 this->getBear()->runAction(this->getWalkAction());,这样一开始熊就不会移动。然后在代码最后添加如下代码:
4.更改熊行走的方向。通过触摸屏幕,来控制熊的移动。打开 HelloWorldScene.cpp文件,在 init函数里面,注释掉代码 this->getBear()->runAction(this->getWalkAction());,这样一开始熊就不会移动。然后在代码最后添加如下代码:
|
1
|
this->setTouchEnabled(
true);
|
添加如下方法:
|
1
2 3 4 5 6 7 8 9 10 11 12 13 14 15 16 17 18 19 20 21 22 23 24 25 26 27 28 29 30 31 32 33 34 35 36 37 38 39 40 41 42 43 44 45 46 47 48 49 50 51 52 53 54 55 56 57 58 59 60 61 62 63 64 65 66 |
void HelloWorld::registerWithTouchDispatcher()
{ CCDirector::sharedDirector()->getTouchDispatcher()->addTargetedDelegate( this, 0, true); } bool HelloWorld::ccTouchBegan(CCTouch *pTouch, CCEvent *pEvent) { return true; } void HelloWorld::ccTouchEnded(CCTouch *pTouch, CCEvent *pEvent) { //1) Determine the touch location CCPoint touchLocation = this->convertTouchToNodeSpace(pTouch); //2) Set the desired velocity CCSize screenSize = CCDirector::sharedDirector()->getWinSize(); float bearVelocity = screenSize.width / 3.0f; //3) Figure out the amount moved in X and Y CCPoint moveDifference = ccpSub(touchLocation, this->getBear()->getPosition()); //4) Figure out the actual length moved float distanceToMove = ccpLength(moveDifference); //5) Figure out how long it will take to move float moveDuration = distanceToMove / bearVelocity; //6) Flip the animation if necessary if (moveDifference.x < 0) { this->getBear()->setFlipX( false); } else { this->getBear()->setFlipX( true); } //7) Run the appropriate actions this->getBear()->stopAction( this->getMoveAction()); if (!_bearMoving) { this->getBear()->runAction( this->getWalkAction()); } this->setMoveAction(CCSequence::create( CCMoveTo::create(moveDuration, touchLocation), CCCallFunc::create( this, callfunc_selector(HelloWorld::bearMoveEnded)), NULL)); this->getBear()->runAction( this->getMoveAction()); _bearMoving = true; } void HelloWorld::cleanup() { CC_SAFE_RELEASE_NULL(_moveAction); CCLayer::cleanup(); } void HelloWorld::bearMoveEnded() { this->getBear()->stopAction( this->getWalkAction()); _bearMoving = false; } |
当
bearMoveEnded方法被调用时,不再移动,停止动画。
ccTouchEnded方法说明如下:
参考资料:
- ①确定触摸位置。转换触摸点到本地节点坐标。
- ②设置期望的速度。设置熊的移动速度。
- ③计算在x轴和y轴上的移动距离。
- ④计算移动的真实长度。
- ⑤计算移动的所需时间。
- ⑥如有必须的话,则翻转动画。通过移动距离的x轴来判断熊是向左还是向右移动。只需设置水平翻转,运行的动画也会跟着翻转。
- ⑦运行适当的动作。首先,停止现有的移动动作,因为可能半途改变熊的目的地。接着,如果已经在移动了,就继续保持行走动作。最后,创建移动动作,指定移动的位置、移动的时间,和一个动作完成时的回调,这个回调用来停止行走动作。变量_bearMoving用来判断是否正在移动中。
参考资料:
2.
http://www.codeandweb.com/texturepacker/documentation
非常感谢以上资料,本例子源代码附加资源 下载地址: http://download.csdn.net/detail/akof1314/5914987
如文章存在错误之处,欢迎指出,以便改正。
非常感谢以上资料,本例子源代码附加资源 下载地址: http://download.csdn.net/detail/akof1314/5914987
如文章存在错误之处,欢迎指出,以便改正。


 1700
1700


 被折叠的 条评论
为什么被折叠?
被折叠的 条评论
为什么被折叠?
 到【灌水乐园】发言


