图像去模糊之DeblurGAN-v2

论文:DeblurGAN-v2: Deblurring (Orders-of-Magnitude) Faster and Better

Github:https://github.com/TAMU-VITA/DeblurGANv2

https://github.com/KupynOrest/DeblurGANv2


ICCV 2019


论文提出了DeblurGAN的改进版,DeblurGAN-v2,在efficiency, quality, flexibility 三方面都取得了state-of-the-art 的效果。


主要贡献:

Framework Level: 

对于生成器,为了更好的保准生成质量,论文首次提出采用Feature Pyramid Network (FPN) 结构进行特征融合。对于判别器部分,采用带有最小开方损失(least-square loss )的相对判别器(relativistic discriminator),并且分别结合了全局(global (image) )和局部(local (patch) )2个尺度的判别loss。

Backbone Level: 

论文采用了3种骨架网络,分别为Inception-ResNet-v2,MobileNet,MobileNet-DSC。Inception-ResNet-v2具有最好的精度,MobileNet和MobileNet-DSC具有更快的速度。

Experiment Level: 

在3个指标PSNR, SSIM, perceptual quality 都取得了很好的结果。基于MobileNet-DSC 的DeblurGAN-v2比DeblurGAN快了11倍,并且只有4M大小。


网络结构:

生成器基本结构为FPN结构,分别获取5个分支的特征输出,基于上采样操作进行融合。最后再加入原图的shortcut分支,得到最终的输出。

输入图片归一化到了[-1,1],输出图片也经过tanh函数归一化到[-1,1]。


损失函数Loss:

传统GAN的损失函数:

Least Squares GANs(LSGAN)的损失函数:

该损失有助于使得训练过程更加平稳,高效。

判别器RaGAN-LS loss :

该loss是在LSGAN loss的基础上,进行的改进。

生成器整体loss:

其中,Lp表示mean-square-error (MSE)

Lx表示感知loss,表示内容的损失

Ladv表示全局和局部的损失,全局表示整个图片的损失,局部类比于PatchGAN,表示将整个图片分块为一个一个的70*70的局部图片的损失。


训练集:

GoPro :3214 blurry/clear 图片对,其中2103作训练,1111做测试。

DVD :6708 blurry/clear 图片对

NFS :75个视频


实验结果:


训练&测试:

本人使用的是GOPRO数据集进行的训练。

代码修改,config/config.yaml

files_a: &FILES_A ./datasets/GOPRO/GOPRO_3840FPS_AVG_3-21/**/*.png

数据集目录结构,

fpn_inception训练,测试:

从头开始训练,python3 train.py

加载预训练模型训练,修改,train.py,

    def _init_params(self):
        self.criterionG, criterionD = get_loss(self.config['model'])
        self.netG, netD = get_nets(self.config['model'])

        self.netG.load_state_dict(torch.load("offical_models/fpn_inception.h5", map_location='cpu')['model'])

        self.netG.cuda()
        self.adv_trainer = self._get_adversarial_trainer(self.config['model']['d_name'], netD, criterionD)
        self.model = get_model(self.config['model'])
        self.optimizer_G = self._get_optim(filter(lambda p: p.requires_grad, self.netG.parameters()))
        self.optimizer_D = self._get_optim(self.adv_trainer.get_params())
        self.scheduler_G = self._get_scheduler(self.optimizer_G)
        self.scheduler_D = self._get_scheduler(self.optimizer_D)

训练loss,

Epoch 25, lr 0.0001: 100%|##################################################################################################################| 1000/1000 [07:27<00:00,  2.23it/s, loss=G_loss=-0.0117; PSNR=38.5462; SSIM=0.9783]
Validation: 100%|#############################################################################################################################################################################| 100/100 [00:36<00:00,  2.76it/s]
G_loss=-0.0147; PSNR=36.3670; SSIM=0.9769

开始测试,python3 predict.py 007952_9.png

fpn_inception的测试效果如下,模型大小234M,

fpn_mobilenet训练,测试:

mobilenet_v2.pth.tar模型的url:http://sceneparsing.csail.mit.edu/model/pretrained_resnet/mobilenet_v2.pth.tar

修改,config/config.yaml

g_name: fpn_mobilenet

加载预训练模型训练,修改train.py,

    def _init_params(self):
        self.criterionG, criterionD = get_loss(self.config['model'])
        self.netG, netD = get_nets(self.config['model'])

        self.netG.load_state_dict(torch.load("offical_models/fpn_mobilenet.h5", map_location='cpu')['model'])

        self.netG.cuda()
        self.adv_trainer = self._get_adversarial_trainer(self.config['model']['d_name'], netD, criterionD)
        self.model = get_model(self.config['model'])
        self.optimizer_G = self._get_optim(filter(lambda p: p.requires_grad, self.netG.parameters()))
        self.optimizer_D = self._get_optim(self.adv_trainer.get_params())
        self.scheduler_G = self._get_scheduler(self.optimizer_G)
        self.scheduler_D = self._get_scheduler(self.optimizer_D)

训练loss,

Epoch 0, lr 0.0001: 100%|####################################################################################################################| 1000/1000 [05:13<00:00,  3.19it/s, loss=G_loss=0.0194; PSNR=39.9682; SSIM=0.9801]
Validation: 100%|#############################################################################################################################################################################| 100/100 [00:36<00:00,  2.71it/s]
G_loss=0.0275; PSNR=39.7776; SSIM=0.9802

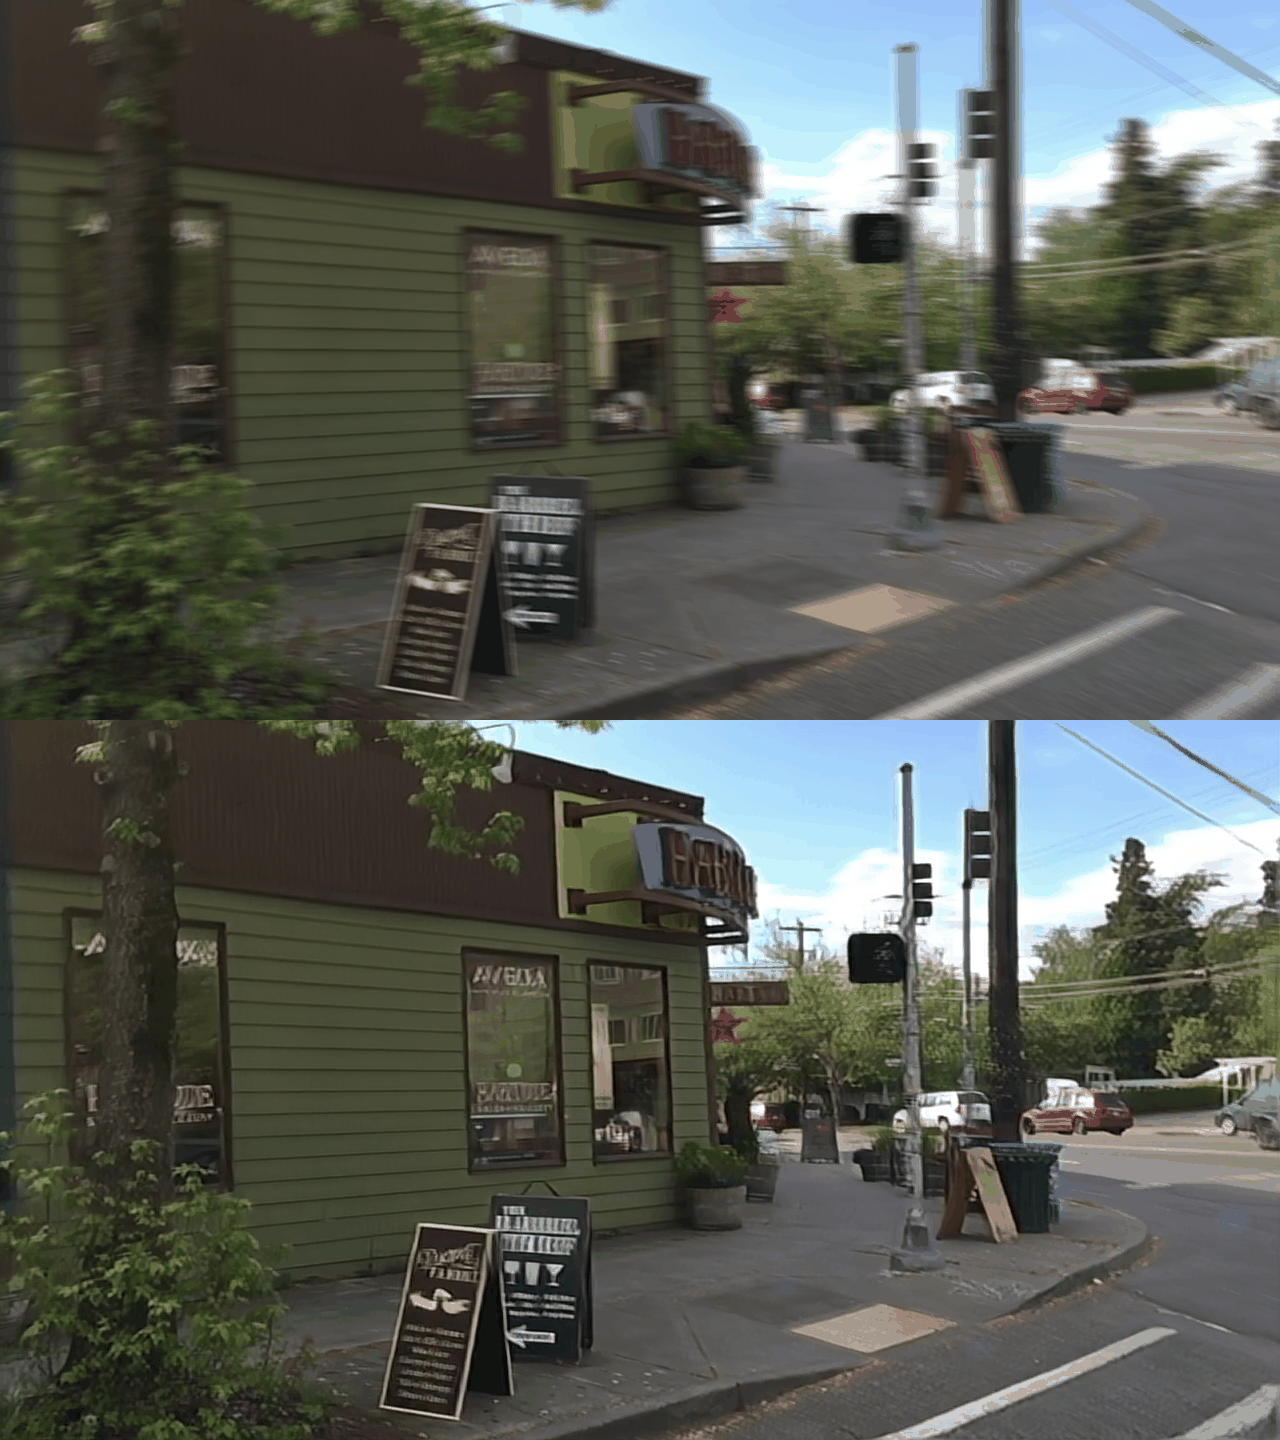
开始测试,python3 predict.py 007952_9.png

fpn_mobilenet的测试效果如下,模型大小13M,
  • 20
    点赞
  • 137
    收藏
    觉得还不错? 一键收藏
  • 149
    评论
DeblurGAN-v2 是一种图像去模糊的深度学习模型,可用于将模糊图像转换为清晰图像。在该模型中,使用了超像素技术来提高去模糊的效果。下面是利用超像素优化DeblurGAN-v2的PyTorch代码: 首先,需要安装以下依赖库: ``` pip install opencv-python pip install scikit-image pip install numpy pip install torch pip install torchvision pip install pydensecrf ``` 然后,加载DeblurGAN-v2模型和测试图像,并生成超像素: ```python import cv2 import torch import numpy as np from skimage.segmentation import slic from skimage.segmentation import mark_boundaries from skimage.color import rgb2gray from models.networks import define_G from options.test_options import TestOptions from util import util from pydensecrf.densecrf import DenseCRF2D # 加载模型 opt = TestOptions().parse() opt.nThreads = 1 opt.batchSize = 1 opt.serial_batches = True opt.no_flip = True model = define_G(opt) util.load_checkpoint(model, opt.pretrained) # 加载测试图像 img_path = 'path/to/test/image' img = cv2.imread(img_path) img = cv2.cvtColor(img, cv2.COLOR_BGR2RGB) h, w, c = img.shape # 生成超像素 segments = slic(img, n_segments=100, sigma=5, compactness=10) ``` 接下来,将每个超像素作为输入,运行DeblurGAN-v2模型进行去模糊: ```python # 对每个超像素进行去模糊 result = np.zeros((h, w, c), dtype=np.float32) for i in np.unique(segments): mask = (segments == i).astype(np.uint8) masked_img = cv2.bitwise_and(img, img, mask=mask) if np.sum(mask) > 0: masked_img = masked_img[np.newaxis, :, :, :] masked_img = torch.from_numpy(masked_img.transpose((0, 3, 1, 2))).float() with torch.no_grad(): output = model(masked_img) output = output.cpu().numpy() output = output.transpose((0, 2, 3, 1)) output = np.squeeze(output) result += output * mask[:, :, np.newaxis] # 对结果进行后处理 result /= 255.0 result = np.clip(result, 0, 1) result = (result * 255).astype(np.uint8) ``` 最后,使用密集条件随机场(DenseCRF)算法对结果进行后处理,以进一步提高去模糊的效果: ```python # 使用DenseCRF算法进行后处理 d = DenseCRF2D(w, h, 2) result_softmax = np.stack([result, 255 - result], axis=0) result_softmax = result_softmax.astype(np.float32) / 255.0 unary = -np.log(result_softmax) unary = unary.reshape((2, -1)) d.setUnaryEnergy(unary) d.addPairwiseGaussian(sxy=5, compat=3) d.addPairwiseBilateral(sxy=20, srgb=3, rgbim=img, compat=10) q = d.inference(5) q = np.argmax(np.array(q), axis=0).reshape((h, w)) result = q * 255 ``` 完整代码如下: ```python import cv2 import torch import numpy as np from skimage.segmentation import slic from skimage.segmentation import mark_boundaries from skimage.color import rgb2gray from models.networks import define_G from options.test_options import TestOptions from util import util from pydensecrf.densecrf import DenseCRF2D # 加载模型 opt = TestOptions().parse() opt.nThreads = 1 opt.batchSize = 1 opt.serial_batches = True opt.no_flip = True model = define_G(opt) util.load_checkpoint(model, opt.pretrained) # 加载测试图像 img_path = 'path/to/test/image' img = cv2.imread(img_path) img = cv2.cvtColor(img, cv2.COLOR_BGR2RGB) h, w, c = img.shape # 生成超像素 segments = slic(img, n_segments=100, sigma=5, compactness=10) # 对每个超像素进行去模糊 result = np.zeros((h, w, c), dtype=np.float32) for i in np.unique(segments): mask = (segments == i).astype(np.uint8) masked_img = cv2.bitwise_and(img, img, mask=mask) if np.sum(mask) > 0: masked_img = masked_img[np.newaxis, :, :, :] masked_img = torch.from_numpy(masked_img.transpose((0, 3, 1, 2))).float() with torch.no_grad(): output = model(masked_img) output = output.cpu().numpy() output = output.transpose((0, 2, 3, 1)) output = np.squeeze(output) result += output * mask[:, :, np.newaxis] # 对结果进行后处理 result /= 255.0 result = np.clip(result, 0, 1) result = (result * 255).astype(np.uint8) # 使用DenseCRF算法进行后处理 d = DenseCRF2D(w, h, 2) result_softmax = np.stack([result, 255 - result], axis=0) result_softmax = result_softmax.astype(np.float32) / 255.0 unary = -np.log(result_softmax) unary = unary.reshape((2, -1)) d.setUnaryEnergy(unary) d.addPairwiseGaussian(sxy=5, compat=3) d.addPairwiseBilateral(sxy=20, srgb=3, rgbim=img, compat=10) q = d.inference(5) q = np.argmax(np.array(q), axis=0).reshape((h, w)) result = q * 255 # 显示结果 result = cv2.cvtColor(result, cv2.COLOR_RGB2BGR) cv2.imshow('result', result) cv2.waitKey(0) cv2.destroyAllWindows() ```

“相关推荐”对你有帮助么?

  • 非常没帮助
  • 没帮助
  • 一般
  • 有帮助
  • 非常有帮助
提交
评论 149
添加红包

请填写红包祝福语或标题

红包个数最小为10个

红包金额最低5元

当前余额3.43前往充值 >
需支付:10.00
成就一亿技术人!
领取后你会自动成为博主和红包主的粉丝 规则
hope_wisdom
发出的红包
实付
使用余额支付
点击重新获取
扫码支付
钱包余额 0

抵扣说明:

1.余额是钱包充值的虚拟货币,按照1:1的比例进行支付金额的抵扣。
2.余额无法直接购买下载,可以购买VIP、付费专栏及课程。

余额充值