


今天用unity5.6播视频,尝试了3种方式,查了一些资料,分享一下。注:其中有些属于转载。我只是搬运工。。。
前2种方法见宣雨松大神的博客链接:Unity3D研究院之两种方式播放游戏视频(二十五) 。这里还在CSND上找到一个分享视频转换器的博客,其中也有一些播放视频的方法觉得写得也不错,贴出来吧:Unity3D播放视频
下面重点介绍第三种方法:
Unity5.6自带的VidePlayer
不久前Unity正式发布了5.6版本,作为5.x版本的最后一版还是有不少给力的更新的。其中新加入了一个Video Player控件,用以取代之前的MovieTexture。虽然还是alpha版本的功能,但是在视频导入编辑和播放等功能上比之前的MovieTexture已经好上很多。当然Unity还是保留了MovieTexture以防出现一个不可用的情况。
首先导入视频,因为默认不进行编码转换,现在的视频导入速度比以前快很多。

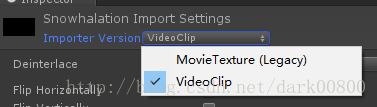
在视频的Import Settings面板上,我们可以选择导入的版本是新的VideoClip或者是旧版的MovieTexture。同时可以设置编码转换,转换的速度视视频的大小而定。
Unity5.6提供了多种生成Video Player控件的方式:
- 新建一个空白的Video Player:选择菜单栏的GameObject->Video->Video Player或者在Hierarchy面板上选择Create->Video->Video Player或者右击Hierarchy面板空白处选择Video->Video Player。
- 直接将导入的VideoClip拖入场景或者Hierarchy面板,生成的VideoPlayer控件的VideoClip将会自动被赋值,如果场景中存在MainCamera,Camera也会被自动赋值为MainCamera。
- 将导入的VideoClip拖动到场景中的Camera物体上,生成的VideoPlayer控件的VideoClip和MainCamera将会自动被赋值,模式默认选择Camera Far Plane。
- 将导入的VideoClip拖动到场景中的2D或者3D物体上,生成的VideoPlayer控件的VideoClip和Renderer将会自动被赋值,模式默认选择Material Override。
- 将导入的VideoClip拖动到场景中的UI物体上,生成的VideoPlayer控件的VideoClip将会自动被赋值,模式默认选择Render Texture。
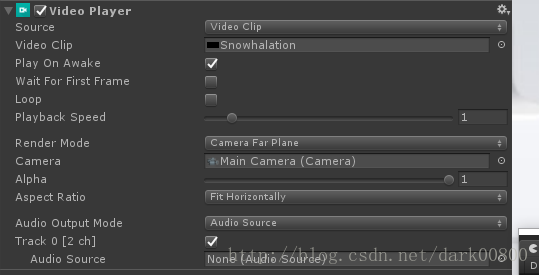
VideoPlayer的Inspector面板提供了基本的播放设置。我们可以选择播放源是指定的视频资源或者url路径,路径可以是本地路径或者http路径。


下面是一些比较大众化的设置:
- Play On Awake:脚本载入时自动播放。
- Wait For First Frame:决定是否在第一帧加载完成后才播放,只有在Play On Awake被勾选是才有效。可以防止视频最前几帧被跳过。(使用过程中发现勾选后视频无法自动播放,原因不明)
- Loop:循环。
- Playback Speed:播放速度。
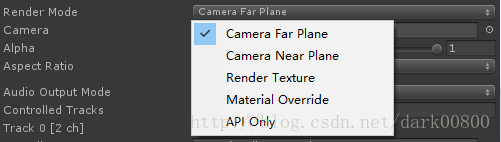
Video Player还提供了多种视频渲染的方式,包括Camera Far Plane,Camera Near Plane,Render Texture,Material Override,Api Only。
-
Camera Far Plane:基于摄像机的渲染,渲染在摄像机的远平面上,需要设置用于渲染的摄像机,同时可以修改alpha通道的值做透明效果,可用于背景播放器。
-
Camera Near Plane:基于摄像机的渲染,渲染在摄像机的近平面上,需要设置用于渲染的摄像机,同时可以修改alpha通道的值做透明效果,可用作前景播放器。
-
Render Texture:将视频画面保存在Render Texture上,以供物体或者RawImage使用,可以用来做基于UGUI的播放器。
-
Material Override:将视频画面复制给所选Render的Material。需要选择具有Render组件的物体,可以选择赋值的材质属性。可制作360全景视频和VR视频。
-
Api Only: 待研究。


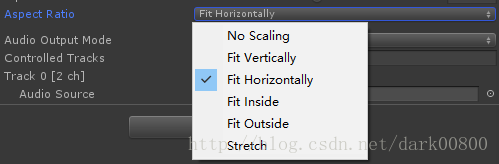
其中Camera Far Plane,Camera Near Planehe和Render Texture可以通过设置Aspect Ratio来选择自适应分辨率的方式:
最后一个Audio Output Mode用于音频的播放,None表示不播放音频,Audio Source表示使用Audio Source进行播放,Direct字面理解应该是直接通过视频来播放,但是我选择这个选项的时候并没有声音。

我们需要新建一个AudioSource物体用于音频播放,Audio Source的Clip不需赋值,其余参数可调。
脚本控制(需引用UnityEngine.Video):
VideoPlayer的脚本控制与AudioSource相似,有常规的Play,Pause,Stop方法,也有用于进度控制的time,isPlaying,isLooping,frame,frameCount等属性。
VideoPlayer可以使用一系列事件来监听播放的各个动作:
- errorReceived: 错误监听到时被执行。
- frameDropped :有丢帧发生时被执行。
- frameReady :新的一帧准备好时被执行。
- loopPointReached :播放结束或播放到循环的点时被执行。
- prepareCompleted :视频准备完成时被执行。
- seekCompleted :查询帧操作完成时被执行。
- started:在Play方法调用之后立刻调用。
下面是关于播放器的创建使用,loopPointReached和PrepareCompleted的用法介绍:
- 1
- 2
- 3
- 4
- 5
- 6
- 7
- 8
- 9
- 10
- 11
- 12
- 13
- 14
- 15
- 16
- 17
- 18
- 19
- 20
- 21
- 22
- 1
- 2
- 3
- 4
- 5
- 6
- 7
- 8
- 9
- 10
- 11
- 12
- 13
- 14
- 15
- 16
- 17
- 18
- 19
- 20
- 21
- 22
By: 蒋志杰
下面再再再再搞一个博主的东西抄一下。哎·~~~这个博主的文前面是讲的和我上面贴出来的差不多,后面着重讲了怎么用代码设置播放器,让播放器播放网络视频、本地视频可以暂停、前后拖动、快进、快退、音量调节、下一个视频
大家可以忽略前面的直接翻到后面看代码,希望对你们有帮助:博文链接:Unity5.6——VideoPlayer播放
using System.Collections;
using System.Collections.Generic;
using UnityEngine;
using UnityEngine.Video;
using UnityEngine.UI;
using System;

public class VideoPlayerTeach : MonoBehaviour {
    //图像
    public RawImage image;
    //播放器
    public VideoPlayer vPlayer;
    public string urlNetWork = "http://www.quirksmode.org/html5/videos/big_buck_bunny.mp4";//网络视频路径
    //播放
    public Button btn_Play;
    //暂停
    public Button btn_Pause;
    //前进
    public Button btn_Fornt;
    //后退
    public Button btn_Back;
    //下一个
    public Button btn_Next;
    //视频控制器
    public Slider sliderVideo;
    //音量控制器
    public Slider sliderSource;
    //音量大小
    public Text text;
    //当前视频时间
    public Text text_Time;
    //视频总时长
    public Text text_Count;
    //音频组件
    public AudioSource source;
    //需要添加播放器的物体
    public GameObject obj;
    //是否拿到视频总时长
    public bool isShow;
    //前进后退的大小
    public float numBer = 20f;
    //时 分的转换
    private int hour, mint;
    private float time;
    private float time_Count;
    private float time_Current;
    //视频是否播放完成
    private bool isVideo;

    // Use this for initialization
    void Start () {
        image = obj.GetComponent<RawImage>();
        //一定要动态添加这两个组件,要不然会没声音
        vPlayer = obj.AddComponent<VideoPlayer>();
        source = obj.AddComponent<AudioSource>();

        //这3个参数不设置也会没声音 唤醒时就播放关闭
        vPlayer.playOnAwake = false;
        source.playOnAwake = false;
        source.Pause();

        //初始化
        Init(urlNetWork);

        btn_Play.onClick.AddListener(delegate { OnClick(0); });
        btn_Pause.onClick.AddListener(delegate { OnClick(1); });
        btn_Fornt.onClick.AddListener(delegate { OnClick(2); });
        btn_Back.onClick.AddListener(delegate { OnClick(3); });
        btn_Next.onClick.AddListener(delegate { OnClick(4); });

        sliderSource.value = source.volume;
        text.text = string.Format("{0:0}%", source.volume * 100);
        sliderSource.onValueChanged.AddListener(delegate { ChangeSource(sliderSource.value); });
    }

    /// <summary>
    ///     初始化VideoPlayer
    /// </summary>
    /// <param name="url"></param>
    private void Init(string url) {
        isVideo = true;
        isShow = true;
        time_Count = 0;
        time_Current = 0;
        sliderVideo.value = 0;
        //设置为URL模式
        vPlayer.source = VideoSource.Url;
        //设置播放路径
        vPlayer.url = url;
        //在视频中嵌入的音频类型
        vPlayer.audioOutputMode = VideoAudioOutputMode.AudioSource;

        //把声音组件赋值给VideoPlayer
        vPlayer.SetTargetAudioSource(0, source);

        //当VideoPlayer全部设置好的时候调用
        vPlayer.prepareCompleted += Prepared;
        //启动播放器
        vPlayer.Prepare();
    }

    /// <summary>
    ///     改变音量大小
    /// </summary>
    /// <param name="value"></param>
    public void ChangeSource(float value) {
        source.volume = value;
        text.text = string.Format("{0:0}%", value * 100);
    }

    /// <summary>
    ///     改变视频进度
    /// </summary>
    /// <param name="value"></param>
    public void ChangeVideo(float value) {
        if (vPlayer.isPrepared)
        {
            vPlayer.time = (long)value;
            Debug.Log("VideoPlayer Time:"+vPlayer.time);
            time = (float)vPlayer.time;
            hour = (int)time / 60;
            mint = (int)time % 60;
            text_Time.text = string.Format("{0:D2}:{1:D2}", hour.ToString(), mint.ToString());
        }
    }

    private void OnClick(int num) {
        switch (num)
        {
            case 0:
                vPlayer.Play();
                Time.timeScale = 1;
                break;
            case 1:
                vPlayer.Pause();
                Time.timeScale = 0;
                break;
            case 2:
                sliderVideo.value = sliderVideo.value + numBer;
                break;
            case 3:
                sliderVideo.value = sliderVideo.value - numBer;
                break;
            case 4:
                vPlayer.Stop();
                Init(Application.streamingAssetsPath + "/EasyMovieTexture.mp4");
                break;
            default:
                break;
        }
    }

    // Update is called once per frame
    void Update ()
    {
        if (vPlayer.isPlaying && isShow)
        {
            //把图像赋给RawImage
            image.texture = vPlayer.texture;
            //帧数/帧速率=总时长    如果是本地直接赋值的视频,我们可以通过VideoClip.length获取总时长
            sliderVideo.maxValue = vPlayer.frameCount/vPlayer.frameRate;

            time = sliderVideo.maxValue;
            hour = (int)time / 60;
            mint = (int)time % 60;
            text_Count.text = string.Format("/  {0:D2}:{1:D2}", hour.ToString(), mint.ToString());

            sliderVideo.onValueChanged.AddListener(delegate { ChangeVideo(sliderVideo.value); });
            isShow = !isShow;
        }

        if (Mathf.Abs((int)vPlayer.time - (int)sliderVideo.maxValue) == 0)
        {
            vPlayer.frame = (long)vPlayer.frameCount;
            vPlayer.Stop();
            Debug.Log("播放完成!");
            isVideo = false;
            return;
        }
        else if (isVideo && vPlayer.isPlaying)
        {
            time_Count += Time.deltaTime;
            if ((time_Count - time_Current) >= 1)
            {
                sliderVideo.value += 1;
                Debug.Log("value:" + sliderVideo.value);
                time_Current = time_Count;
            }
        }
    }

    private void FixedUpdate()
    {

    }

    void Prepared(VideoPlayer player) {
        player.Play();
    }
}//Raw Image to Show Video Images [Assign from the Editor]
public RawImage image;
//Video To Play [Assign from the Editor]
public VideoClip videoToPlay;
private VideoPlayer videoPlayer;
private VideoSource videoSource;
//Audio
private AudioSource audioSource;
// Use this for initialization
void Start()
{
Application.runInBackground = true;
StartCoroutine(playVideo());
}
IEnumerator playVideo()
{
//Add VideoPlayer to the GameObject
videoPlayer = gameObject.AddComponent<VideoPlayer>();
//Add AudioSource
audioSource = gameObject.AddComponent<AudioSource>();
//Disable Play on Awake for both Video and Audio
videoPlayer.playOnAwake = false;
audioSource.playOnAwake = false;
//We want to play from video clip not from url
videoPlayer.source = VideoSource.VideoClip;
//Set video To Play then prepare Audio to prevent Buffering
videoPlayer.clip = videoToPlay;
videoPlayer.Prepare();
//Wait until video is prepared
while (!videoPlayer.isPrepared)
{
Debug.Log("Preparing Video");
yield return null;
}
Debug.Log("Done Preparing Video");
//Set Audio Output to AudioSource
videoPlayer.audioOutputMode = VideoAudioOutputMode.AudioSource;
//Assign the Audio from Video to AudioSource to be played
videoPlayer.EnableAudioTrack(0, true);
videoPlayer.SetTargetAudioSource(0, audioSource);
//Assign the Texture from Video to RawImage to be displayed
image.texture = videoPlayer.texture;
//Play Video
videoPlayer.Play();
//Play Sound
audioSource.Play();
Debug.Log("Playing Video");
while (videoPlayer.isPlaying)
{
Debug.LogWarning("Video Time: " + Mathf.FloorToInt((float)videoPlayer.time));
yield return null;
}
Debug.Log("Done Playing Video");
}贴了那么多吼,也该秀秀自己的见解了吧。
public RawImage image;
    public VideoClip videoToPlay;
    public VideoPlayer videoPlayer;
    public AudioSource audioSource;


	// Use this for initialization
	void Start () {
        videoPlayer.source = VideoSource.VideoClip;
        videoPlayer.audioOutputMode = VideoAudioOutputMode.AudioSource;
        //videoPlayer.EnableAudioTrack(0, true);

        videoPlayer.SetTargetAudioSource(0, audioSource);
        videoPlayer.clip = videoToPlay;
        //添加prepareCompleted事件监听,videoPlayer.texture在 videoPlayer.Prepare()事件完成后才不为空
        videoPlayer.prepareCompleted += Prepared;
        videoPlayer.Prepare();

	}
    void Prepared(VideoPlayer vPlayer)
    {
        Debug.Log("准备播放视频!");
        image.texture = videoPlayer.texture;
        vPlayer.Play();
    }


 2112
2112

 被折叠的 条评论
为什么被折叠?
被折叠的 条评论
为什么被折叠?
 到【灌水乐园】发言


