


参考
https://docs.nvidia.com/deeplearning/triton-inference-server/user-guide/docs/vllm_backend/README.html
https://github.com/triton-inference-server/perf_analyzer/blob/main/genai-perf/README.md
vLLM后端部署大模型
部署步骤
- 去 https://catalog.ngc.nvidia.com/orgs/nvidia/containers/tritonserver/tags 拉取 vllm 后端的镜像
- 进入容器
docker run -it --name triton_vllm_25.01 --ipc=host --network host --entrypoint /bin/bash --gpus all -v /data/:/models/ tritonserver:25.01-vllm-python-py3
- 准备目录
./models/
└── vllm_ai
    ├── 1
    │   └── model.json
    └── config.pbtxt
# model.json
{
    "model":"/Qwen2.5-7B-Instruct",
    "disable_log_requests": true,
    "gpu_memory_utilization": 0.9,
    "enforce_eager": true,
    "max_model_len": 8196,
    "tensor_parallel_size": 4
}
# config.pbtxt
backend: "vllm"

instance_group [
  {
    count: 1
    kind: KIND_MODEL
  }
]
- 启动服务
tritonserver --model-repository=./models/
- 发送请求
curl -X POST localhost:8000/v2/models/vllm_ai/generate \
-d '{"text_input": "What is Triton Inference Server?用中文回答我", "parameters": {"stream": false, "temperature": 0, "exclude_input_in_output": true, "max_tokens": 450}}'
输出:
{"model_name":"vllm_ai","model_version":"1",
"text_output":"。\nTriton Inference Server 是一个高性能的机器学习推理服务器,由 NVIDIA 开发。它能够支持多种深度学习框架生成的模型,并提供统一的接口来执行这些模型的推理任务。Triton Inference Server 可以在多种硬件平台上运行,包括 NVIDIA GPU、CPU 和其他加速器。它支持多种模型格式,包括 ONNX、TensorFlow、PyTorch 等,并且可以进行模型优化和并行化处理,以提高推理性能。此外,Triton Inference Server 还提供了灵活的调度策略和负载均衡功能,可以满足不同应用场景的需求。总之,Triton Inference Server 是一个功能强大、灵活且高效的机器学习推理解决方案。"}
- 查看性能指标
curl localhost:8002/metrics
输出:
nv_inference_count{model="vllm_ai",version="1"} 4
# HELP nv_inference_exec_count Number of model executions performed (does not include cached requests)
# TYPE nv_inference_exec_count counter
nv_inference_exec_count{model="vllm_ai",version="1"} 4
# HELP nv_inference_request_duration_us Cumulative inference request duration in microseconds (includes cached requests)
# TYPE nv_inference_request_duration_us counter
nv_inference_request_duration_us{model="vllm_ai",version="1"} 4406
# HELP nv_inference_queue_duration_us Cumulative inference queuing duration in microseconds (includes cached requests)
# TYPE nv_inference_queue_duration_us counter
nv_inference_queue_duration_us{model="vllm_ai",version="1"} 463
# HELP nv_inference_compute_input_duration_us Cumulative compute input duration in microseconds (does not include cached requests)
# TYPE nv_inference_compute_input_duration_us counter
nv_inference_compute_input_duration_us{model="vllm_ai",version="1"} 668
# HELP nv_inference_compute_infer_duration_us Cumulative compute inference duration in microseconds (does not include cached requests)
# TYPE nv_inference_compute_infer_duration_us counter
nv_inference_compute_infer_duration_us{model="vllm_ai",version="1"} 3197
# HELP nv_inference_compute_output_duration_us Cumulative inference compute output duration in microseconds (does not include cached requests)
# TYPE nv_inference_compute_output_duration_us counter
nv_inference_compute_output_duration_us{model="vllm_ai",version="1"} 43
从这些指标可以看出:
- 推理总耗时: 4.4 毫秒(nv_inference_request_duration_us)。
主要耗时阶段:
-
推理计算(nv_inference_compute_infer_duration_us): 3.2 毫秒,占总耗时的 72.7%。
-
输入处理(nv_inference_compute_input_duration_us): 0.67 毫秒,占总耗时的 15.2%。
-
队列等待(nv_inference_queue_duration_us): 0.46 毫秒,占总耗时的 10.5%。
-
输出处理(nv_inference_compute_output_duration_us): 0.04 毫秒,占总耗时的 0.9%。
瓶颈分析:
- 推理计算阶段(nv_inference_compute_infer_duration_us)是主要的性能瓶颈,占总耗时的 72.7%。
部署 OpenAI 兼容接口的服务
需要用到 https://github.com/triton-inference-server/server/tree/main/python/openai 的代码
git clone 下来
- 启动服务
python3 /triton_server/python/openai/openai_frontend/main.py \
   --model-repository ./models/ \
   --tokenizer /Qwen2.5-0.5B-Instruct/
- curl 调用
MODEL="vllm_ai"
curl -s http://localhost:9000/v1/chat/completions -H 'Content-Type: application/json' -d '{
  "model": "'${MODEL}'",
  "messages": [{"role": "user", "content": "你好,你是谁!"}]
}'
输出:
{"id":"cmpl-dd951084-f40c-11ef-add2-3fb38431bf72",
"choices":[{"finish_reason":"stop","index":0,
"message":{"content":"你好!我是Qwen,由阿里云开发的大型语言模型。我",
"tool_calls":null,"role":"assistant","function_call":null},"logprobs":null}],
"model":"vllm_ai",  "system_fingerprint":null,"object":"chat.completion","usage":null}
- 代码调用
from openai import OpenAI
client = OpenAI(
    base_url="http://localhost:9000/v1",
    api_key="EMPTY",
)

model = "vllm_ai"
completion = client.chat.completions.create(
    model=model,
    messages=[
        {
            "role": "system",
            "content": "You are a helpful assistant.",
        },
        {"role": "user", "content": "你是deepseek吗?"},
    ],
    max_tokens=256,
)
print(completion.choices[0].message.content)
# 不,我不是DeepSeek。我是阿里云开发的超大规模语言模型“通义千问”,与DeepSeek无关。
# 如果您有任何问题或需要帮助,可以随时告诉我,我会尽力提供支持。
性能测试
使用 genai-perf 测试,pip install genai-perf
genai-perf profile \
  -m vllm_ai \
  --tokenizer /Qwen2.5-0.5B-Instruct \
  --service-kind openai \
  --endpoint-type chat \
  --url localhost:9000 \
  --synthetic-input-tokens-mean 200 \
  --synthetic-input-tokens-stddev 0 \
  --output-tokens-mean 100 \
  --output-tokens-stddev 0 \
  --streaming \
  --request-count 50 \
  --warmup-request-count 10 \
  --concurrency 1
输出:
[INFO] genai_perf.parser:115 - Profiling these models: vllm_ai
[INFO] genai_perf.subcommand.common:208 - Running Perf Analyzer : 'perf_analyzer -m vllm_ai --async --input-data artifacts/vllm_ai-openai-chat-concurrency1/inputs.json -i http --concurrency-range 1 --endpoint v1/chat/completions --service-kind openai -u localhost:9000 --request-count 50 --warmup-request-count 10 --profile-export-file artifacts/vllm_ai-openai-chat-concurrency1/profile_export.json --measurement-interval 10000 --stability-percentage 999'
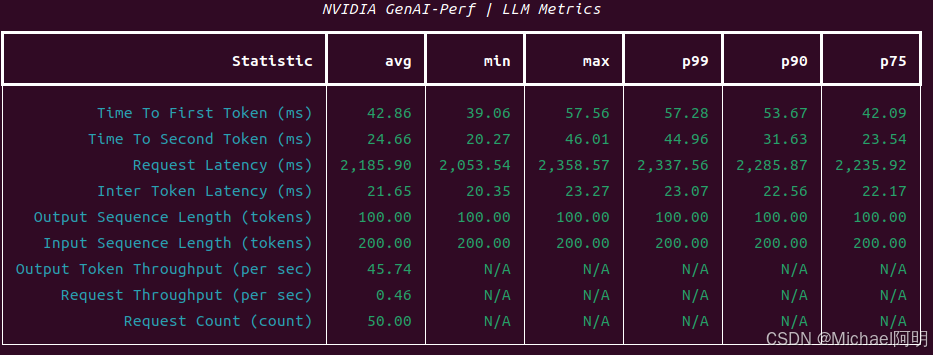
并发 = 1 输出:
并发 = 10 输出:
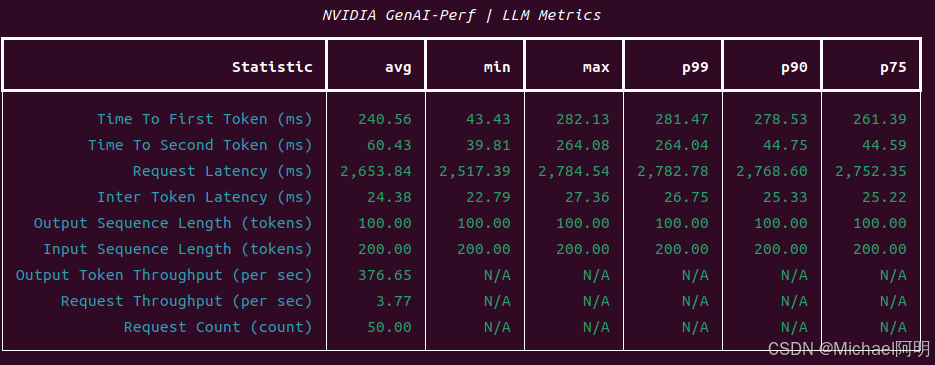
可以获得:首token响应时间、吞吐量等指标


 3441
3441

 被折叠的 条评论
为什么被折叠?
被折叠的 条评论
为什么被折叠?
 到【灌水乐园】发言


