


一、前世
MNIST数据集是一个手写数字数据集,每一张图片都是0到9中的单个数字,比如下面几个:

MNIST数据库的来源是两个数据库的混合,一个来自Census Bureau employees(SD-3),一个来自high-school students(SD-1);有训练样本60000个,测试样本10000个。训练样本和测试样本中,employee和student写的都是各占一半。60000个训练样本一共大概250个人写的。训练样本和测试样本的来源人群没有交集。MNIST数据库也保留了手写数字与身份的对应关系。
TensorFlow使用MNIST 数据集
我们可以使用Tensorflow提供的input_data.py 脚本来加载数据集。
tensorflow中具体训练使用例程为:
from tensorflow.examples.tutorials.mnist import input_data
mnist = input_data.read_data_sets("MNIST_data/", one_hot=True)

print(mnist.train.images.shape, mnist.train.labels.shape)
print(mnist.test.images.shape, mnist.test.labels.shape)
print(mnist.validation.images.shape, mnist.validation.labels.shape)

import tensorflow as tf
sess = tf.InteractiveSession()
x = tf.placeholder(tf.float32, [None, 784])

W = tf.Variable(tf.zeros([784, 10]))
b = tf.Variable(tf.zeros([10]))

y = tf.nn.softmax(tf.matmul(x, W) + b)

y_ = tf.placeholder(tf.float32, [None, 10])
cross_entropy = tf.reduce_mean(-tf.reduce_sum(y_ * tf.log(y), reduction_indices=[1]))

train_step = tf.train.GradientDescentOptimizer(0.5).minimize(cross_entropy)

tf.global_variables_initializer().run()

for i in range(1000):
    batch_xs, batch_ys = mnist.train.next_batch(100)
    train_step.run({x: batch_xs, y_: batch_ys})

correct_prediction = tf.equal(tf.argmax(y, 1), tf.argmax(y_, 1))

accuracy = tf.reduce_mean(tf.cast(correct_prediction, tf.float32))

print(accuracy.eval({x: mnist.test.images, y_: mnist.test.labels}))
二、今生
2019年5月29日,纽约大学教授、Facebook 副总裁与首席 AI 科学家 Yann LeCun 在推特上推了一条推特:
MNIST reborn, restored and expanded.
Now with an extra 50,000 training samples.
If you used the original MNIST test set more than a few times, chances are your models overfit the test set. Time to test them on those extra samples. arxiv.org/abs/1905.10498
三、QMINST 简介
详见GitHub:https://github.com/facebookresearch/qmnist/blob/master/README.md
四、QMNIST数据集文件剖析及可视化图像及标签
1. Using the QMNIST extended testing set
(1)介绍
The simplest way to use the QMNIST extended testing set is to download the two following files. These gzipped files have the same format as the standard MNIST data files but contain the 60000 testing examples. The first 10000 examples are the QMNIST reconstruction of the standard MNIST testing digits. The following 50000 examples are the reconstruction of the lost MNIST testing digits.
| Filename | Format | Description |
|---|---|---|
qmnist-test-images-idx3-ubyte.gz | 60000x28x28 | testing images |
qmnist-test-labels-idx1-ubyte.gz |
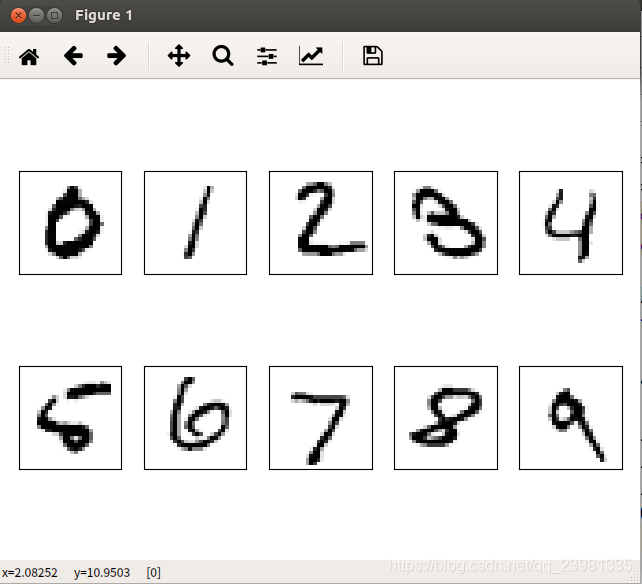
(2)简单可视化
这种数据格式和旧版的mnist一样,可视化test数据的方法参考博客:https://blog.csdn.net/simple_the_best/article/details/75267863
这里贴上可视化代码:
import tensorflow as tf
import numpy as np
import os
import sys
import struct
import matplotlib.pyplot as plt
# class QMNIST(object):
#     def __init__(self,root):
#         self.path=root

def load_mnist(path, kind='test'):
    labels_path = os.path.join(path,
                               'qmnist-%s-labels-idx1-ubyte'
                               % kind)
    images_path = os.path.join(path,
                               'qmnist-%s-images-idx3-ubyte'
                               % kind)
    with open(labels_path, 'rb') as lbpath:
        magic, n = struct.unpack('>II',
                                 lbpath.read(8))
        labels = np.fromfile(lbpath,
                             dtype=np.uint8)

    with open(images_path, 'rb') as imgpath:
        magic, num, rows, cols = struct.unpack('>IIII',
                                               imgpath.read(16))
        images = np.fromfile(imgpath,
                             dtype=np.uint8).reshape(len(labels), 784)

    return images, labels

X_test,y_test= load_mnist('/media/pci/NewDisk2/zwl/GACProject/Tfexercise/Visualization/QMNIST_data/')

fig, ax = plt.subplots(
    nrows=2,
    ncols=5,
    sharex=True,
    sharey=True, )

ax = ax.flatten()
for i in range(10):
    img = X_test[y_test == i][0].reshape(28, 28)
    ax[i].imshow(img, cmap='Greys', interpolation='nearest')

ax[0].set_xticks([])
ax[0].set_yticks([])
plt.tight_layout()
plt.show()
得到的图像数据集X_test的shape=(60000,784),标签集合y_test的shape=(60000,)。
2. Using the QMNIST extended labels
(1)介绍
The official NIST training data (series hsf0 to hsf3, writers 0 to 2099) was written by NIST employees. The official testing data (series hsf4, writers 2100 to 2599) was written by high-school students and is considered to be substantially more challenging. Since machine learning works better when training and testing data follow the same distribution, the creators of the MNIST dataset decided to distribute writers from both series into their training and testing sets. The QMNIST extended labels trace each training or testing digit to its source in the NIST Special Database 19. Since the QMNIST training set and the first 10000 examples of the QMNIST testing set exactly match the MNIST training and testing digits, this information can also be used for the standard MNIST dataset. The extended labels are found in the following files.
| Filename | Format | Description |
|---|---|---|
qmnist-train-labels-idx2-int.gz | 60000x8 | extended training labels |
qmnist-train-labels.tsv.gz | 60000x8 | same, tab separated file |
qmnist-test-labels-idx2-int.gz | 60000x8 | extended testing labels |
qmnist-test-labels.tsv.gz | 60000x8 | same, tab separated file |
The format of these gzipped files is very simlar to the format of the standard MNIST label files. However, instead of being a one-dimensional tensor of unsigned bytes (idx1-ubyte), the label tensor is a two-dimensional tensor of integers (idx2-int) with 8 columns:
| Column | Description | Range |
|---|---|---|
| 0 | Character class | 0 to 9 |
| 1 | NIST HSF series | 0, 1, or 4 |
| 2 | NIST writer ID | 0-326 and 2100-2599 |
| 3 | Digit index for this writer | 0 to 149 |
| 4 | NIST class code | 30-39 |
| 5 | Global NIST digit index | 0 to 281769 |
| 6 | Duplicate | 0 |
| 7 | Unused | 0 |
The binary files idx2-int encode this information as a sequence of big-endian 32 bit integers
| Offset | Type | Value | Description |
|---|---|---|---|
| 0 | 32 bit integer | 0x0c02(3074) | magic number |
| 4 | 32 bit integer | 60000 | number of rows |
| 8 | 32 bit integer | 8 | number of columns |
| 12.. | 32 bit integers | ... | data in row major order |
Due to popular demand, we also provide the same information as TSV files.
The QMNIST distribution provides in fact the following files:
| Filename | Format | Description |
|---|---|---|
qmnist-train-images-idx3-ubyte.gz | 60000x28x28 | training images |
qmnist-train-labels-idx2-int.gz | 60000x8 | extended training labels |
qmnist-train-labels.tsv.gz | 60000x8 | same, tab separated file |
qmnist-test-images-idx3-ubyte.gz | 60000x28x28 | testing images |
qmnist-test-labels-idx2-int.gz | 60000x8 | extended testing labels |
qmnist-test-labels.tsv.gz | 60000x8 | same, tab separated file |
xnist-images-idx3-ubyte.xz | 402953x28x28 | NIST digits images |
xnist-labels-idx2-int.xz | 402953x8 | NIST digits extended labels |
xnist-labels.tsv.xz | 402953x8 | same, tab separated file |
Files with the .gz suffix are gzipped and can be decompressed with the standard commmand gunzip. Files with the .xzsuffix are LZMA compressed and can be decompressed using the standard command unxz.
The QMNIST training examples match the MNIST training example one-by-one and in the same order. The first 10000 QMNIST testing examples match the MNIST testing examples one-by-one and in the same order. The xnist-* data files provide preprocessed images and extended labels for all digits appearing in the NIST Special Database 19 in partition and writer order. Column 5 of the extended labels give the index of each digit in this file. We found three duplicate digits in the NIST dataset. Column 6 of the extended labels then contain the index of the digit for which this digit is a duplicate. Since duplicate digits have been eliminated from the QMNIST/MNIST training set and testing set, this never happens in the qmnist-* extended label files.
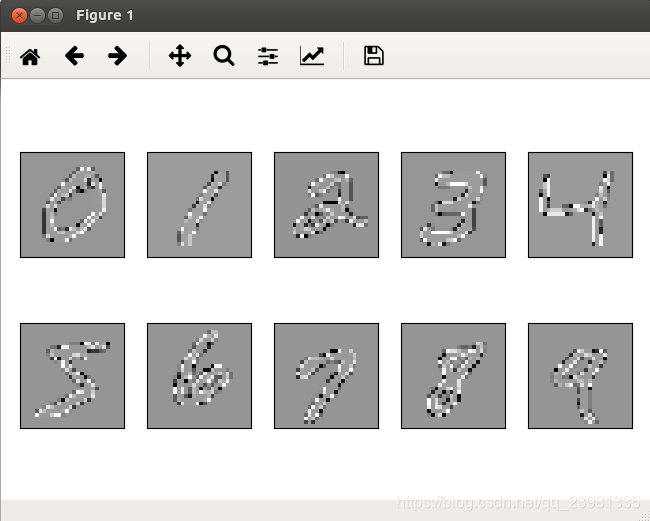
(2)简单可视化
显然,经过上面介绍,扩展数据集的图像数据和MNIST数据集是一样的,读取方式所以也一样,但是标签的格式却发生了变化,以前是单一的“Character class ”标签,现在加了其他, 标签由8个项目组成:[Character class ,NIST HSF series ,NIST writer ID, Digit index for this writer ,NIST class code ,Global NIST digit index ,Duplicate ,Unused],所以标签shape变成(60000,8)。具体如何从文件中获取见一下代码:
import tensorflow as tf
import numpy as np
import os
import sys
import struct
import matplotlib.pyplot as plt
# class QMNIST(object):
#     def __init__(self,root):
#         self.path=root

def load_mnist(path, kind='train'):
    labels_path = os.path.join(path,
                               'qmnist-%s-labels-idx2-int'
                               % kind)
    images_path = os.path.join(path,
                               'qmnist-%s-images-idx3-ubyte'
                               % kind)
    with open(labels_path, 'rb') as lbpath:
        magic, n, m = struct.unpack('>III',
                                 lbpath.read(12))
        labels = np.fromfile(lbpath,
                             dtype=np.dtype('>i4'))

        labels=labels.reshape(n, 8)
        print(labels.shape)

    with open(images_path, 'rb') as imgpath:
        magic, num, rows, cols = struct.unpack('>IIII',
                                               imgpath.read(16))
        images = np.fromfile(imgpath,
                             dtype=np.byte)  #np.byte=np.uint8,all of them are 8 bits

        images=images.reshape(num, 784)
        print(images.shape)

    return images, labels

X_train,y_train = load_mnist('/media/pci/NewDisk2/zwl/GACProject/Tfexercise/Visualization/QMNIST_data/')

label=y_train[:,0]  #提取到的类别标签


# img=X_train[3].reshape(28,28)
# plt.imshow(img, cmap='Greys', interpolation='nearest')
# plt.show()

fig, ax = plt.subplots(
    nrows=2,
    ncols=5,
    sharex=True,
    sharey=True, )

ax = ax.flatten()
print((y_train[:,0]).shape)
for i in range(10):
    img = X_train[y_train[:,0] == i][0].reshape(28, 28)
    ax[i].imshow(img, cmap='Greys', interpolation='nearest')

ax[0].set_xticks([])
ax[0].set_yticks([])
plt.tight_layout()
plt.show()
重点是:
labels = np.fromfile(lbpath,dtype=np.dtype('>i4')) #定义的标签为一个big-endian int 4*8=32位的数据类型图像显示为:
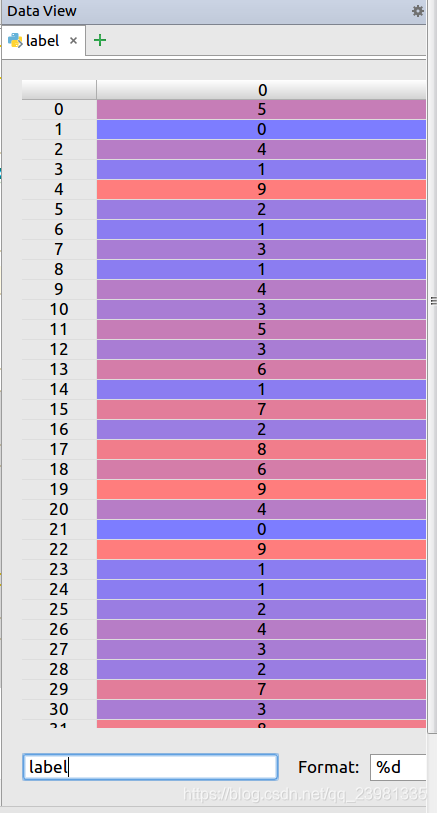
类别标签为:
label = y_train[:,0]具体看到为:
五、The Pytorch QMNIST loader
File qmnist.py contains a QMNIST data loader for the popular Pytorch platform. It either loads the QMNIST data files provided in the same directory as the file pytorch.py or downloads them from the web when passing the option download=True. This data loader is compatible with the standard Pytorch MNIST data loader and also provided additional features whose documentation is best found in the comments located inside pytorch.py.
Here are a couple examples:
from qmnist import QMNIST

# the qmnist training set, download from the web if not found
qtrain = QMNIST('_qmnist', train=True, download=True)

# the qmnist testing set, do not download.
qtest = QMNIST('_qmnist', train=False)

# the first 10k of the qmnist testing set with extended labels
# (targets are a torch vector of 8 integers)
qtest10k = QMNIST('_qmnist', what='test10k', compat=False, download='True')

# all the NIST digits with extended labels
qall = QMNIST('_qmnist', what='nist', compat=False)


 2911
2911

 被折叠的 条评论
为什么被折叠?
被折叠的 条评论
为什么被折叠?
 到【灌水乐园】发言


