


最近在做一个帮助美术初学者画稿定位的一个项目,里面涉及到了一些要把图片变成水墨风格的一个需求,查阅资料,在前人的基础上修修改改,弄出了一个Shader,效果如下
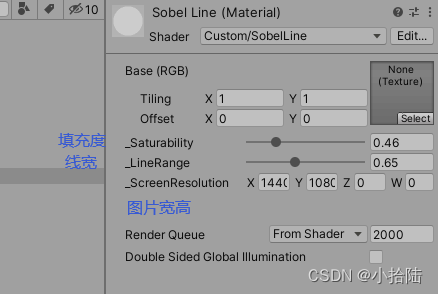
效果就是可以切换水墨画风格和原画,还可以调整线条的粗细和内容的填充度,具体参数如下
shader代码如下:
Shader "Custom/SobelLine"
{
Properties
{
_MainTex ("Base (RGB)", 2D) = "white" {}
//_MainTex ("Base (RGB)", 2D) = "white" {}
_Saturability ("_Saturability",Range(0.0,2.0))= 0.5
_LineRange ("_LineRange", Range(0, 1.6)) = 0.8
_ScreenResolution ("_ScreenResolution", Vector) = (0,0,0,0)
}
SubShader
{
Tags { "RenderType"="Opaque" }
LOD 100
Pass
{
Cull Off ZWrite Off ZTest Always
CGPROGRAM
#pragma vertex vert
#pragma fragment frag
#pragma multi_compile MY_multi_Y MY_multi_N
#include "UnityCG.cginc"
uniform sampler2D _MainTex;
uniform float _Saturability;
uniform float _LineRange;
uniform float4 _ScreenResolution;
float4 _MainTex_ST;
struct appdata
{
float4 vertex : POSITION;
float2 uv : TEXCOORD0;
float4 color : COLOR;
};
struct v2f
{
float2 uv : TEXCOORD0;
UNITY_FOG_COORDS(1)
float4 vertex : SV_POSITION;
float4 color : COLOR;
};
v2f vert (appdata v)
{
v2f o;
o.vertex = UnityObjectToClipPos(v.vertex);
o.uv = TRANSFORM_TEX(v.uv, _MainTex);
UNITY_TRANSFER_FOG(o,o.vertex);
#if _TEX_ON
v2f OUT;
OUT.vertex = UnityObjectToClipPos(v.vertex);
OUT.uv = v.uv;
OUT.color = v.color;
return OUT;
#endif
return o;
}
float intensity(in float4 color){
return sqrt((color.x*color.x)+(color.y*color.y)+(color.z*color.z));
}
float3 sobel(float stepx, float stepy, float2 center){
float tleft = intensity(tex2D(_MainTex,center + float2(-stepx,stepy)*_LineRange));
float left = intensity(tex2D(_MainTex,center + float2(-stepx,0)*_LineRange));
float bleft = intensity(tex2D(_MainTex,center + float2(-stepx,-stepy)*_LineRange));
float top = intensity(tex2D(_MainTex,center + float2(0,stepy)*_LineRange));
float bottom = intensity(tex2D(_MainTex,center + float2(0,-stepy)*_LineRange));
float tright = intensity(tex2D(_MainTex,center + float2(stepx,stepy)*_LineRange));
float right = intensity(tex2D(_MainTex,center + float2(stepx,0)*_LineRange));
float bright = intensity(tex2D(_MainTex,center + float2(stepx,-stepy)*_LineRange));
float x = tleft + 2.0 * left + bleft - tright - 2.0 * right - bright;
float y = -tleft - 2.0 * top - tright + bleft + 2.0 * bottom + bright;
float color = sqrt((x*x) + (y*y));
if(color<_Saturability)
{
color=0;
}
return float3(1- color,1- color,1- color);
}
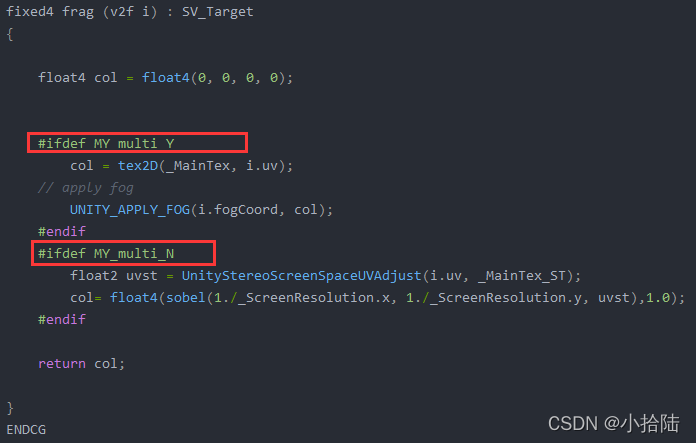
fixed4 frag (v2f i) : SV_Target
{
float4 col = float4(0, 0, 0, 0);
#ifdef MY_multi_Y
col = tex2D(_MainTex, i.uv);
// apply fog
UNITY_APPLY_FOG(i.fogCoord, col);
#endif
#ifdef MY_multi_N
float2 uvst = UnityStereoScreenSpaceUVAdjust(i.uv, _MainTex_ST);
col= float4(sobel(1./_ScreenResolution.x, 1./_ScreenResolution.y, uvst),1.0);
#endif
return col;
}
ENDCG
}
}
}
值得注意的是,在原话和水墨风格切换的时候我是通过两个变体处理的
 然后C#脚本里面进行切换
 		if (Input.GetKeyDown(KeyCode.W))
        {

            Shader.EnableKeyword("MY_multi_Y");
            Shader.DisableKeyword("MY_multi_N");


        }

        if (Input.GetKeyDown(KeyCode.A))
        {

            Shader.EnableKeyword("MY_multi_N");
            Shader.DisableKeyword("MY_multi_Y");

        }
代码一共就这么多,需要复制粘贴一下就行,或者私信向我要也ok,快下班了,时间仓促,就这样,有时间我在补充补充放个工程上去,哈哈哈


 1683
1683

 被折叠的 条评论
为什么被折叠?
被折叠的 条评论
为什么被折叠?
 到【灌水乐园】发言


