格式整理的不好,可参考知乎文章:https://zhuanlan.zhihu.com/p/703269995(知乎可以直接上传word,格式保留相对完整)
或者从这里下载完整版pdf:https://download.csdn.net/download/qq_25284701/89430116
目录
目录
1 CANape工具详解
(1)CANape工具基本应用
(2)测量配置Measurement Configration
(3)CMD数据管理、数据回放、测量CAN总线数据
(4)A2L文件设计31
2 CANape快速入门【参考官方】
(1)创建工程
(2)测量(Measurement)
(3)数据记录(DataLogging)
(4)数据分析(Data Analysis)
(5)标定(Calibration)
(6)DHPR高性能分布式记录器
(7)CANape项目灵活移动的方式
(8)有趣的CASL脚本
(9)All about Comments标签用法
(10)显示系统信息
3 CANape使用技巧合集【参考官方】
(1)轻松添加测量文件至CANape
(2)导出CANape工程压缩包
(3)CANape脚本语言CASL简介
(4)XCP测量模式简介:Polling与DAQ
(5)Project Explorer项目管理
(6)其他小技巧
PS:内容太多,超过10M的word无法上传,只能分为3篇文章发布
PS:文档制作过程中参考了网络视频教程,后附相关链接,在此鸣谢
2 CANape快速入门【参考官方】
(1)创建工程
- 工程的作用
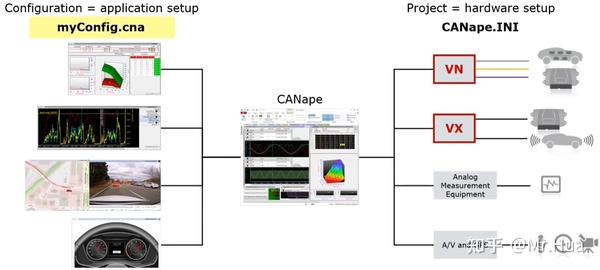
CANape工程主要是硬件设置,这里的硬件可以包括①连接到ECU或汽车总线上的Vector网络接口卡(VN1610等);②连接到ECU或者ADAS上的高速ECU内存接口(VX1000等);③还可能是模拟量设备;④或者是音视频、GPS输入以及摄像头。
![](https://img-blog.csdnimg.cn/img_convert/a872829f61d6f6e6ea915ef13fe4ab9d.jpeg)
![](https://img-home.csdnimg.cn/images/20230724024159.png?origin_url=data%3Aimage%2Fsvg%2Bxml%3Butf8%2C%3Csvg%20xmlns%3D'http%3A%2F%2Fwww.w3.org%2F2000%2Fsvg'%20width%3D'693'%20height%3D'496'%3E%3C%2Fsvg%3E&pos_id=img-zYNBWmsd-1718288895880%29)
这些硬件设置都被保存在CANape.INI文件中。但这些硬件设置并没有定义CANape需要完成什么任务。这正是工程配置中要定义的内容。
工程设置Configuration是应用设置,包括用于标定ECU的窗口;用于测量数据的窗口;用于将测量数据保存到日志文件的记录器;用于分析数据的窗口;以及用于运行测试的脚本和函数。这些应用设置保存在.cna文件中。
![](https://img-blog.csdnimg.cn/img_convert/04ca51deed3a687789afa2b598c943b5.jpeg)
![](https://img-home.csdnimg.cn/images/20230724024159.png?origin_url=data%3Aimage%2Fsvg%2Bxml%3Butf8%2C%3Csvg%20xmlns%3D'http%3A%2F%2Fwww.w3.org%2F2000%2Fsvg'%20width%3D'1399'%20height%3D'630'%3E%3C%2Fsvg%3E&pos_id=img-VMGFMDGd-1718288897876%29)
- 创建工程的准备工作
创建工程前需要在Vector Hardware Manager应用中设置通道。这个应用是与驱动程序一起安装的,并且需要保持与最新版相同。设置流程如下:
①确保模式开关处于扳手位置(开关在右侧);②然后点击下面的“Application Channels Configuration”并选择CANape功能;③然后再从右侧拖动VN1610的Channel 1到中间CAN通道下面(插入ape硬件才会显示VN1610)。
![](https://img-blog.csdnimg.cn/img_convert/3e267b00b09249a05072e32d14697fd2.jpeg)
![](https://img-home.csdnimg.cn/images/20230724024159.png?origin_url=data%3Aimage%2Fsvg%2Bxml%3Butf8%2C%3Csvg%20xmlns%3D'http%3A%2F%2Fwww.w3.org%2F2000%2Fsvg'%20width%3D'1301'%20height%3D'478'%3E%3C%2Fsvg%3E&pos_id=img-iV3neV3n-1718288898550%29)
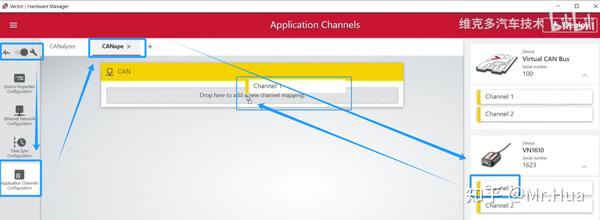
此时VN1610的硬件通道1就被映射到了CANape的逻辑CAN通道上;④然后点击窗口右上角的部署“Deploy” 按钮。
![](https://img-blog.csdnimg.cn/img_convert/aa6fb1e1057aca3022234b0b0996d1eb.jpeg)
![](https://img-home.csdnimg.cn/images/20230724024159.png?origin_url=data%3Aimage%2Fsvg%2Bxml%3Butf8%2C%3Csvg%20xmlns%3D'http%3A%2F%2Fwww.w3.org%2F2000%2Fsvg'%20width%3D'967'%20height%3D'226'%3E%3C%2Fsvg%3E&pos_id=img-kJryIc8A-1718288898970%29)
- 新建工程
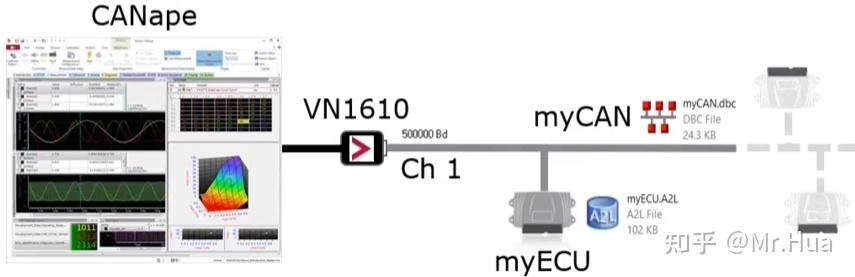
想要上位机通过ape解析ECU中的参数就需要A2L数据库;想要上位机通过ape解析CAN网络上传递的信号就需要DBC数据库。这两个数据库在CANape里面就分别具象化或显示为XCP(或CCP)设备、CAN总线监控设备。
![](https://img-blog.csdnimg.cn/img_convert/5c97b032969986f563acc344c3167ac2.jpeg)
![](https://img-home.csdnimg.cn/images/20230724024159.png?origin_url=data%3Aimage%2Fsvg%2Bxml%3Butf8%2C%3Csvg%20xmlns%3D'http%3A%2F%2Fwww.w3.org%2F2000%2Fsvg'%20width%3D'855'%20height%3D'277'%3E%3C%2Fsvg%3E&pos_id=img-YHf9iE5U-1718288899443%29)
创建工程时,CANape.INI文件会表征系统的硬件布局。
打开CANape会默认弹出工程Project菜单,点击“New”→输入工程名,这个名称也会是所有工程文件所在的文件夹名。
![](https://img-blog.csdnimg.cn/img_convert/39d87987ba6e3a227374707f3e6eb37d.jpeg)
![](https://img-home.csdnimg.cn/images/20230724024159.png?origin_url=data%3Aimage%2Fsvg%2Bxml%3Butf8%2C%3Csvg%20xmlns%3D'http%3A%2F%2Fwww.w3.org%2F2000%2Fsvg'%20width%3D'970'%20height%3D'427'%3E%3C%2Fsvg%3E&pos_id=img-Hw3EJClL-1718288900533%29)
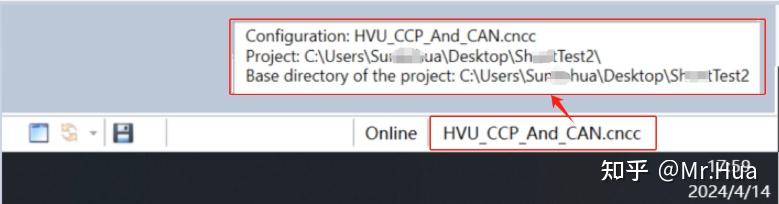
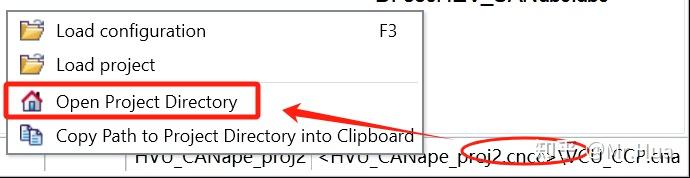
在CANape主界面状态栏右下角是工程文件名**.cnc,鼠标放到上面会弹出悬浮窗提示工程项目的名称、配置和主路径等信息。右击该处→“Open Project Directory”可以打开工程文件夹。此时文件夹下将只有CANape.INI文件。【我的CANape点击这个按钮会崩溃】
![](https://img-blog.csdnimg.cn/img_convert/a2843d0f0b517cf0cb0f36581b6377ca.jpeg)
![](https://img-home.csdnimg.cn/images/20230724024159.png?origin_url=data%3Aimage%2Fsvg%2Bxml%3Butf8%2C%3Csvg%20xmlns%3D'http%3A%2F%2Fwww.w3.org%2F2000%2Fsvg'%20width%3D'779'%20height%3D'204'%3E%3C%2Fsvg%3E&pos_id=img-G1i2QMFn-1718288901588%29)
![](https://img-blog.csdnimg.cn/img_convert/4ba8df6835e61e5e00651de2e203f7f1.jpeg)
![](https://img-home.csdnimg.cn/images/20230724024159.png?origin_url=data%3Aimage%2Fsvg%2Bxml%3Butf8%2C%3Csvg%20xmlns%3D'http%3A%2F%2Fwww.w3.org%2F2000%2Fsvg'%20width%3D'690'%20height%3D'178'%3E%3C%2Fsvg%3E&pos_id=img-F9UJjXeT-1718288901963%29)
- 新建设备
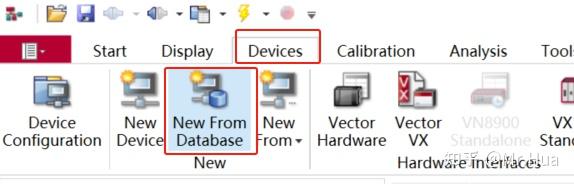
新建设备前最好将数据库文件拷贝到工程文件夹下。然后点击【Device】菜单→“New From database”。
![](https://img-blog.csdnimg.cn/img_convert/3b1c3e58093f20b9b1d398965ed8cad1.jpeg)
![](https://img-home.csdnimg.cn/images/20230724024159.png?origin_url=data%3Aimage%2Fsvg%2Bxml%3Butf8%2C%3Csvg%20xmlns%3D'http%3A%2F%2Fwww.w3.org%2F2000%2Fsvg'%20width%3D'574'%20height%3D'184'%3E%3C%2Fsvg%3E&pos_id=img-4O0dpxxV-1718288902405%29)
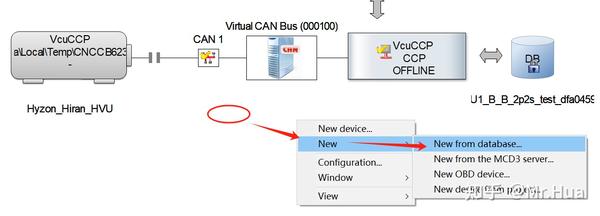
或者在Device窗口空白处右击→“New”→“New From database”。依次选择对应的DBC文件,然后选择基于CAN的通信,最后选择硬件通道。
![](https://img-blog.csdnimg.cn/img_convert/6e691734ff3ff8747f4316b27d86c503.jpeg)
![](https://img-home.csdnimg.cn/images/20230724024159.png?origin_url=data%3Aimage%2Fsvg%2Bxml%3Butf8%2C%3Csvg%20xmlns%3D'http%3A%2F%2Fwww.w3.org%2F2000%2Fsvg'%20width%3D'1230'%20height%3D'442'%3E%3C%2Fsvg%3E&pos_id=img-RtrLiYJr-1718288902801%29)
![](https://img-blog.csdnimg.cn/img_convert/11b30aceb59f56d8f29e6815f38d90a8.jpeg)
![](https://img-home.csdnimg.cn/images/20230724024159.png?origin_url=data%3Aimage%2Fsvg%2Bxml%3Butf8%2C%3Csvg%20xmlns%3D'http%3A%2F%2Fwww.w3.org%2F2000%2Fsvg'%20width%3D'1132'%20height%3D'352'%3E%3C%2Fsvg%3E&pos_id=img-PS5o98e3-1718288903166%29)
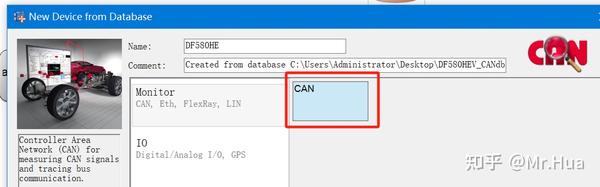
下图选择逻辑CAN通道1,根据前面Vector Hardware Manager应用中的通道设置,这将连接到VN1610的硬件通道1。
![](https://img-blog.csdnimg.cn/img_convert/544d31bb4715412dec9979a1557c1c52.jpeg)
![](https://img-home.csdnimg.cn/images/20230724024159.png?origin_url=data%3Aimage%2Fsvg%2Bxml%3Butf8%2C%3Csvg%20xmlns%3D'http%3A%2F%2Fwww.w3.org%2F2000%2Fsvg'%20width%3D'1089'%20height%3D'667'%3E%3C%2Fsvg%3E&pos_id=img-Vq916sm1-1718288903590%29)
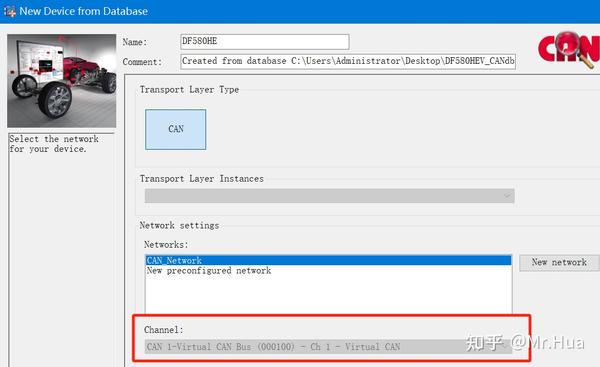
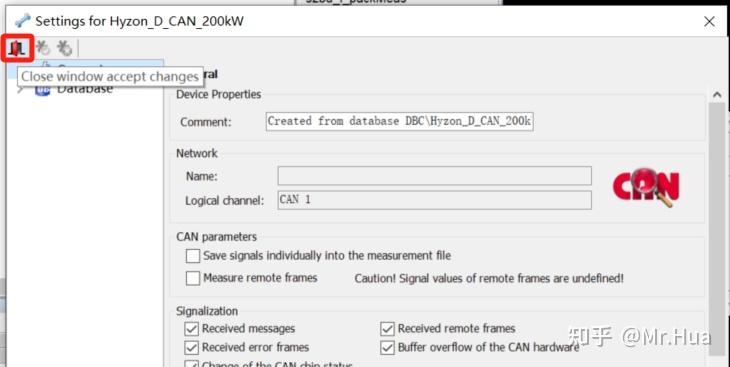
点击OK会弹出确认对话窗,点击左上角的“close windows and accept changes”即可。
![](https://img-blog.csdnimg.cn/img_convert/9e2fa088c4557b13ecc8406f32a4a677.jpeg)
![](https://img-home.csdnimg.cn/images/20230724024159.png?origin_url=data%3Aimage%2Fsvg%2Bxml%3Butf8%2C%3Csvg%20xmlns%3D'http%3A%2F%2Fwww.w3.org%2F2000%2Fsvg'%20width%3D'730'%20height%3D'367'%3E%3C%2Fsvg%3E&pos_id=img-IRfemqav-1718288903952%29)
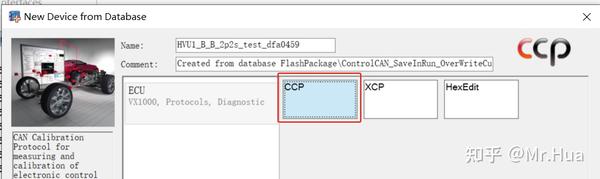
同理可以新建CCP标定设备。在选择A2L文件后,会自动弹出选择CCP或XCP作为通讯方式。
![](https://img-blog.csdnimg.cn/img_convert/5a740373750eaf9f7134af6470bcffee.jpeg)
![](https://img-home.csdnimg.cn/images/20230724024159.png?origin_url=data%3Aimage%2Fsvg%2Bxml%3Butf8%2C%3Csvg%20xmlns%3D'http%3A%2F%2Fwww.w3.org%2F2000%2Fsvg'%20width%3D'958'%20height%3D'286'%3E%3C%2Fsvg%3E&pos_id=img-09QADatt-1718288904567%29)
新建完的设备会自动显示在左侧Explorer浏览器中。CCP设备和XCP设备都会在浏览器显示一个“显示器”图标,而在设备窗口则显示为一个控制器。对于在线的设备显示
![](https://img-blog.csdnimg.cn/img_convert/92f75804673245c3202b69c067b2ad10.png)
![](https://img-home.csdnimg.cn/images/20230724024159.png?origin_url=data%3Aimage%2Fsvg%2Bxml%3Butf8%2C%3Csvg%20xmlns%3D'http%3A%2F%2Fwww.w3.org%2F2000%2Fsvg'%20width%3D'27'%20height%3D'25'%3E%3C%2Fsvg%3E&pos_id=img-hyHP6mHh-1718288904998%29)
图标(上位机已通过CANape与ECU通信);不在线的设备显示
![](https://img-blog.csdnimg.cn/img_convert/552e990210c1b7185f0860e37d47ad24.png)
![](https://img-home.csdnimg.cn/images/20230724024159.png?origin_url=data%3Aimage%2Fsvg%2Bxml%3Butf8%2C%3Csvg%20xmlns%3D'http%3A%2F%2Fwww.w3.org%2F2000%2Fsvg'%20width%3D'27'%20height%3D'25'%3E%3C%2Fsvg%3E&pos_id=img-hyHP6mHh-1718288904998%29)
图标。