ROS学习笔记62《arduino Servo Controller Example》

本教程介绍如何使用Arduino和rosserial基于ROS控制R/C 。

这可用于控制release mechanism,廉价机器人手臂,ROS动力两足动物或任何需要廉价执行器的地方。

提供的代码是一个非常基本的例子,显示了对单个可爱伺服的控制。

1 硬件

arduino_servo.png

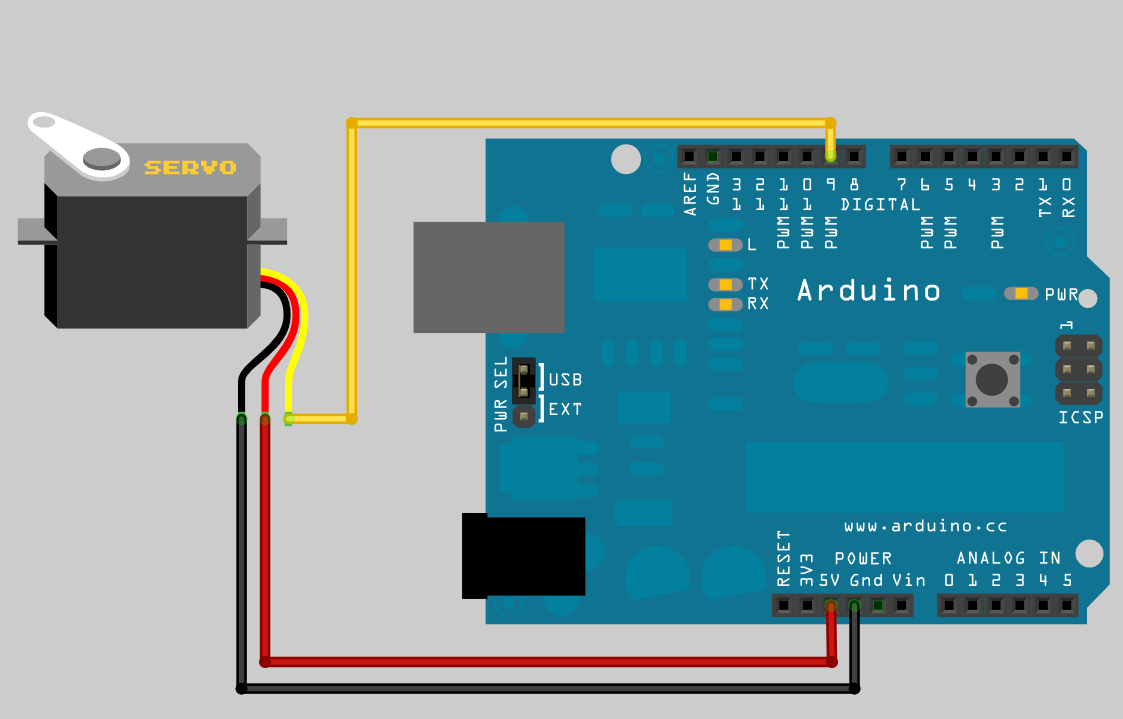
这个例子假设你有一个Arduino和一个r/c servo。r/c servo可以从当地的爱好商店,TowerhobbiesSparkfun等等购买。

伺服遥控器是很棒的小型执行器,因为它们比较便宜(低至10美元),不过包含齿轮箱和电机控制电子设备。

它们通过每20毫秒发送1-2毫秒宽的方波脉冲来控制。

这通常会使伺服臂从0-180度转动。伺服系统有各种尺寸,扭矩和角度精度。

2 程序

通过使用Arduino Servo库,本教程的程序变得非常简单。该伺服库处理所有low level的控制的生成,并维持伺服脉冲。

您需要做的所有代码都是指定伺服器所连接的引脚,然后将角度写入伺服对象。

在下面,Servo库使用Arduino的内置定时器中断来生成正确的脉冲。

在这个例子中,我们只控制一个伺服,但是同一个库可以用来控制大多数Arduino板上的12个伺服器和Arduino Mega上的48个伺服器。

/*
 * rosserial Servo Control Example
 *
 * This sketch demonstrates the control of hobby R/C servos
 * using ROS and the arduiono
 * 
 * For the full tutorial write up, visit
 * www.ros.org/wiki/rosserial_arduino_demos
 *
 * For more information on the Arduino Servo Library
 * Checkout :
 * http://www.arduino.cc/en/Reference/Servo
 */

#if defined(ARDUINO) && ARDUINO >= 100
  #include "Arduino.h"
#else
  #include <WProgram.h>
#endif

#include <Servo.h> 
#include <ros.h>
#include <std_msgs/UInt16.h>

ros::NodeHandle  nh;

Servo servo;

void servo_cb( const std_msgs::UInt16& cmd_msg){
  servo.write(cmd_msg.data); //set servo angle, should be from 0-180  
  digitalWrite(13, HIGH-digitalRead(13));  //toggle led  
}


ros::Subscriber<std_msgs::UInt16> sub("servo", servo_cb);

void setup(){
  pinMode(13, OUTPUT);

  nh.initNode();
  nh.subscribe(sub);
  
  servo.attach(9); //attach it to pin 9
}

void loop(){
  nh.spinOnce();
  delay(1);
}


关键地方是,增加全局Servo对象,连接到正确的Arduino引脚,在每个伺服订阅主题,调用回调函数,写入一个新的角度到Servo对象。

这个程序可以参考《》基于ROS系统使用Arduino控制舵机》https://blog.csdn.net/qq_27806947/article/details/83153934

3 测试

首先,在他们自己的终端窗口中启动你的roscore和rosserial python节点。

roscore
rosrun rosserial_python serial_node.py /dev/ttyACM0

现在,在一个新的终端窗口中,使用rostopic pub来控制你的伺服!只需指定0-180的角度并观察它的移动。


rostopic pub servo std_msgs/UInt16  <angle>
Chapter 1, Getting Started with Arduino, introduces the reader to the Arduino platform, beginning with acquiring the necessary components and installing the software to write your frst program and see the magic begin. Chapter 2, Digital Ruler, brings in commonly used Arduino-friendly components such as an ultrasound sensor and a small programmable LCD panel, and puts them together to create a digital ruler, which is capable of measuring distances using the sensor and displaying them in real time on the LCD screen. Chapter 3, Converting Finger Gestures to Text, makes use of a relatively new line of sensors such as a fully functional touch sensor. The basic algorithms are taught that allow the Arduino to translate fnger gestures into corresponding characters that are then displayed graphically using a commonly used software called Processing. Chapter 4, Burglar Alarm – Part 1, introduces the reader to using PIR sensors or motion sensors, implementing a remote camera with Arduino, and linking the Arduino to a smart phone. Additionally, the reader will learn about Python and how it interfaces with Arduino. Chapter 5, Burglar Alarm – Part 2, combines the elements learned in the preceding project with a project that uses a sensor to detect motion at an entry point, which triggers a security camera to take the intruder's photo via Bluetooth and sends that image to your smart phone. Chapter 6, Home Automation – Part 1, follows the sophisticated security system's path. This chapter involves connecting the Arduino to the Wi-Fi network using an electro-magnetic switch called a relay to control an electric appliance and communicating to it using Telnet. Chapter 7, Home Automation – Part 2, uses the Arduino to create a simple home automation system operating within the bounds of the Wi-Fi that would allow the user to control an appliance using a computer, smart phone, and their voice. Chapter 8, Robot Dog – Part 1, revolves around building a four-legged robot dog from scratch. This part teaches you about the Arduino MEGA board, servos, and stand-alone power requirements for the board. Chapter 9, Robot Dog – Part 2, involves using household items to build the chassis of the dog and then completing the circuit using the Arduino MEGA board and a lot of servos. This is where the bulk of the actual construction of the robot dog lies. Chapter 10, Robot Dog – Part 3, acts as the icing on the cake. The reader will fnally fnish building the robot and will learn to calibrate and teach (program) the robot to stand, walk, and play. Also, fnally, speech recognition will be implemented so that the dog can actually listen to the user.
评论
添加红包

请填写红包祝福语或标题

红包个数最小为10个

红包金额最低5元

当前余额3.43前往充值 >
需支付:10.00
成就一亿技术人!
领取后你会自动成为博主和红包主的粉丝 规则
hope_wisdom
发出的红包
实付
使用余额支付
点击重新获取
扫码支付
钱包余额 0

抵扣说明:

1.余额是钱包充值的虚拟货币,按照1:1的比例进行支付金额的抵扣。
2.余额无法直接购买下载,可以购买VIP、付费专栏及课程。

余额充值