HoloLens开发学习记录--- 4.Gesture手势操作( 导航旋转 + 点击手势时的指示器 [不同于方向指示器] + 拖拽)

创建一个新的 Unity 项目 ,初始化项目:   

一,前期界面操作

1.导入 MRTK 包

2.应用项目设置为 MR 项目

3.使用 HoloLensCamera 替代默认相机

4.添加 CursorWithFeedback

5.添加 InputManager

6.设置 InputManager 的 SimpleSinglePointerSelector 脚本的 Cursor 属性为添加的 CursorWithFeedback

7.添加一个 Cube,位置如下

最终 Hierarchy 结构如下:

8.  创建图片文件夹 -----  拖图片到文件夹下

9. 创建材质文件夹-------新建材质---------并改变材质中的shader -----拖动图片到材质即可

Material_Baby

二,添加自己写的脚本到cube上    (Navigation.cs 导航的脚本  使cube可以旋转)      INavigationHandler接口必须有的四个方法

实现导航旋转手势主要是实现 INavigationHandler 接口,在 OnNavigationUpdated() 方法中改变 Cube 的 Rotate。

using System.Collections;
using System.Collections.Generic;
using UnityEngine;
using HoloToolkit.Unity.InputModule;


public class CubeNavigation : MonoBehaviour,INavigationHandler
{
    [Tooltip("旋转速度")] //设置一个浮动窗口
    public float RotationSensitivity = 10.0f;

    public void OnNavigationCanceled(NavigationEventData eventData)   //选择旋转取消时,输入到“手势输入管理器”InputManger 为空
    {
        InputManager.Instance.PopModalInputHandler();
    }
    public void OnNavigationCompleted(NavigationEventData eventData)  //选择旋转完成时,输入到“手势输入管理器”InputManger 为空
    {
        InputManager.Instance.PopModalInputHandler();
    }
    public void OnNavigationStarted(NavigationEventData eventData)    //选择旋转开始时,输入到“手势输入管理器”InputManger 为当前物体gameObject
    {
        InputManager.Instance.PushModalInputHandler(gameObject);
    }
    public void OnNavigationUpdated(NavigationEventData eventData)   //选择旋转正在更新时,输入到“手势输入管理器”InputManger 为当前物体gameObject
    {
        // 计算旋转值,其中:eventData的CumulativeDelta返回手势导航差值,值域[-1, 1]
        float rotationFactor = eventData.CumulativeDelta.x * RotationSensitivity;
        transform.Rotate(new Vector3(0, -1 * rotationFactor, 0));
    }
}

三,Hand Guidance实现一个当手势快要超出检测范围时,给出提示的效果。[手的指示器]

[真机运行:当射线检测不到物体时,手势又处于点击状态,则显示出可以旋转的物体的方位在何处]

1.在 Hierarchy 创建一个空的 gameObject 并重命名为 HandGuidanceManager,为其添加 MRTK 的 HandGuidance.cs 脚本。

2.设置该脚本的 Cursor 属性为 Hierarchy 中的 CursorWithFeedback,设置其 HandGuidanceIndicator 属性为 MRTK 中的 HeadsUpDirectionIndicatorPointer。

3.HandGuidanceThreshold 属性含义是:当开始显示手动导航指示器时。1不在视图中,0在视图中居中。


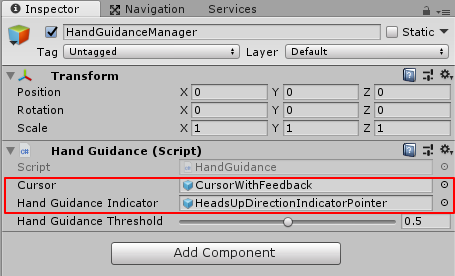
四, 添加拖拽脚本,实现拖拽移动(CubeManipulation.cs 操纵脚本,使cube可以拖拽)

新建一个脚本 CubeManipulation.cs,并将其添加到 Cube 上。IManipulationHandler手势拖拽接口必须有四个方法

using System.Collections;
using System.Collections.Generic;
using UnityEngine;
using HoloToolkit.Unity.InputModule;

public class CubeManipulation : MonoBehaviour , IManipulationHandler
{
    //cube 移动前的位置
    private Vector3 OrigiPosition;

    public void OnManipulationCanceled(ManipulationEventData eventData)
    {
        InputManager.Instance.PopModalInputHandler();
    }
    public void OnManipulationCompleted(ManipulationEventData eventData)
    {
        InputManager.Instance.PopModalInputHandler();
    }
    public void OnManipulationStarted(ManipulationEventData eventData)
    {
        InputManager.Instance.PushModalInputHandler(gameObject);
        //开始移动前,保存Cube原始位置
        OrigiPosition = transform.position;
    }
    public void OnManipulationUpdated(ManipulationEventData eventData)
    {
        transform.position = OrigiPosition + eventData.CumulativeDelta;
    }
}


  • 0
    点赞
  • 2
    收藏
    觉得还不错? 一键收藏
  • 0
    评论
以下是使用 OpenCV-Python 识别图片中石头剪刀布手势的代码: ```python import cv2 import numpy as np # 定义手势识别函数 def recognize_gesture(hand): # 将手势图像转换为灰度图像 gray = cv2.cvtColor(hand, cv2.COLOR_BGR2GRAY) # 对灰度图像进行高斯模糊 blur = cv2.GaussianBlur(gray, (5, 5), ) # 进行二值化处理 ret, thresh = cv2.threshold(blur, , 255, cv2.THRESH_BINARY+cv2.THRESH_OTSU) # 查找轮廓 contours, hierarchy = cv2.findContours(thresh, cv2.RETR_TREE, cv2.CHAIN_APPROX_SIMPLE) # 如果没有找到轮廓,则返回 None if len(contours) == : return None # 找到最大的轮廓 max_contour = max(contours, key=cv2.contourArea) # 计算轮廓的凸包 hull = cv2.convexHull(max_contour) # 计算轮廓的缺陷 defects = cv2.convexityDefects(max_contour, cv2.convexHull(max_contour, returnPoints=False)) # 如果没有找到缺陷,则返回 None if defects is None: return None # 计算缺陷的数量 num_defects = for i in range(defects.shape[]): s, e, f, d = defects[i, ] start = tuple(max_contour[s][]) end = tuple(max_contour[e][]) far = tuple(max_contour[f][]) # 计算缺陷的角度 angle = np.degrees(np.arctan2(far[1]-start[1], far[]-start[]) - np.arctan2(end[1]-start[1], end[]-start[])) # 如果角度小于 90 度,并且距离大于 30 像素,则认为是一个缺陷 if angle < 90 and d > 30: num_defects += 1 # 如果缺陷的数量为 ,则认为是石头 if num_defects == : return "rock" # 如果缺陷的数量为 1 或 2,则认为是剪刀 elif num_defects == 1 or num_defects == 2: return "scissors" # 如果缺陷的数量大于 2,则认为是布 else: return "paper" # 加载图像 img = cv2.imread("gesture.jpg") # 调整图像大小 img = cv2.resize(img, (640, 480)) # 获取图像的高度和宽度 height, width = img.shape[:2] # 将图像转换为 HSV 颜色空间 hsv = cv2.cvtColor(img, cv2.COLOR_BGR2HSV) # 定义 HSV 颜色范围 lower_skin = np.array([, 20, 70], dtype=np.uint8) upper_skin = np.array([20, 255, 255], dtype=np.uint8) # 对图像进行颜色过滤 mask = cv2.inRange(hsv, lower_skin, upper_skin) # 对图像进行形态学操作 kernel = np.ones((5, 5), np.uint8) mask = cv2.erode(mask, kernel, iterations=1) mask = cv2.dilate(mask, kernel, iterations=1) # 查找轮廓 contours, hierarchy = cv2.findContours(mask, cv2.RETR_TREE, cv2.CHAIN_APPROX_SIMPLE) # 如果没有找到轮廓,则返回 None if len(contours) == : print("No hand detected") else: # 找到最大的轮廓 max_contour = max(contours, key=cv2.contourArea) # 计算轮廓的凸包 hull = cv2.convexHull(max_contour) # 绘制凸包 cv2.drawContours(img, [hull], -1, (, 255, ), 2) # 获取凸包的矩形 x, y, w, h = cv2.boundingRect(hull) # 绘制矩形 cv2.rectangle(img, (x, y), (x+w, y+h), (, , 255), 2) # 获取手势图像 hand = img[y:y+h, x:x+w] # 如果手势图像的高度或宽度小于 50 像素,则认为手势不明确 if hand.shape[] < 50 or hand.shape[1] < 50: print("Gesture not clear") else: # 调用手势识别函数 gesture = recognize_gesture(hand) # 如果识别结果为 None,则认为手势不明确 if gesture is None: print("Gesture not clear") else: # 输出识别结果 print("Gesture:", gesture) # 显示图像 cv2.imshow("Image", img) cv2.waitKey() cv2.destroyAllWindows() ``` 注意:以上代码仅供参考,实际应用中可能需要根据具体情况进行调整和优化。

“相关推荐”对你有帮助么?

  • 非常没帮助
  • 没帮助
  • 一般
  • 有帮助
  • 非常有帮助
提交
评论
添加红包

请填写红包祝福语或标题

红包个数最小为10个

红包金额最低5元

当前余额3.43前往充值 >
需支付:10.00
成就一亿技术人!
领取后你会自动成为博主和红包主的粉丝 规则
hope_wisdom
发出的红包
实付
使用余额支付
点击重新获取
扫码支付
钱包余额 0

抵扣说明:

1.余额是钱包充值的虚拟货币,按照1:1的比例进行支付金额的抵扣。
2.余额无法直接购买下载,可以购买VIP、付费专栏及课程。

余额充值