


前几天有个朋友说她心中热爱科研的那团火不灭,而我心中的火早已熄灭,所以我选择“闭眼挣钱”。今天分享的是上周五闭眼谈的项目,结果客户不见了。估计客户找到了便宜的吧。虽然客户跑了,但是我流程也跑了,还学到了点点东西,分享出来。
这是我分析的第二个单细胞数据,可能由于经验不足,本文有错误地方,请自行甄别。
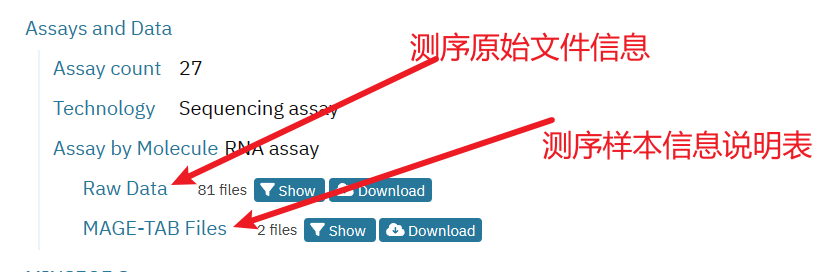
数据介绍与下载
数据是来自ArrayExpress的E-MTAB-7895https://www.ebi.ac.uk/biostudies/arrayexpress/studies/E-MTAB-7895?query=E-MTAB-7895项目。一个小鼠心脏损伤的10X genomics 单细胞测序数据。一共27组测序结果,81个fastq文件。
下载原始数据
点击原始数据右侧的Download 下载,根据习惯选择下载方式,我这里选择的Aspera。
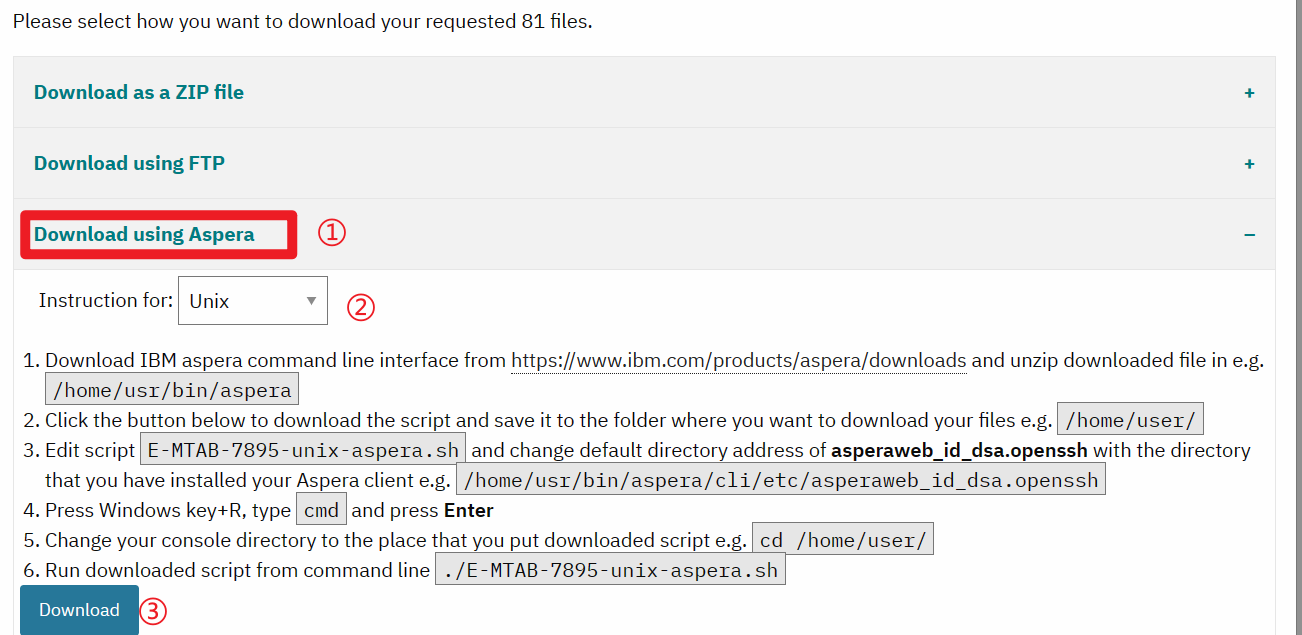
下载下来脚本为E-MTAB-7895-unix-aspera.sh。虽然我选择了Unix模式的脚本,但是下载下来密钥脚本路径依然是C: 开头,这里修该下代码,将其下载到Raw_data 文件夹中。
$ cat E-MTAB-7895-unix-aspera.sh |sed -e 's/"C:\/aspera\/cli\/etc\/asperaweb_id_dsa.openssh"/~\/\.aspera\/connect\/etc\/asperaweb_id_dsa.openssh  -vQT -l 500m -k 1/g' > run_download.sh
$ bash run_download.sh
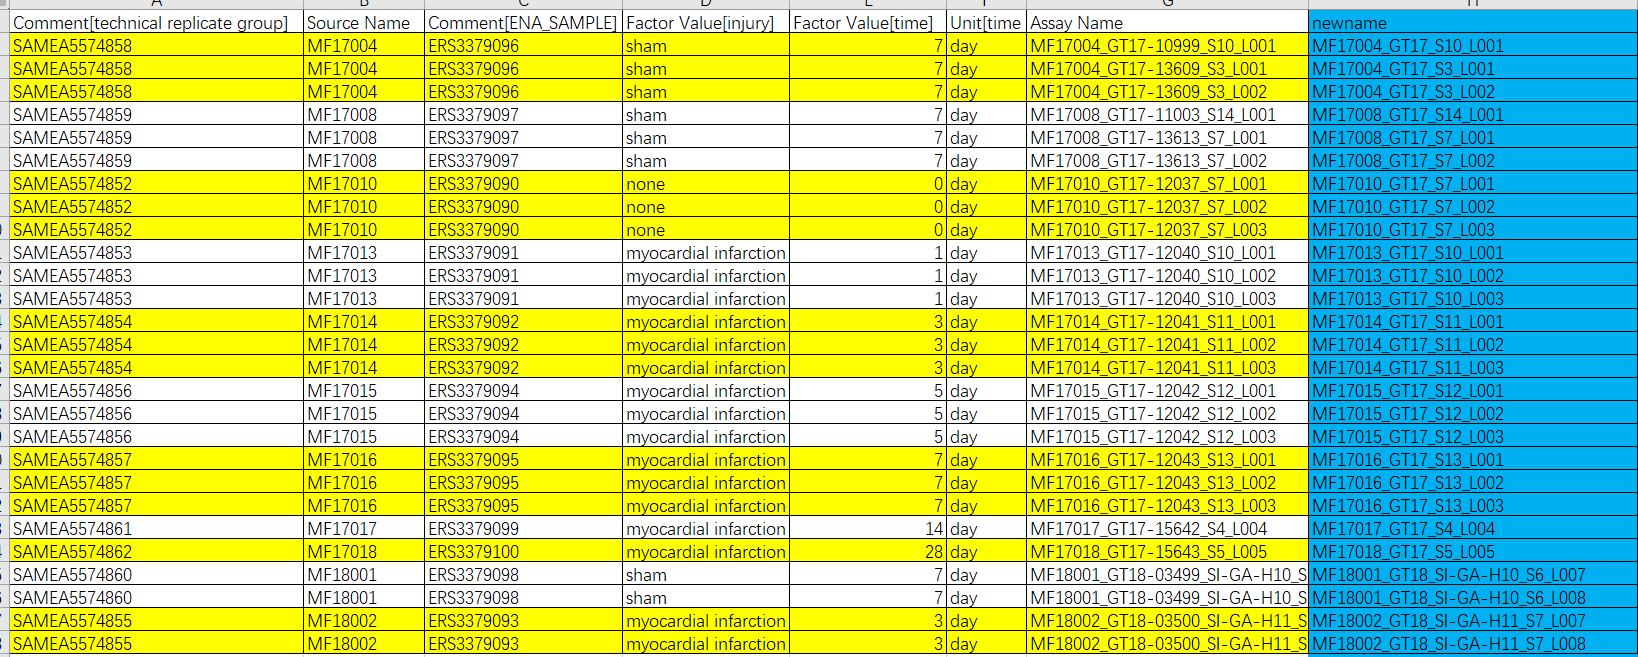
样本信息表同样方式下载。里面包含样本信息表,类似ENA,包含ftp链接,公共数据库编号(ERR编号)和实验处理时间。
根据信息表和文章可知,该项目数据中存在技术重复。
瞄一眼样本文件名称,部分如下:
MF17004_GT17-10999_S10_L001_I1_001.fastq.gz
MF17004_GT17-10999_S10_L001_R1_001.fastq.gz
MF17004_GT17-10999_S10_L001_R2_001.fastq.gz
MF17004_GT17-13609_S3_L001_I1_001.fastq.gz
MF17004_GT17-13609_S3_L001_R1_001.fastq.gz
MF17004_GT17-13609_S3_L001_R2_001.fastq.gz
MF17004_GT17-13609_S3_L002_I1_001.fastq.gz
MF17004_GT17-13609_S3_L002_R1_001.fastq.gz
MF17004_GT17-13609_S3_L002_R2_001.fastq.gz
下载下来的文件即为命名好的测序文件。这种下载方式跟便捷,但是找不到原文件MD5值文件,不过可以根据样本信息表中的ERR编号从ENA获取md5文件用于校验。
官网1展示示例名称如下:
[Sample Name]_S1_L00[Lane Number]_[Read Type]_001.fastq.gz
Where Read Type is one of:
I1: Sample index read (optional)I2: Sample index read (optional)R1: Read 1R2: Read 2
可以看到文件名称仅凭S前面的[Sample Name] 在本次分析中无法区分样品,而且由于cellranger count 中的--sample选项是根据[Sample Name] 识别样本文件。所以这里需要把不同的样本加以区分,这里我选择将不同的样本放到各自的文件夹中。
重命名
根据信息表中技术重复,讲有技术重复的数据的[Sample Name] 部分修改为一致。利用sed进行测试修改命名的命令。
$ ls *fastq.gz |sed 's/-[0-9]\+//g'
MF17004_GT17_S10_L001_I1_001.fastq.gz
MF17004_GT17_S10_L001_R1_001.fastq.gz
MF17004_GT17_S10_L001_R2_001.fastq.gz
MF17004_GT17_S3_L001_I1_001.fastq.gz
MF17004_GT17_S3_L001_R1_001.fastq.gz
MF17004_GT17_S3_L001_R2_001.fastq.gz
MF17004_GT17_S3_L002_I1_001.fastq.gz
MF17004_GT17_S3_L002_R1_001.fastq.gz
MF17004_GT17_S3_L002_R2_001.fastq.gz
重命名
for i in  *fastq.gz; do
new=$(echo $i |sed 's/-[0-9]\+//g')
# echo $new
mv $i $new
done
部分新文件名如下:
MF17004_GT17_S10_L001_I1_001.fastq.gz
MF17004_GT17_S10_L001_R1_001.fastq.gz
MF17004_GT17_S10_L001_R2_001.fastq.gz
MF17004_GT17_S3_L001_I1_001.fastq.gz
MF17004_GT17_S3_L001_R1_001.fastq.gz
MF17004_GT17_S3_L001_R2_001.fastq.gz
MF17004_GT17_S3_L002_I1_001.fastq.gz
MF17004_GT17_S3_L002_R1_001.fastq.gz
MF17004_GT17_S3_L002_R2_001.fastq.gz
构建参考基因组
ENSEMBL下载GRCm39.110 版本数据用于分析。
查看小鼠基因组中的gene_biotype 。直接写成cellranger mkgtf需要的模式,便于复制。
$ cat Mus_musculus.GRCm39.110.gtf |grep -w gene |grep -o 'gene_biotype.*' |sort |uniq |sed  -e 's/";//g' -e 's/ "/:/g' | awk '{print "   --attribute="$1" \\"}'
   --attribute=gene_biotype:IG_C_gene \
   --attribute=gene_biotype:IG_C_pseudogene \
   --attribute=gene_biotype:IG_D_gene \
   --attribute=gene_biotype:IG_D_pseudogene \
   --attribute=gene_biotype:IG_J_gene \
   --attribute=gene_biotype:IG_LV_gene \
   --attribute=gene_biotype:IG_pseudogene \
   --attribute=gene_biotype:IG_V_gene \
   --attribute=gene_biotype:IG_V_pseudogene \
   --attribute=gene_biotype:lncRNA \
   --attribute=gene_biotype:miRNA \
   --attribute=gene_biotype:misc_RNA \
   --attribute=gene_biotype:Mt_rRNA \ # 删除
   --attribute=gene_biotype:Mt_tRNA \  # 删除
   --attribute=gene_biotype:processed_pseudogene \
   --attribute=gene_biotype:protein_coding \
   --attribute=gene_biotype:pseudogene \
   --attribute=gene_biotype:ribozyme \
   --attribute=gene_biotype:rRNA \
   --attribute=gene_biotype:scaRNA \
   --attribute=gene_biotype:scRNA \
   --attribute=gene_biotype:snoRNA \
   --attribute=gene_biotype:snRNA \
   --attribute=gene_biotype:sRNA \
   --attribute=gene_biotype:TEC \
   --attribute=gene_biotype:transcribed_processed_pseudogene \
   --attribute=gene_biotype:transcribed_unitary_pseudogene \
   --attribute=gene_biotype:transcribed_unprocessed_pseudogene \
   --attribute=gene_biotype:translated_unprocessed_pseudogene \
   --attribute=gene_biotype:TR_C_gene \
   --attribute=gene_biotype:TR_D_gene \
   --attribute=gene_biotype:TR_J_gene \
   --attribute=gene_biotype:TR_J_pseudogene \
   --attribute=gene_biotype:TR_V_gene \
   --attribute=gene_biotype:TR_V_pseudogene \
   --attribute=gene_biotype:unitary_pseudogene \
   --attribute=gene_biotype:unprocessed_pseudogene \ # 删掉最后一个\
选择需要的gene_biotype 用于过滤gtf。其实我根本不知道大家为什么选择这些类型,只知道是要保留可能有polyA尾类型的基因,这里算是人云亦云了。
cellranger mkgtf \
	Mus_musculus.GRCm39.110.gtf  \
	Mus_musculus.GRCm39.110.filter.gtf  \
	--attribute=gene_biotype:protein_coding \
    --attribute=gene_biotype:lncRNA \
    --attribute=gene_biotype:miRNA \
    --attribute=gene_biotype:IG_C_gene \
    --attribute=gene_biotype:IG_C_pseudogene \
    --attribute=gene_biotype:IG_D_gene \
    --attribute=gene_biotype:IG_D_pseudogene \
    --attribute=gene_biotype:IG_J_gene \
    --attribute=gene_biotype:IG_LV_gene \
    --attribute=gene_biotype:IG_pseudogene \
    --attribute=gene_biotype:IG_V_gene \
    --attribute=gene_biotype:IG_V_pseudogene \
    --attribute=gene_biotype:TR_C_gene \
    --attribute=gene_biotype:TR_D_gene \
    --attribute=gene_biotype:TR_J_gene \
    --attribute=gene_biotype:TR_J_pseudogene \
    --attribute=gene_biotype:TR_V_gene \
    --attribute=gene_biotype:TR_V_pseudogene
对于基因组
nohup cellranger mkref --nthreads  20 \
	--genome=Mus_musculus_GRCm39_110 \
	--fasta=Mus_musculus.GRCm39.dna.primary_assembly.fa \
	--genes=Mus_musculus.GRCm39.110.filter.gtf &
运行
先把不同的样本放入到不同的文件夹中。
这里注意使用>&2 将我们测试的部分作为标准误输出,防止跟我们的脚本命令行部分一起输入到运行脚本中。
ref=/home/data/ssy010/db/scRNA/Mus_musculus_GRCm39_110
raw_data=$PWD/Raw_data/
count_dir=$PWD/Count/
mkdir -p $count_dir

# 获取样品名称[Sample Name]部分
prefix=$(ls $raw_data/*q.gz |sed -e 's/.*\///g' -e 's/_S[0-9]\+_L00[1-9]_[RI][12]_.*//g' |sort |uniq)
# MF17004_GT17
# MF17008_GT17
# MF17010_GT17
# MF17013_GT17
# MF17014_GT17
# MF17015_GT17
# MF17016_GT17
# MF17017_GT17
# MF17018_GT17
# MF18001_GT18_SI-GA-H10
# MF18002_GT18_SI-GA-H11

for i in $prefix ;do

echo "mkdir -p  $count_dir/$i && cellranger count \
--nosecondary \
--localcores=12 \
--localmem=60 \
--no-bam  \
--transcriptome=$ref \
--fastqs=$raw_data \
--output-dir=$count_dir/$i \
--id=$i \
--sample=$i "

done > run_cellranger_count.sh

nohup ParaFly -c run_cellranger_count.sh -CPU 3  -failed_cmds failed.cellranger_count.log &
- –sample Prefix of the filenames of FASTQs to select
限定你选择的样品。
- –id A unique run id and output folder name [a-zA-Z0-9_-]+
输出结果文件夹名称。不太清楚会不会自动创建,所以我这里还是提前创建了下这个文件夹。
- –fastqs Path to input FASTQ data
经验:如果所有分析样品的文件名中有相同[Sample Name] 部分的样品,相同[Sample Name] 部分的样品会自动合并分析得到一个结果。这个可以通过查看web版本报告reads数佐证。
- –output-dir Output the results to this directory
- –transcriptome Path of folder containing 10x-compatible transcriptome reference
- –nosecondary Disable secondary analysis, e.g. clustering. Optional
- –no-bam Set --no-bam to not generate the BAM file. This will reduce the total computation time for the pipestance and the size of the output directory. If unsure, we recommend not to use this option. BAM file could be useful for troubleshooting and downstream analysis
小结
主要是注意文件下载脚本的修改,md5校验思路和将不同样本放入不同的文件夹的处理方式。
经验:如果所有分析样品的文件名中有相同[Sample Name] 部分的样品,相同[Sample Name] 部分的样品会自动合并分析得到一个结果。这个可以通过查看web版本报告reads数佐证。
验证:思路是通过统计reads数。
首先统计cellranger结果中各个metrics_summary.csv结果

通过对R1或R2测序数据的fastqc+multiqc的结果,导出reads结果。这里展示R1部分(R2亦可)统计结果
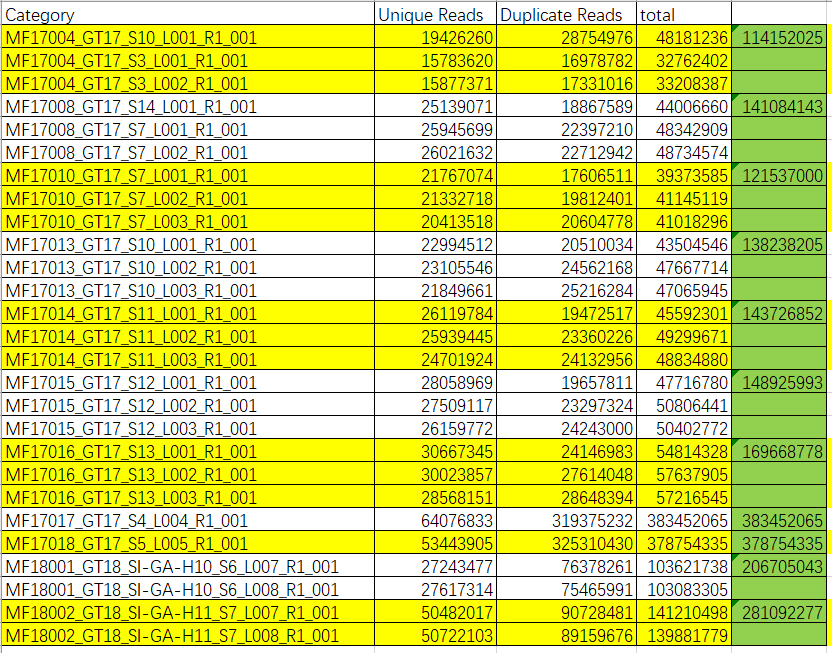
通过比较reads数,可以看到参与cellranger count运算的reads数是合并了技术重复的。不用单独合并技术重复,而是可以通过--sample指定相同前缀即可。省事儿,省空间。
参考
Specifying Input FASTQ Files for 10x Pipelines -Software -Single Cell Gene Expression -Official 10x Genomics Support:https://support.10xgenomics.com/single-cell-gene-expression/software/pipelines/latest/using/fastq-input ↩︎


 1269
1269

 被折叠的 条评论
为什么被折叠?
被折叠的 条评论
为什么被折叠?
 到【灌水乐园】发言


