张量维度的理解

介绍

参考链接1:
参考链接2:

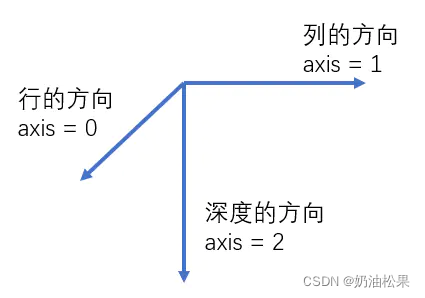
张量的阶数有时也称维度,或者轴axis。
比如矩阵[[1,2],[3,4]],是一个二维张量。

  • 沿着第0个轴可以看到[1,2],[3,4]两个向量
  • 沿着第1个轴可以看到[1,3],[2,4]两个向量。

图示:
在这里插入图片描述

一维张量

const1 = tf.constant([1,2,3,4],tf.float16)

二维张量

# 三行四列
const2 = tf.constant([
	[1,2,3,4],
	[5,6,7,8],
	[9,10,11,12]
],tf.float16)

几何表示:
在这里插入图片描述

三维张量

# 3行4列深度为2
const3 = tf.constant([
	[[1,2],[3,4],[5,6],[7,8]],
	[[11, 12], [13, 14], [15, 16], [17, 18]],
    [[21, 22], [23, 24], [25, 26], [27, 28]]
],tf.float16)
shape = (3,4,2)

几何表示:
在这里插入图片描述

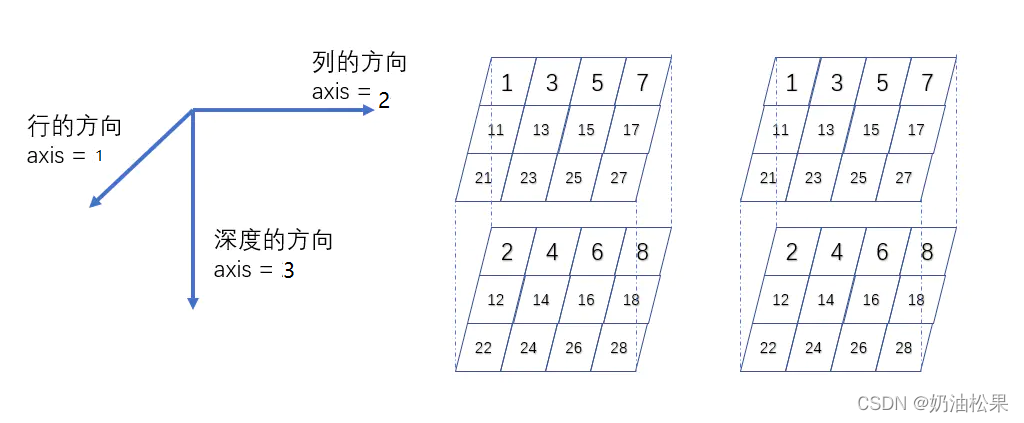
四维张量 (仅用于理解,坐标系已经不再适用)

# 3行4列深度为2
const3 = tf.constant([
	#第一个3行4列深度为2的三维张量
	[[[1,2],[3,4],[5,6],[7,8]],
	[[11, 12], [13, 14], [15, 16], [17, 18]],
    [[21, 22], [23, 24], [25, 26], [27, 28]]],
    #第二个3行4列深度为2的三维张量
    [[[1,2],[3,4],[5,6],[7,8]],
	[[11, 12], [13, 14], [15, 16], [17, 18]],
    [[21, 22], [23, 24], [25, 26], [27, 28]]]
],tf.float16)
shape = (2,3,4,2)

几何表示:
在这里插入图片描述

如何判断张量的batch数、行、列、深度

从左边开始数连续[的数量,最多有X个[说明是X维张量。上面的例子就是4维张量。

小结:

shape属性中的元素大于等于3时,可以用3维空间来理解。
shape=(3, 4, 2)时,表示3行4列深度为2的张量
shape=(2, 3, 4, 2)时,表示有2个 3行4列深度为2的张量
shape=(6, 2, 3, 4, 2)时,表示有6个四维张量,这个四维张量又可以表示为2个 3行4列深度为2的张量。

shape中的属性分别与axis=0,axis=1、axis=2、axis=3……对应,以此类推。当维度超过3时,上图几何中的坐标系表示就已经错误了。但是对于理解多维是有帮助的。

### 关于张量维度的概念及其操作 #### Pandas 和 NumPy 中的标量定义 仅包含一个数字的张量被称为标量(scalar),也称为标量张量、零维张量或 0D 张量。在 NumPy 中,float32 或 float64 类型的单个数值即构成标量张量(或标量数组)。通过 `ndim` 属性可查询 Numpy 张量所具有的轴数量;对于标量而言,其具有 0 个轴(`ndim == 0`)[^3]。 ```python import numpy as np x = np.array(12) print(f"x.ndim: {x.ndim}") print(x) ``` #### TensorFlow中的张量维度变换 在 TensorFlow 中,可以通过 `tf.squeeze()` 函数移除大小为 1 的维度,而利用 `tf.expand_dims()` 则可以在指定位置插入新的单一维度。例如: ```python import tensorflow as tf a = tf.constant([[[1], [2], [3]], [[4], [5], [6]], [[7], [8], [9]]]) s = tf.squeeze(a) d = tf.expand_dims(s, axis=0) tf.print("Original tensor a:", a.shape) # Original tensor a: (3, 3, 1) tf.print("Squeezed tensor s:", s.shape) # Squeezed tensor s: (3, 3) tf.print("Expanded dims of d:", d.shape) # Expanded dims of d: (1, 3, 3)[^1] ``` #### PyTorch中的张量维度变换 同样,在 PyTorch 中也可以执行类似的尺寸调整操作。使用 `.unsqueeze(dim)` 方法增加新维度,并用 `.squeeze(dim)` 来减少不必要的单位维度。 ```python import torch tensor_3x3x1 = torch.rand((3, 3, 1)) tensor_squeezed = tensor_3x3x1.squeeze() tensor_expanded = tensor_squeezed.unsqueeze(0) print("Original tensor size:", tensor_3x3x1.size()) # Output: torch.Size([3, 3, 1]) print("After squeezing the dimensions:", tensor_squeezed.size()) # Output: torch.Size([3, 3]) print("After expanding back one dimension at start:", tensor_expanded.size()) # Output: torch.Size([1, 3, 3])[^4] ``` 上述代码展示了如何在两种不同的框架下处理张量形状的变化,这有助于理解不同库之间相似功能实现方式上的差异以及各自的特点。
评论 6
添加红包

请填写红包祝福语或标题

红包个数最小为10个

红包金额最低5元

当前余额3.43前往充值 >
需支付:10.00
成就一亿技术人!
领取后你会自动成为博主和红包主的粉丝 规则
hope_wisdom
发出的红包
实付
使用余额支付
点击重新获取
扫码支付
钱包余额 0

抵扣说明:

1.余额是钱包充值的虚拟货币,按照1:1的比例进行支付金额的抵扣。
2.余额无法直接购买下载,可以购买VIP、付费专栏及课程。

余额充值