


BLIP-2模型技术学习
前言
最近多模态模型特别火,从头开始学习!在前面写的几篇里面学习了MiniCPM-V、ViT、CLIP和BLIP之后,今天学习一下BLIP-2模型,记录学习过程,主要是模型架构、训练方式和相关源代码的理解。欢迎批评指正,一起学习~~
1 充分利用现有视觉和文本模型的多模态模型
- BLIP2出自Salesforce发表在ICML 2023的论文BLIP-2: Bootstrapping Language-Image Pre-training with Frozen Image Encoders and Large Language Models
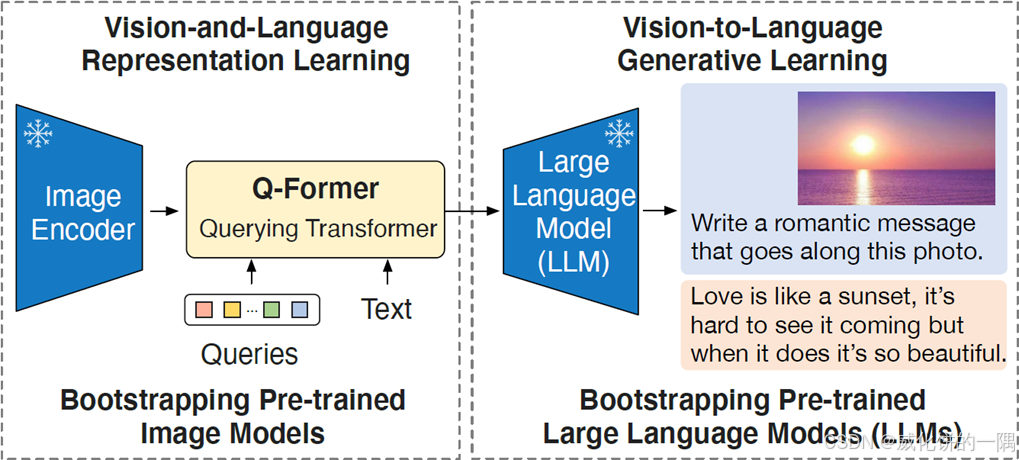
- 通过加入一个Q-Former模块将视觉模块和LLM连接起来,预训练过程中只训练Q-Former,冻结视觉模块和LLM,充分利用现有模型能力【 Q-Former = query + transformer,会训练query和模型本身】
- 包含2个阶段的预训练:(1) 视觉模块+Q-Former,训练Q-Former从图片中提取出和文本最相关的表征;(2) Q-Former+LLM,训练Q-Former产生出能让LLM看得懂的视觉表征
2 Q-Former两阶段的预训练
两阶段的预训练,这两个阶段是同一个Q-Former,先进行第一阶段训练,再进行第二阶段训练,这两个阶段数据流经过的模型不一样。
第一阶段
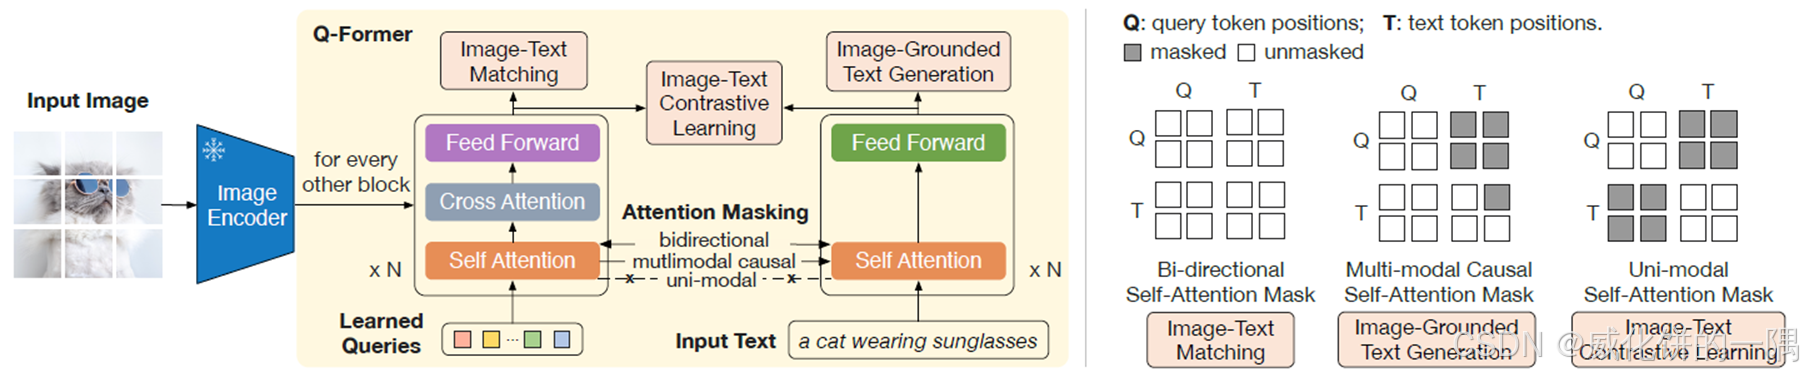
- 第一阶段论文里面的图比较抽象,看着不太容易理解。总而言之,Q-Former接在图像编码器后,Q-Former自身充当文本模型
- 实际上Q-Former就是一个bert,没有2个encoder;左边部分是输入会经过cross-attention层图文直接交互,右边部分没有cross-attention层
- 这一阶段有3个训练loss,和BLIP一致,训练query和模型从图片中提取出和文本最相关的表征:
(1) Image-Text Contrastive Loss (ITC) – 图文对比学习,在隐空间对齐图片编码和文本编码
(2) Image-Text Matching Loss (ITM) - 二分类任务,让模型判断图文是否一致
(3) Image-grounded Text Generation (ITG) - 下一词预测,让模型学会给定图片输出caption
第二阶段
- 第二阶段,Q-Former接在图像编码器后,同时Q-Former的query对应的输出接到LLM上
- 这一个阶段训练Q-Former输出让LLM能看得懂的中间结果,是Language Modeling Loss

3 官方代码结构
官方代码在:https://github.com/salesforce/LAVIS/tree/main/lavis,其中和BLIP-2有关的需要关注:
- 训练脚本:lavis/run_scripts/blip2/train/
- 训练配置: lavis/projects/blip2/train/
- 模型配置(第二阶段模型): lavis/configs/models/blip2/,里面有例如blip2_caption_opt6.7b.yaml
- 模型代码: lavis/models/blip2_models/,关注blip2.py, Q-Former.py, blip2_qformer.py(第1阶段预训练),blip2_opt.py(第2阶段预训练)
训练调用train.py,loss是在每个模型类里面返回的,下载完整项目在pycharm里面看会清晰很多
4 第一阶段预训练loss计算——ITC图文对比学习Loss
4.1 基础数据准备
核心代码在blip2_qfomer.py的forward()函数,同时训练query和bert,这个函数会返回计算的3个loss,首先会获取基础的图片编码和文本编码:
- 图片编码是普通的ViT的编码结果
- 这里的文本编码不是LLM的编码,而是Q-Former的bert模块的编码结果,经过bert的Encoder的self-attention层获得文本编码输出,由于是单文本模态,不经过bert的Encoder的交叉注意力层
image = samples["image"]
text = samples["text_input"]

image_embeds = self.ln_vision(self.visual_encoder(image))  # go through ViT
image_atts = torch.ones(image_embeds.size()[:-1], dtype=torch.long).to(image.device)
text_tokens = self.tokenizer(
    text,
    padding="max_length",
    truncation=True,
    max_length=self.max_txt_len,
    return_tensors="pt",
).to(image.device)
text_output = self.Qformer.bert(
    text_tokens.input_ids,
    attention_mask=text_tokens.attention_mask,
    return_dict=True,
)
text_feat = F.normalize(self.text_proj(text_output.last_hidden_state[:, 0, :]), dim=-1)
4.2 query_output生成
接着获取用query查询图片的输出query_output,用于后面优化query和bert,需要注意:
- query_tokens的默认大小是[1,32,hidden_size],每个图片slice对应长度为num_query_token的query向量
- expand这行代码很关键,是把query复制了batch份,query变成[batch,32,hidden_size],batch内的每个样本是使用同一份query,每1份是共享内存的,只存在1份query;如果改变query_tokens[0],query_tokens每一个索引下内容都会变
query_tokens = self.query_tokens.expand(image_embeds.shape[0], -1, -1)  # encoder_width = ViT feature width

# query见到图片,得到一个输出,普通的交叉注意力,query真的是query,目标是优化query
# query_output的形状和query_tokens一样
query_output = self.Qformer.bert(
    query_embeds=query_tokens,
    encoder_hidden_states=image_embeds,
    encoder_attention_mask=image_atts,
    use_cache=True,
    return_dict=True,
)

# 隐向量维度统一,图片和文本的统一,映射到同一个维度embed_dim
image_feats = F.normalize(self.vision_proj(query_output.last_hidden_state), dim=-1)
上面和一开始文本输入bert不一样,Qformer.bert输出query_output过程中会经过bert的encoder的交叉注意力层:
- 在Qformer.py的BertLayer类中可以看到,每一个layer都会先经过自注意力模块,如果是第0层,hidden_states就是query的embedding,如果在第i(i>0)层,hidden_states就是中间输出
- 当有query_length>0时,有图像时,会计算交叉注意力,query_attention_output取query长度对应的注意力输出,encoder_hidden_states是图像编码,图像编码作为自注意力的key和value
self_attention_outputs = self.attention(
    hidden_states, attention_mask, head_mask,
    output_attentions=output_attentions,
    past_key_value=self_attn_past_key_value,
)
attention_output = self_attention_outputs[0]

if query_length > 0:
    query_attention_output = attention_output[:, :query_length, :]
    if self.has_cross_attention:
        cross_attention_outputs = self.crossattention(
            query_attention_output, attention_mask, head_mask,
            encoder_hidden_states, encoder_attention_mask,
            output_attentions=output_attentions,
        )
        query_attention_output = cross_attention_outputs[0]
4.3 ITC图文对比学习
- 对比学习会计算相似度矩阵,分别计算相似度矩阵按行和按列的相似度,在CLIP和BLIP中都有这样的操作
- 但是在BLIP-2这里会发现做矩阵乘法张量维度是不一样的
image_feats_all = concat_all_gather(image_feats)  # [batch_size, num_query_tokens, embed_dim]
text_feat_all = concat_all_gather(text_feat)  # [batch_size, embed_dim]

sim_q2t = torch.matmul(
    image_feats.unsqueeze(1),  # [batch_size, 1, num_query_tokens, embed_dim]
    text_feat_all.unsqueeze(-1)  # [batch_size, embed_dim, 1]
).squeeze()
# 得到 [batch_size, batch_size, num_query_tokens]

# text-query similarity: [batch_size, batch_size, num_query_tokens]
sim_t2q = torch.matmul(
    text_feat.unsqueeze(1).unsqueeze(1),  # [batch_size, 1, 1, embed_dim]
    image_feats_all.permute(0, 2, 1)  # [batch_size, num_query_tokens, embed_dim]
).squeeze()
具体而言,以query和文本相似度为例,涉及image_feats和text_feat_all的乘法,这两个张量维度不一样。
Pytorch的matmul运算机制会自动把低维度的做维度扩展,先把右边维度对齐,扩左边,左边最前面添加1维,扩展了之后image_feats_expanded第一维大小为batch_size,所以text_feat_all广播到batch_size同样大小,像下面这样:
# 扩展维度
image_feats_expanded = image_feats.unsqueeze(1)  # 形状为 [batch_size, 1, num_query_tokens, embed_dim]
text_feat_all_expanded = text_feat_all.unsqueeze(-1).unsqueeze(0)  # 形状为 [1, batch_size, embed_dim, 1]

# 广播机制 形状为 [batch_size, batch_size, embed_dim, 1]
text_feat_all_expanded = text_feat_all_expanded.expand(batch_size, -1, -1, -1)
有了相似度矩阵后,会计算图文/文图相似度,这里取了query对应的相似度max的元素来计算相似度。
到这里ITC损失计算完毕,因为query和图像一起过的bert,text单独过的bert,它们没有交集,query和text不会互相看见泄露信息,如下面的代码所示:
# image-text similarity: aggregate across all query tokens
sim_i2t, _ = sim_q2t.max(-1)
sim_i2t = sim_i2t / self.temp

# text-image similarity: aggregate across all query tokens
sim_t2i, _ = sim_t2q.max(-1)
sim_t2i = sim_t2i / self.temp  # [batch_size, batch_size*num_gpu]

rank = dist.get_rank()
bs = image.size(0)
targets = torch.linspace(rank * bs, rank * bs + bs - 1, bs, dtype=int).to(image.device)

loss_itc = (
    F.cross_entropy(sim_i2t, targets, label_smoothing=0.1) +
    F.cross_entropy(sim_t2i, targets, label_smoothing=0.1)
) / 2
5 第一阶段预训练loss计算——ITM图文匹配Loss
5.1 正负样本采样
BLIP-2的ITM图文匹配损失计算方式和BLIP一致,相似度矩阵对角线填-10000(对角线文本和图片是对应的,是正例),然后依概率抽负样本:
text_input_ids_world = concat_all_gather(text_tokens.input_ids)
text_attention_mask_world = concat_all_gather(text_tokens.attention_mask)
image_embeds_world = all_gather_with_grad(image_embeds)

sim_t2i[:, :bs].fill_diagonal_(-10000)
sim_i2t[:, :bs].fill_diagonal_(-10000)

weights_t2i = F.softmax(sim_t2i, dim=1)
weights_i2t = F.softmax(sim_i2t, dim=1)

# select a negative image for each text
image_embeds_neg = []
for b in range(bs):
    neg_idx = torch.multinomial(weights_t2i[b], 1).item()
    image_embeds_neg.append(image_embeds_world[neg_idx])
image_embeds_neg = torch.stack(image_embeds_neg, dim=0)

# select a negative text for each image
text_ids_neg = []
text_atts_neg = []
for b in range(bs):
    neg_idx = torch.multinomial(weights_i2t[b], 1).item()
    text_ids_neg.append(text_input_ids_world[neg_idx])
    text_atts_neg.append(text_attention_mask_world[neg_idx])
text_ids_neg = torch.stack(text_ids_neg, dim=0)
text_atts_neg = torch.stack(text_atts_neg, dim=0)
同样,和BLIP一致,会把正负样本填到列表里。但是要注意,这里输入的attention_mask_all 长度涵盖了query和text,因为函数里面后续会把query和text拼接,所以会在下面代码里面先看到这个奇怪的拼接操作:
text_ids_all = torch.cat(
    [text_tokens.input_ids, text_tokens.input_ids, text_ids_neg], dim=0
)  # pos, pos, neg

text_atts_all = torch.cat(
    [text_tokens.attention_mask, text_tokens.attention_mask, text_atts_neg],
    dim=0,
)

query_tokens_itm = self.query_tokens.expand(text_ids_all.shape[0], -1, -1)
query_atts_itm = torch.ones(query_tokens_itm.size()[:-1], dtype=torch.long).to(image.device)
attention_mask_all = torch.cat([query_atts_itm, text_atts_all], dim=1)  # 注意这个mask长度包含了query和text

image_embeds_all = torch.cat(
    [image_embeds, image_embeds_neg, image_embeds], dim=0
)  # pos, neg, pos

image_atts_all = torch.ones(image_embeds_all.size()[:-1], dtype=torch.long).to(
    image.device
)
5.2 ITM的loss计算
有了正负样本,就可以计算ITM的loss,这里面有文本,有query,还有图像编码,取query对应的作为vl_embbeding计算loss:
output_itm = self.Qformer.bert(
    text_ids_all,
    query_embeds=query_tokens_itm,
    attention_mask=attention_mask_all,
    encoder_hidden_states=image_embeds_all,
    encoder_attention_mask=image_atts_all,
    return_dict=True,
)  # [batch_size, 32+seq_len, embed_dim]

vl_embeddings = output_itm.last_hidden_state[:, :query_tokens_itm.size(1), :]
vl_output = self.itm_head(vl_embeddings)
logits = vl_output.mean(dim=1)

itm_labels = torch.cat(
    [torch.ones(bs, dtype=torch.long), torch.zeros(2 * bs, dtype=torch.long)],
    dim=0,
).to(image.device)

loss_itm = F.cross_entropy(logits, itm_labels)
5.3 query、text和image输入流程
query、text和图像编码输入bert的过程有一些复杂,首先是会经过embbeding层:
query_length = query_embeds.shape[1] if query_embeds is not None else 0

# 如果同时有text和query,把query拼接在text前面,并且query的mask是1
embedding_output = self.embeddings(
    input_ids=input_ids,
    position_ids=position_ids,
    query_embeds=query_embeds,
    past_key_values_length=past_key_values_length,
)  # [batch_size, 32+seq_len, embed_dim]
可以看到在embedding层里面做了拼接,把query拼到text前面,这也是前面要在mask里面拼上query这部分长度的原因:
if input_ids is not None:
    embeddings = self.word_embeddings(input_ids)
    if query_embeds is not None:
        embeddings = torch.cat((query_embeds, embeddings), dim=1)
else:
    embeddings = query_embeds

embeddings = self.LayerNorm(embeddings)
embeddings = self.dropout(embeddings)
return embeddings
接着,embedding_output与图像编码encoder_hidden_states一起经过bert的encoder和之前一样
6 第一阶段预训练loss计算——ITG文本生成Loss
6.1 基本流程
- 最后一个是文本生成损失,需要注意mask的形状,以及Qformer的输入
- 输入了text,以及query_output的KV值(这部分有图像信息),基于图像信息解码,没有输入image_embed【Image-grounde并不是说把图片编码一起输进去】,在后面的代码展开部分会看到一个拼接操作嵌入图像信息
decoder_input_ids = text_tokens.input_ids.clone()
decoder_input_ids[:, 0] = self.tokenizer.bos_token_id
labels = decoder_input_ids.masked_fill(
    decoder_input_ids == self.tokenizer.pad_token_id, -100
)

# [batch_size, 32, hidden_size]
query_atts = torch.ones(query_tokens.size()[:-1], dtype=torch.long).to(image.device)

# 用于计算prefix_seq_len = attention_mask.shape[1] - causal_mask.shape[1]
# mask这里需要注意,query不需要生成;
attention_mask = torch.cat([query_atts, text_tokens.attention_mask], dim=1)

# 因为传递的是query的KV,并且会把query_output的key和value拼接在text的key和value前面,后面会看到这部分
# 相当于后面text已经看到了前面的query,在这个函数里面会把query的KV拼接到text的KV前面
lm_output = self.Qformer(
    decoder_input_ids,
    attention_mask=attention_mask,
    past_key_values=query_output.past_key_values,  # 把query_output看到图像的KV,和decoder这里的KV直接拼接,嵌入图像信息
    return_dict=True,
    labels=labels,
)

loss_lm = lm_output.loss
掩码生成部分的代码在Qformer的bert的encoder中,Qformer的forward函数的is_decoder=True,会看到掩码前面有一段全1的prefix_seq_len,后半部分是三角形的causal_mask:
if is_decoder:
    batch_size, seq_length = input_shape  # text.input_id.shape
    seq_ids = torch.arange(seq_length, device=device)
    causal_mask = (seq_ids[None, None, :].repeat(batch_size, seq_length, 1) <= seq_ids[None, :, None])
    # add a prefix ones mask to the causal mask
    # causal and attention masks must have same type with pytorch version < 1.3
    causal_mask = causal_mask.to(attention_mask.dtype)

    if causal_mask.shape[1] < attention_mask.shape[1]:
        prefix_seq_len = attention_mask.shape[1] - causal_mask.shape[1]  # 所以前面attention_mask传了32+len
        causal_mask = torch.cat([
            torch.ones((batch_size, causal_mask.shape[1], prefix_seq_len),
                       device=device, dtype=causal_mask.dtype),
            causal_mask
        ], axis=-1)

    extended_attention_mask = (causal_mask[:, None, :, :] * attention_mask[:, None, None, :])
6.2 图像信息拼接
ITG是Image-grounded的text generation,图片信息不是通过encoder_hidden_stats传递的,而是通过query_output的past_key_value传递的。
前面说到,对于query_output的每一层的key和value,实际上现在会传递到bert的encoder的layer中,和text的KV拼接,实现解码过程中图片信息的嵌入。
# decoder uni-directional self-attention cached key/values tuple is at positions 1,2
self_attn_past_key_value = (
    past_key_value[:2] if past_key_value is not None else None
)

self_attention_outputs = self.attention(
    hidden_states,
    attention_mask,
    head_mask,
    output_attentions=output_attentions,
    past_key_value=self_attn_past_key_value,  # query_output的key和value
)
继续深入,在self-attention层可以看到, query_output的每一层的key和value,拼接在了text的key和value的前面,实现在解码时插入图像相关信息:
elif past_key_value is not None:
    key_layer = self.transpose_for_scores(self.key(hidden_states))
    value_layer = self.transpose_for_scores(self.value(hidden_states))
    key_layer = torch.cat([past_key_value[0], key_layer], dim=2)
    value_layer = torch.cat([past_key_value[1], value_layer], dim=2)
7 第二阶段文本生成Loss计算
- 前一阶段的文本生成是使用Q-Former的bert模块来训练生成,这一阶段是Q-Former+LLM,在blip2_opt.py
- 这一阶段是让Q-Former学会生成能让LLM看懂的视觉特征,只用了Q-Former的query提取图像信息这部分
# 扩展query到与图像嵌入相同的批次大小
query_tokens = self.query_tokens.expand(image_embeds.shape[0], -1, -1)

# 使用Qformer模型的BERT部分对查询token进行编码
query_output = self.Qformer.bert(
    query_embeds=query_tokens,
    encoder_hidden_states=image_embeds,
    encoder_attention_mask=image_atts,
    return_dict=True,
)

# 对查询输出进行投影转换,准备与文本部分结合
inputs_opt = self.opt_proj(query_output.last_hidden_state)  # 视觉部分编码

# 创建注意力掩码,确保所有token都能相互关注
atts_opt = torch.ones(inputs_opt.size()[:-1], dtype=torch.long).to(image.device)

# 设置OPT模型的填充侧为右侧
self.opt_tokenizer.padding_side = "right"

# 处理样本中的文本输入,每个文本后添加换行符
text = [t + "\n" for t in samples["text_input"]]

# 对文本进行编码
opt_tokens = self.opt_tokenizer(
    text,
    return_tensors="pt",
    padding="longest",
    truncation=True,
    max_length=self.max_txt_len,
).to(image.device)

# 创建目标张量,将填充token的位置标记为-100,这样在计算交叉熵时不考虑这些位置
targets = opt_tokens.input_ids.masked_fill(
    opt_tokens.input_ids == self.opt_tokenizer.pad_token_id, -100
)

# 如果存在prompt,则不对其应用损失
if self.prompt:  # prompt不需要生成,例如 'a photo of'
    targets[:, :self.prompt_length] = -100  # 不对提示词部分计算损失
在这一阶段给LLM的输入是视觉和文本编码进行拼接,target是文本caption,所以视觉部分是empty的target,和prompt一样填充-100无需算到cross_entropy里面:
empty_targets = (
    torch.ones(atts_opt.size(), dtype=torch.long).to(image.device).fill_(-100)
)
targets = torch.cat([empty_targets, targets], dim=1)

inputs_embeds = self.opt_model.model.decoder.embed_tokens(opt_tokens.input_ids)
inputs_embeds = torch.cat([inputs_opt, inputs_embeds], dim=1)  # 拼接视觉和文本
attention_mask = torch.cat([atts_opt, opt_tokens.attention_mask], dim=1)

with self.maybe_autocast():
    outputs = self.opt_model(
        inputs_embeds=inputs_embeds,
        attention_mask=attention_mask,
        return_dict=True,
        labels=targets,
    )
loss = outputs.loss


 2173
2173

 被折叠的 条评论
为什么被折叠?
被折叠的 条评论
为什么被折叠?
 到【灌水乐园】发言


