


一、ready-valid接口
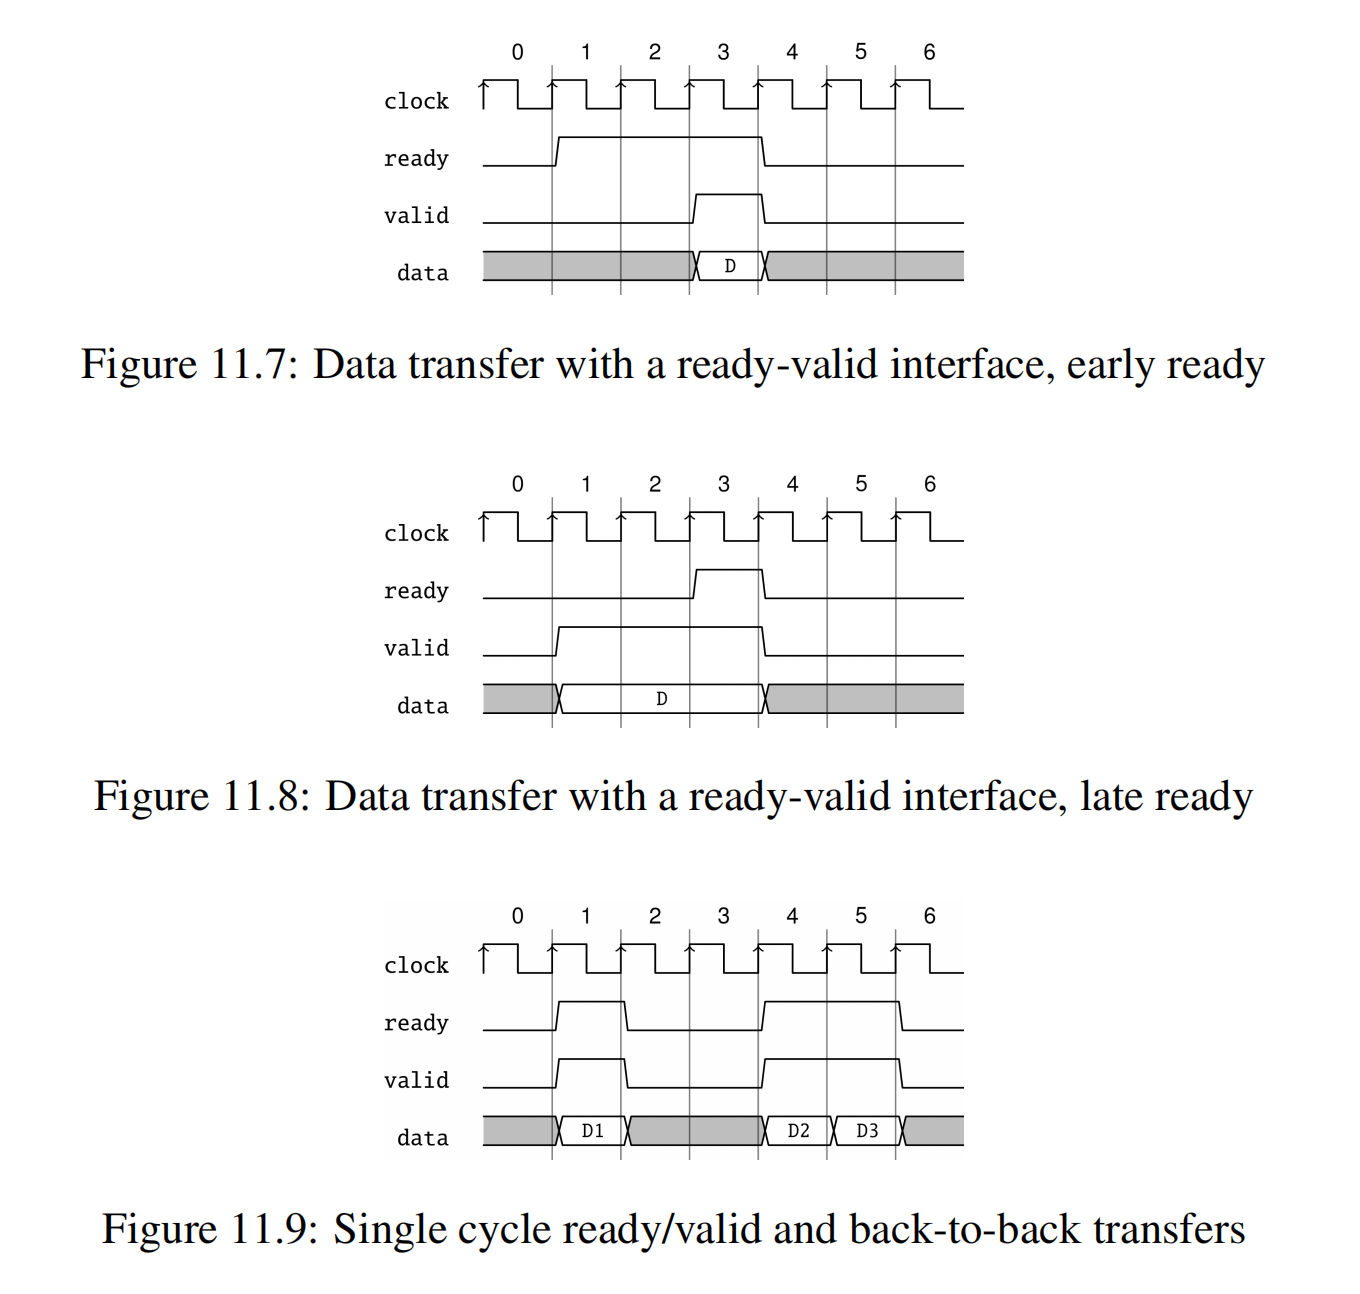
Arbiter和Queue都使用了ready-valid接口,该类型的端口在单一数据信号的基础上又添加了ready和valid信号以使用ready-valid握手协议。它包含3个信号:
- ready:高有效时表示数据接收者
consumer已经准备好接收信号,由consumer驱动。 - valid:高有效时表示数据生产者
producer已经准备好待发送的数据了,由producer驱动。 - bits:是要在producer与consumer之间传输的数据。
需要注意的是,valid和ready信号之间不能存在组合逻辑关系,valid信号应该只依赖于此时的源数据是否有效,ready信号应该只依赖于此时的数据接收者是否准备好接收数据了。当在某个时钟周期,valid和ready同时有效时,数据被视为传输。
创建ready-valid接口很简单,使用单例对象Decoupled即可创建,有以下两种形式:
-
Decoupled(...):可以传入任意的数据类型,然后返回一个ready-valid接口,此时ready是input信号,valid和bits都是output信号。因此它是属于数据生产者producer的端口。 -
Flipped(Decoupled(...)):Flipped()会将ready-valid接口的信号方向进行取反,因此此时ready是output信号,valid和bits都是input信号。因此它是属于数据接收者consumer的端口。
数据接收者和发送者都是相对的,一定要根据具体的情况正确设置信号方向。
二、仲裁器Arbiter
Chisel内建了两种仲裁器,一种是优先仲裁器,另一种是循环仲裁器。
- 优先仲裁器的输入通道的优先级是固定的,每次都是选择多个有效通道中优先级最高的。
- 而循环仲裁器每次都从不同的起点开始仲裁,采用轮询方式查看各个通道是否有请求,优先选择先查到的有效通道。由于起点是依次变化的,所以每个通道总体来说具有相同的优先级。
第一种仲裁器优先仲裁器Arbiter在chisel3.util包下面,只定义了Arbiter类,没有单例对象,所以每次都需要通过new来创建Arbiter对象。
创建Arbiter对象的方式如下所示:
new Arbiter(gen: T, n: Int)
需要提供两个参数,gen是传输的数据的类型,n是待仲裁对象的个数,也即数据发送者producer的个数。数据接收者consumer的个数为默认为1。
Arbiter内部使用ArbiterIO定义端口,而ArbiterIO内部又使用Decoupled()创建最终所需的ready-valid接口,定义如下:
class ArbiterIO[T <: Data](private val gen: T, val n: Int) extends Bundle {
   val in  = Flipped(Vec(n, Decoupled(gen)))
   val out = Decoupled(gen)
   val chosen = Output(UInt(log2Ceil(n).W))
}
可以看出,它会创建n个和producer连接的ready-valid接口,1个和consumer连接的ready-valid接口,以及一个表示最终选择了哪个producer的chosen变量,该变量的值表示被选择的producer在所有待仲裁对象中的索引,从0开始。
下面定义一个二选一仲裁器MyArbiter,并在代码中例化了Arbiter:
class MyArbiter extends Module {
  val io = IO(new Bundle {
      val in = Flipped(Vec(2, Decoupled(UInt(8.W))))
      val out = Decoupled(UInt(8.W))
      val chosen = Output(UInt())
  })
  val arbiter = Module(new Arbiter(UInt(8.W), 2))  // 2 to 1 Priority Arbiter
  arbiter.io.in <> io.in
  io.out <> arbiter.io.out
  io.chosen := arbiter.io.chosen
}
生成的verliog代码如下:
module Arbiter(
  output       io_in_0_ready,
  input        io_in_0_valid,
  input  [7:0] io_in_0_bits,
  output       io_in_1_ready,
  input        io_in_1_valid,
  input  [7:0] io_in_1_bits,
  input        io_out_ready,
  output       io_out_valid,
  output [7:0] io_out_bits,
  output       io_chosen
);
  wire  grant_1 = ~io_in_0_valid; // @[Arbiter.scala 31:78]
  assign io_in_0_ready = io_out_ready; // @[Arbiter.scala 134:19]
  assign io_in_1_ready = grant_1 & io_out_ready; // @[Arbiter.scala 134:19]
  assign io_out_valid = ~grant_1 | io_in_1_valid; // @[Arbiter.scala 135:31]
  // @[Arbiter.scala 126:27 Arbiter.scala 128:19 Arbiter.scala 124:15]
  assign io_out_bits = io_in_0_valid ? io_in_0_bits : io_in_1_bits;
  // @[Arbiter.scala 126:27 Arbiter.scala 127:17 Arbiter.scala 123:13]
  assign io_chosen = io_in_0_valid ? 1'h0 : 1'h1;
endmodule

module MyArbiter(
  input        clock,
  input        reset,
  output       io_in_0_ready,
  input        io_in_0_valid,
  input  [7:0] io_in_0_bits,
  output       io_in_1_ready,
  input        io_in_1_valid,
  input  [7:0] io_in_1_bits,
  input        io_out_ready,
  output       io_out_valid,
  output [7:0] io_out_bits,
  output       io_chosen
);
  wire  arbiter_io_in_0_ready; // @[Arbiter.scala 37:23]
  wire  arbiter_io_in_0_valid; // @[Arbiter.scala 37:23]
  wire [7:0] arbiter_io_in_0_bits; // @[Arbiter.scala 37:23]
  wire  arbiter_io_in_1_ready; // @[Arbiter.scala 37:23]
  wire  arbiter_io_in_1_valid; // @[Arbiter.scala 37:23]
  wire [7:0] arbiter_io_in_1_bits; // @[Arbiter.scala 37:23]
  wire  arbiter_io_out_ready; // @[Arbiter.scala 37:23]
  wire  arbiter_io_out_valid; // @[Arbiter.scala 37:23]
  wire [7:0] arbiter_io_out_bits; // @[Arbiter.scala 37:23]
  wire  arbiter_io_chosen; // @[Arbiter.scala 37:23]
  Arbiter arbiter ( // @[Arbiter.scala 37:23]
    .io_in_0_ready(arbiter_io_in_0_ready),
    .io_in_0_valid(arbiter_io_in_0_valid),
    .io_in_0_bits(arbiter_io_in_0_bits),
    .io_in_1_ready(arbiter_io_in_1_ready),
    .io_in_1_valid(arbiter_io_in_1_valid),
    .io_in_1_bits(arbiter_io_in_1_bits),
    .io_out_ready(arbiter_io_out_ready),
    .io_out_valid(arbiter_io_out_valid),
    .io_out_bits(arbiter_io_out_bits),
    .io_chosen(arbiter_io_chosen)
  );
  assign io_in_0_ready = arbiter_io_in_0_ready; // @[Arbiter.scala 38:17]
  assign io_in_1_ready = arbiter_io_in_1_ready; // @[Arbiter.scala 38:17]
  assign io_out_valid = arbiter_io_out_valid; // @[Arbiter.scala 39:10]
  assign io_out_bits = arbiter_io_out_bits; // @[Arbiter.scala 39:10]
  assign io_chosen = arbiter_io_chosen; // @[Arbiter.scala 40:13]
  assign arbiter_io_in_0_valid = io_in_0_valid; // @[Arbiter.scala 38:17]
  assign arbiter_io_in_0_bits = io_in_0_bits; // @[Arbiter.scala 38:17]
  assign arbiter_io_in_1_valid = io_in_1_valid; // @[Arbiter.scala 38:17]
  assign arbiter_io_in_1_bits = io_in_1_bits; // @[Arbiter.scala 38:17]
  assign arbiter_io_out_ready = io_out_ready; // @[Arbiter.scala 39:10]
endmodule
Verilog代码中生成了两个module,第一个module Arbiter对应的是例化的优先仲裁器Arbiter,第二个module MyArbiter对应的是顶层模块MyArbiter。
下面是一个例子,通过一个Arbiter的具体的输入输出数据的情况,来理解一下其工作逻辑:
test(new Module {
    // Example circuit using a priority arbiter
    val io = IO(new Bundle {
      val in = Flipped(Vec(2, Decoupled(UInt(8.W))))
      val out = Decoupled(UInt(8.W))
    })
    // Arbiter doesn't have a convenience constructor, so it's built like any Module
    val arbiter = Module(new Arbiter(UInt(8.W), 2))  // 2 to 1 Priority Arbiter
    arbiter.io.in <> io.in
    io.out <> arbiter.io.out
  }) { c =>
    c.io.in(0).valid.poke(false.B)
    c.io.in(1).valid.poke(false.B)
    c.io.out.ready.poke(false.B)
    println(s"Start:")
    println(s"\tin(0).ready=${c.io.in(0).ready.peek().litValue}, in(1).ready=${c.io.in(1).ready.peek().litValue}")
    println(s"\tout.valid=${c.io.out.valid.peek().litValue}, out.bits=${c.io.out.bits.peek().litValue}")
    c.io.in(1).valid.poke(true.B)  // Valid input 1
    c.io.in(1).bits.poke(42.U)
    c.io.out.ready.poke(true.B)
    // What do you think the output will be?
    println(s"valid input 1:")
    println(s"\tin(0).ready=${c.io.in(0).ready.peek().litValue}, in(1).ready=${c.io.in(1).ready.peek().litValue}")
    println(s"\tout.valid=${c.io.out.valid.peek().litValue}, out.bits=${c.io.out.bits.peek().litValue}")
    c.io.in(0).valid.poke(true.B)  // Valid inputs 0 and 1
    c.io.in(0).bits.poke(43.U)
    // What do you think the output will be? Which inputs will be ready?
    println(s"valid inputs 0 and 1:")
    println(s"\tin(0).ready=${c.io.in(0).ready.peek().litValue}, in(1).ready=${c.io.in(1).ready.peek().litValue}")
    println(s"\tout.valid=${c.io.out.valid.peek().litValue}, out.bits=${c.io.out.bits.peek().litValue}")
    c.io.in(1).valid.poke(false.B)  // Valid input 0
    // What do you think the output will be?
    println(s"valid input 0:")
    println(s"\tin(0).ready=${c.io.in(0).ready.peek().litValue}, in(1).ready=${c.io.in(1).ready.peek().litValue}")
    println(s"\tout.valid=${c.io.out.valid.peek().litValue}, out.bits=${c.io.out.bits.peek().litValue}")
}
Elaborating design…
Done elaborating.
Start:
in(0).ready=0, in(1).ready=0
out.valid=0, out.bits=0
valid input 1:
in(0).ready=1, in(1).ready=1
out.valid=1, out.bits=42
valid inputs 0 and 1:
in(0).ready=1, in(1).ready=0
out.valid=1, out.bits=43
valid input 0:
in(0).ready=1, in(1).ready=0
out.valid=1, out.bits=43
test Helper_Anon Success: 0 tests passed in 2 cycles in 0.077434 seconds 25.83 Hz
没有什么需要特别说明的,因为它就是一个组合逻辑的模块。
第二种仲裁器循环仲裁器RRArbiter也在chisel3.util包下面,并且只定义了RRArbiter类,没有单例对象,所以每次都需要通过new来创建RRArbiter对象。它的创建与调用方式和Arbiter是一样的,只是内部实现的仲裁逻辑不同。
三、队列Queue
Chisel内建了队列Queue,它会创建一个使用ready-valid接口 的FIFO,在chisel3.util包下面既定义了Queue类,也定义了其单例对象,所以有两种创建Queue对象的方式。
Queue内部使用QueueIO定义端口,QueueIO最终仍然是使用Decoupled()创建所需的ready-valid接口,定义如下:
class QueueIO[T <: Data](private val gen: T, val entries: Int) extends Bundle
{
   val enq = Flipped(EnqIO(gen))
   val deq = Flipped(DeqIO(gen))
   val count = Output(UInt(log2Ceil(entries + 1).W))
}

object EnqIO {
  def apply[T<:Data](gen: T): DecoupledIO[T] = Decoupled(gen)
}

object DeqIO {
  def apply[T<:Data](gen: T): DecoupledIO[T] = Flipped(Decoupled(gen))
}
enq是用来写数据的端口,因此它和数据生产者producer连接;deq是用来读数据的端口,因此它和数据接收者consumer连接;count表示此时Queue中的数据个数。
可以通过以下两种形式使用Queue:
new Queue(gen: T,entries: Int)
第一个参数是存储的数据的类型,第二个参数是存储的数据的深度。该方式返回的是一个Queue对象,该对象包含QueueIO属性,因此我们可以在代码中访问QueueIO的enq deq count这三种端口信号。
Queue(enq: ReadyValidIO[T],entries: Int = 2)
第一个参数是ReadyValidIO[T]类型的端口,第二个参数是存储的数据的深度,默认值为2。该方式返回的是DecoupledIO[T]类型的读数据端口,也即上述的deq,因此我们不能在代码中访问enq和count。
以上两种形式由于返回的对象不一样,因此在使用时也有一些不同,下面通过两个例子分别展示一下这两种形式的具体使用方法。
- 第一种形式的使用案例:
class MyQueue extends Module {
  val io = IO(new Bundle {
    val in = Flipped(Decoupled(UInt(8.W)))
    val out = Decoupled(UInt(8.W))
    val cnt = Output(UInt(4.W))
  })
  val q = Module(new Queue(UInt(8.W), entries = 16))
  q.io.enq <> io.in
  io.out <> q.io.deq
  io.cnt := q.io.count
 }
- 第二种形式的使用案例:
class MyQueue extends Module {
    val io = IO(new Bundle {
    val in = Flipped(Decoupled(UInt(8.W)))
    val out = Decoupled(UInt(8.W))
  })
    val q = Queue(io.in, 2)
  	io.out <> q
}
上述两段代码都调用了Queue,因此在各自生成的verilog代码中,会定义Queue对应的module Queue,该module会在顶层module MyQueue中被例化。两者生成的module Queue的端口定义分别如下:
module Queue(
  input        clock,
  input        reset,
  output       io_enq_ready,
  input        io_enq_valid,
  input  [7:0] io_enq_bits,
  input        io_deq_ready,
  output       io_deq_valid,
  output [7:0] io_deq_bits,
  output [4:0] io_count
);
module Queue(
  input        clock,
  input        reset,
  output       io_enq_ready,
  input        io_enq_valid,
  input  [7:0] io_enq_bits,
  input        io_deq_ready,
  output       io_deq_valid,
  output [7:0] io_deq_bits
);
可以看出,module Queue的端口中都有所需的两对ready-valid握手信号,并且这两对信号方向相反,这是因为它们分别是用来写数据和读数据的。
在第二种形式中,是不会有io_count端口的,因为我们无法使用QueueIO中的count。
此外,Queue对象的empty和full属性我们也访问不到,但是由于在class Queue中有如下定义:
  io.deq.valid := !empty
  io.enq.ready := !Full
因此,我们就可以通过io.deq.valid和io.enq.ready间接地访问empty和full信号,通过这两个信号来完成和empty和full信号有关的一些逻辑。
下面是一个例子,通过一个Queue(上述第二种使用形式)的具体的输入输出数据的情况,来理解一下其工作逻辑,注意它是一个时序模块:
- 首先,先看下生成的verilog代码
module Queue(
  input        clock,
  input        reset,
  output       io_enq_ready,
  input        io_enq_valid,
  input  [7:0] io_enq_bits,
  input        io_deq_ready,
  output       io_deq_valid,
  output [7:0] io_deq_bits,
  output [4:0] io_count
);
`ifdef RANDOMIZE_MEM_INIT
  reg [31:0] _RAND_0;
`endif // RANDOMIZE_MEM_INIT
`ifdef RANDOMIZE_REG_INIT
  reg [31:0] _RAND_1;
  reg [31:0] _RAND_2;
  reg [31:0] _RAND_3;
`endif // RANDOMIZE_REG_INIT
  reg [7:0] ram [0:15]; // @[Decoupled.scala 218:16]
  wire [7:0] ram_io_deq_bits_MPORT_data; // @[Decoupled.scala 218:16]
  wire [3:0] ram_io_deq_bits_MPORT_addr; // @[Decoupled.scala 218:16]
  wire [7:0] ram_MPORT_data; // @[Decoupled.scala 218:16]
  wire [3:0] ram_MPORT_addr; // @[Decoupled.scala 218:16]
  wire  ram_MPORT_mask; // @[Decoupled.scala 218:16]
  wire  ram_MPORT_en; // @[Decoupled.scala 218:16]
  reg [3:0] enq_ptr_value; // @[Counter.scala 60:40]
  reg [3:0] deq_ptr_value; // @[Counter.scala 60:40]
  reg  maybe_full; // @[Decoupled.scala 221:27]
  wire  ptr_match = enq_ptr_value == deq_ptr_value; // @[Decoupled.scala 223:33]
  wire  empty = ptr_match & ~maybe_full; // @[Decoupled.scala 224:25]
  wire  full = ptr_match & maybe_full; // @[Decoupled.scala 225:24]
  wire  do_enq = io_enq_ready & io_enq_valid; // @[Decoupled.scala 40:37]
  wire  do_deq = io_deq_ready & io_deq_valid; // @[Decoupled.scala 40:37]
  wire [3:0] _value_T_1 = enq_ptr_value + 4'h1; // @[Counter.scala 76:24]
  wire [3:0] _value_T_3 = deq_ptr_value + 4'h1; // @[Counter.scala 76:24]
  wire [3:0] ptr_diff = enq_ptr_value - deq_ptr_value; // @[Decoupled.scala 257:32]
  wire [4:0] _io_count_T_1 = maybe_full & ptr_match ? 5'h10 : 5'h0; // @[Decoupled.scala 259:20]
  wire [4:0] _GEN_8 = {{1'd0}, ptr_diff}; // @[Decoupled.scala 259:62]
  assign ram_io_deq_bits_MPORT_addr = deq_ptr_value;
  assign ram_io_deq_bits_MPORT_data = ram[ram_io_deq_bits_MPORT_addr]; // @[Decoupled.scala 218:16]
  assign ram_MPORT_data = io_enq_bits;
  assign ram_MPORT_addr = enq_ptr_value;
  assign ram_MPORT_mask = 1'h1;
  assign ram_MPORT_en = io_enq_ready & io_enq_valid;
  assign io_enq_ready = ~full; // @[Decoupled.scala 241:19]
  assign io_deq_valid = ~empty; // @[Decoupled.scala 240:19]
  assign io_deq_bits = ram_io_deq_bits_MPORT_data; // @[Decoupled.scala 242:15]
  assign io_count = _io_count_T_1 | _GEN_8; // @[Decoupled.scala 259:62]
  always @(posedge clock) begin
    if(ram_MPORT_en & ram_MPORT_mask) begin
      ram[ram_MPORT_addr] <= ram_MPORT_data; // @[Decoupled.scala 218:16]
    end
    if (reset) begin // @[Counter.scala 60:40]
      enq_ptr_value <= 4'h0; // @[Counter.scala 60:40]
    end else if (do_enq) begin // @[Decoupled.scala 229:17]
      enq_ptr_value <= _value_T_1; // @[Counter.scala 76:15]
    end
    if (reset) begin // @[Counter.scala 60:40]
      deq_ptr_value <= 4'h0; // @[Counter.scala 60:40]
    end else if (do_deq) begin // @[Decoupled.scala 233:17]
      deq_ptr_value <= _value_T_3; // @[Counter.scala 76:15]
    end
    if (reset) begin // @[Decoupled.scala 221:27]
      maybe_full <= 1'h0; // @[Decoupled.scala 221:27]
    end else if (do_enq != do_deq) begin // @[Decoupled.scala 236:28]
      maybe_full <= do_enq; // @[Decoupled.scala 237:16]
    end
  end
endmodule

module MyQueue(
  input        clock,
  input        reset,
  output       io_in_ready,
  input        io_in_valid,
  input  [7:0] io_in_bits,
  input        io_out_ready,
  output       io_out_valid,
  output [7:0] io_out_bits,
  output [3:0] io_cnt
);
  wire  q_clock; // @[Queue.scala 14:17]
  wire  q_reset; // @[Queue.scala 14:17]
  wire  q_io_enq_ready; // @[Queue.scala 14:17]
  wire  q_io_enq_valid; // @[Queue.scala 14:17]
  wire [7:0] q_io_enq_bits; // @[Queue.scala 14:17]
  wire  q_io_deq_ready; // @[Queue.scala 14:17]
  wire  q_io_deq_valid; // @[Queue.scala 14:17]
  wire [7:0] q_io_deq_bits; // @[Queue.scala 14:17]
  wire [4:0] q_io_count; // @[Queue.scala 14:17]
  Queue q ( // @[Queue.scala 14:17]
    .clock(q_clock),
    .reset(q_reset),
    .io_enq_ready(q_io_enq_ready),
    .io_enq_valid(q_io_enq_valid),
    .io_enq_bits(q_io_enq_bits),
    .io_deq_ready(q_io_deq_ready),
    .io_deq_valid(q_io_deq_valid),
    .io_deq_bits(q_io_deq_bits),
    .io_count(q_io_count)
  );
  assign io_in_ready = q_io_enq_ready; // @[Queue.scala 16:12]
  assign io_out_valid = q_io_deq_valid; // @[Queue.scala 17:10]
  assign io_out_bits = q_io_deq_bits; // @[Queue.scala 17:10]
  assign io_cnt = q_io_count[3:0]; // @[Queue.scala 18:10]
  assign q_clock = clock;
  assign q_reset = reset;
  assign q_io_enq_valid = io_in_valid; // @[Queue.scala 16:12]
  assign q_io_enq_bits = io_in_bits; // @[Queue.scala 16:12]
  assign q_io_deq_ready = io_out_ready; // @[Queue.scala 17:10]
endmodule
- 然后,再看下测试案例
test(new Module {
    // Example circuit using a Queue
    val io = IO(new Bundle {
      val in = Flipped(Decoupled(UInt(8.W)))
      val out = Decoupled(UInt(8.W))
    })
    val queue = Queue(io.in, 2)  // 2-element queue
    io.out <> queue
  }) { c =>
    c.io.out.ready.poke(false.B)
    c.io.in.valid.poke(true.B)  // Enqueue an element
    c.io.in.bits.poke(42.U)
    println(s"Starting:")
    println(s"\tio.in: ready=${c.io.in.ready.peek().litValue}")
    println(s"\tio.out: valid=${c.io.out.valid.peek().litValue}, bits=${c.io.out.bits.peek().litValue}")
    c.clock.step(1)

    c.io.in.valid.poke(true.B)  // Enqueue another element
    c.io.in.bits.poke(43.U)
    // What do you think io.out.valid and io.out.bits will be?
    println(s"After first enqueue:")
    println(s"\tio.in: ready=${c.io.in.ready.peek().litValue}")
    println(s"\tio.out: valid=${c.io.out.valid.peek().litValue}, bits=${c.io.out.bits.peek().litValue}")
    c.clock.step(1)

    c.io.in.valid.poke(true.B)  // Read a element, attempt to enqueue
    c.io.in.bits.poke(44.U)
    c.io.out.ready.poke(true.B)
    // What do you think io.in.ready will be, and will this enqueue succeed, and what will be read?
    println(s"On first read:")
    println(s"\tio.in: ready=${c.io.in.ready.peek()}")
    println(s"\tio.out: valid=${c.io.out.valid.peek()}, bits=${c.io.out.bits.peek()}")
    c.clock.step(1)

    c.io.in.valid.poke(false.B)  // Read elements out
    c.io.out.ready.poke(true.B)
    // What do you think will be read here?
    println(s"On second read:")
    println(s"\tio.in: ready=${c.io.in.ready.peek()}")
    println(s"\tio.out: valid=${c.io.out.valid.peek()}, bits=${c.io.out.bits.peek()}")
    c.clock.step(1)

    // Will a third read produce anything?
    println(s"On third read:")
    println(s"\tio.in: ready=${c.io.in.ready.peek()}")
    println(s"\tio.out: valid=${c.io.out.valid.peek()}, bits=${c.io.out.bits.peek()}")
    c.clock.step(1)
}
Elaborating design…
Done elaborating.
Starting:
io.in: ready=1
io.out: valid=0, bits=0
After first enqueue:
io.in: ready=1
io.out: valid=1, bits=42
On first read:
io.in: ready=Bool(false)
io.out: valid=Bool(true), bits=UInt<8>(42)
On second read:
io.in: ready=Bool(true)
io.out: valid=Bool(true), bits=UInt<8>(43)
On third read:
io.in: ready=Bool(true)
io.out: valid=Bool(false), bits=UInt<8>(42)
test Helper_Anon Success: 0 tests passed in 7 cycles in 0.013966 seconds 501.23 Hz
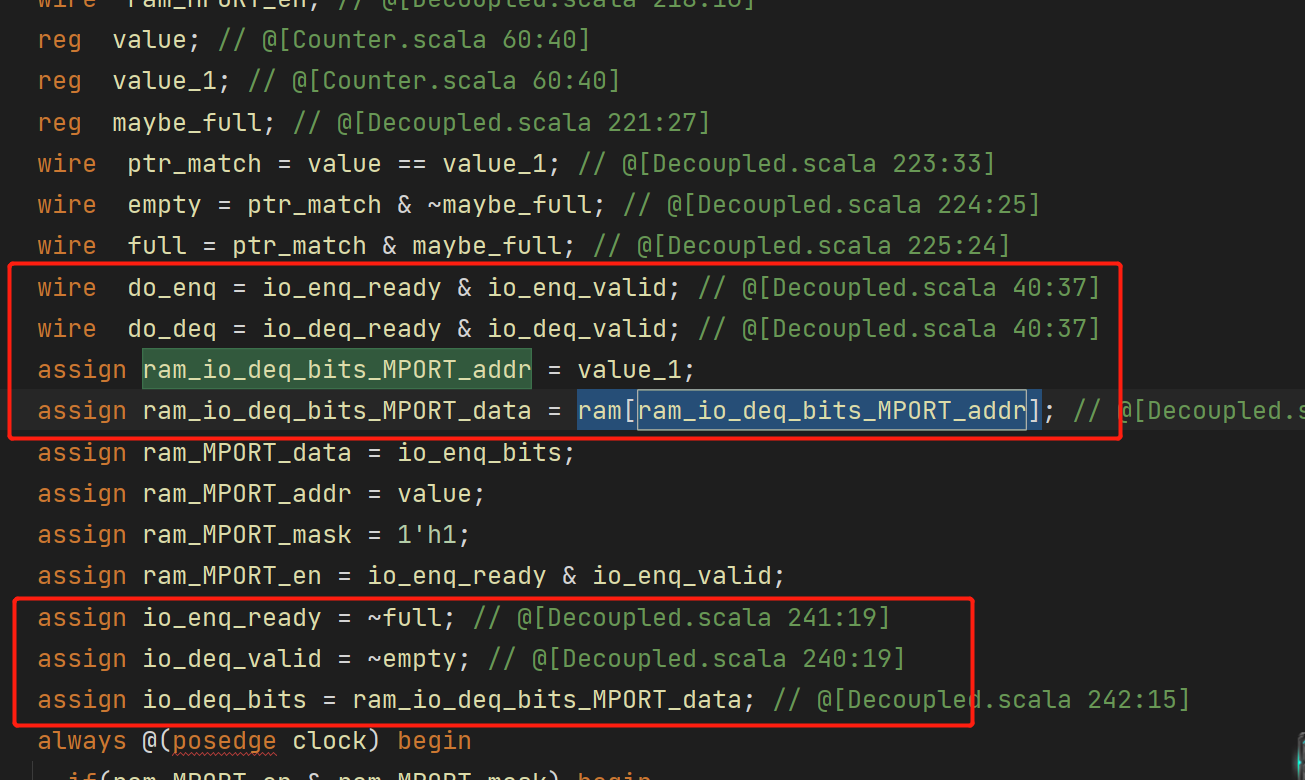
关键在于上图中的几段代码:
- 只要非空,io_out_valid就为1,如果io_out_ready也为1,那么do_deq就会为1,读数据就被使能了;
- 只要不满,io_in_ready就为1,如果io_in_valid也为1,那么do_enq就会为1,写数据就被使能了;
- 读写要执行一下step才能完成;
- 只要queue中有数据,那么io_out_bits就会随时将此时指向的数据放在端口上,所以你会看到即使没有使能读数据,io_out_bits也会有值。


 1359
1359


 被折叠的 条评论
为什么被折叠?
被折叠的 条评论
为什么被折叠?
 到【灌水乐园】发言


