


文章目录
引用与前言
- 官方网页【部分文字来源于此处 (经翻译)】:https://carla.readthedocs.io/en/0.9.11/
- 知乎关于这个行为规划器的介绍【本文部分文字参考于此】:https://zhuanlan.zhihu.com/p/355420522
- 参考官方代码:automatic_control.py
前言:运行环境Win10,压缩包版,Carla 0.9.11,本文部分文字参考于[2],本文部分文字参考于[2],本文部分文字参考于[2]【重要的话说三遍】中间可能夹杂着一些奇奇怪怪的内心独白😅 请忽略或者给点回复也OK
第一篇初入Carla请见:https://blog.csdn.net/qq_39537898/article/details/115921745
第二篇深入Carla时间设置见:https://blog.csdn.net/qq_39537898/article/details/117190371
第三篇关于Carla Traffic Manager 管理车辆的见:https://blog.csdn.net/qq_39537898/article/details/117562578
Notion外链及后续小错误更新等见:https://www.notion.so/kinzhang/6-Carla-follow-cde5f8c076544f6fae52c285ae8ec728
简化整体代码
此处是从引用2中获得的
import glob
import os
import sys

# ==============================================================================
# -- Find CARLA module ---------------------------------------------------------
# ==============================================================================
try:
    sys.path.append(glob.glob('../carla/dist/carla-*%d.%d-%s.egg' % (
        sys.version_info.major,
        sys.version_info.minor,
        'win-amd64' if os.name == 'nt' else 'linux-x86_64'))[0])
except IndexError:
    pass
# ==============================================================================
# -- Add PythonAPI for release mode --------------------------------------------
# ==============================================================================
try:
    sys.path.append(os.path.dirname(os.path.dirname(os.path.abspath(__file__))) + '/carla')
except IndexError:
    pass

import carla
from carla import ColorConverter as cc

from agents.navigation.behavior_agent import BehaviorAgent  # pylint: disable=import-error

import random

def main():
    try:
        client = carla.Client('localhost', 3000)
        client.set_timeout(3.0)

        # Retrieve the world that is currently running
        world = client.get_world()

        origin_settings = world.get_settings()

        # set sync mode
        settings = world.get_settings()
        settings.synchronous_mode = True
        settings.fixed_delta_seconds = 0.05
        world.apply_settings(settings)

        blueprint_library = world.get_blueprint_library()

        # read all valid spawn points
        all_default_spawn = world.get_map().get_spawn_points()
        # randomly choose one as the start point
        spawn_point = random.choice(all_default_spawn) if all_default_spawn else carla.Transform()

        # create the blueprint library
        ego_vehicle_bp = blueprint_library.find('vehicle.lincoln.mkz2017')
        ego_vehicle_bp.set_attribute('role_name', "hero")
        ego_vehicle_bp.set_attribute('color', '0, 0, 0')
        # spawn the vehicle
        vehicle = world.spawn_actor(ego_vehicle_bp, spawn_point)

        # we need to tick the world once to let the client update the spawn position
        world.tick()

        # create the behavior agent
        agent = BehaviorAgent(vehicle, behavior='normal')

        # set the destination spot
        spawn_points = world.get_map().get_spawn_points()
        random.shuffle(spawn_points)

        # to avoid the destination and start position same
        if spawn_points[0].location != agent.vehicle.get_location():
            destination = spawn_points[0]
        else:
            destination = spawn_points[1]

        # generate the route
        agent.set_destination(agent.vehicle.get_location(), destination.location, clean=True)

        while True:
            agent.update_information()

            world.tick()
            # top view
            spectator = world.get_spectator()
            transform = vehicle.get_transform()
            spectator.set_transform(carla.Transform(transform.location + carla.Location(z=40),
                                                    carla.Rotation(pitch=-90)))

            speed_limit = vehicle.get_speed_limit()
            agent.get_local_planner().set_speed(speed_limit)

            control = agent.run_step(debug=True)
            vehicle.apply_control(control)
            if len(agent.get_local_planner().waypoints_queue) == 0:
                print("Target reached, mission accomplished...")
                break

    finally:
        world.apply_settings(origin_settings)
        vehicle.destroy()

if __name__ == '__main__':
    try:
        main()
    except KeyboardInterrupt:
        print(' - Exited by user.')
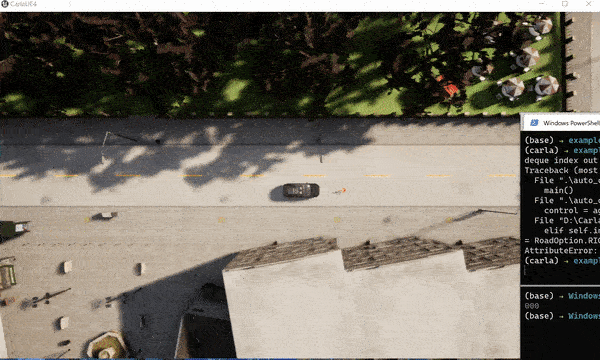
无其他车辆运行示意

有其他车辆运行图 (碰撞情况见最后问题区解释)
逐步介绍
行为规划器简介:Carla里的behavior planning大执分为全局路线规划、行为规划、轨迹规划与底层控制四大部分。
前面关于生成之类的我就不… 介绍了,主要是后面agent = BehaviorAgent(vehicle, behavior='normal') 这里开始就是使用行为规划器的东西的
BehaviorAgent初始化
正如前面直接调用这般,输入参数,第一项是生成的vehicle,第二项是行为模式(分为Cautious, Normal, Aggressive)。
-
在调用过程中,是直接的初始化:
class BehaviorAgent(Agent): """ BehaviorAgent implements an agent that navigates scenes to reach a given target destination, by computing the shortest possible path to it. This agent can correctly follow traffic signs, speed limitations, traffic lights, while also taking into account nearby vehicles. Lane changing decisions can be taken by analyzing the surrounding environment, such as overtaking or tailgating avoidance. Adding to these are possible behaviors, the agent can also keep safety distance from a car in front of it by tracking the instantaneous time to collision and keeping it in a certain range. Finally, different sets of behaviors are encoded in the agent, from cautious to a more aggressive ones. """ def __init__(self, vehicle, ignore_traffic_light=True, behavior='normal'): """ Constructor method. :param vehicle: actor to apply to local planner logic onto :param ignore_traffic_light: boolean to ignore any traffic light :param behavior: type of agent to apply """ super(BehaviorAgent, self).__init__(vehicle) self.vehicle = vehicle self.ignore_traffic_light = ignore_traffic_light self._local_planner = LocalPlanner(self) self._grp = None self.look_ahead_steps = 0 # Vehicle information self.speed = 0 self.speed_limit = 0 self.direction = None self.incoming_direction = None self.incoming_waypoint = None self.start_waypoint = None self.end_waypoint = None self.is_at_traffic_light = 0 self.light_state = "Green" self.light_id_to_ignore = -1 self.min_speed = 5 self.behavior = None self._sampling_resolution = 4.5 # Parameters for agent behavior if behavior == 'cautious': self.behavior = Cautious() elif behavior == 'normal': self.behavior = Normal() elif behavior == 'aggressive': self.behavior = Aggressive() -
具体可见官方的types_behavior.py文件:
# This work is licensed under the terms of the MIT license. # For a copy, see <https://opensource.org/licenses/MIT>. """ This module contains the different parameters sets for each behavior. """ class Cautious(object): """Class for Cautious agent.""" max_speed = 40 speed_lim_dist = 6 speed_decrease = 12 safety_time = 3 min_proximity_threshold = 12 braking_distance = 6 overtake_counter = -1 tailgate_counter = 0 class Normal(object): """Class for Normal agent.""" max_speed = 50 speed_lim_dist = 3 speed_decrease = 10 safety_time = 3 min_proximity_threshold = 10 braking_distance = 5 overtake_counter = 0 tailgate_counter = 0 class Aggressive(object): """Class for Aggressive agent.""" max_speed = 70 speed_lim_dist = 1 speed_decrease = 8 safety_time = 3 min_proximity_threshold = 8 braking_distance = 4 overtake_counter = 0 tailgate_counter = -1 -
参数解释待完善:
max_speed行驶的最大速度;speed_limit道路限速,会根据update_information的函数进行更新的;speed_lim_dist这个是在self.behavior里面定义的,如果是normal的话,speed_lim_dist=3;主要是在后续解释速度的时候,用到就是这几个
关于这项开始我们的重点就应该在于行为规划器的东西,类似于计算与下发指令的“大脑”
agent.set_destination() 全局规划
随后我们在看agent的时候就是设置起终点了,直接一行就可以搞定,具体里面呢则分为了,
-
self._map.get_waypoint得到起终点的waypoint -
self._trace_route(self.start_waypoint, self.end_waypoint)得到全局路径这里面呢再继续全局规划的东西,sampling resolution则是这个路径点的间隔,类似于我们第一节介绍map的时候的这个distance:
world.get_map().generate_waypoints(distance) -
self._local_planner.set_global_plan(route_trace, clean)发送全局规划指令
def set_destination(self, start_location, end_location, clean=False):
        """
        This method creates a list of waypoints from agent's position to destination location
        based on the route returned by the global router.
            :param start_location: initial position
            :param end_location: final position
            :param clean: boolean to clean the waypoint queue
        """
        if clean:
            self._local_planner.waypoints_queue.clear()
        self.start_waypoint = self._map.get_waypoint(start_location)
        self.end_waypoint = self._map.get_waypoint(end_location)

        route_trace = self._trace_route(self.start_waypoint, self.end_waypoint)

        self._local_planner.set_global_plan(route_trace, clean)

def _trace_route(self, start_waypoint, end_waypoint):
        """
        This method sets up a global router and returns the
        optimal route from start_waypoint to end_waypoint.
            :param start_waypoint: initial position
            :param end_waypoint: final position
        """
        # Setting up global router
        if self._grp is None:
            wld = self.vehicle.get_world()
            dao = GlobalRoutePlannerDAO(
                wld.get_map(), sampling_resolution=self._sampling_resolution)
            grp = GlobalRoutePlanner(dao)
            grp.setup()
            self._grp = grp

        # Obtain route plan
        route = self._grp.trace_route(
            start_waypoint.transform.location,
            end_waypoint.transform.location)

        return route
在dao = GlobalRoutePlannerDAO(wld.get_map(), sampling_resolution=self._sampling_resolution) 和grp = GlobalRoutePlanner(dao) 是对Carla地图的拓扑结构提取,代码:
class GlobalRoutePlanner(object):
    """
    This class provides a very high level route plan.
    Instantiate the class by passing a reference to
    A GlobalRoutePlannerDAO object.
    """

    def __init__(self, dao):
        """
        Constructor
        """
        self._dao = dao
        self._topology = None
        self._graph = None
        self._id_map = None
        self._road_id_to_edge = None
        self._intersection_end_node = -1
        self._previous_decision = RoadOption.VOID

    def setup(self):
        """
        Performs initial server data lookup for detailed topology
        and builds graph representation of the world map.
        """
        self._topology = self._dao.get_topology()
        self._graph, self._id_map, self._road_id_to_edge = self._build_graph()
        self._find_loose_ends()
        self._lane_change_link()
get_topology() 获得路径点与道路之间的信息
def get_topology(self):
        """
        Accessor for topology.
        This function retrieves topology from the server as a list of
        road segments as pairs of waypoint objects, and processes the
        topology into a list of dictionary objects.
            :return topology: list of dictionary objects with the following attributes
                entry   -   waypoint of entry point of road segment
                entryxyz-   (x,y,z) of entry point of road segment
                exit    -   waypoint of exit point of road segment
                exitxyz -   (x,y,z) of exit point of road segment
                path    -   list of waypoints separated by 1m from entry
                            to exit
        """
        topology = []
        # Retrieving waypoints to construct a detailed topology
        for segment in self._wmap.get_topology():
            wp1, wp2 = segment[0], segment[1]
            l1, l2 = wp1.transform.location, wp2.transform.location
            # Rounding off to avoid floating point imprecision
            x1, y1, z1, x2, y2, z2 = np.round([l1.x, l1.y, l1.z, l2.x, l2.y, l2.z], 0)
            wp1.transform.location, wp2.transform.location = l1, l2
            seg_dict = dict()
            seg_dict['entry'], seg_dict['exit'] = wp1, wp2
            seg_dict['entryxyz'], seg_dict['exitxyz'] = (x1, y1, z1), (x2, y2, z2)
            seg_dict['path'] = []
            endloc = wp2.transform.location
            if wp1.transform.location.distance(endloc) > self._sampling_resolution:
                w = wp1.next(self._sampling_resolution)[0]
                while w.transform.location.distance(endloc) > self._sampling_resolution:
                    seg_dict['path'].append(w)
                    w = w.next(self._sampling_resolution)[0]
            else:
                seg_dict['path'].append(wp1.next(self._sampling_resolution)[0])
            topology.append(seg_dict)
        return topology
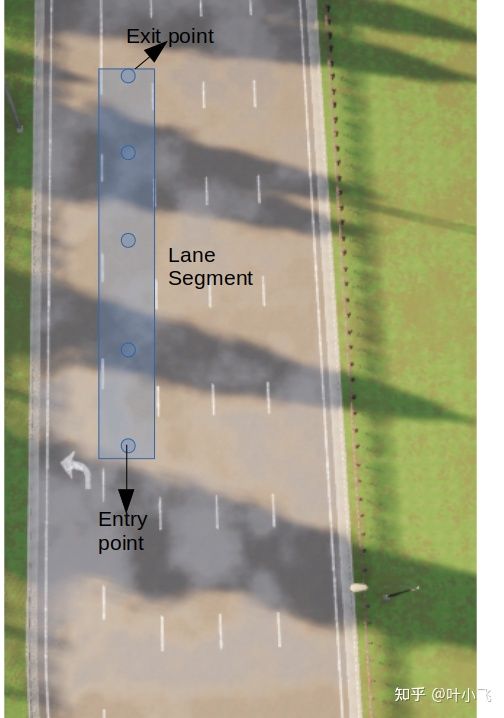
这里的get_topology()返回的数据类型格式如下:
[{entry:Waypoint1, exit:Waypoint2, path:[Waypoint1_1, Waypoint1_2,......]},
 {entry:Waypoint3, exit:Waypoint4, path:[Waypoint3_1, Waypoint3_2,......]},
 ......]
它的本质是一个list of dictionary, 每一个 dictionary 都是一段在carla的提前定义的lane segment.如下图所示,entry和exit是一段lane segment的开始和结尾点,path是一个list,里面装着entry 和 exit之间的node, 每个node相距4.5米(即你的sampling resolution)。每一个node都是一个Waypoint class, 它永远位于lane的中央,同时还可以记录左右lane上平行的waypoint的位置。
- 但是这里记录的左右lane平行路径点位置是记录在哪里呢?待查证 → 有记录但是没有作区分需要自己再读取其属性得知
从上面的那段代码来看,是没有平行路径点的记录的,也就是说直接是从entry到exit的路径点中的下一个下一个 → 但是好像第一个for循环是循环的整个地图的segemnt?为什么要循环整个地图的呢?直接按输入进来的 是要建立整个世界的拓扑地图而不是仅仅起终点之间的所以每两个segment之间都会被waypoint连接
所以查证的重点应该是wp1.next 是否会next到其他路径下,如果不行的话是无法记录平行Lane上的 → 然后就去搜索了world.get_map().get_topology() 返回的是什么
get_topology(self)
Returns a list of tuples describing a minimal graph of the topology of the OpenDRIVE file. The tuples contain pairs of waypoints located either at the point a road begins or ends. The first one is the origin and the second one represents another road end that can be reached. This graph can be loaded into NetworkX to work with. Output could look like this: [(w0, w1), (w0, w2), (w1, w3), (w2, w3), (w0, w4)].
Return:list(tuple(carla.Waypoint, carla.Waypoint))
emmm 按照这个描述是指(w0,w1)能被连通,w0是起点,w1是终点,而不在乎是哪条路上的,所以.next确实会切到另一条路的waypoint但是并没有指明是哪个点会切到另一条路,只能自己get_waypoint按照waypoint内的性质去读取了吧 → 直接waypoint.section_id,waypoint.lane_id就可以获得了
-
自己开了manual_control.py 然后又写了个脚本读了一下:
try:

    client = carla.Client('localhost', 3000)
    client.set_timeout(3.0)
    world = client.get_world()
    world_map = world.get_map()
    vehicles_list = world.get_actors().filter('vehicle.*')
    for v in vehicles_list:
        if v.attributes['role_name'] == "hero":
            hero_vehicle = v # Actor

    while True:
        # print('position:',hero_vehicle.get_transform().location)
        print('vehicle waypoint',world_map.get_waypoint(hero_vehicle.get_transform().location).lane_id)

except KeyboardInterrupt:
        print('\nCancelled by user. Bye!')
_build_graph()Graph建立
这一步会利用上面提取的topology(list格式)来构建道路的graph(
networkx.Diagraph()格式)。其中每一个entry point或者exit point被看作node, path里的多个point组合起来当作edge。这些edge不仅会记录每一个waypoint的xyz坐标,还会记录entry/exit point的yaw angle,从而知道汽车进入这条lane时车头朝向什么位置。
首先 networkx超好用的,因为IIMP6010的路径项目拿的这个做的省了很多很多事… 主要就是把边加进去,然后自动算最优路线,比较友好的一个库,官方Tutorial网址:https://networkx.org/documentation/stable/tutorial.html
lane segment的对应
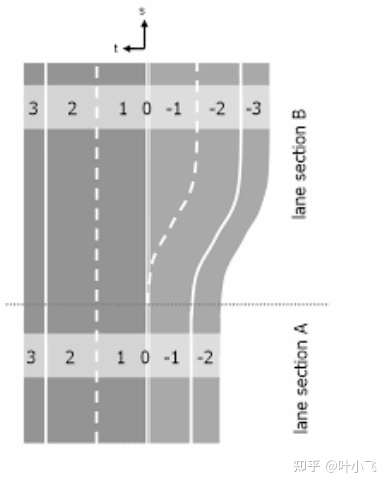
road, section 和 lane的关系
-
self._graph, self._id_map, self._road_id_to_edge = self._build_graph()主要是返回的这三个参数需要注意:def _build_graph(self): """ This function builds a networkx graph representation of topology. The topology is read from self._topology. graph node properties: vertex - (x,y,z) position in world map graph edge properties: entry_vector - unit vector along tangent at entry point exit_vector - unit vector along tangent at exit point net_vector - unit vector of the chord from entry to exit intersection - boolean indicating if the edge belongs to an intersection return : graph -> networkx graph representing the world map, id_map-> mapping from (x,y,z) to node id road_id_to_edge-> map from road id to edge in the graph """ graph = nx.DiGraph() id_map = dict() # Map with structure {(x,y,z): id, ... } road_id_to_edge = dict() # Map with structure {road_id: {lane_id: edge, ... }, ... } for segment in self._topology: entry_xyz, exit_xyz = segment['entryxyz'], segment['exitxyz'] path = segment['path'] entry_wp, exit_wp = segment['entry'], segment['exit'] intersection = entry_wp.is_junction road_id, section_id, lane_id = entry_wp.road_id, entry_wp.section_id, entry_wp.lane_id for vertex in entry_xyz, exit_xyz: # Adding unique nodes and populating id_map if vertex not in id_map: new_id = len(id_map) id_map[vertex] = new_id graph.add_node(new_id, vertex=vertex) n1 = id_map[entry_xyz] n2 = id_map[exit_xyz] if road_id not in road_id_to_edge: road_id_to_edge[road_id] = dict() if section_id not in road_id_to_edge[road_id]: road_id_to_edge[road_id][section_id] = dict() road_id_to_edge[road_id][section_id][lane_id] = (n1, n2) entry_carla_vector = entry_wp.transform.rotation.get_forward_vector() exit_carla_vector = exit_wp.transform.rotation.get_forward_vector() # Adding edge with attributes graph.add_edge( n1, n2, length=len(path) + 1, path=path, entry_waypoint=entry_wp, exit_waypoint=exit_wp, entry_vector=np.array( [entry_carla_vector.x, entry_carla_vector.y, entry_carla_vector.z]), exit_vector=np.array( [exit_carla_vector.x, exit_carla_vector.y, exit_carla_vector.z]), net_vector=vector(entry_wp.transform.location, exit_wp.transform.location), intersection=intersection, type=RoadOption.LANEFOLLOW) return graph, id_map, road_id_to_edge
第一个是graph 也就是networkx的方式去表示整个世界里的地图,比如我搞个小一点的城镇哈(最简单的也是Town 2了):连起来的图是这样的 但是每次的运行都会随机生成这样子的图的所以… 看个快乐吧 [其中有些较远的点没有连起来很让我疑惑] → 从id_map好像知道原因了 我并没有按照xyz去画图,直接拿node id画的图所以xy并没有对应地图
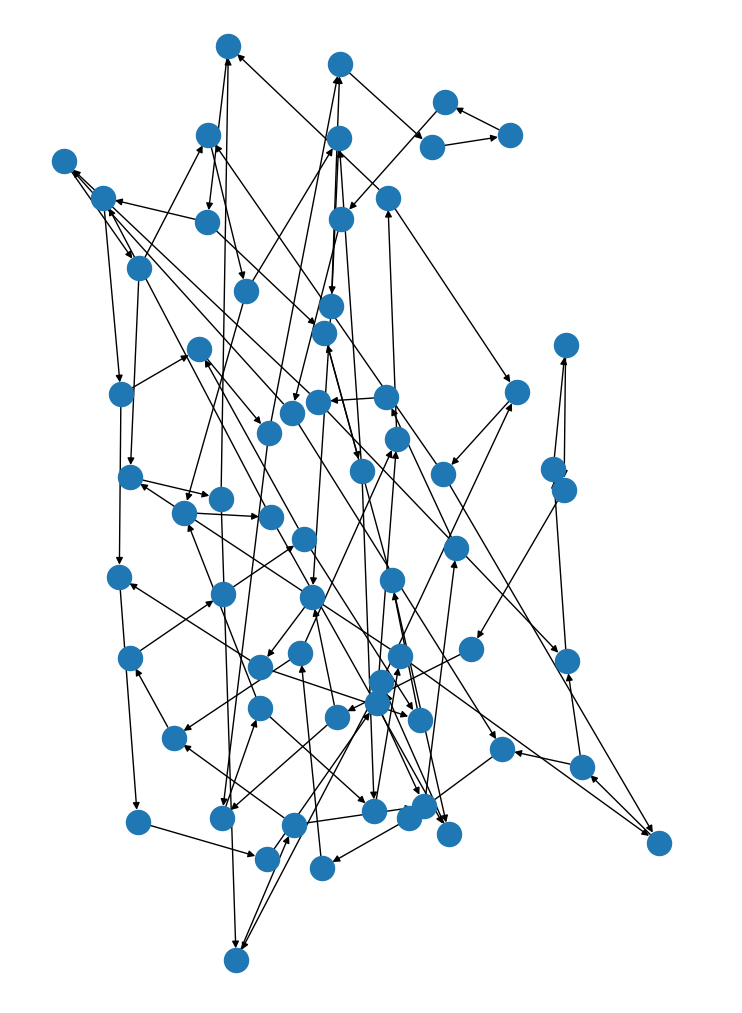
networkx的segemnt展现图

Town 2的全图
第二个是id_map 也就是使得当知道xyz时对应的graph里的node id是多少
第三个road_id_to_edge 也和上面那个是一个意思,从知道的road_id对应到graph里的edge id是多少
# 以向量的形式记录了车辆如果正常驶入和离开这条lane时它的角度是怎样的
entry_carla_vector = entry_wp.transform.rotation.get_forward_vector()
exit_carla_vector = exit_wp.transform.rotation.get_forward_vector()

# Adding edge with attributes
graph.add_edge(
    n1, n2,
    length=len(path) + 1, path=path,
    entry_waypoint=entry_wp, exit_waypoint=exit_wp,
    entry_vector=np.array(
        [entry_carla_vector.x, entry_carla_vector.y, entry_carla_vector.z]),
    exit_vector=np.array(
        [exit_carla_vector.x, exit_carla_vector.y, exit_carla_vector.z]),
    net_vector=vector(entry_wp.transform.location, exit_wp.transform.location),
    intersection=intersection, type=RoadOption.LANEFOLLOW)
这里对应的我们可以发现 entry_wp, exit_wp = segment['entry'], segment['exit'] 这样的形式,有个问题:要是我的起点在lane_id=1,但是终点在lane_id=2上,那segment里面没有这两条路相连的了,全局规划出来的路线只能顺着一条道开到黑,无法进行变道甚至转弯的操作,所以呢在执行完建graph后,还有一个lane_change_link
class GlobalRoutePlanner(object):
    def setup(self):
				# 忽略了很多噢
        self._lane_change_link()

def self._lane_change_link():
		# 忽略了很多很多
		self._graph.add_edge(
		self._id_map[segment['entryxyz']], next_segment[0], entry_waypoint=waypoint,
		exit_waypoint=next_waypoint, intersection=False, exit_vector=None,
		path=[], length=0, type=next_road_option, change_waypoint=next_waypoint)
这句代码要做的事情很简单,如果已存在的node里它的左边或右边有可驾驶的lane(node本质是waypoint class, waypoint里会存这个信息),那么读取它左边或右边lane里离自己最近的那个node, 与自己建立起edge. 这样一来,整个graph既有了纵向的链接,又有了横向的链接
self._grp.trace_route(start,end) 起终点间路径点生成
networkx构建的graph的node是entry/exit point, edge是它们之间的插入点,每个相隔4.5米,总而言之,无论是node还是edge, 本质上都是一系列的Waypoint。所以tuple里的waypoint很好理解,就是让汽车朝着这些点一个个开,最后就能开到目的地。road_option是一个enum class, 主要用来表示这个waypoint是不是涉及到变道,为后面的行为规划提供额外的信息。
This method returns list of (carla.Waypoint, RoadOption) from origin to destination
set_global_plan(route_trace, clean)
-
上面呢我们生成的是间隔4.5m的路径点,这个呢是把上面返回的list里的路径点和roadoption赋给一个队列
for elem in current_plan: self.waypoints_queue.append(elem) -
然后从第一点中的一个个pop出来,主要思想和我们的差不多 因为我们关注的路径点不是全部的而是局部的从全局路径点中一个个抽取就行了
if clean:
  self._waypoint_buffer.clear()
  for _ in range(self._buffer_size):
      if self.waypoints_queue:
          self._waypoint_buffer.append(
              self.waypoints_queue.popleft())
      else:
          break
agent.update_information() 更新信息
def update_information(self):
        """
        This method updates the information regarding the ego
        vehicle based on the surrounding world.
        """
        self.speed = get_speed(self.vehicle)
        self.speed_limit = self.vehicle.get_speed_limit()
        self._local_planner.set_speed(self.speed_limit)
        self.direction = self._local_planner.target_road_option
        if self.direction is None:
            self.direction = RoadOption.LANEFOLLOW

        self.look_ahead_steps = int((self.speed_limit) / 10)

        self.incoming_waypoint, self.incoming_direction = self._local_planner.get_incoming_waypoint_and_direction(
            steps=self.look_ahead_steps)
        if self.incoming_direction is None:
            self.incoming_direction = RoadOption.LANEFOLLOW

        self.is_at_traffic_light = self.vehicle.is_at_traffic_light()
        if self.ignore_traffic_light:
            self.light_state = "Green"
        else:
            # This method also includes stop signs and intersections.
            self.light_state = str(self.vehicle.get_traffic_light_state())
首先是限速,向前看的部署不超过速度的10%,比如限速30km/h 除10的话,就是往前看3步,所以这里的步数以m来计嘛?→ 不是,是直接对比waypoint队列是否够往前三步,然后够的话就抽出的一个路径点(self.waypoints_queue[steps])抽的也是steps位置上的,这里包括路径点所有的信息 比如方向等;最后就是红绿灯的更新,如果开启忽略红绿灯就直接赋值Green来代替
agent.run_step() 返回控制指令
这里如果debug=True的话就会画路径点的小箭头,具体可以进去瞅瞅,其实在第一节的时候我们也用过这个world.debug的功能来画出地图所有的路径点位置
在前面部分,已经完成初始化BehaviorAgent, 制定好了全局路线,并将当前server的重要信息更新给了agent, 现在所有的信息都一应俱全,最后就是CARLA中的行为规划,可大致分为五步:
- 针对交通信号灯的行为规划
- 针对行人的行为规划
- 针对路上其它车辆的行为规划
- 交叉口的行为规划
- 正常驾驶的行为规划
emmm 仅仅一个run_step就包含这么多东东,但是其实仔细看听粗略的… 毕竟我后面实验的时候Normal模式下还撞到NPC的车了,这其中五个部分,知乎叶小飞大佬那篇讲的很好,而且没啥有问题的内心独白地方所以大家就移步那边看吧【https://zhuanlan.zhihu.com/p/376411890】,主要几个注意点为:
-
如果不改限速的话,normal情况下,默认速度一直都是30km/h不会增大的
# Under safety time distance, slow down. if self.behavior.safety_time > ttc > 0.0: control = self._local_planner.run_step(target_speed=min(positive(vehicle_speed - self.behavior.speed_decrease), min(self.behavior.max_speed, self.speed_limit - self.behavior.speed_lim_dist)), debug=debug) # Actual safety distance area, try to follow the speed of the vehicle in front. elif 2 * self.behavior.safety_time > ttc >= self.behavior.safety_time: control = self._local_planner.run_step(target_speed=min(max(self.min_speed, vehicle_speed), min(self.behavior.max_speed, self.speed_limit - self.behavior.speed_lim_dist)), debug=debug) # Normal behavior. else: control = self._local_planner.run_step(target_speed= min(self.behavior.max_speed, self.speed_limit - self.behavior.speed_lim_dist), debug=debug) -
从以上的路径点寻路的步骤可以看出,CARLA里严格意义来说,是没有轨迹规划的,因为它直接从一个目标点直线冲向另外一个数米外的目标点,没有任何插值和弧度可言
-
关于避障行人的:
1)是否有行人可能与小车发生碰撞,2)如果有,返回该行人,3)该行人与车的距离, 如果该距离过小,则立刻紧急刹车
-
关于超车的条件:
1)前方障碍汽车离己方较近,挡在了行驶路线上。2)汽车不在交叉路口。 3)ego vehicle速度大于10, 且大于前方障碍汽车
超车后也会重新根据现在的路径点来设起终点:CARLA里超车的具体方式很简单粗暴,直接使用set_destination(left_waypoint, self.end_waypoint), 也就是重新规划一下全局路线,由于新的全局路线是从左车道开始,ego自然会变到左车道,完成超车。
几个问题

路径点间间隔更小 (=2) x5倍速播放
默认路径点间隔 (=4.5) x4倍速播放
-
我在实验过程中发现 车辆在进行一个路径点到另一个路径点(生成间隔后的那种)是不会执行避障的,除非是车辆在间隔米数之上,会撞上去应该这么说
正常情况下,在behavior_agent.py文件内init初始化中self._sampling_resolution = 4.5,可以试着设小一点,比如2,然后因为间隔比较小,两点之间判断更为频繁所以就没有撞上去了 -
还有个问题是关于轨迹规划的,正如上面所提到的轨迹规划非常差… 转弯的PID感觉转角太小 要绕挺大的,还有个点就是上面那条,我曾经看了一下他们的PID写法,是没有刹车帮忙减速的,所以避障其他车辆时,只是松油门的动作没有刹车,这其实对于跟踪和快速减速是不太OK的吧 吧 吧
留个小作业?
为下一次的速度到油门做铺垫吧,
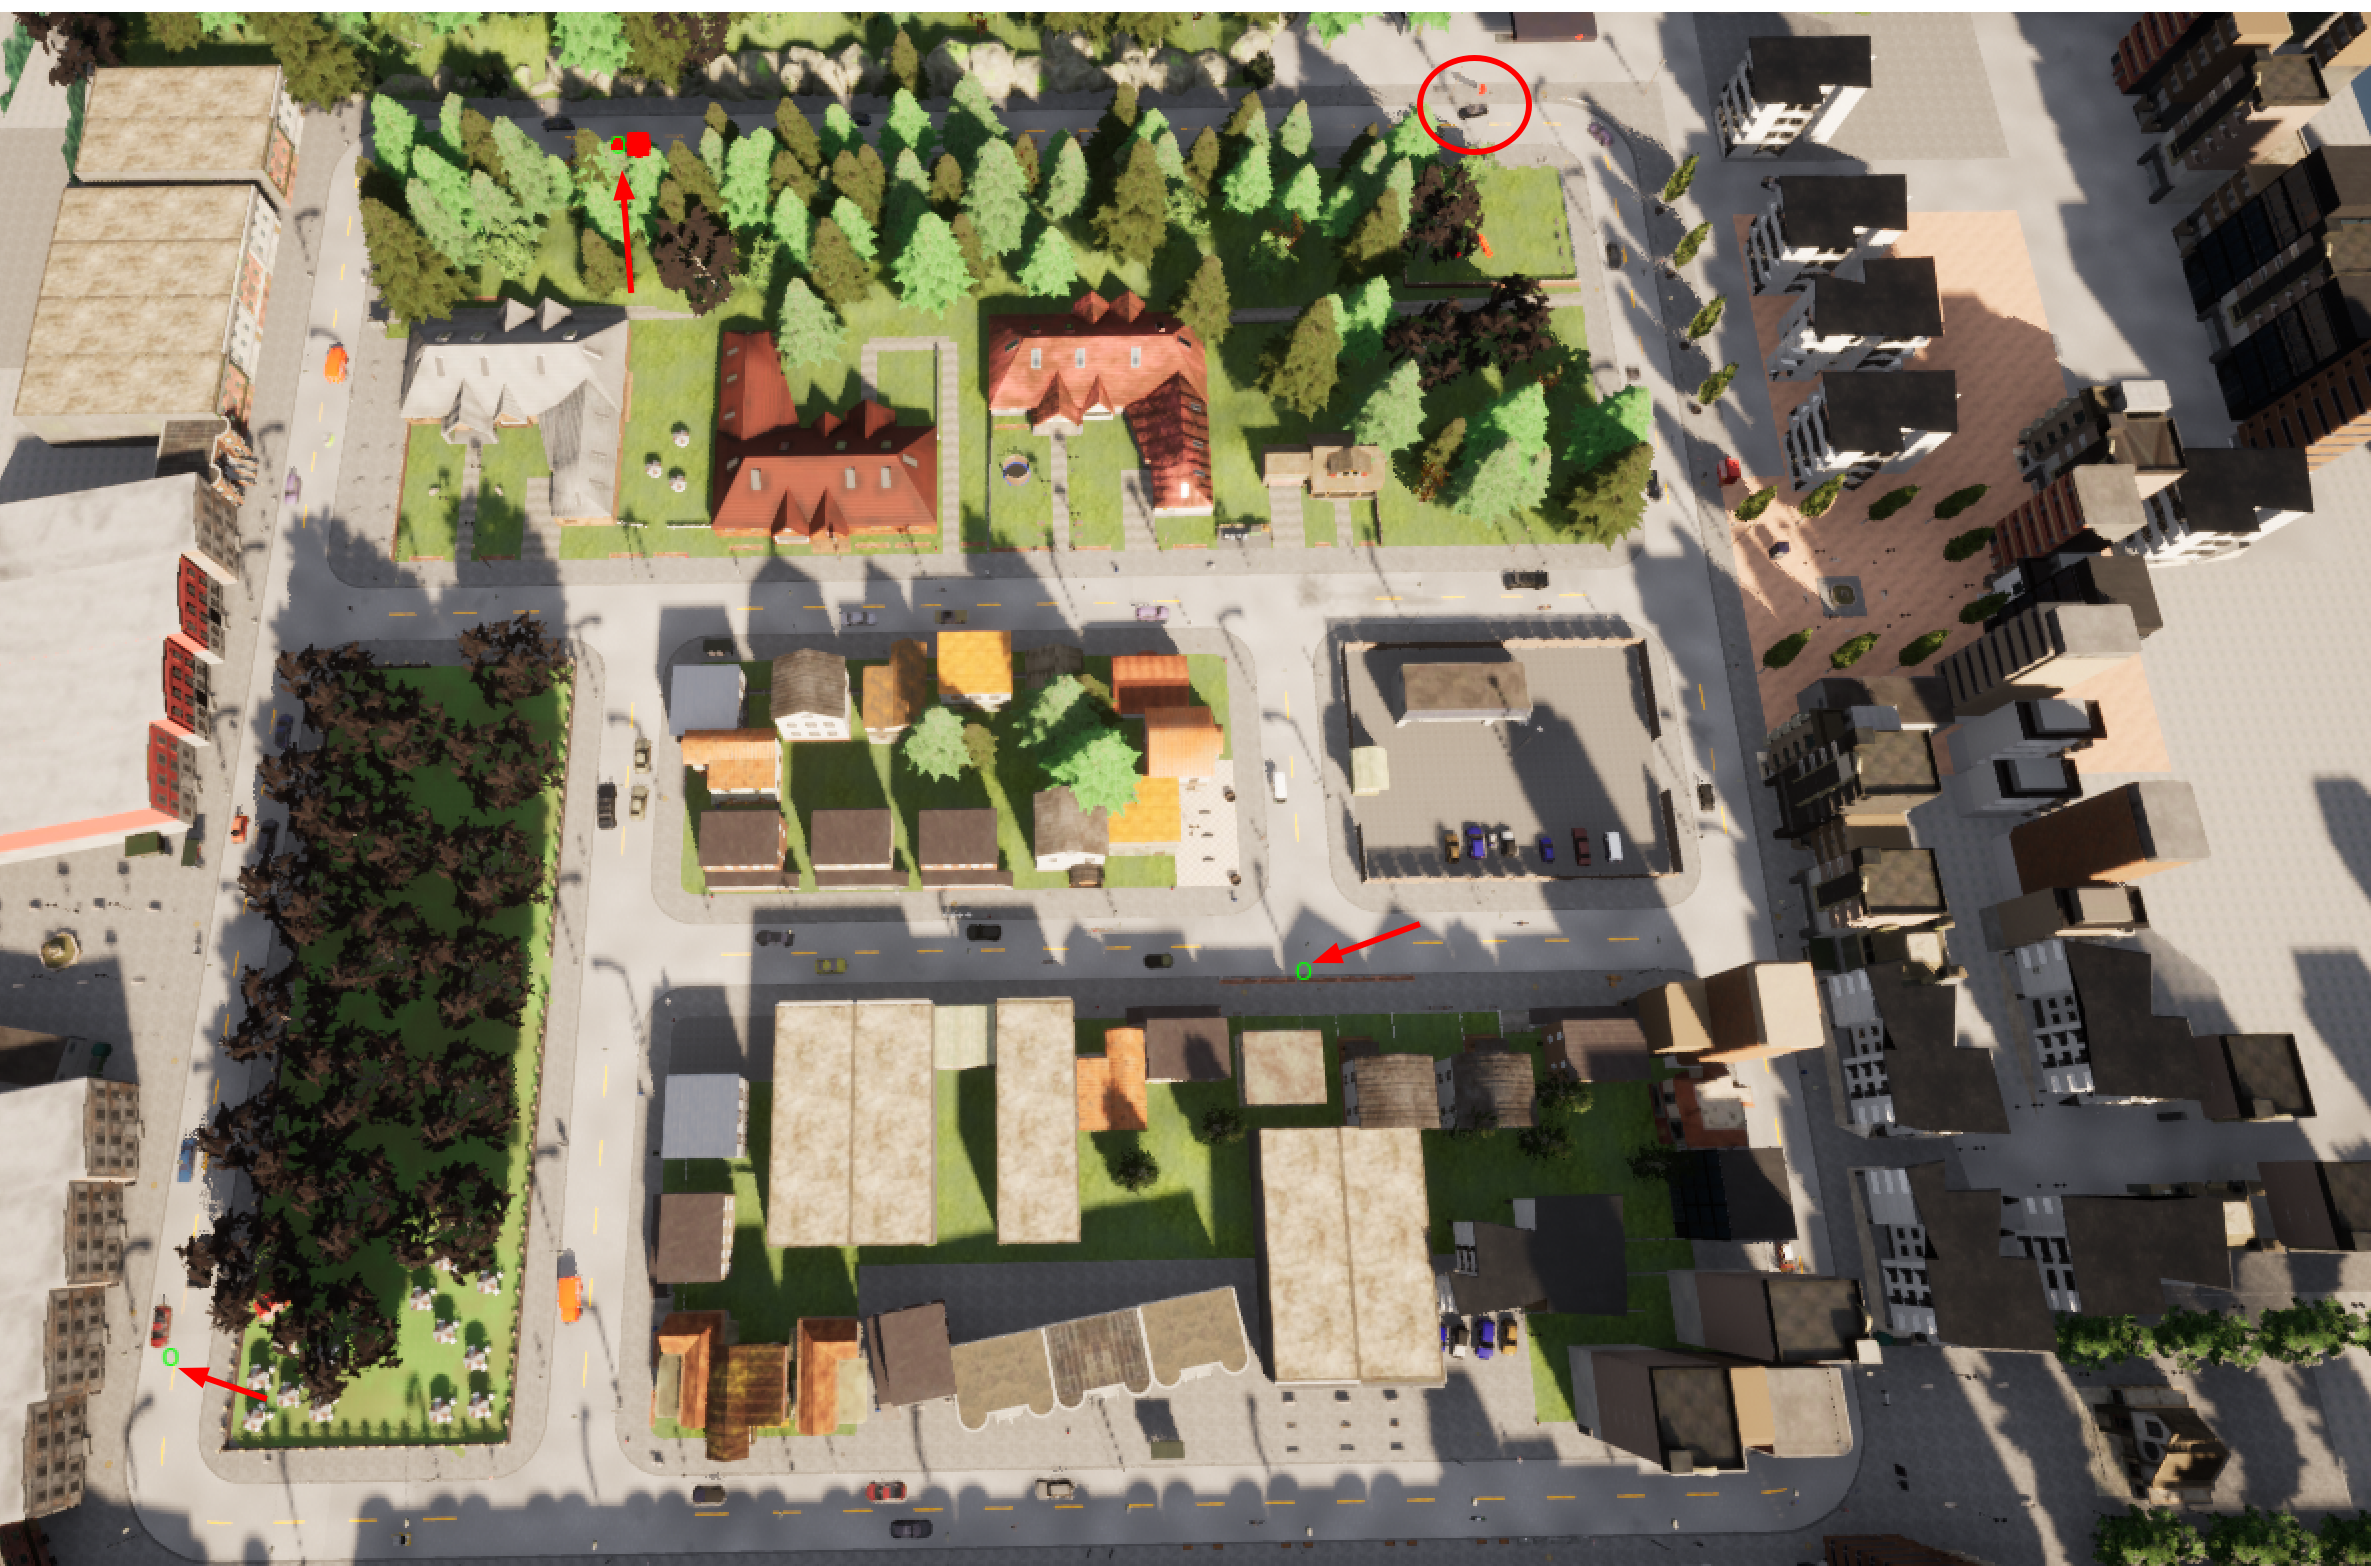
图片中循环三个绿色目标点,红色为当前要去的目标,使用Behavior 行为规划器进行循环目标点


 570
570


 被折叠的 条评论
为什么被折叠?
被折叠的 条评论
为什么被折叠?
 到【灌水乐园】发言


