


如果嫌弃c站,可移步博客园:只要主题不崩 问题不大: https://www.cnblogs.com/kin-zhang/p/16984139.html
前提:大家需要换源【软件源和pip源】;git clone的时候走博主给的Gitee的链接吧 不然得等个十万年…
如果想看最终是啥样的可以直接点运行autoware书签查看Gif图,此次安装还没有给CUDA降级所以是without CUDA,这个系列后面应该还会继续写 因为要做一个拿autoware搭建的小车
参考:
1.Autoware官方Github
2.官方源码编译教程
3.官方运行BAG教程
大家记得点开左/右侧目录看哈!!记得看目录哈!
更新日记:
2022/12/16:看到这个于 2021-01-08 14:42:49 发布 的 当时真的是给自己记录的帖子 帮助了那么多人 也算是没有白写 hhhh,这次主要是重构了一下内容 把官方不见的wiki链接贴上,顺便贴一下对大家下载更友好的网盘方式
0. 系统依赖
换源,不然速度真的很慢哦!
pip升级
pip install -i https://pypi.tuna.tsinghua.edu.cn/simple pip -U
换源pip
pip config set global.index-url https://pypi.tuna.tsinghua.edu.cn/simple
ROS源
基本在安装ROS的时候应该就改好了,这就不复述了
软件源
打开Software&Updates
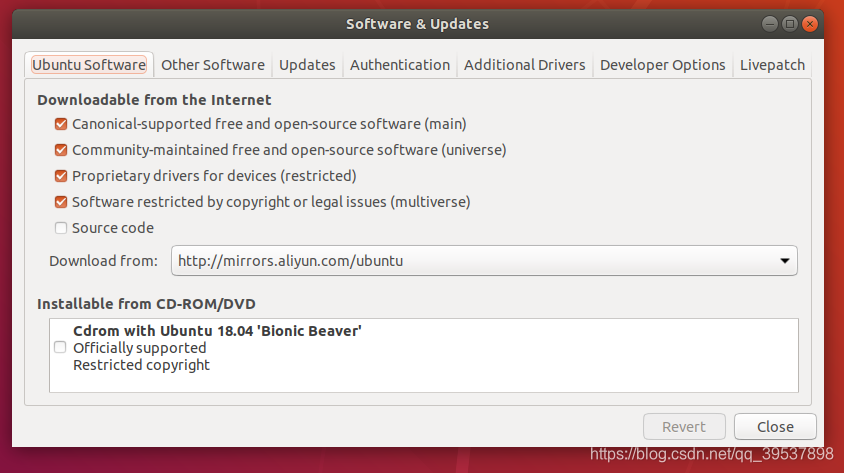
更新软件源
sudo apt update
更新python-ros的一些东西(catkin_make rosdep有关ros装依赖的可以类比Python的requirement.txt)
sudo apt install -y python-catkin-pkg python-rosdep ros-$ROS_DISTRO-catkin
python的依赖
sudo apt install -y python3-pip python3-colcon-common-extensions python3-setuptools python3-vcstool
pip3的设置工具安装
pip3 install -U setuptools
1. CUDA (Additional system) 如果不用CUDA直接跳转第二部分拉取2.
注意!!!ATTENTION!!!
显卡显存在4G以下的可以直接跳过这个部分了,如果想开Carla显卡显存至少6G,GPU就==out of memory==了
Autoware对CUDA的要求是:10.0 从2022年看来 这个版本着实有点低了
安装整合到另一篇文章内了 Ubuntu下的NVIDIA显卡【安装与卸载、CUDA安装】
2. 拉取repos
创建工作区 workspace
mkdir -p autoware.ai/src
cd autoware.ai
官方的
创建autoware.ai.repos的文件,拉取官方的repos链接 真的很慢很慢哈
wget -O autoware.ai.repos "https://raw.githubusercontent.com/Autoware-AI/autoware.ai/master/autoware.ai.repos"
repositories:
  autoware/common:
    type: git
    url: https://github.com/Autoware-AI/common.git
    version: master
  autoware/core_perception:
    type: git
    url: https://github.com/Autoware-AI/core_perception.git
    version: master
  autoware/core_planning:
    type: git
    url: https://github.com/Autoware-AI/core_planning.git
    version: master
  autoware/documentation:
    type: git
    url: https://github.com/Autoware-AI/documentation.git
    version: master
  autoware/messages:
    type: git
    url: https://github.com/Autoware-AI/messages.git
    version: master
  autoware/simulation:
    type: git
    url: https://github.com/Autoware-AI/simulation.git
    version: master
  autoware/utilities:
    type: git
    url: https://github.com/Autoware-AI/utilities.git
    version: master
  autoware/visualization:
    type: git
    url: https://github.com/Autoware-AI/visualization.git
    version: master
  drivers/awf_drivers:
    type: git
    url: https://github.com/Autoware-AI/drivers.git
    version: master
  citysim:
    type: git
    url: https://github.com/CPFL/osrf_citysim.git
    version: master
  car_demo:
    type: git
    url: https://github.com/CPFL/car_demo.git
    version: master
  drivers/ds4:
    type: git
    url: https://github.com/tier4/ds4.git
    version: master
拉到了gitee上
就是在创建好的autoware.ai.repos上直接全选覆盖掉
repositories:
  autoware/common:
    type: git
    url: https://gitee.com/kin_zhang/common.git
    version: master
  autoware/core_perception:
    type: git
    url: https://gitee.com/kin_zhang/core_perception.git
    version: master
  autoware/core_planning:
    type: git
    url: https://gitee.com/kin_zhang/core_planning.git
    version: master
  autoware/documentation:
    type: git
    url: https://gitee.com/kin_zhang/documentation.git
    version: master
  autoware/messages:
    type: git
    url: https://gitee.com/kin_zhang/messages.git
    version: master
  autoware/simulation:
    type: git
    url: https://gitee.com/kin_zhang/simulation.git
    version: master
  autoware/utilities:
    type: git
    url: https://gitee.com/panecho/utilities.git
    version: master
  autoware/visualization:
    type: git
    url: https://gitee.com/kin_zhang/visualization.git
    version: master
  drivers/awf_drivers:
    type: git
    url: https://gitee.com/kin_zhang/drivers.git
    version: master
  citysim:
    type: git
    url: https://gitee.com/kin_zhang/osrf_citysim.git
    version: master
  car_demo:
    type: git
    url: https://gitee.com/kin_zhang/car_demo.git
    version: master
  drivers/ds4:
    type: git
    url: https://gitee.com/kin_zhang/ds4.git
    version: master
3. 下载
如果在内地记得 先都换成gitee上的链接 再运行这这步 会快很多
vcs import src < autoware.ai.repos
4. rosdep的依赖
这一个我安装ROS的时候dep那步一直拉不过来所以一直没… rosdep的功能
如果有dep的功能的话,请直接运行:并忽略下面的安装依赖部分(并且十分建议rosdep这么做)
rosdep install -y --from-paths src --ignore-src --rosdistro $ROS_DISTRO
那就麻烦点,一个编译一个错误的安装?
ROS方面的
主机上直接安装的ROS-full-desktop,傻一点的方法碰到一个错误就安装一个漏掉的包这是所有的:运行这一堆的就是全部了
sudo apt-get install ros-melodic-jsk-recognition-msgs ros-melodic-jsk-rviz-plugins ros-melodic-lanelet2* ros-melodic-nmea* ros-melodic-grid-map* ros-melodic-automotive-* ros-melodic-velodyne* ros-melodic-gps-common ros-melodic-qpoases-vendor
下面是一个个的介绍:这里是一个个的介绍哦【运行了上面这条指令不需要再逐个运行这个了】
sudo apt-get install ros-melodic-jsk-recognition-msgs ros-melodic-jsk-rviz-plugins ros-melodic-lanelet2* ros-melodic-nmea* ros-melodic-grid-map* ros-melodic-automotive-* ros-melodic-velodyne*
sudo apt-get install ros-melodic-gps-common
sudo apt-get install ros-melodic-qpoases-vendor
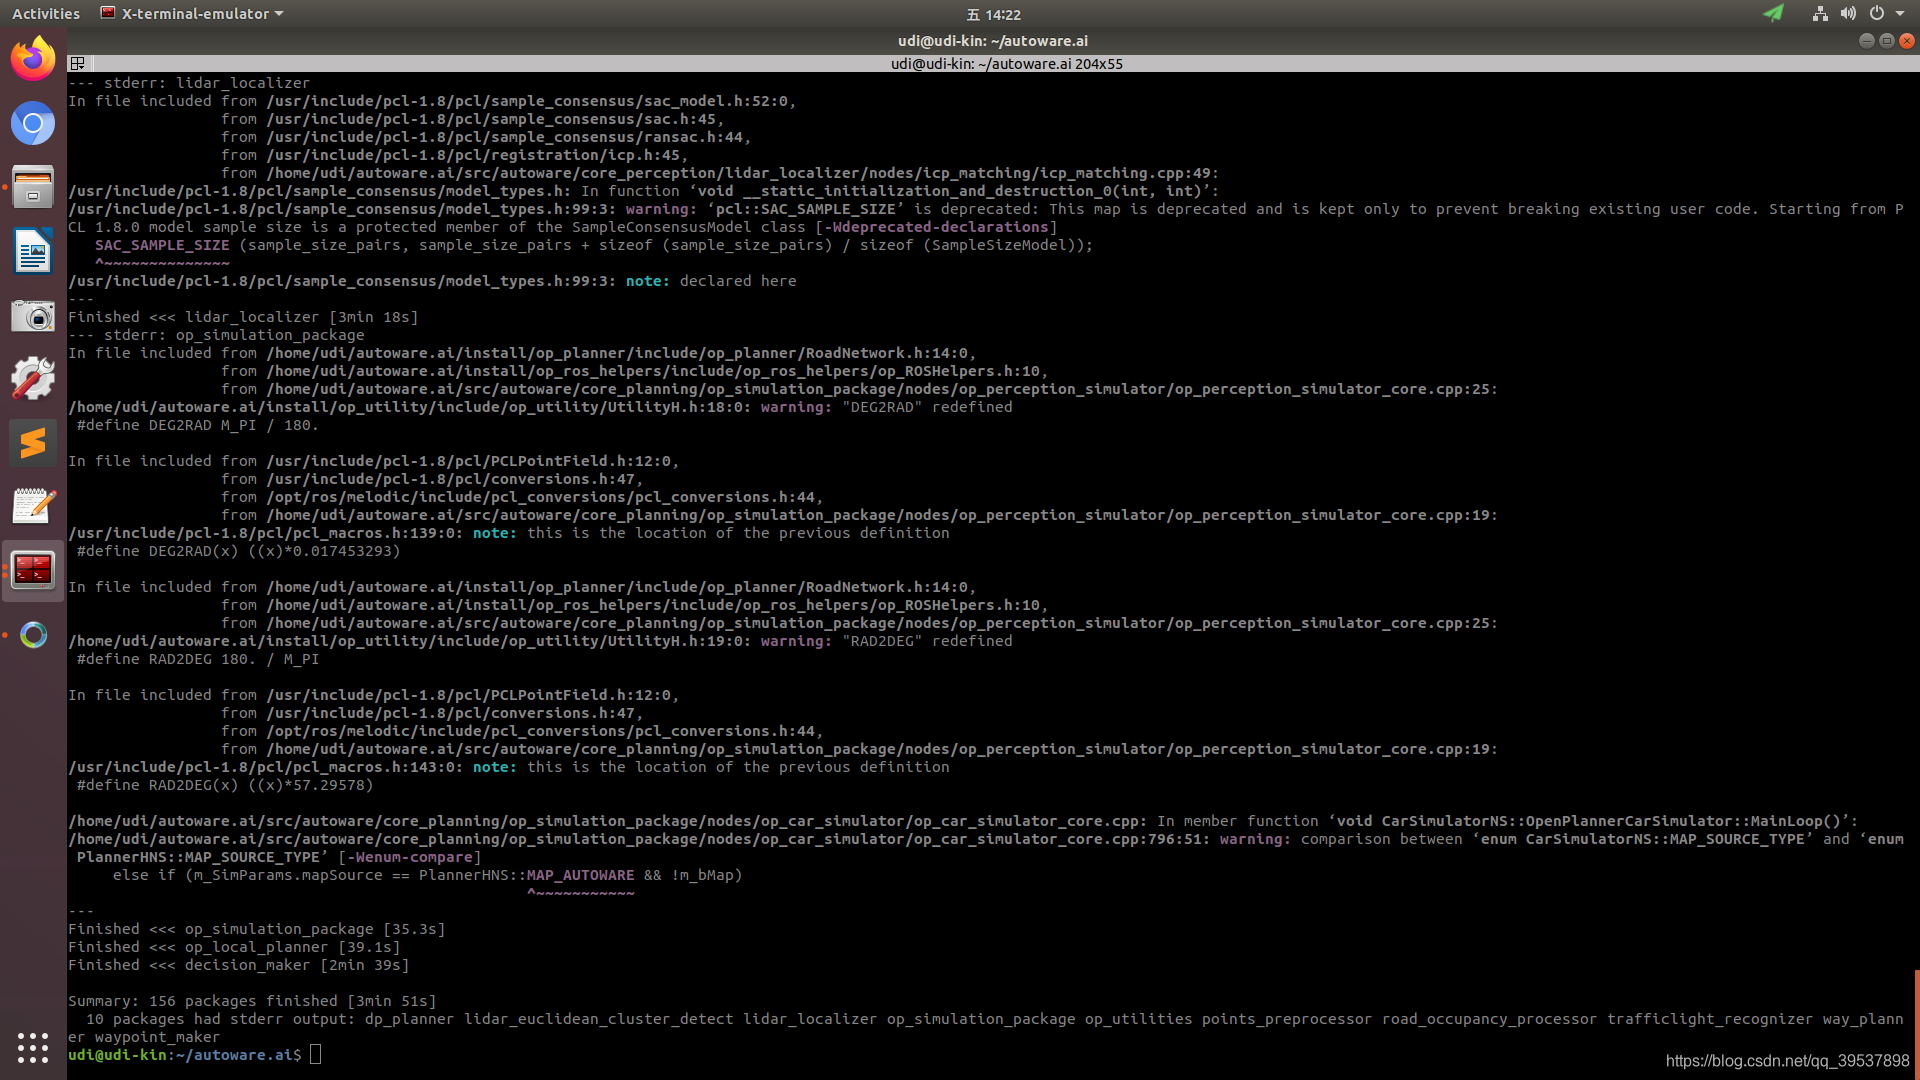
错误及警告的示例
错误及警告的示例,其实远远不止这么点
#错误1
Finished <<< sick_lms5xx [20.4s]
Starting >>> system_monitor
Finished <<< imm_ukf_pda_track [31.5s]
Starting >>> twist2odom
--- stderr: system_monitor
CMake Error: The following variables are used in this project, but they are set to NOTFOUND.
Please set them or make sure they are set and tested correctly in the CMake files:
LIBNL3_INCLUDE_DIRS

#错误2
--- stderr: system_monitor
CMake Error: The following variables are used in this project, but they are set to NOTFOUND.
Please set them or make sure they are set and tested correctly in the CMake files:
NLGENL3
    linked by target "net_monitor" in directory /home/udi/autoware.ai/src/autoware/utilities/system_monitor
    linked by target "test_net_monitor" in directory /home/udi/autoware.ai/src/autoware/utilities/system_monitor

#警告
[6.285s] WARNING:colcon.colcon_cmake.task.cmake.build:Could not run installation step for package 'ndt_gpu' because it has no 'install' target
系统方面的
sudo apt install libnl-3-*
sudo apt install libnl-genl-3-*
关于依赖的后话
我后面又在我的PC双系统上按着自己的教程走了一遍发现(同样没有dep)有些我==没有写全==,所以大家还是开一下小飞机 把dep过一下,让rosdep自己去搞定依赖,
还有有一个问题:velodyne的驱动中的一个系统的包升级了不存在旧包,当时的解决方法是删了新包,安了旧包的版本,但是不建议这样操作,因为很容易导致系统依赖出问题,之所以我当时这么做:是因为发送删新包的时候没有其他东西同时删除,也就说没有其他的影响(比如我安装plotjuggler就要删除一个系统包 基本附加删除删了整个ROS… 也就是不要这么干的原因)
//home/user/anaconda3/lib/libfontconfig.so.1: undefined reference to `FT_Done_MM_Var’
参考:
ubuntu18 anaconda3/lib/libfontconfig.so.1: undefined reference to `FT_Done_MM_Var‘ collect2: error:
cd /usr/lib/x86_64-linux-gnu
ll |grep libfontconfig.so.1
cd ~/anaconda3/lib
ll | grep libfontconfig.so.1

方法就是把1.10.1复制到anaconda文件夹下,删除原有链接并创建新链接
cp /usr/lib/x86_64-linux-gnu/libfontconfig.so.1.10.1 ~/anaconda3/lib/libfontconfig.so.1.10.1
ls ~/anaconda3/lib/libfontconfig.so*
5. 编译 Compile the workspace
建议走CPU【也就是without CUDA support】比较简单,如果想用GPU运行一些节点的话,测试过的是需要3G以上的显存才行,CUDA版本是10.0
【两个方式二选一!!!】 不是都要做哈!!!选其一!!!比如不用GPU就选without的哈!!【也就是without CUDA support】
With CUDA support
编译Autoware
1.14版本的或者直接master拉下来的,在其中一个地方有点问题没有define,记得改一下这个。在cnn_segmentation.h中没有define__APP_NAME__
gedit ~/autoware.ai/src/autoware/core_preception//lidar_apollo_cnn_seg_detect_include/cnn_segmentation.h
#define __APP_NAME__ "lidar_apollo_cnn_seg_detect"
//加入这行进去就行 不然会报错
caffe详情见:请记得跳转GPU版本,这句命令一定要建立在安装好了CUDA和caffe的!
$ AUTOWARE_COMPILE_WITH_CUDA=1 colcon build --cmake-args -DCMAKE_BUILD_TYPE=Release
Without CUDA Support 【两个方式二选一!!!执行了上面的就跳过这段】
Without CUDA Support 【我没装CUDA那步 所以使用的是这条命令】
$ colcon build --cmake-args -DCMAKE_BUILD_TYPE=Release
编译完成后:
单独编译某个包
colcon build --cmake-args -DCMAKE_BUILD_TYPE=Release --packages-select detected_objects_visualizer
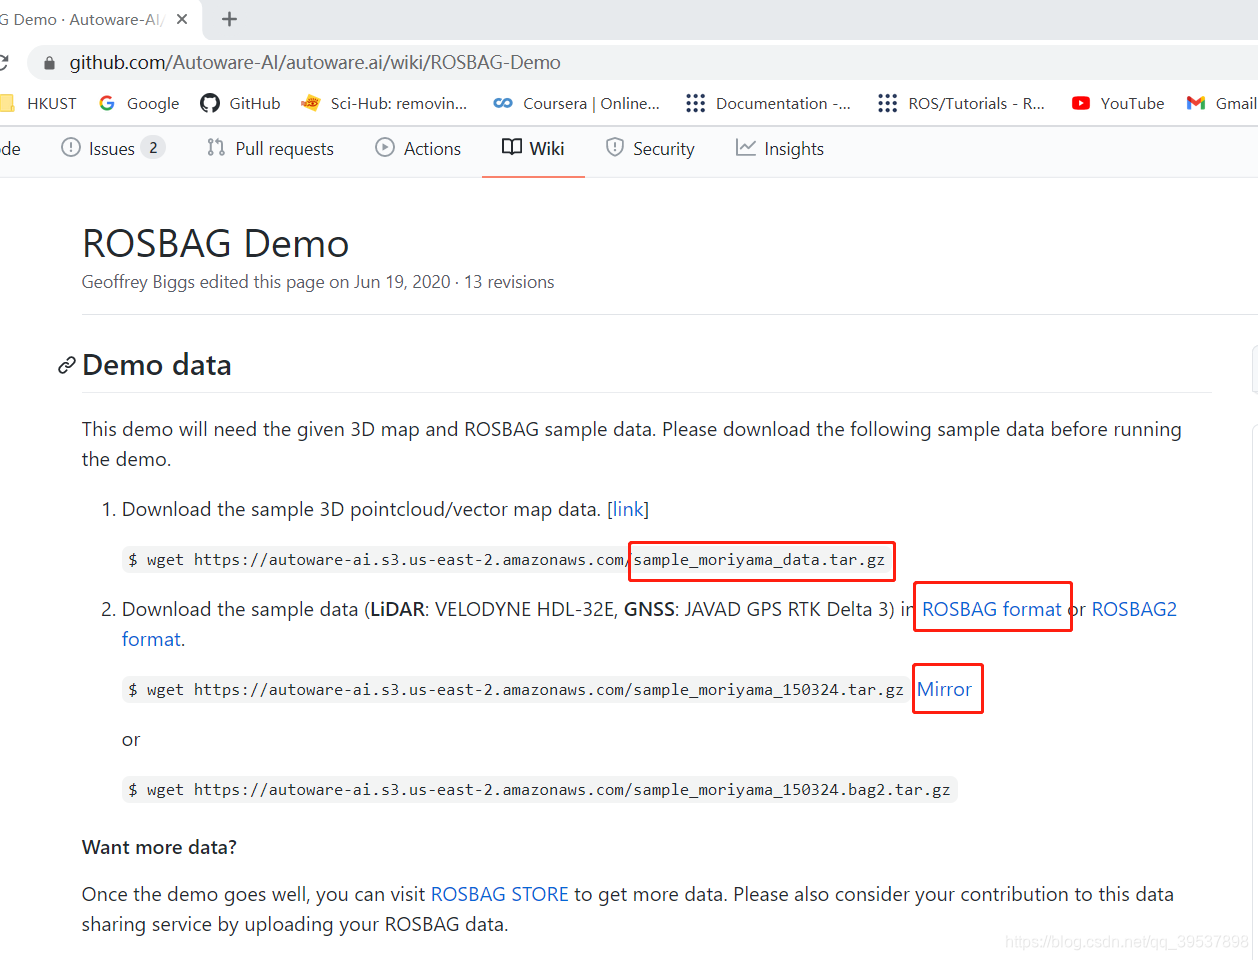
6. 下载Bag包并运行
下载BAG包
这个过期了:官方的下载地址 但是很慢很慢很慢
2022/12/14这是我找到的官方gitlab上还有存留下来的:官方下载地址 但是在内地很慢很慢很慢
百度云下载地址 但是不是会员也很慢 password: kinz ,阿里云盘无法分享 所以就无了
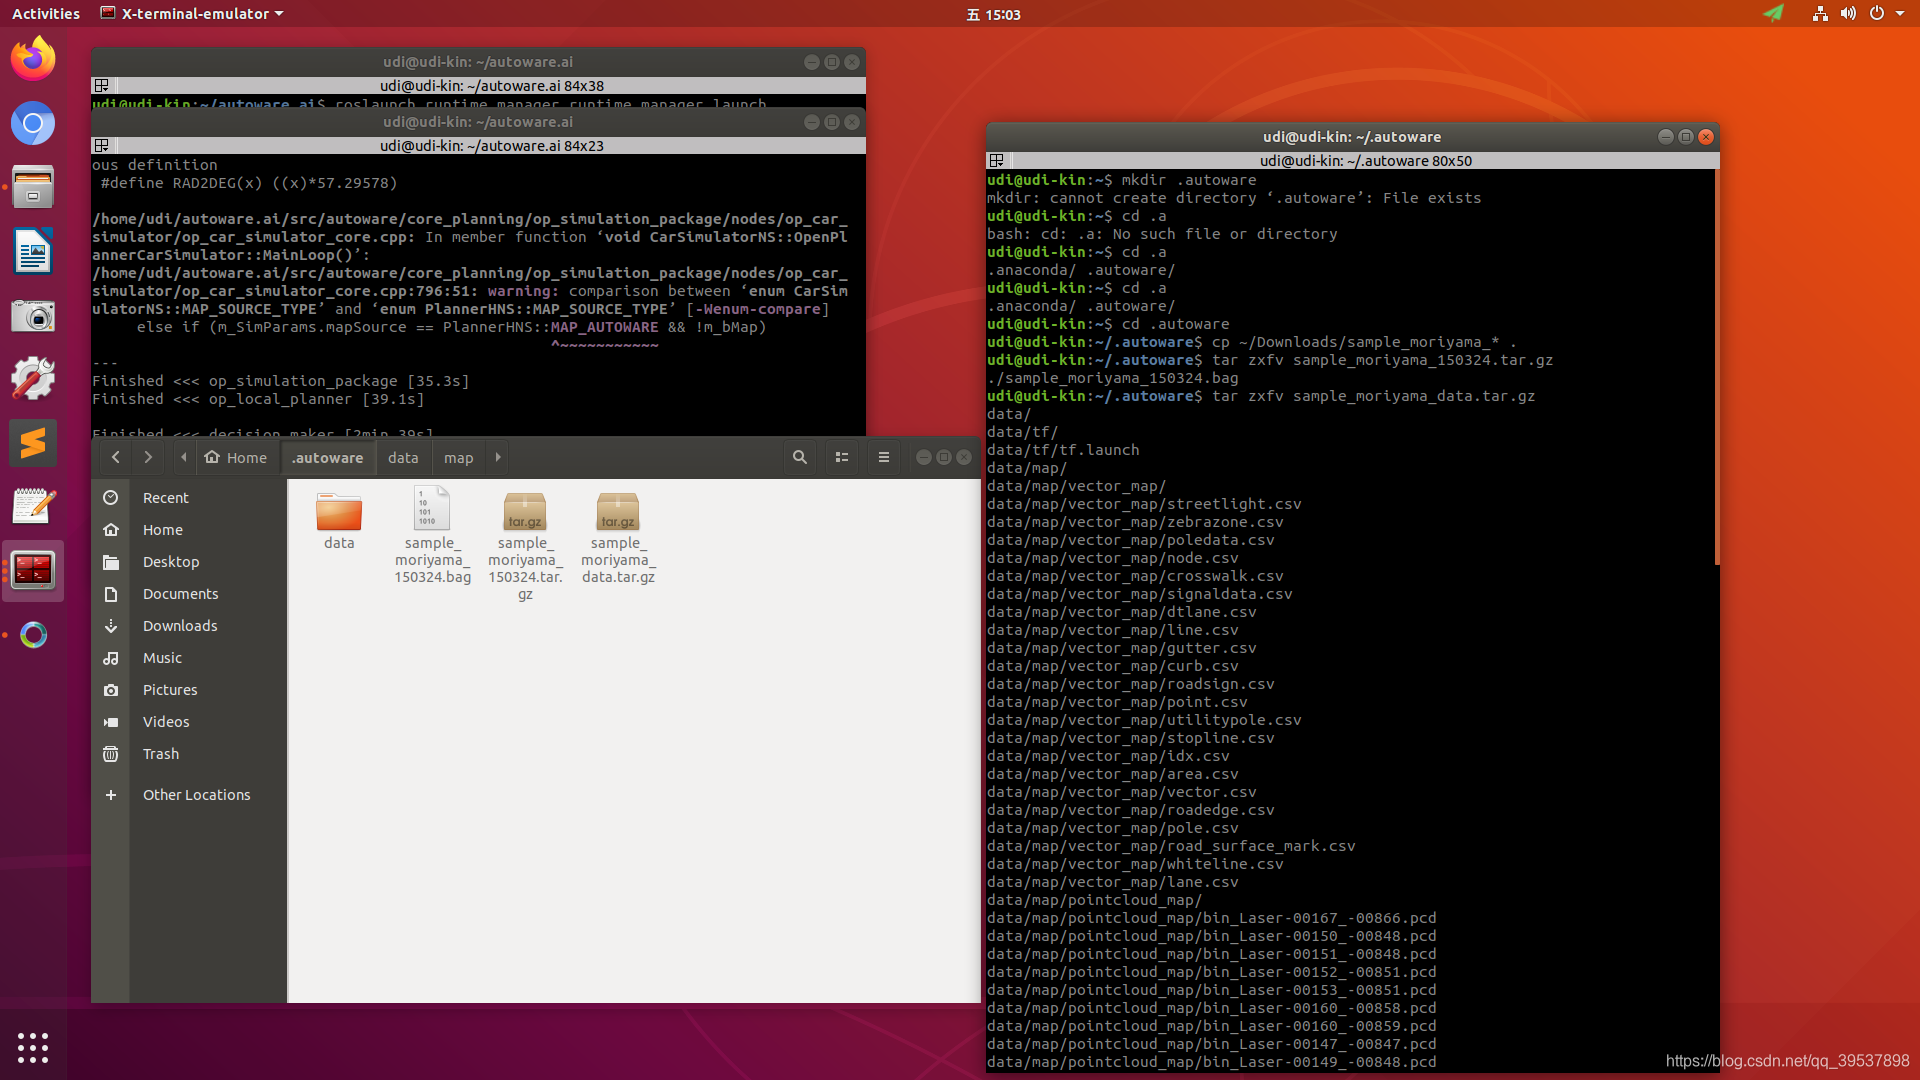
这里是把下载下来的BAG包复制到.autoware的文件夹下:
mkdir .autoware
cd .autoware
cp ~/Downloads/sample_moriyama_* .
这一步是把BAG解压出来:
tar zxfv sample_moriyama_150324.tar.gz
moriyama的数据解压出来:
tar zxfv sample_moriyama_data.tar.gz
图形化界面下是这样的:
运行autoware
cd autoware.ai
source install/setup.bash
roslaunch runtime_manager runtime_manager.launch
运行的截图界面如下:
剩下复制官方的哈~
- 导入BAG:Go to the Simulation tab of Autoware Runtime Manager (ARM), and load the sample ROSBAG data, which is located in ~/.autoware. Show Hidden Files needs to be checked for the .autoware folder to be displayed.
- 设置开始时间并运行:Set the start time to 140, then click Play and Pause just after it has started playing.
- 启动rviz:Launch RViz through the RViz button in the bottom-right corner of the ARM and load the default.rviz config provided with Autoware. To do this got to File -> Open Config and navigate to
autoware.ai/src/autoware/documentation/autoware_quickstart_examples/launch/rosbag_demo/default.rviz. - Go to the Quick Start tab of ARM, and load the preinstalled roslaunch scripts one by one. The scripts are located in autoware.ai/src/autoware/documentation/autoware_quickstart_examples/launch/rosbag_demo/. The scripts need to be enabled by clicking on the left button as shown in the image for the Map.
- Un-pausing the simulation after starting the Map will show the pointcloud map in Rviz.
Simulation的界面:
Quick Start的界面:
运行所有的launch后的示意图:

运行时的graph图:
一些需要注意的问题
ndt_mapping 无法建图 [GO TO Autoware: ndt_mapping doesn’t compute transformation matrix]
2022年:或者这个就别用了,我直接抽取了一个simple_ndt_mapping,内核是一样的 只是变得更适配了 hhh 比较简单就能上手,脱离Autoware,但是!生成出来的map可以直接load autoware的GUI里 这一点都是一样的哈
这个问题出现在0.1.14里,如果换成1.13就可以了,具体原因还在compare找一下,Autoware: ndt_mapping doesn’t compute transformation matrix
直接在1.14里的解法是:在原ndt_mapping.cpp的1016-1046之间换成这个:
  double tf_x, tf_y, tf_z, tf_roll, tf_pitch, tf_yaw;
  // 3. Try getting base_link -> lidar TF from tf_* params
  if (!received_tf)
  {
    if (nh.getParam("tf_x", tf_x) &&
        nh.getParam("tf_y", tf_y) &&
        nh.getParam("tf_z", tf_z) &&
        nh.getParam("tf_roll", tf_roll) &&
        nh.getParam("tf_pitch", tf_pitch) &&
        nh.getParam("tf_yaw", tf_yaw))
    {
      tf::Vector3 trans(tf_x, tf_y, tf_z);
      tf::Quaternion quat;
      quat.setRPY(tf_roll, tf_pitch, tf_yaw);
      tf_baselink2primarylidar.setOrigin(trans);
      tf_baselink2primarylidar.setRotation(quat);
      received_tf = true;
    }
    else
    {
      ROS_WARN("Query base_link to primary lidar frame through tf_* params failed");
    }
  }
  if (received_tf)
  {
    ROS_INFO("base_link to primary lidar transform queried successfully");

    tf_baselink2primarylidar.getOrigin();
    tf_x = tf_baselink2primarylidar.getOrigin().getX();
    tf_y = tf_baselink2primarylidar.getOrigin().getY();
    tf_z = tf_baselink2primarylidar.getOrigin().getZ();
    Eigen::Translation3f tl_btol(tf_x, tf_y, tf_z);// tl: translation

    tf::Matrix3x3(tf_baselink2primarylidar.getRotation()).getRPY( tf_roll, tf_pitch,tf_yaw);
    Eigen::AngleAxisf rot_x_btol(tf_roll, Eigen::Vector3f::UnitX());  // rot: rotation
    Eigen::AngleAxisf rot_y_btol(tf_pitch, Eigen::Vector3f::UnitY());
    Eigen::AngleAxisf rot_z_btol(tf_yaw, Eigen::Vector3f::UnitZ());
    tf_btol = (tl_btol * rot_z_btol * rot_y_btol * rot_x_btol).matrix();
    tf_ltob = tf_btol.inverse();
  }
主要原因是他没有更新tf_ltob这个需要在计算变换矩阵里用到的矩阵,然后我们做的就是看了看1.13 对比了,发现更新没有在1.14里所以emmm 就是这样
最后的bag包的建图局部效果:

关于后续
更多关于autoware.ai的学习请关注后续文章的发出,主要是移植路上遇到的问题、学习笔记、看代码笔记更多一些的~ 噢 当然也包含操作视频 想想应该搞完会拍一个系列到b站 毕竟真的是约到后面越难记清开这么多节点 \lol
2022年:其实吧 之前留的言 也算是实现了几个flag 确实搞了几个视频,写了更多一点的博客,回想当时第一次用autoware.ai的稚嫩,hhh 对很多东西都不太清楚 包括ubuntu本身 ros 算法 C++,现在看来自己一年成长的这么快也是算欣慰啦;很幸运第一次的入门是与autoware.ai,真的是一个很好很好的学习资料(除了网速拖累了我们的学习进度
希望此贴仅仅是开启 让你们步入使用,但是学习远不止于此,一起加油
记住这个博文是我2021年写的 很多东西确实会过时的哦,学有余力的大佬们可以抽取自己需要的部分,再分享给大家 更简易的使用!
最后Autoware 万岁!
赠人点赞 手有余香 😆;正向回馈 才能更好开放记录 hhh


 326
326


 被折叠的 条评论
为什么被折叠?
被折叠的 条评论
为什么被折叠?
 到【灌水乐园】发言


