


1.工具安装
通过git安装Verilator参照官方文档Installation — Verilator 5.003 documentation
git clone https://github.com/verilator/verilator   # Only first time

# Every time you need to build:
unsetenv VERILATOR_ROOT  # For csh; ignore error if on bash
unset VERILATOR_ROOT  # For bash
cd verilator
git pull         # Make sure git repository is up-to-date
git tag          # See what versions exist
#git checkout master      # Use development branch (e.g. recent bug fixes)
#git checkout stable      # Use most recent stable release
#git checkout v{version}  # Switch to specified release version

autoconf         # Create ./configure script
./configure      # Configure and create Makefile
make -j `nproc`  # Build Verilator itself (if error, try just 'make')
sudo make install
设置指向路径
export VERILATOR_ROOT=/path/to/where/verilator/was/installed
export PATH=$VERILATOR_ROOT/bin:$PATH
安装波形查看工具gtkwave
sudo apt-get install gtkwave
2.Verilator官方C++ demo
demo分为our.v硬件逻辑代码和sim_main.cpp上层仿真程序
our.v

module our;
     initial begin $display("Hello World"); $finish; end
endmodule
sim_main.cpp
#include "Vour.h"
#include "verilated.h"
int main(int argc, char** argv, char** env) {
VerilatedContext* contextp = new VerilatedContext;
contextp->commandArgs(argc, argv);
Vour* top = new Vour{contextp};
while (!contextp->gotFinish()) { top->eval(); }
delete top;
delete contextp;
return 0;
}运行脚本命令
verilator -Wall --cc --exe --build sim_main.cpp our.v
obj_dir/Vour
得到以下输出
Hello World
- our.v:2: Verilog $finish
3.双控开关
硬件逻辑单元
module top(
	input		wire		a,
	input		wire		b,
	output	    wire		f
);

	assign f = a ^ b;

endmodule
仿真文件程序
#include <stdio.h>
#include <stdlib.h>
#include <assert.h>

#include "Vtop.h"
#include "verilated.h"

#include "verilated_vcd_c.h"

int main(int argc,char** argv,char** env){
	  VerilatedContext* contextp = new VerilatedContext;
		contextp->commandArgs(argc, argv);
		Vtop* top = new Vtop{contextp};

		VerilatedVcdC* tfp = new VerilatedVcdC;//初始化VCD对象指针
		contextp->traceEverOn(true);//打开追踪功能
		top->trace(tfp,0);
		tfp->open("wave.vcd");//设置输出的文件wave.vcd


//		while(!contextp->gotFinish())
//		{
			for(int i = 0;i < 10; i++) {
				int a = rand() & 1;
				int b = rand() & 1;
				top->a = a;
				top->b = b;
				top->eval();
				printf("a = %d, b = %d, f = %d\n", a, b, top->f);

				tfp->dump(contextp->time());//dump wave
				contextp->timeInc(1);//推动仿真时间

				assert(top->f == (a ^ b));
			}
//			$finish;
//		}
		delete top;
		tfp->close();
		delete contextp;
		return 0;
}
运行脚本命令
verilator -Wall sim_top.cpp top.v --cc --trace --exe --build
obj_dir/Vtop
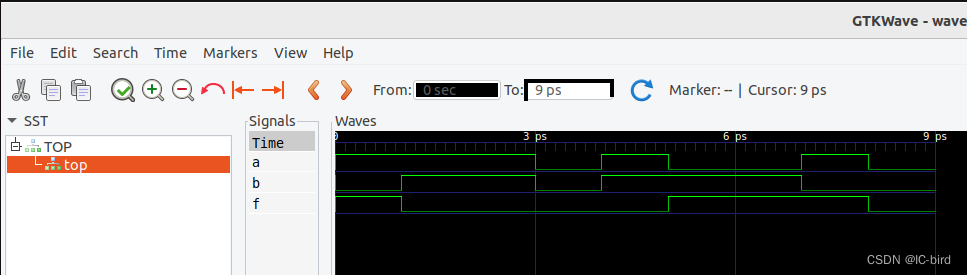
gtkwave wave.vcd输出如下
a = 1, b = 0, f = 1
a = 1, b = 1, f = 0
a = 1, b = 1, f = 0
a = 0, b = 0, f = 0
a = 1, b = 1, f = 0
a = 0, b = 1, f = 1
a = 0, b = 1, f = 1
a = 1, b = 0, f = 1
a = 0, b = 0, f = 0
a = 0, b = 0, f = 0
仿真波形


 2728
2728


 被折叠的 条评论
为什么被折叠?
被折叠的 条评论
为什么被折叠?
 到【灌水乐园】发言


