


文章目录
一、渲染属性与模式
OSG封装了几乎所有OpenGL渲染接口,包括光照、材质、纹理、Alpha测试、图像融合、面剔除、雾效、深度测试等,还包括OpenGL着色器语言GLSL中顶点着色器,几何着色器和片元着色器的实现。
1.OpenGl中的渲染状态设置
OpenGl使用了大量用于增强场景渲染性能的渲染状态宏,只要预先设定好这些宏的参数,并在适当的时候启用或者禁用宏,就可以实现多种多样的场景描述效果。且使用的是context上下文机制、状态机机制,即用户输入某一种渲染状态会一直保留,直到用户再次改变他们为止。

2.节点的渲染状态集合StateSet类
OSG采用包围体层次的形式来构建不同层次、不同功能的场景节点,每一个节点都可以保存多种类型的渲染属性和模式;而父子节点之间则存在多种渲染状态的继承关系。
我们将一个节点所赋予的多个渲染状态,包括各种属性Attribute和模式Mode,称为一个渲染状态集合,并使用StateSet类表示。

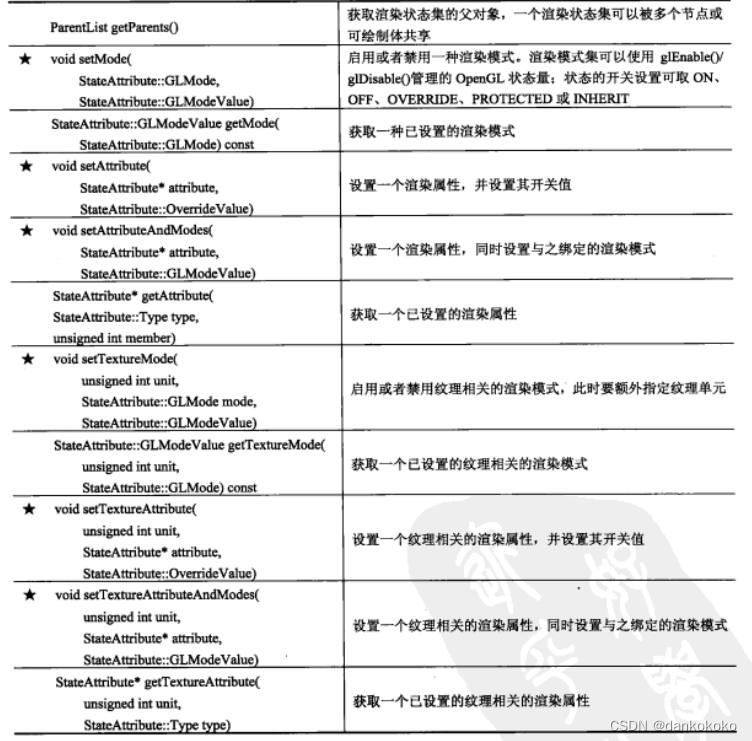
- OpenGL的某一类渲染属性往往需要通过设置一个或多个状态参数来实现。
- 渲染模式则是通过glEnable/glDisable设置一个开关量。
- 属性和模式之间可能存在绑定的关系,即某类属性由某一模式开关来执行启用/禁用。
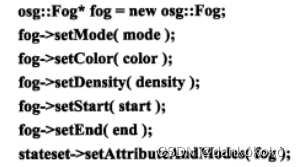
例如:


- 就是将OpenGL中各个渲染属性参数按照其类型进行分组和封装,并通过
setAttribute()设置给某个节点的渲染状态集StateSet。 - 对于纹理相关的属性,还需要额外指定一个纹理单元并使用
setTextureAttribute()进行传递。 - 属性和模式互相绑定时,则可以使用
setAttributeAndModes()或setTextureAttributeAndModes()。 - 上面的代码将可以改变成:
- 除了节点,可绘制对象Drawable也能应用渲染状态集。即一个叶节点Geode包含多个可绘制对象,那么这个叶节点和可绘制对象都可以拥有自己的渲染属性和模式集合。Drawable类和节点类设置和获取当前对应的渲染状态集接口类同:
osg::StateSet* stateset = node->getOrCreateStateSet();

- 渲染状态集的实例化

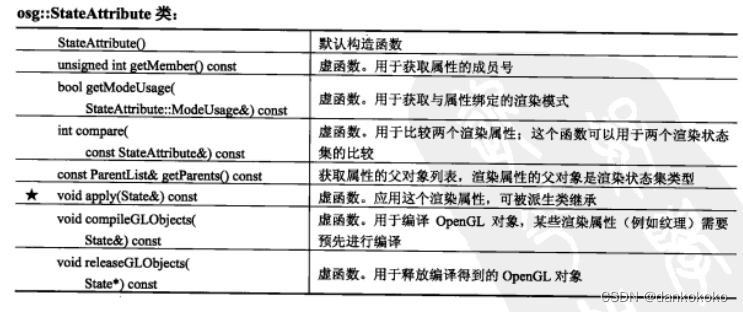
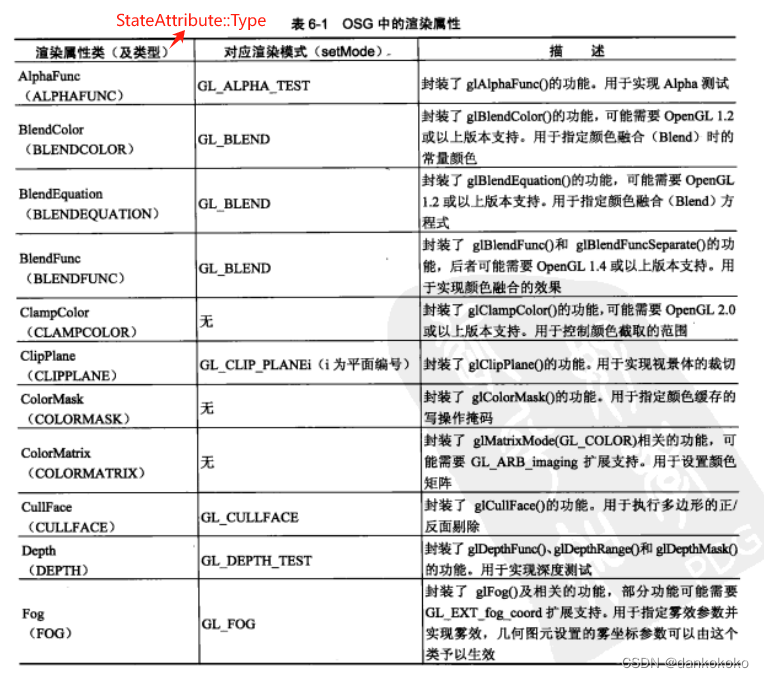
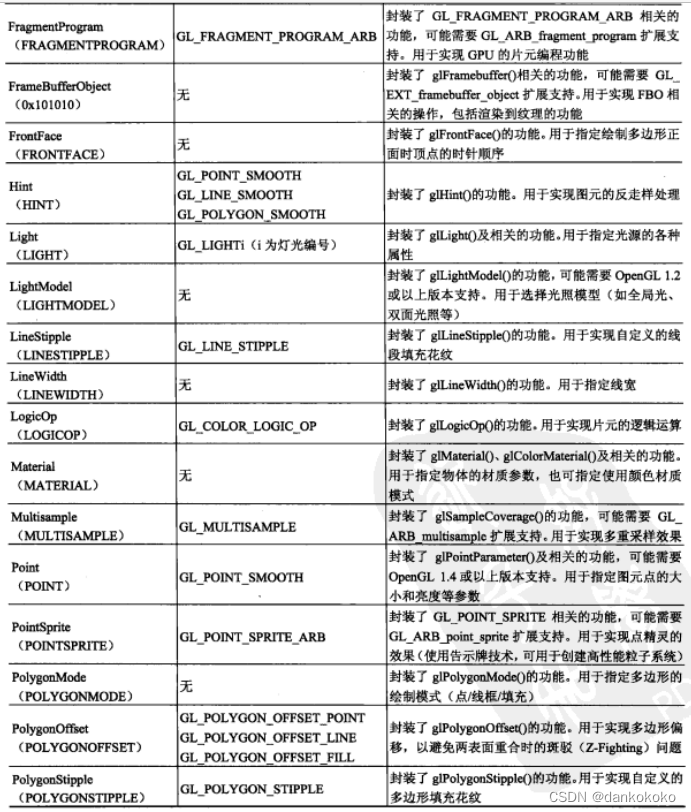
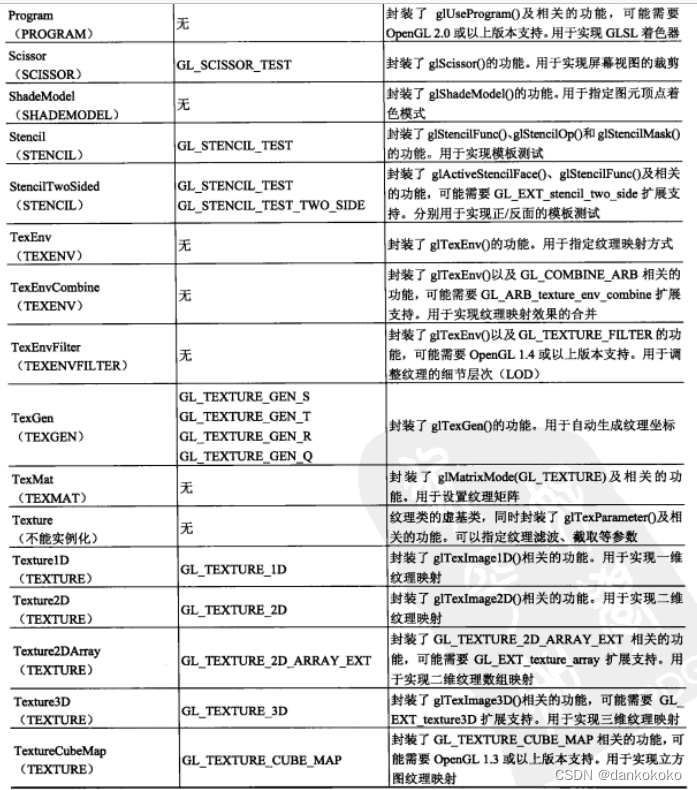
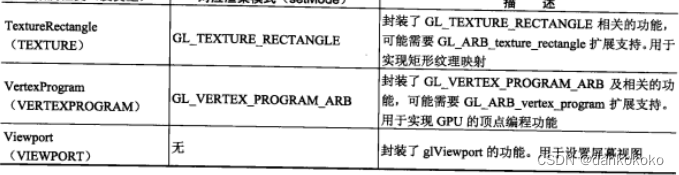
3.渲染属性StateAttribute类及其派生类(封装OpenGL渲染属性)
-
State是OpenGL状态集,用于封装顶点数组和VBO的绘制操作,参考
-
使用
osg::StateSet::getAttribute()获取渲染属性时,有可能出现一个渲染状态集包含了多个同类型属性的情况,此时可以使用成员号进一步区分。

-
属性对应的渲染模式可以使用
setMode()手动进行设置。 -
如果使用了
setAttibuteAndModes(),则相关的模式会自动在渲染过程中被启用(相当于自动执行了glEnable函数)。 -
没有对应渲染模式的渲染属性,仅仅使用setAttribute或setTextureAttribute进行设置即可。
Inherited by osg::AlphaFunc, osg::BlendColor, osg::BlendEquation, osg::BlendFunc,
osg::BufferIndexBinding, osg::Capability, osg::ClampColor, osg::ClipControl, osg::ClipPlane,
osg::ColorMask, osg::ColorMatrix, osg::CullFace, osg::Depth, osg::Fog, osg::FragmentProgram,
osg::FrameBufferObject, osg::FrontFace, osg::Hint, osg::Light, osg::LightModel, osg::LineStipple,
osg::LineWidth, osg::LogicOp, osg::Material, osg::Multisample, osg::PatchParameter, osg::Point,
osg::PointSprite, osg::PolygonMode, osg::PolygonOffset, osg::PolygonStipple,
osg::PrimitiveRestartIndex, osg::Program, osg::SampleMaski, osg::Scissor, osg::ShadeModel,
osg::ShaderAttribute, osg::Stencil, osg::StencilTwoSided, osg::TexEnv, osg::TexEnvCombine,
osg::TexEnvFilter, osg::TexGen, osg::TexMat, osg::Texture, osg::VertexAttribDivisor,
osg::VertexProgram, osg::Viewport, and osgFX::Validator.

//
OFF
means that associated GLMode and Override is disabled.

ON
means that associated GLMode is enabled and Override is disabled.

OVERRIDE
Overriding of GLMode's or StateAttributes is enabled, so that state below it is overridden.

PROTECTED
Protecting of GLMode's or StateAttributes is enabled, so that state from above cannot override this and below state.

INHERIT
means that GLMode or StateAttribute should be inherited from above.
二、纹理与纹理属性
1.纹理的实现方法
- 纹理映射Texture Mapping中,纹理是一个数组的概念,其中每一个数据(RGB颜色以及Alpha值,或系统及用户定义类型)称为一个纹素texel。
- 物体的纹理是可以根据用户视点的远近来自动调整和变化的,即纹理图像的细节层次Mipmap(Mipmap是一系列纹理,每个纹理都是同一图像的分辨率逐渐降低的表示形式,避免同一个图像在远处失真)。
- 当纹理无法安全覆盖几何体的每一个顶点时,通过边界截取方式的调整,可以重复映射同一块纹理,或者将边界颜色应用到未覆盖的物体表面上。
CLAMP:使用边界像素
CLAMP_TO_BORDER:使用指定边的颜色
REPEAT:重复纹理
MIRROR:镜像纹理
- 纹理坐标系中习惯用S,T,R三个轴表达世界坐标系X,Y,Z,并截取纹理坐标范围到[0.0,1.0]。二维纹理类型总是矩形的。
- 多重纹理是指同一个几何体上映射和混合多个纹理图像的绘制效果,每一个映射通道称为一个纹理单元(Texture Unit)。
osg::Texture

对场景中的节点Node或者几何体Geometry应用纹理属性时,通常需要预先指定每个顶点的纹理坐标,以便将图像正确地贴至物体上。
只有几何体可以设置纹理坐标。因此在设置节点的纹理之前,必须得到该节点子树中所有几何体对象并设置他们的纹理坐标。
因为stateset是可以被共享的,instance实例化,所以只要按需设置纹理坐标,可以对同一个纹理进行采样。
//geometry节点下每个顶点的纹理坐标
osg::ref_ptr<osg::Vec2Array> texcoords = new osg::Vec2Array;
texcoords->push_back(??);
...
geom->setTexCoordArray(0,texcoords.get());
- osg::Texture作为各种纹理表达方式的基类,保存了一些共通的属性和方法,包括纹理的滤波方式Filter(放大缩小过滤)、边界处的截取方式Clamp、明细层次Mipmaps的生成方式。纹理细节参考这里
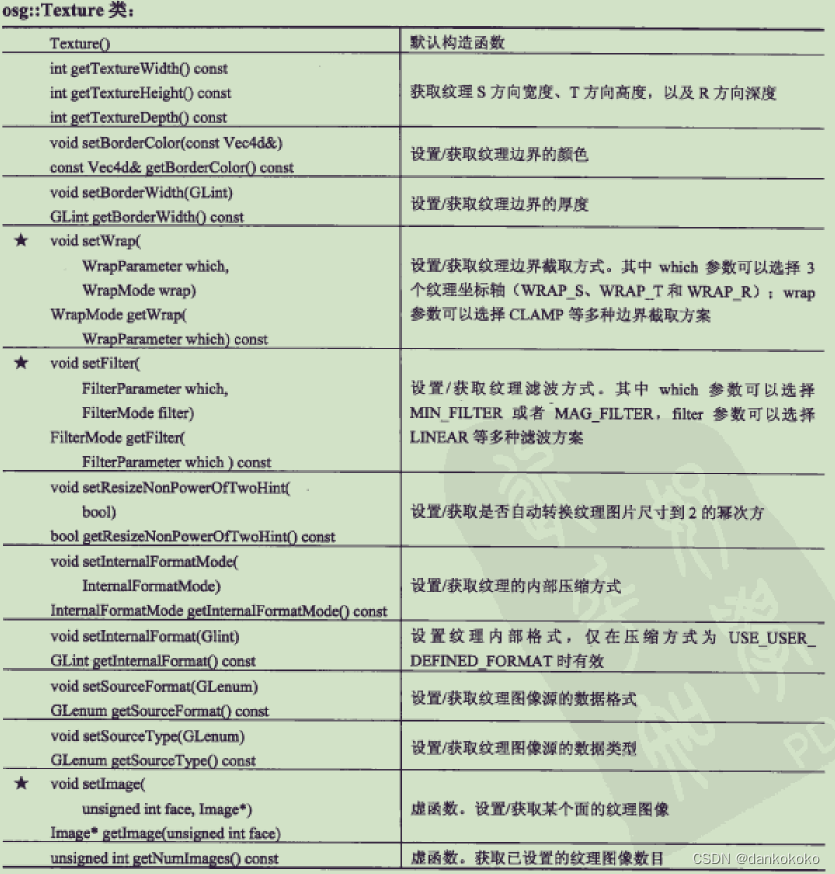
纹理内部格式InternalFormat
- The number of color components in the texture。
- 需要设置纹理内部压缩方式为USE_USER_DEFINED_FORMAT,参考
- internalformat 是指 OpenGL 内部存储这个纹理时所用的格式,同时指定了哪些分量以及每个分量对应的 bit 数,可以理解为显存中存储的格式,形如 GL_RGB, GL_RGB32F。
GL_ALPHA, GL_ALPHA4, GL_ALPHA8, GL_ALPHA12, GL_ALPHA16, GL_LUMINANCE, GL_LUMINANCE4, GL_LUMINANCE8, GL_LUMINANCE12, GL_LUMINANCE16, GL_LUMINANCE_ALPHA, GL_LUMINANCE4_ALPHA4, GL_LUMINANCE6_ALPHA2, GL_LUMINANCE8_ALPHA8, GL_LUMINANCE12_ALPHA4, GL_LUMINANCE12_ALPHA12, GL_LUMINANCE16_ALPHA16, GL_INTENSITY, GL_INTENSITY4, GL_INTENSITY8, GL_INTENSITY12, GL_INTENSITY16, GL_R3_G3_B2, GL_RGB, GL_RGB4, GL_RGB5, GL_RGB8, GL_RGB10, GL_RGB12, GL_RGB16, GL_RGBA, GL_RGBA2, GL_RGBA4, GL_RGB5_A1, GL_RGBA8, GL_RGB10_A2, GL_RGBA12, or GL_RGBA16.
以及上面代表每个分量的bit参考这里。
纹理图像源的数据格式和数据类型
- 描述传入的图像数据的!
- format 形如 GL_RG, GL_RED 等,即指定哪些颜色分量/模板/深度/亮度。
GL_COLOR_INDEX,GL_STENCIL_INDEX,GL_DEPTH_COMPONENT,GL_RGB,GL_ALPHA,GL_GL_LUMINANCE等。
- type 是像素数据的 bit depth,包括 GL_UNSIGNED_BYTE,GL_FLOAT等。
osg::Texture2D,二维纹理
新增了少量便捷操作函数,以及一个用于记录二维纹理图像源的osg::Image对象
 	Texture2D ();
 	Texture2D (Image *image);
 	void 	setImage (const ref_ptr< T > &image);
	Image * 	getImage ();

	// 设置2D纹理图像的大小
	void 	setTextureWidth (int width);
	void 	setTextureHeight (int height);
- OpenGL中使用glTexImage2D来实现二维纹理,它的传入参数与对应osg::Texture2D的成员方法如下(补:
- 二维纹理要求图像的宽度和高度必须是2的幂次方,单位是纹理。如果不符合此要求,Texture2D内部将自动重新采样,调整纹理图像的大小。
实例
osg::Texture2D *t = new osg::Texture2D(image);
t->setWrap(osg::Texture::WRAP_S,osg::Texture::CLAMP);
t->setWrap(osg::Texture::WRAP_T,osg::Texture::CLAMP);
t->setFilter(osg::Texture::MIN_FILTER,osg::Texture::LINEAR);
t->setFilter(osg::Texture::MAG_FILTER,osg::Texture::LINEAR);
osg::Texture1D,一维纹理
一般用于绘制一个彩色的条带,或者表达气压水饮柱的升降与警示值变化,因为只存在S方向上变化。
osg::Texture3D,三维纹理
常用于医学和地质学,可以理解为多层二维子纹理所构成的一个立方体。
osg::Texture2DArray,二维纹理数组
与三维纹理概念一致,成员函数也与Texture3D一致。
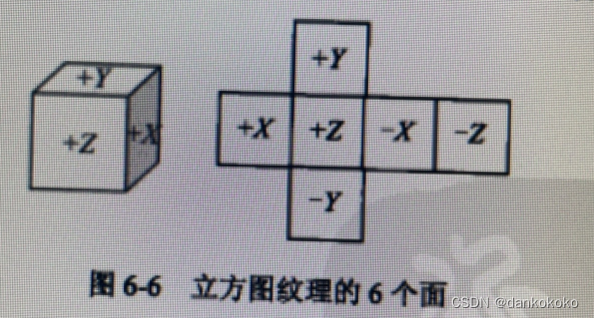
osg::TextureCubeMap,立方图纹理
使用6个二维图像表达一个立方体的6个面,而S\T\R坐标轴的原点为这个立方体的中心点。
主要用于反射贴图或环境贴图的表达,例如天空盒子。
osg::ref_ptr<osg::TextureCubeMap> cubemap = new osg::TextureCubeMap;
cubemap->setImage(osg::TextureCubeMap::POSITIVE_X,...);
cubemap->setImage(osg::TextureCubeMap::NEGATIVE_X,...);
osg::TextureRectangle,矩形纹理
不需要图像的尺寸必须是2的幂次方了,支持任意尺寸的二维图像作为纹理。
不受2的幂次方限制的图像成为NPOTS纹理(Non-power-of-two Sized),避免了重新采样过程,且节省空间,但是不支持Mipmap。
对于纹理边界截取方式也只有GL_CLAMP\GL_CLAMP_TO_EDGE和GL_CLAMP_TO_BORDER。
功能函数与Texture2D相同。
实例:一维纹理、二维纹理和立方图纹理(到球体上)(补
实例:纹理的明细层次(Mipmap)(补
三、属性的实现与访问StateAttribute
1.将属性应用到场景
渲染属性StateAttribute,包括纹理以及其他OpenGL属性(参考上面),其实现关键在于StateAttribute::apply函数。通过重构这个函数,在其中实现属性自定义代码,即可完成属性的设置(大多是用OpenGL API,将在场景渲染流程时讲解,参考)。
2.渲染状态集回调
OSG具有更新和事件的回调结构,用于场景每一帧更新的过程中,或者产生人机交互事件时,自动调用用户自定义的回调功能代码。

实例:雾参数的实时更新(补
四、OSG3.6.5与OpenGL着色语言
1.OpenGL着色语言GLSL
需要了解OpenGL渲染管线,参考,本节仅仅作为补充。
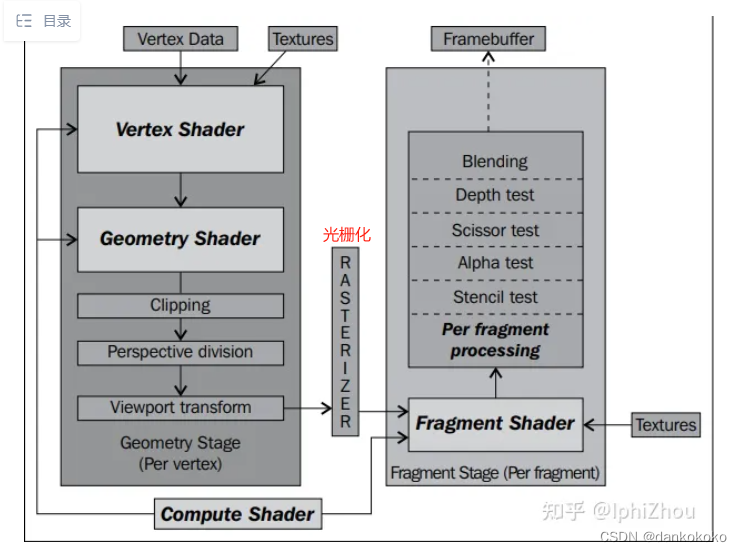
下面为GPU做的事情:
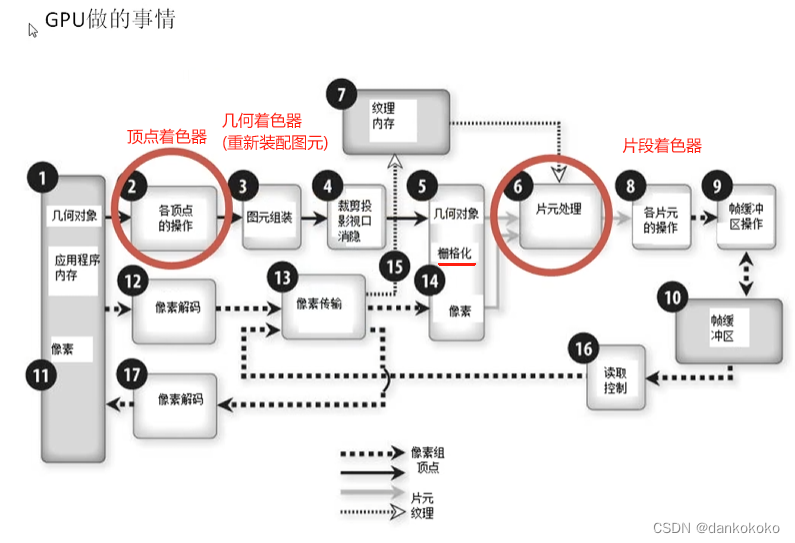
- 顶点着色器VS可以替代顶点和法线变换、纹理坐标生成和变换,如果是计算最好在顶点着色器中进行,因为VS一般是一个顶点运行一次,而片段着色器FS则每个像素可能执行多次,深度有关。
- 几何着色器可以在图元(Primitive)装配的过程中重新生成新的图元,例如通过一个点,生成多个点。
- 片段着色器FS用于替代纹理应用、雾化和像素汇总。FS至少有一个vec4 color的输出值就是一个像素的颜色。
- GLSL语法大全原文+参考+补充
- OpenGL_API
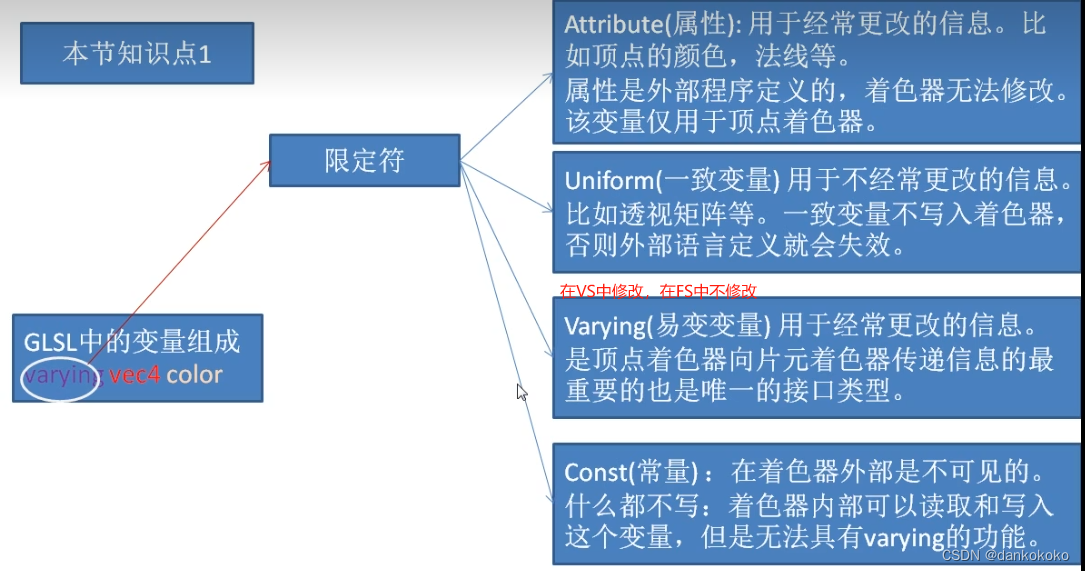
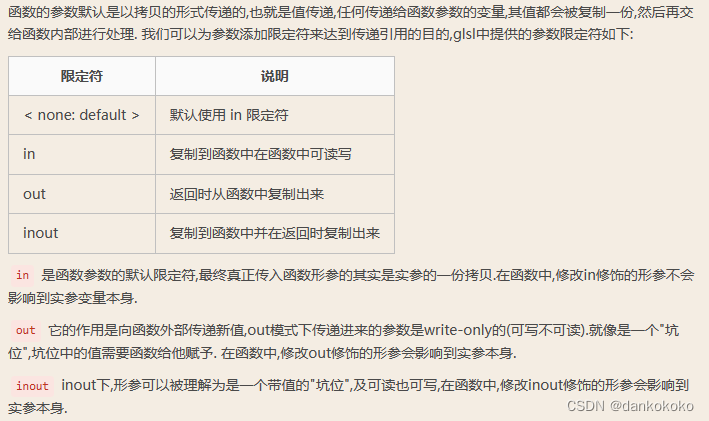
- 限定符(旧版本)
- 函数参数限定符(旧版本)
在330版本之后core,都是用glVertexAttribArray/glBindAttribLocation等接口将顶点每个属性绑定到指定索引,所以只要在着色器中使用layout(location = 0) in vec3 vPos;这种格式即可传入数据到着色器。
还可以作为各个着色器间的数据传递。建议参考
- 着色器是在GPU上运行的程序(例如使用OpenGL接口编译好字符串写的着色器),GPU是高度并行化、向量化的架构。在GPU中还有很多内置的操作:加减,点乘,内乘,外乘,几何运算,三角函数或者指数函数。
- GLSL有许多系统内置变量,OSG也设置了很多内置OpenGL变量,参考下文。
2.着色器属性
OSG提供了完整的GLSL着色语言的功能封装,主要实现包括一下几个类
osg::Program类
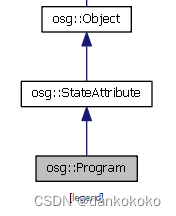
相当于OpenGL中glProgram的一个实现接口,可以(通过StateSet)被设置到一个节点或者一个可绘制物体Drawable上,从而将自定义着色器绑定到指定的场景对象。
// 追加/删除一个着色器对象
bool 	addShader (const ref_ptr< T > &shader);
bool 	removeShader (const ref_ptr< T > &shader);

// 获取指定索引位置的着色器对象
Shader * 	getShader (unsigned int i);

// 设置/获取着色器设置参数。这些设置值将被传递到glProgramParamteri(),并为几何着色器所用
void 	setParameter (GLenum pname, GLint value);
GLint 	getParameter (GLenum pname) const;

// 将顶点属性数据(索引号index)绑定到顶点着色器的属性变量(名为name),或取消绑定。封装了glBindAttribLocation的内容
void 	addBindAttribLocation (const std::string &name, GLuint index);
void 	removeBindAttribLocation (const std::string &name);

// 将片段着色器输出数据(名为name)绑定到某个颜色通道(索引号index),其实就是绑定到FBO,或者取消绑定;之后可以使用FBO帧缓冲对象将反馈数据读出(参考后文有关纹理烘培的内容)
void 	addBindFragDataLocation (const std::string &name, GLuint index);
void 	removeBindFragDataLocation (const std::string &name);
由StateSet管理,使用方法:
stateset.setAttributeAndModes(program.get());
osg::Shader类
封装了顶点着色器、片段着色器和几何着色器的代码加载和编译功能。相当于glShaderSource和glCompileShader。
// 构造函数,可以直接设置着色器对象的类型,例如VERTEX,FRAGMENT,GEOMETRY以及着色器源代码的文本内容。
enum  Type
{
  VERTEX = GL_VERTEX_SHADER, TESSCONTROL = GL_TESS_CONTROL_SHADER, TESSEVALUATION = GL_TESS_EVALUATION_SHADER, GEOMETRY = GL_GEOMETRY_SHADER,
  FRAGMENT = GL_FRAGMENT_SHADER, COMPUTE = GL_COMPUTE_SHADER, UNDEFINED = -1
}
 Shader (Type type=UNDEFINED);
 Shader (Type type, const std::string &source);
 Shader (Type type, ShaderBinary *shaderBinary);

// 设置/获取着色器的类型
bool 	setType (Type t);
Type 	getType () const;

// 直接设置/获取着色器源代码的文本内容
void 	setShaderSource (const std::string &sourceText);
const std::string & 	getShaderSource () const;

// 从文件中读取着色器源代码的文本
bool 	loadShaderSourceFromFile (const std::string &fileName);

//	Read shader source from file and then constructor shader of specified type
static Shader * 	readShaderFile (Type type, const std::string &fileName);
osg::Uniform类,一致变量
是着色器一致变量的接口类,是用户应用程序与着色器的主要交互接口。不随顶点变化.
// name需要和着色器代码中变量名字定义一致,numElement用于设置uniform块。
 Uniform (Type type, const std::string &name, int numElements=1);
 Uniform (const char *name, double d);//...很多

// 设置/获取一直变量的更新回调
void 	setUpdateCallback (UniformCallback *uc);
UniformCallback * 	getUpdateCallback ();

// 设置/获取一致变量的交互事件回调
void 	setEventCallback (UniformCallback *ec);
UniformCallback * 	getEventCallback ();

//
bool 	set (double d);
bool 	setElement (unsigned int index, float f);
bool 	get (float &f) const;

// 刷新这个一致变量。它由set函数自动负责调用
void ditry();

// 设置/获取一个浮点数组类型的一致变量,操作一致变量数组时,需要使用这个函数来实现
bool 	setArray (FloatArray *array);//..多个
const FloatArray * 	getFloatArray () const;
Uniform支持绑定多种类型的一致变量,可以通过设置回调并在其中更新Uniform绑定的一致变量的值,实现一致变量每帧变化 ,从而实现着色器的各种动画效果。
一致变量Uniform由渲染状态集StateSet负责管理。
// 追加/删除一个一致变量对象,并可以设置该对象是否立即生效,默认为ON
void 	addUniform (const ref_ptr< T > &uniform, StateAttribute::OverrideValue value=StateAttribute::ON);

void 	removeUniform (Uniform *uniform);
Uniform * 	getUniform (const std::string &name);
UniformList & 	getUniformList ();
实例1
osg::ref_ptr<osg::Shader> vs = new osg::Shader(osg::Shader::VERTEX,vertSource);
osg::ref_ptr<osg::Shader> fs = new osg::Shader(osg::Shader::FRAGMENT,fragSource);

osg::ref_ptr<osg::Program> program = new osg::Program);
program ->addShader(vs .get());
program ->addShader(fs .get());

float value = 0.0;
stateset->addUniform(new osg::Uniform("userValue",value));
stateset->setAttributeAndModes(program.get(),osg::StateAttribute::ON);
实例2:Uniform块
osg内置的一致变量/Shader变量
只要用户在自己的着色器中定义这些变量,OSG系统将自动负责每帧对其进行更新。但是需要对图形设备GC(context)获得state进行设置,详见这里
uniform int osg_FrameNumber:当前OSG程序运行的帧数
uniform float osg_FrameTime:当前OSG程序运行总时间
uniform float osg_DeltaFrameTime:当前OSG程序运行每帧的间隔时间
//需要设置" viewer.getCamera()->getGraphicsContext()->getState()->setUseModelViewAndProjectionUniforms(true);"
uniform mat4 osg_ViewMatrix:当前OSG摄像机的观察矩阵
uniform mat4 osg_ViewMatrixInverse:当前OSG摄像机观察矩阵的逆矩阵
uniform mat4 osg_ModelViewMatrix:内置gl_ModelViewMatrix模型视点变换矩阵
uniform mat4 osg_ModelViewProjectionMatrix:内置gl_ModelViewProjectionMatrix
uniform mat4 osg_ProjectionMatrix:内置gl_ProjectionMatrix投影矩阵
uniform mat3 osg_NormalMatrix:内置gl_NormalMatrix法线变换矩阵

// 以下需要设置viewer.getCamera()->getGraphicsContext()->getState()->setUseVertexAttributeAliasing(true);
// 此时setColorArray等都实际上是用setVertexAttribArray,序号参考 https://blog.csdn.net/FreeSouthS/article/details/118971243
osg_Vertex
osg_Normal
osg_Color
osg_MultiTexCoord0......
osg内置Shader变量(旧版本,新版本有些已移除)

实例:旧版本GLSL
// 顶点着色器
static const char* vertShader =
{
	"varying vec4 color;\n"
	"void main(void)\n"
	"{\n"
		"color = gl_Vertex;\n"
		"gl_Position = gl_ModelViewProjectionMatrix*gl_Vertex;\n"
	"}\n"
};

// 片段着色器
static const char* fragShader =
{
	"varying vec4 color;\n"
	"void main(void)\n"
	"{\n"
		"gl_FragColor = clamp(color,0.0,1.0);\n"
	"}\n"
};

int main()
{
	osg::ref_ptr<osgViewer::Viewer> viewer = new osgViewer::Viewer;
	osg::ref_ptr<osg::Node> node  = osgDB::readNodeFile("cow.osg");
	osg::StateSet* stateset = node->getOrCreateStateSet();
	osg::Program *program = new osg::Program;
	program->addShader(new osg::Shader(osg::Shader::VERTEX,vertShader));
	program->addShader(new osg::Shader(osg::Shader::FRAGMENT,fragShader));
	stateset->setAttributeAndModes(program,osg::StateAttribute::ON);

	viewer->setSceneData(node.get());
	return viewer->run();
}
实例:330 及以上GLSL使用1/读取模型
static const char* vertSource =
{
	"#version 430\n"
	"uniform mat4 osg_ModelViewProjectionMatrix;\n"
	"uniform mat3 osg_NormalMatrix;\n"
	"layout(location =0) in vec4 vPos;\n"
	"layout(location =1) in vec3 vNormal;\n"
	"layout(location =2) in vec4 vColor;\n"
	"out vec3 normal;\n"
	"out vec4 position;\n"
	"out vec4 color;\n"
	"void main(){\n"
	"	normal  = normalize(osg_NormalMatrix*vNormal);\n"
	"	gl_Position = osg_ModelViewProjectionMatrix*vPos;\n"
	"	position = gl_Position;\n"
	"	color = vColor;\n"
	"}\n"
};

staitc const char* vertSource2 =
{
	"#version 430\n"
	"uniform mat4 osg_ModelViewProjectionMatrix;\n"
	"uniform mat3 osg_NormalMatrix;\n"
	"in vec4 osg_Vertex;\n"
	"in vec3 osg_Normal;\n"
	"in vec4 osg_Color;\n"
	"out vec3 normal;\n"
	"out vec4 position;\n"
	"out vec4 color;\n"
	"void main(){\n"
	"	normal  = normalize(osg_NormalMatrix*osg_Normal);\n"
	"	gl_Position = osg_ModelViewProjectionMatrix*osg_Vertex;\n"
	"	position = gl_Position;\n"
	"	color = osg_Color;\n"
	"}\n"
};

staitc const char* fragSource =
{
	"#version 430\n"
	"in vec3 normal;\n"
	"in vec4 position;\n"
	"in vec4 color;\n"
	"layout(location =0) out vec4 FragColor;\n"
	"void main(){\n"
	"	float intensity = dot(vec3(position),normal);\n"
	"	if(intensity>0.95) FragColor = color;\n"
	"	else if(intensity>0.5) FragColor = vec4(1.0,0.0,0.0,1.0);\n"
	"	else if(intensity>0.25) FragColor = vec4(0.0,1.0,0.0,1.0);\n"
	"	else FragColor = vec4(0.0,0.0,1.0,1.0);\n"
	"}\n"
};

void createShader(osg::StateSet& ss)
{
	osg::ref_ptr<osg::Shader> vs = new osg::Shader(osg::Shader::VERTEX,vertSource );
	osg::ref_ptr<osg::Shader> fs = new osg::Shader(osg::Shader::FRAGMENT,vertSource );

	osg::ref_ptr<osg::Program> program = new osg::Program;
	program ->addShader(vs.get());
	program ->addShader(fs.get());

	ss.setAttributeAndModes(program.get());
}

int main()
{
	osg::Node* node = osgDB::readNodeFile("gilder.osg");
	createShader(*(node->getOrCreateStateSet()));

	osgViewer::Viewer viewer;
	viewer.setSceneData(node);
	viewer.realize();//初始化

	//viewer.getCamera()->getGraphicsContext()->getState()->resetVertexAttributeAlias(false);
	// 没有下面这句则没有设置osg_ModelViewProjectionMatrix
	viewer.getCamera()->getGraphicsContext()->getState()->setUseModelViewAndProjectionUniforms(true);
	// 下面这句是为了保证a卡和n卡location一致,但是因为此时改变了Shader中默认location,当不使用我们自定义着色器时,会出现灰模
	// 可以该句之前调用“viewer.getCamera()->getGraphicsContext()->getState()->resetVertexAttributeAlias(false);并且使用verSource2,因为该函数是将OSG内置变量和OpenGL内置变量做了个别名和索引的映射,映射又变了
	 viewer.getCamera()->getGraphicsContext()->getState()->setUseVertexAttributeAliasing(true);
	return viewer.run();
}
实例:330 及以上GLSL使用2/Geometry->setVertexArrtibArray()
#include <osg/shader>
#include <osg/Node>
#include <osgDB/ReadFile>
#include <osgDB/fileutils>
#include <osg/Geometry>
#include <osgViewer/viewer>

static const char* vertexShader = {
		"#version 430 \n"
		"layout (location=0) in vec3 VertexPosition;\n"
		"layout (location=1) in vec4 VertexColor;\n"
		"uniform mat4 mvp;\n"
		"out vec4 Color;\n"
	    "out  vec4 Position;\n"
		"void main()\n"
		"{\n"
			"	Color = VertexColor;\n"
			"	gl_Position = mvp*vec4(VertexPosition, 1.0);\n"

	"	}\n"
};

static const char* fragShader = {
		"#version 430 \n"
		"in vec4 Color;\n"
		"layout (location=0) out vec4 FragColor;\n"
		"void main() {\n"
		"	FragColor = Color;//vec4(0.5,0.5,0.5,0.4);\n"
		"}\n"
};
osg::Node* CreateNode()
{
	osg::Geode* geode = new osg::Geode;
	osg::Geometry* polyGeom = new osg::Geometry();

	osg::Vec3Array* vertices = new osg::Vec3Array();
	vertices->push_back(osg::Vec3(-5, 0, 0));
	vertices->push_back(osg::Vec3(5, 0, 0));
	vertices->push_back(osg::Vec3(0, 0, 5));

	// polyGeom->setVertexArray(vertices);  // 非手动绑定着色器location的设置三角形顶点的方式

	osg::ref_ptr<osg::Vec4Array> colorsArray = new osg::Vec4Array;
	colorsArray->push_back(osg::Vec4(1.0f, 0.0f, 0.0f, 1.0f));
	colorsArray->push_back(osg::Vec4(0.0f, 0.0f, 1.0f, 1.0f));
	colorsArray->push_back(osg::Vec4(0.0f, 1.0f, 0.0f, 1.0f));

	//polyGeom->setColorArray(colorsArray, osg::Array::Binding::BIND_PER_VERTEX); // 非手动绑定着色器location方式
	polyGeom->addPrimitiveSet(new osg::DrawArrays(osg::PrimitiveSet::TRIANGLES, 0, 3));

	polyGeom->setVertexAttribArray(0, vertices);
	polyGeom->setVertexAttribBinding(0, osg::Geometry::BIND_PER_VERTEX);// 注意:这里只能为BIND_PER_VERTEX,不能BIND_OVERALL、BIND_PER_PRIMITIVE_SET、BIND_OFF,否则三边形不会显示,下同
	polyGeom->setVertexAttribArray(1, colorsArray.get());
	polyGeom->setVertexAttribBinding(1, osg::Geometry::BIND_PER_VERTEX);

	geode->addDrawable(polyGeom);

	return geode;
}

class MVPCallback : public osg::Uniform::Callback
{
public:
	MVPCallback(osg::Camera* camera) :mCamera(camera) {
	}
	virtual void operator()(osg::Uniform* uniform, osg::NodeVisitor* nv)
	{
		osg::Matrixf modelView = mCamera->getViewMatrix();
		osg::Matrixf projectM = mCamera->getProjectionMatrix();
		uniform->set(modelView * projectM);
	}

private:
	osg::Camera* mCamera;
};
int main(int argc, char* argv[]) {
	osgViewer::Viewer viewer;

	osg::Group* root = new osg::Group;
	osg::ref_ptr<osg::Node>node = CreateNode();

	osg::Shader* vS = new osg::Shader(osg::Shader::FRAGMENT, fragShader);
	osg::Shader* fS = new osg::Shader(osg::Shader::VERTEX, vertexShader);

	auto pCamera = viewer.getCamera();
	osg::Matrixf modelView = pCamera->getViewMatrix();
	osg::Matrixf projectM = pCamera->getProjectionMatrix();

	osg::Uniform* MVPUniform = new osg::Uniform("mvp", modelView * projectM);
	osg::StateSet* ss = node->getOrCreateStateSet();
	ss->addUniform(MVPUniform);//对应的Program和Uniform要加到同一个Node下的StateSet中

	MVPUniform->setUpdateCallback(new MVPCallback(viewer.getCamera()));

	osg::Program* program = new osg::Program;
	program->addShader(vS);
	program->addShader(fS);

	ss->setAttributeAndModes(program, osg::StateAttribute::ON);

	root->addChild(node);
	viewer.setSceneData(root);

	viewer.run();

	return 0;
}
实例:330 及以上GLSL使用3/Geometry->setVertexArray()
#include <osg/shader>
#include <osg/Node>
#include <osgDB/ReadFile>
#include <osgDB/fileutils>
#include <osg/Geometry>
#include <osgViewer/viewer>

static const char* vertexShader = {
		"#version 430 \n"
		"layout (location=0) in vec3 VertexPosition;\n"
		"layout (location=2) in vec4 VertexColor;\n"
		"uniform mat4 mvp;\n"
		"out vec4 Color;\n"
	    "out  vec4 Position;\n"
		"void main()\n"
		"{\n"
			"	Color = VertexColor;\n"
			"	gl_Position = mvp*vec4(VertexPosition, 1.0);\n"

	"	}\n"
};

static const char* fragShader = {
		"#version 430 \n"
		"in vec4 Color;\n"
		"layout (location=0) out vec4 FragColor;\n"
		"void main() {\n"
		"	FragColor = Color;//vec4(0.5,0.5,0.5,0.4);\n"
		"}\n"
};
osg::Node* CreateNode()
{
	osg::Geode* geode = new osg::Geode;
	osg::Geometry* polyGeom = new osg::Geometry();

	osg::Vec3Array* vertices = new osg::Vec3Array();
	vertices->push_back(osg::Vec3(-5, 0, 0));
	vertices->push_back(osg::Vec3(5, 0, 0));
	vertices->push_back(osg::Vec3(0, 0, 5));

	polyGeom->setVertexArray(vertices);  // 非手动绑定着色器location的设置三角形顶点的方式

	osg::ref_ptr<osg::Vec4Array> colorsArray = new osg::Vec4Array;
	colorsArray->push_back(osg::Vec4(1.0f, 0.0f, 0.0f, 1.0f));
	colorsArray->push_back(osg::Vec4(0.0f, 0.0f, 1.0f, 1.0f));
	colorsArray->push_back(osg::Vec4(0.0f, 1.0f, 0.0f, 1.0f));

	polyGeom->setColorArray(colorsArray, osg::Array::Binding::BIND_PER_VERTEX); // 非手动绑定着色器location方式
	polyGeom->setColorBinding(osg::Geometry::BIND_PER_VERTEX);
	polyGeom->addPrimitiveSet(new osg::DrawArrays(osg::PrimitiveSet::TRIANGLES, 0, 3));

	geode->addDrawable(polyGeom);

	return geode;
}

class MVPCallback : public osg::Uniform::Callback
{
public:
	MVPCallback(osg::Camera* camera) :mCamera(camera) {
	}
	virtual void operator()(osg::Uniform* uniform, osg::NodeVisitor* nv)
	{
		osg::Matrixf modelView = mCamera->getViewMatrix();
		osg::Matrixf projectM = mCamera->getProjectionMatrix();
		uniform->set(modelView * projectM);
	}

private:
	osg::Camera* mCamera;
};
int main(int argc, char* argv[]) {
	osgViewer::Viewer viewer;

	osg::Group* root = new osg::Group;
	osg::ref_ptr<osg::Node>node = CreateNode();

	osg::Shader* vS = new osg::Shader(osg::Shader::FRAGMENT, fragShader);
	osg::Shader* fS = new osg::Shader(osg::Shader::VERTEX, vertexShader);

	auto pCamera = viewer.getCamera();
	osg::Matrixf modelView = pCamera->getViewMatrix();
	osg::Matrixf projectM = pCamera->getProjectionMatrix();

	osg::Uniform* MVPUniform = new osg::Uniform("mvp", modelView * projectM);
	osg::StateSet* ss = node->getOrCreateStateSet();
	ss->addUniform(MVPUniform);//对应的Program和Uniform要加到同一个Node下的StateSet中

	MVPUniform->setUpdateCallback(new MVPCallback(viewer.getCamera()));

	osg::Program* program = new osg::Program;
	program->addShader(vS);
	program->addShader(fS);

	ss->setAttributeAndModes(program, osg::StateAttribute::ON);

	root->addChild(node);
	viewer.setSceneData(root);
 	viewer.realize();//建立上下文
	viewer.getCamera()->getGraphicsContext()->getState()->setUseVertexAttributeAliasing(true);

	return viewer.run();
}
3.一致变量Uniform回调
用于每帧更新着色器中的用户数据,从而改变渲染的行为和输出结果。
osg::Uniform::Callback:
void opertator()(Uniform*,NodeVisitor*);
- 第一个参数为一致变量本身,为一个已知的一致变量对象uniform设置用户自定义回调UserCallback:
uniform->setUpdateCallback(new UserCallback);
实例:动态颜色变化效果(补


 6454
6454

 被折叠的 条评论
为什么被折叠?
被折叠的 条评论
为什么被折叠?
 到【灌水乐园】发言


