


采用深度摄像机获取深度数据
今天和大家分享之前一个项目中用于获取物体的深度数据来求体积的一些操作。
我使用的深度摄像机的型号是 Intel RealSense Depth Camera D435,关于该深度摄像机的使用大家可以 参考该博客。
连接深度相机获取RGB图和深度图
首先调用我们后面会用到的一些库
import pyrealsense2 as rs
import numpy as np
import cv2
import pandas as pd
import os
from matplotlib import pyplot as plt
from mpl_toolkits.mplot3d import Axes3D
调用完相关的库后设置深度相机获取数据的相关参数。
其中深度数据可获取的分辨率可达1280 x 720,其他先关参数可点击此处查看。
#configure depth and color streams
pipeline = rs.pipeline()
config = rs.config()
config.enable_stream(rs.stream.depth,640,480,rs.format.z16,30)#分辨率可更改为(1280 x 720)
config.enable_stream(rs.stream.color,640,480,rs.format.bgr8,30)
pipeline.start(config)
在设置完相关参数后调用深度相机获取彩色图数据和深度数据。
frames = pipeline.wait_for_frames()
depth_frames = frames.get_depth_frame()
color_frames = frames.get_color_frame()
为了使所获得的深度数据和彩色数据在位置上能够匹配,我们使用rs.align函数进行对其处理
#获取图像和深度信息
def get_imgData():
    # rs.align允许执行深度帧与其他帧的对齐
    # “align_to”是计划对齐深度帧的流类型
    align_to = rs.stream.color
    align = rs.align(align_to)
    frames = pipeline.wait_for_frames()
    align_frames = align.process(frames)
    depth_frames = align_frames.get_depth_frame()
    color_frames = align_frames.get_color_frame()
    depth_image = np.asanyarray(depth_frames.get_data())
    color_image = np.asanyarray(color_frames.get_data())
    return depth_image,color_image
之后调用之前写的函数,将获取的彩色数据和深度数据进行呈现
if __name__ == '__main__':
    while True:
        depth_image, color_image = get_imgData()
        depth_colormap = cv2.applyColorMap(cv2.convertScaleAbs(depth_image, alpha=0.03), cv2.COLORMAP_JET)
        cv2.imshow("color_image", color_image)
        cv2.imshow("depth_colormap", depth_colormap)
        key = cv2.waitKey(1)
        if key & 0xFF == ord('q') or key == 27:
            break
    cv2.destroyAllWindows()
获得图像结果如下

深度数据转三维曲面图
在获得相关的深度数据(depth_image)后,我们该如何来使用呢,就以上图为例,我们将所获取到的深度数据转换为三维曲面图,来查看被测物体的到摄像机之间的距离。
1、搭建绘制曲面图的相关函数
def draw_3D(depth_data):
    fig = plt.figure()
    ax = Axes3D(fig)
    x = np.arange(0,depth_data.shape[1],1)
    y = np.arange(0,depth_data.shape[0],1)
    ax.set_ylim(-10, depth_data.shape[0] + 10)
    ax.set_xlim(-10, depth_data.shape[1] + 10)
    ax.set_xlabel('x')
    ax.set_ylabel('y')
    ax.set_zlabel('z/(mm)')
    X,Y = np.meshgrid(x,y)
    ax.plot_surface(X, Y, depth_data,cmap=plt.get_cmap('rainbow'))
    #ax.contour(X,Y,depth_data,zdir="y",offset=depth_data.shape[0],cmap=plt.get_cmap("rainbow"))
    #ax.contour(X,Y,depth_data,zdir="x", offset=0, cmap=plt.get_cmap("rainbow"))
    #plt.savefig(os.path.join(paths, 'Figure_3DX' + str(i)))#保存三维曲面图
    plt.show()
2、在主函数中调用该部分函数,当按下“s”键时便可获得相关的深度曲面图。
if __name__ == '__main__':
    while True:
        depth_image, color_image = get_imgData()
        depth_colormap = cv2.applyColorMap(cv2.convertScaleAbs(depth_image, alpha=0.03), cv2.COLORMAP_JET)
        cv2.imshow("color_image", color_image)
        cv2.imshow("depth_colormap", depth_colormap)

        key = cv2.waitKey(1)
        if key & 0xFF == ord('q') or key == 27:
            break
        if key & 0xFF == ord('s'):
            draw_3D(depth_image)
    cv2.destroyAllWindows()

目标区域选择
为了更直观的看到某个区域的深度数据,我们可以对彩色图进行区域选择,提取我们所需要的深度数据。
def select_img_data(select_data,color_frame,depth_frame):
    select_color = color_frame[select_data[1]:select_data[1] + select_data[3], select_data[0]:select_data[0] + select_data[2]]
    select_depth = depth_frame[select_data[1]:select_data[1] + select_data[3], select_data[0]:select_data[0] + select_data[2]]
    select_colormap = cv2.applyColorMap(cv2.convertScaleAbs(select_depth, alpha=0.03), cv2.COLORMAP_JET)
    #select_colormap = cv2.cvtColor(select_colormap, cv2.COLOR_BGR2GRAY)
    selects = np.hstack((select_color,select_colormap))
    cv2.namedWindow("choose_video",cv2.WINDOW_AUTOSIZE)
    cv2.imshow("choose_video", selects)
    return select_color,select_depth
我们在主函数中加入
if key & 0xFF == ord('s'):
    select_data = cv2.selectROI('color_image', color_image)
    color_image, depth_image = select_img_data(select_data, color_image, depth_image)
    choose_img = True
并对主函数做适当的调整
if __name__ == '__main__':
    choose_img = False
    while True:
        depth_image, color_image = get_imgData()
        depth_colormap = cv2.applyColorMap(cv2.convertScaleAbs(depth_image, alpha=0.03), cv2.COLORMAP_JET)
        cv2.imshow("color_image", color_image)
        cv2.imshow("depth_colormap", depth_colormap)
        key = cv2.waitKey(1)
        if key & 0xFF == ord('s'):
            select_data = cv2.selectROI('color_image', color_image)
            color_image, depth_image = select_img(select_data, color_image, depth_image)
            choose_img = True
        if key & 0xFF == ord('q') or key == 27:
            break
        if choose_img == True:
            draw_3D(depth_image)
            choose_img = False
    cv2.destroyAllWindows()
按下“s”后便可以框选我们所需要的相关区域的数据

选框区域内的彩色图和深度图

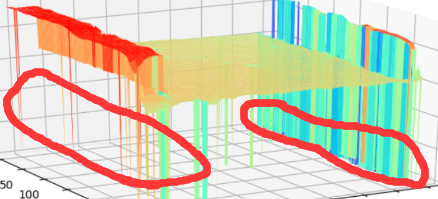
选框区域的深度曲面图。

由于深度相机(D435)在使用时,获得的深度数据中存在一些失效点,因此我们需要对失效部分的数据进行拟合处理和复原,如下图红色部分就是由于失效点造成。
失效点数据处理
所以我们需要对失效点的数据进行拟合处理和复原,经过拟合处理后的图像如下

相关的数据拟合及恢复处理操作将在下一篇博客中进行介绍。


 1万+
1万+


 被折叠的 条评论
为什么被折叠?
被折叠的 条评论
为什么被折叠?
 到【灌水乐园】发言


