


LIO-SAM系列文章目录
新手SLAM小白如何利用LIO-SAM框架跑通各种数据集
LIO-SAM适配数据集(激光点云数据有无intensity、ring、time)
文章目录
- LIO-SAM系列文章目录
- 前言
- 一、激光雷达数据结构
- 二、修改代码以适应其他数据集
- 1、为什么LIO-SAM源码对点云数据结构有要求(即使用除xyz之外的点云信息做了什么操作)
- 2、如何适配其他数据集
- 源码数据集中,因为有ring信息,以某种16线的激光雷达数据举例,ring=16,Horizon_SCAN 设为 1800。因此深度图的分辨率应该为:16*1800。即一个16行乘以1800列的网格,每个网格存储为点云距离大小。 现在考虑没有ring数据的情况(Horizon_SCAN数据通过配置文件设定),如何通过每个激光点云的x,y数据计算出rowIdn呢? verticalAngle就是下图中的θ 上面代码中的ang_bottom应该是激光雷达安装时候的(仰角)起始角度。 ang_res_y应该是深度图中每个像素点在列方向上的分辨率。 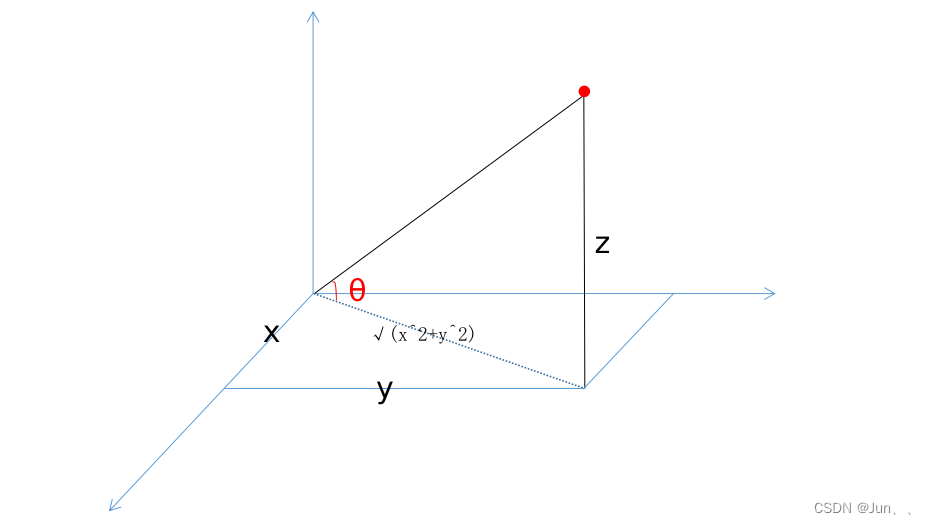 3. ang_bottom;ang_res_y如何设置
- 总结
前言
最近在准备开题,基于LIO-SAM系统跑了很多数据集。包括Kitti、UrbanLoco、mulran等。由于不同数据集的激光雷达数据因为使用了不同厂家的激光雷达,它们的数据结构都不太一致,有的只有xyz,有的为xyzi,有的为xyzirt。因此如果要在LIO-SAM上跑这些数据集,则需要修改一些代码和配置文件。鉴于网上并没有怎么找到专门写这部分的帖子,而跑通代码对于像我这样的SLAM小白来说又非常重要,可以直观的看出该框架运行不同的数据集有不同的效果。因此,在此做一个总结,也是为了方便自己后面进行回顾。
一、激光雷达数据结构
1、LIO-SAM源码中所需点云数据结构
LIO-SAM项目地址:https://github.com/TixiaoShan/LIO-SAM
在项目下可以看到提供了3个数据集:分别是Walking dataset、Park dataset、Garden dataset
我在本地下载了Park dataset,那么如何根据数据集查看数据集中点云数据所带的信息格式呢?下面我介绍一个之前了解到的比较直观的方法。
使用rviz查看点云数据的格式
相信大部分人的电脑里的ubuntu系统都装了ros和rviz,可以借助rviz可视化工具直观地显示点云数据的信息格式。
(1)使用rosbag运行数据集
进入存放数据集的文件夹下,打开终端,运行以下命令
rosbag play park_dataset.bag
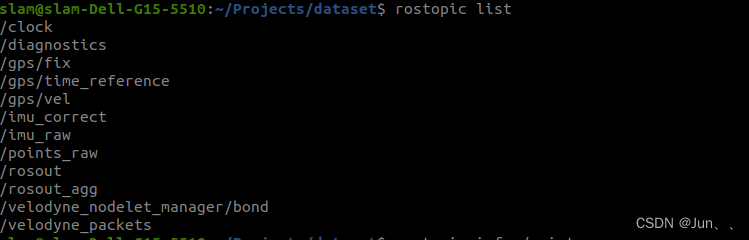
在另一个终端中使用rostopic命令查看数据集中点云数据的话题名称
rostopic list
可以看到如下图所示,点云话题为/points_raw
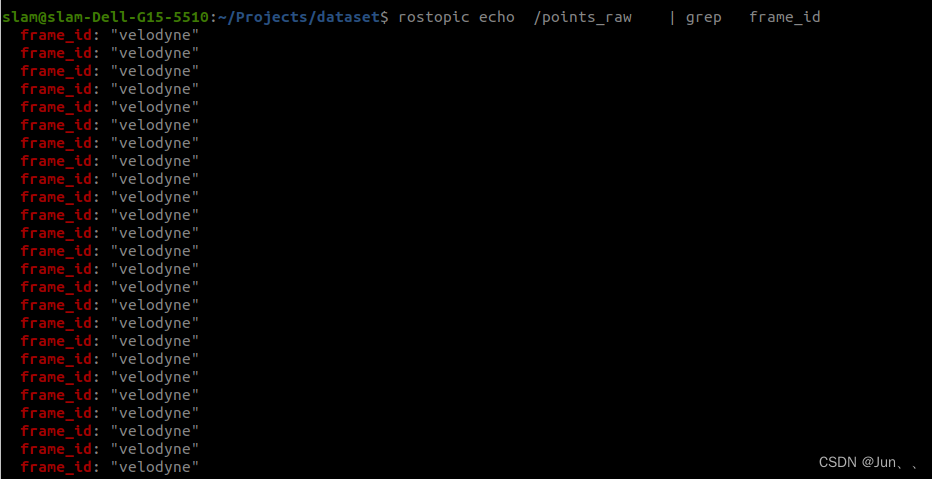
(2)查找点云话题的frame_id
为了在rviz中显示上述查找到的点云话题的数据,还需要知道该点云话题的frame_id
使用下面的命令查找
// 在播放数据包的时候使用如下指令查看某一Topic的frame_id:
rostopic echo  /Topic    | grep   frame_id
这里应该为:
rostopic echo  /points_raw    | grep   frame_id
可以从下图看到该话题的frame_id为velodyne
接下来只要在rviz中选择该点云话题,修改frame_id为velodyne就行。
(3)在rviz中查看数据结构
打开终端,输入
rviz rviz
打开rviz后点击左下角的“add”按钮,然后添加一个PointCloud2
然后在这个PointCloud2下将话题topic改为上面查询到的/points_raw ,再将Global Options改为上面查到的velodyne,此时就能在rviz中看到可视化的点云数据了,如下图所示。
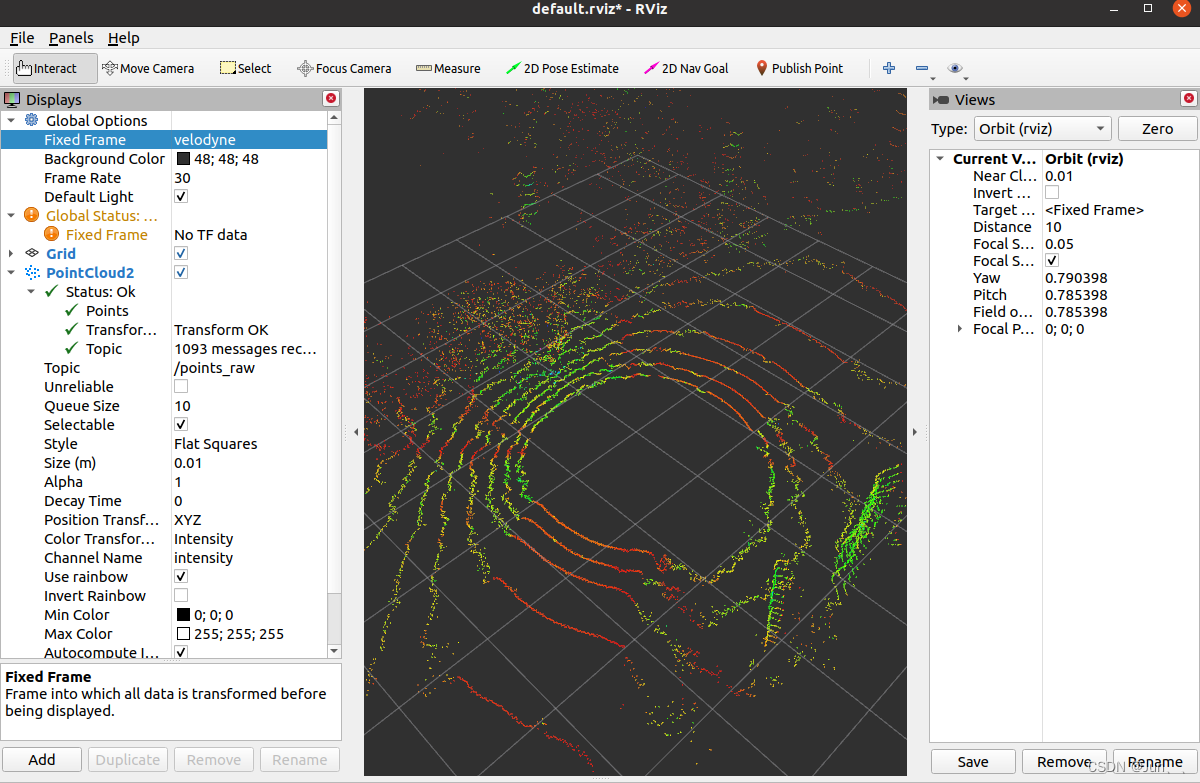
然后在rviz中左上角的“Panels”选项下打开Selection功能,然后鼠标点击rviz上方第二行的Select后在中间可视化窗口中随便框选一部分点云,随机在左侧就能看到这些点云的具体信息了,当然也包括点云信息结构。

从上图左侧可以看到该Park dataset数据集点云数据有Position(xyz)、I(intensity点云强度)、R(ring点云位于哪条线上)、T(time具体时间戳)
2、其他数据集中点云数据结构对比
下面我总结了我运行过的数据集的点云数据结构
| 数据集 | 数据结构 |
|---|---|
| kitti | XYZIR |
| part dataset | XYZIRT |
| UrbanLoco | XYZI |
| mulran | XYZITR |
二、修改代码以适应其他数据集
1、为什么LIO-SAM源码对点云数据结构有要求(即使用除xyz之外的点云信息做了什么操作)
搞清楚每个数据集点云数据结构的差异,下面来分析LIO-SAM针对点云数据做了哪些工作,即点云数据中的IRT三个值在哪些地方使用了。
首先看一下LIO-SAM关于点云预处理部分的代码,只有了解了LIO-SAM源码中如何处理激光点云数据,我们才能去修改它运行其他数据集。
    /* 接收激光雷达点云数据回调函数 */
    void cloudHandler(const sensor_msgs::PointCloud2ConstPtr& laserCloudMsg)
    {
        // 根据激光雷达类型,转化数据格式,去除无效点云数据,缓存点云数据
        if (!cachePointCloud(laserCloudMsg))
            return;

        // 将两帧lidar数据之间的IMU数据用于获取对应的IMU姿态角 并且将IMU里程计作为当前两帧之间的初始位姿
        if (!deskewInfo())
            return;

        // 遍历激光点云数据,并使用IMU数据去激光点云数据的运动畸变 存储点云的深度
        projectPointCloud();

        // 该函数的作用主要是保存有效激光点云数据,
        // 并且由于特征提取的时候不考虑每一行的前5个和最后5个,因此设置startRingIndex和endRingIndex这两个索引从第五个和倒数第五个
        cloudExtraction();

        // 发布用户自定义的cloudInfo激光数据(经过数据预处理的)
        publishClouds();

        /* 重置部分参数数据 */
        resetParameters();
    }
上面是激光雷达点云数据的回调函数,其中对我们现在这个步骤最关键的就是第一个if中的函数cachePointCloud,这个函数主要作用就是检查回调函数中接收到的点云数据结构是否满足程序的要求。如果不满足,我们可以在终端中看到错误信息,这也是我一开始接触这个框架,认识不深,跑论文中的其他数据集时,遇到的第一个问题。连点云数据结构都不对,程序直接终止,SLAM系统根本跑不起来,满满的挫败感。
接下来我们仔细分析cachePointCloud这个函数,同样的给出该函数的代码和注释:
    /* 根据激光雷达类型,转化数据格式,去除无效点云数据,缓存点云数据 */
    bool cachePointCloud(const sensor_msgs::PointCloud2ConstPtr& laserCloudMsg)
    {
        // cache point cloud
        cloudQueue.push_back(*laserCloudMsg);// 添加当前激光数据帧到队列
        if (cloudQueue.size() <= 2)
            return false;

        // convert cloud
        currentCloudMsg = std::move(cloudQueue.front());// 从队列中获取激光点云数据
        cloudQueue.pop_front(); // 获取点云数据后,将队列最前面的数据剔除
        if (sensor == SensorType::VELODYNE || sensor == SensorType::LIVOX)// 判断激光雷达类型(VELODYNE、LIVOX)
        {
            // 如果是VELODYNE、LIVOX类型的激光雷达 将点云数据从ROS数据转化为PCL数据格式
            pcl::moveFromROSMsg(currentCloudMsg, *laserCloudIn);//
        }
        else if (sensor == SensorType::OUSTER)// 如果是 OUSTER激光雷达
        {
            // Convert to Velodyne format
            pcl::moveFromROSMsg(currentCloudMsg, *tmpOusterCloudIn);// 转化数据格式
            laserCloudIn->points.resize(tmpOusterCloudIn->size());  // 重置数据数量
            laserCloudIn->is_dense = tmpOusterCloudIn->is_dense;    // is_dense用于去除无效点云
            // 遍历一帧有效激光数据中的所有点云 将OUSTER雷达点云数据存到laserCloudIn中
            for (size_t i = 0; i < tmpOusterCloudIn->size(); i++)
            {
                auto &src = tmpOusterCloudIn->points[i];
                auto &dst = laserCloudIn->points[i];
                dst.x = src.x;
                dst.y = src.y;
                dst.z = src.z;
                dst.intensity = src.intensity;  // 激光雷达的反射强度
                dst.ring = src.ring;    // 通道
                dst.time = src.t * 1e-9f;   // 时间戳
            }
        }
        else    // 如果均不是枚举的激光雷达数据类型 则报错
        {
            ROS_ERROR_STREAM("Unknown sensor type: " << int(sensor));
            ros::shutdown();
        }

        // get timestamp 获取时间戳
        cloudHeader = currentCloudMsg.header;
        timeScanCur = cloudHeader.stamp.toSec(); // 当前激光点云的时间戳
        //可以看出lasercloudin中存储的time是一帧中距离起始点的相对时间,timeScanEnd是该帧点云的结尾时间
        timeScanEnd = timeScanCur + laserCloudIn->points.back().time;

        // check dense flag 根据is_dense去除无效点云
        if (laserCloudIn->is_dense == false)
        {
            ROS_ERROR("Point cloud is not in dense format, please remove NaN points first!");
            ros::shutdown();
        }

        // check ring channel
        //由于static关键字,只检查一次,检查ring这个field是否存在. veloodyne和ouster都有;
        //ring代表线数,0是最下面那条
        static int ringFlag = 0;
        if (ringFlag == 0)
        {
            ringFlag = -1;
            for (int i = 0; i < (int)currentCloudMsg.fields.size(); ++i)
            {
                if (currentCloudMsg.fields[i].name == "ring")
                {
                    ringFlag = 1;
                    break;
                }
            }
            if (ringFlag == -1)
            {
                ROS_ERROR("Point cloud ring channel not available, please configure your point cloud data!");
                ros::shutdown();
            }
        }

        // check point time
        // 检查是否存在time通道
        if (deskewFlag == 0)
        {
            deskewFlag = -1;
            // 这里的fields代表每个点云数据的成员变量
            for (auto &field : currentCloudMsg.fields)
            {
                if (field.name == "time" || field.name == "t")
                {
                    deskewFlag = 1;
                    break;
                }
            }
            if (deskewFlag == -1)
                ROS_WARN("Point cloud timestamp not available, deskew function disabled, system will drift significantly!");
        }

        return true;    // 上述步骤都通过,代表该帧点云数据有效
    }
这个函数很长,但是实际上内容并不多,主要就是检查点云数据的各种信息,下面我总结一下:
- 保存数据到队列
- 根据配置文件(程序Config文件夹下的yaml文件)设置的激光雷达类型来转化为PCL点云数据格式
- 获取当前点云的时间戳,计算相对时间
- 检查点云是否为无效点云(主要这里的is_dense应该理解为“有效”)
- 检查点云消息中是否包含名为 “ring” 的数据,也就是当前激光点云位于哪条线上
- 检查点云消息中是否包含名为 "time"或者“t” 的数据,也就是时间
从上面总结的过程可见,LIO-SAM源码如果不经过改动,是无法运行那些激光点云数据结构没有ring和time的数据集的,程序会直接报错并终止。前面列出的4个数据集中只有park dataset和mulran dataset满足程序的要求,其他两个数据集要跑LIO-SAM都必须修改代码。
2、如何适配其他数据集
接下来介绍如何修改代码,这里我一开始也是参考了别人的博客,但是只是拿过来用,并没有真正搞明白,直到现在回过头来总结,才知道以后如果是设计自己的SLAM系统,数据预处理环节针对不同的激光雷达应该怎么处理。
参考博客:
LIO-SAM运行自己数据包遇到的问题解决–SLAM不学无数术小问题
LIO-SAM从0到1运行自己的数据集
下面上代码:
(1)修改cachePointCloud()函数
    bool cachePointCloud(const sensor_msgs::PointCloud2ConstPtr& laserCloudMsg)
    {
        // cache point cloud
        cloudQueue.push_back(*laserCloudMsg);
        if (cloudQueue.size() <= 2)
            return false;

        // convert cloud
        currentCloudMsg = std::move(cloudQueue.front());

        cloudHeader = currentCloudMsg.header;
        timeScanCur = cloudHeader.stamp.toSec();

        cloudQueue.pop_front();

        if (sensor == SensorType::VELODYNE)
        {
            pcl::moveFromROSMsg(currentCloudMsg, *laserCloudIn);
            // Remove Nan points                                                                   (为跑kitti数据集改,本没有下面两行)
            std::vector<int> indices;
            pcl::removeNaNFromPointCloud(*laserCloudIn, *laserCloudIn, indices);
        }
        else if (sensor == SensorType::OUSTER)
        {
            // Convert to Velodyne format
            pcl::moveFromROSMsg(currentCloudMsg, *tmpOusterCloudIn);
            laserCloudIn->points.resize(tmpOusterCloudIn->size());
            laserCloudIn->is_dense = tmpOusterCloudIn->is_dense;
            for (size_t i = 0; i < tmpOusterCloudIn->size(); i++)
            {
                auto &src = tmpOusterCloudIn->points[i];
                auto &dst = laserCloudIn->points[i];
                dst.x = src.x;
                dst.y = src.y;
                dst.z = src.z;
                dst.intensity = src.intensity;
                dst.ring = src.ring;
                dst.time = src.t * 1e-9f;
            }
        }
        else if (sensor == SensorType::MULRAN)
        {
            // Convert to Velodyne format
            pcl::moveFromROSMsg(currentCloudMsg, *tmpMulranCloudIn);
            laserCloudIn->points.resize(tmpMulranCloudIn->size());
            laserCloudIn->is_dense = tmpMulranCloudIn->is_dense;
            for (size_t i = 0; i < tmpMulranCloudIn->size(); i++)
            {
                auto &src = tmpMulranCloudIn->points[i];
                auto &dst = laserCloudIn->points[i];
                dst.x = src.x;
                dst.y = src.y;
                dst.z = src.z;
                dst.intensity = src.intensity;
                dst.ring = src.ring;
                dst.time = float(src.t);
            }
        }
        else
        {
            ROS_ERROR_STREAM("Unknown sensor type: " << int(sensor));
            ros::shutdown();
        }

        // get timestamp
        timeScanEnd = timeScanCur + laserCloudIn->points.back().time;

        // check dense flag
        if (laserCloudIn->is_dense == false)
        {
            ROS_ERROR("Point cloud is not in dense format, please remove NaN points first!");
            ros::shutdown();
        }

        if (!has_ring)
            return true;

        // check ring channel
        static int ringFlag = 0;
        if (ringFlag == 0)
        {
            ringFlag = -1;
            for (int i = 0; i < (int)currentCloudMsg.fields.size(); ++i)
            {
                if (currentCloudMsg.fields[i].name == "ring")
                {
                    ringFlag = 1;
                    break;
                }
            }
            if (ringFlag == -1)
            {
                ROS_ERROR("Point cloud ring channel not available, please configure your point cloud data!");
                ros::shutdown();
            }
        }

        // check point time
        if (deskewFlag == 0)
        {
            deskewFlag = -1;
            for (auto &field : currentCloudMsg.fields)
            {
                if (field.name == "time" || field.name == "t")
                {
                    deskewFlag = 1;
                    break;
                }
            }
            if (deskewFlag == -1)
                ROS_WARN("Point cloud timestamp not available, deskew function disabled, system will drift significantly!");
        }

        return true;
    }
上面为修改后的代码,总结一下主要有以下变化:
- 增加了MULRAN激光雷达类型,主要是为了适应mulran数据集
- 增加了has_ring这个bool类型的标志位,主要用于在配置文件yaml中预先设定好当前数据集是否有ring数据,因此需要在utility.h文件中添加下面的代码:
    // add by sx
    bool has_ring;
    float ang_bottom;
    float ang_res_y;
在Config文件夹下的yaml文件中添加:
  has_ring: true                              # lidar data format, if lidar driver has ring data publish, set 'ture'
  ang_bottom: 15.0                            # if 'has_ring' is false, change it
  ang_res_y: 1
。。。。。
3. 根据has_ring标志位控制是否进行后续判断
如果has_ring为true,则执行和原来代码一样的点云数据检查步骤,如果has_ring为false则跳过后续步骤
(2)修改projectPointCloud();函数
将projectPointCloud();函数修改为如下所示:
void projectPointCloud()
{

    int cloudSize = laserCloudIn->points.size();    //  获取输入激光点云的大小


    bool halfPassed = false;                        // 用于判断是否经过了半圈
    // 记录激光点云的起始和结束方向
    cloudInfo.startOrientation = -atan2(laserCloudIn->points[0].y, laserCloudIn->points[0].x);
    cloudInfo.endOrientation   = -atan2(laserCloudIn->points[laserCloudIn->points.size() - 1].y,
                                                 laserCloudIn->points[laserCloudIn->points.size() - 1].x) + 2 * M_PI;
    if (cloudInfo.endOrientation - cloudInfo.startOrientation > 3 * M_PI) {
        cloudInfo.endOrientation -= 2 * M_PI;
    } else if (cloudInfo.endOrientation - cloudInfo.startOrientation < M_PI)
        cloudInfo.endOrientation += 2 * M_PI;
    // 记录激光点云的方向差
    cloudInfo.orientationDiff = cloudInfo.endOrientation - cloudInfo.startOrientation;

    // range image projection 循环遍历激光点云,逐点进行处理
    for (int i = 0; i < cloudSize; ++i)
    {
        PointType thisPoint;
        thisPoint.x = laserCloudIn->points[i].x;
        thisPoint.y = laserCloudIn->points[i].y;
        thisPoint.z = laserCloudIn->points[i].z;
        thisPoint.intensity = laserCloudIn->points[i].intensity;
        // 计算每个点的距离,并根据设定的最小和最大测距范围进行过滤
        float range = pointDistance(thisPoint);
        if (range < lidarMinRange || range > lidarMaxRange)
            continue;


        // 计算当前点在栅格中的行号 rowIdn                          (从这开始到下面的if rowIdn<0为止为跑kitti而修改)
        int rowIdn = -1;
        if (has_ring == true){
            rowIdn = laserCloudIn->points[i].ring;
        }
        else{
            float verticalAngle, horizonAngle;
            verticalAngle = atan2(thisPoint.z, sqrt(thisPoint.x * thisPoint.x + thisPoint.y * thisPoint.y)) * 180 / M_PI;
            rowIdn = (verticalAngle + ang_bottom) / ang_res_y;
        }

        if (rowIdn < 0 || rowIdn >= N_SCAN)
            continue;

        if (rowIdn % downsampleRate != 0)
            continue;

        // 计算当前点在栅格中的列号 columnIdn
        int columnIdn = -1;
        if (sensor == SensorType::VELODYNE || sensor == SensorType::OUSTER)
        {
            float horizonAngle = atan2(thisPoint.x, thisPoint.y) * 180 / M_PI;
            static float ang_res_x = 360.0/float(Horizon_SCAN);
            columnIdn = -round((horizonAngle-90.0)/ang_res_x) + Horizon_SCAN/2;
            if (columnIdn >= Horizon_SCAN)
                columnIdn -= Horizon_SCAN;
        }
        // 进行列号的范围判断
        if (columnIdn < 0 || columnIdn >= Horizon_SCAN)
            continue;
        // 如果当前栅格位置已经被占用,则跳过
        if (rangeMat.at<float>(rowIdn, columnIdn) != FLT_MAX)
            continue;
        // 如果使用ring信息,对点进行去畸变处理
        if (has_ring == true)
            thisPoint = deskewPoint(&thisPoint, laserCloudIn->points[i].time);
        else {
                // 如果没有ring信息,对点进行去畸变处理,并根据半圈判断调整时间戳
                float ori = -atan2(thisPoint.y, thisPoint.x);
                if (!halfPassed) {
                    if (ori < cloudInfo.startOrientation - M_PI / 2) {
                        ori += 2 * M_PI;
                    } else if (ori > cloudInfo.startOrientation + M_PI * 3 / 2) {
                        ori -= 2 * M_PI;
                    }
                    if (ori - cloudInfo.startOrientation > M_PI) {
                        halfPassed = true;
                   columnIdn }
                } else {
                    ori += 2 * M_PI;
                    if (ori < cloudInfo.endOrientation - M_PI * 3 / 2) {
                        ori += 2 * M_PI;
                    } else if (ori > cloudInfo.endOrientation + M_PI / 2) {
                        ori -= 2 * M_PI;
                    }
                }
                float relTime = (ori - cloudInfo.startOrientation) / cloudInfo.orientationDiff;
                // 激光雷达10Hz,周期0.1
                laserCloudIn->points[i].time = 0.1 * relTime;
                thisPoint = deskewPoint(&thisPoint, laserCloudIn->points[i].time);
        }

        // 将距离信息存储在 rangeMat 中
        rangeMat.at<float>(rowIdn, columnIdn) = range;

        int index = columnIdn + rowIdn * Horizon_SCAN;
        fullCloud->points[index] = thisPoint;
    }
}
当然你需要在msg文件夹下的cloud_info.msg文件中添加以下语句并重新编译你才能使用上面函数:
# 用于改写ring和time相关
float32 startOrientation
float32 endOrientation
float32 orientationDiff
为什么我们要这么修改呢?
主要是根据ring和time数据在源代码中的作用来修改的,源码中该函数利用ring将扫描点云转为深度图,利用time数据来去除激光点云的运动畸变。如果激光数据中没有这两个信息,则需要其他方式来间接的计算出激光点云在转化后深度图中的位置以及当前扫描中具体每个点云的具体时间戳。
下面一一进行讨论:
- 利用点云x,y,z位置数据计算点云在深度图中的位置
直接看代码。
首先我们看函数最后部分有一段代码:
	// 将距离信息存储在 rangeMat 中
	rangeMat.at<float>(rowIdn, columnIdn) = range;

	int index = columnIdn + rowIdn * Horizon_SCAN;
	fullCloud->points[index] = thisPoint;
rangeMat就是得到的深度图,rowIdn和columnIdn就是每个点云在图中的行和列,每个像素点保存了点云的距离数据range,还计算了点云的索引index。那么rowIdn和columnIdn是如何计算出来的呢?
具体的可以查看我另一篇博客中介绍了一部分:
LIO-SAM中利用IMU去运动畸变
在这里我主要再提一下相较于源码,需要修改的部分:
            // 计算当前点在栅格中的行号 rowIdn
            int rowIdn = -1;
            if (has_ring == true){
                rowIdn = laserCloudIn->points[i].ring;
            }
            else{
                float verticalAngle, horizonAngle;
                verticalAngle = atan2(thisPoint.z, sqrt(thisPoint.x * thisPoint.x + thisPoint.y * thisPoint.y)) * 180 / M_PI;
                rowIdn = (verticalAngle + ang_bottom) / ang_res_y;
            }
源码数据集中,因为有ring信息,以某种16线的激光雷达数据举例,ring=16,Horizon_SCAN 设为 1800。因此深度图的分辨率应该为:16*1800。即一个16行乘以1800列的网格,每个网格存储为点云距离大小。
现在考虑没有ring数据的情况(Horizon_SCAN数据通过配置文件设定),如何通过每个激光点云的x,y数据计算出rowIdn呢?
verticalAngle就是下图中的θ
上面代码中的ang_bottom应该是激光雷达安装时候的(仰角)起始角度。
ang_res_y应该是深度图中每个像素点在列方向上的分辨率。
 3. ang_bottom;ang_res_y如何设置
2024.7.1重新回顾
看了评论区对ang_bottom;ang_res_y;有点不太理解两个值对应不同数据集应该如何设置。这里的ang_res_y意思是激光雷达点云垂直分辨率,以下面速腾聚创RS-16激光雷达为例,垂直VFOV为15+15=30度,因此:
ang_res_y = 30/(16-1) = 2
ang_bottom应该为雷达水平正常放置时的俯仰角,这里为15度,因此:
ang_bottom = 15
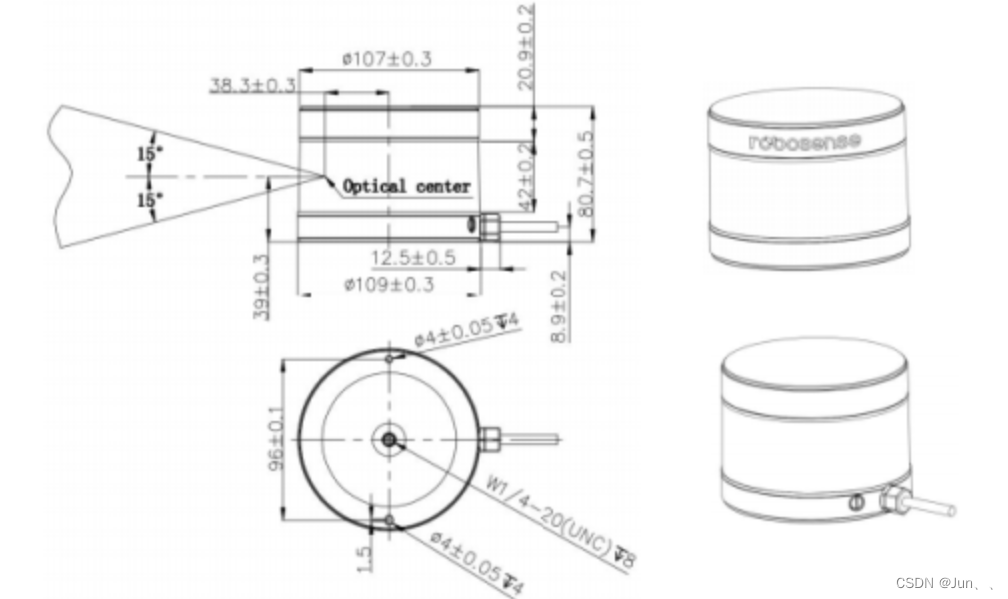
Urbanloco数据集有部分使用的也是速腾聚创的激光雷达,不过是32线的,同理可以由该雷达参数求出:
ang_res_y: 1.29
ang_bottom: 15


 1万+
1万+

 被折叠的 条评论
为什么被折叠?
被折叠的 条评论
为什么被折叠?
 到【灌水乐园】发言


