基于深度学习的语义分割教程(含python代码)

目录

一、遥感数据介绍

二、代码实现

1、UNet网络

2、数据集划分

3、超参数设置

4、数据加载

5、训练

6、结果出图

附录

1、RGB彩色标签转单波段

2、查看标签

三、项目代码


支持任意语义分割任务类型,包括医学语义分割、遥感语义分割、作物语义分割等。支持任意数据类型,无需修改代码,tif、png、jpg等。本教程以Unet为例,其他模型可以替换模型文件即可。
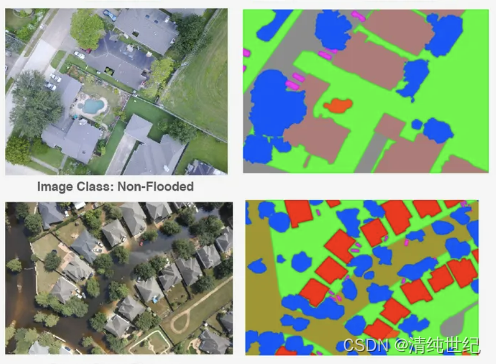
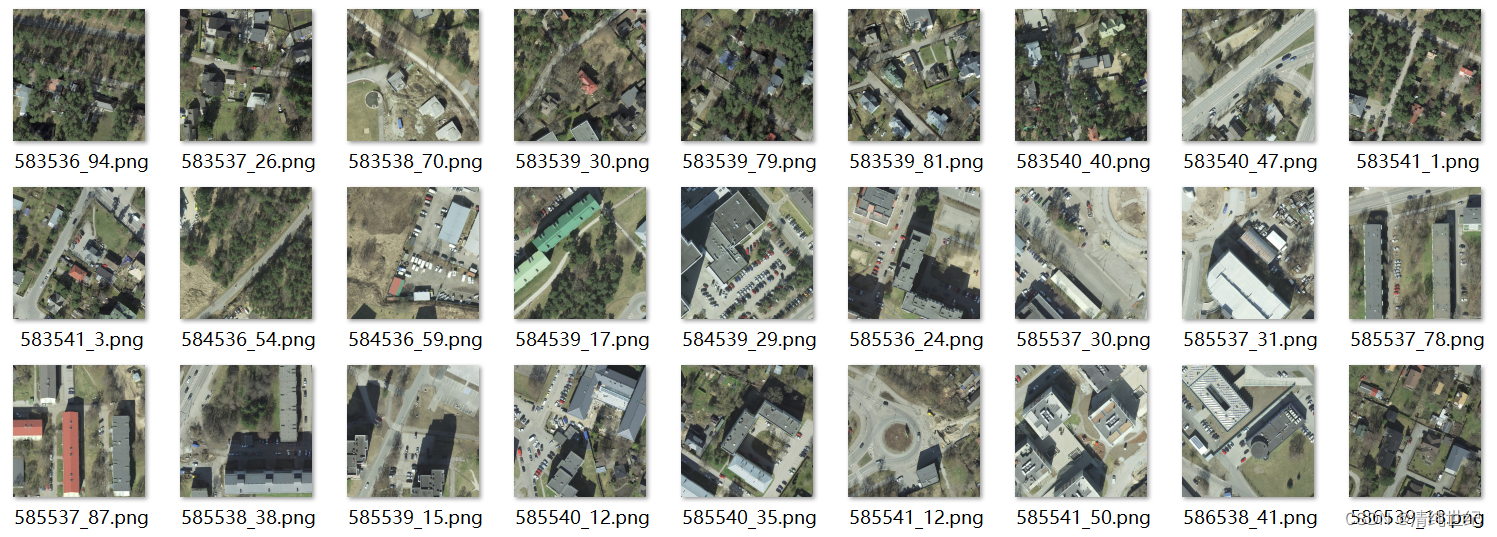
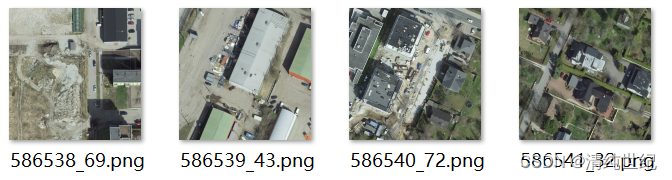
一、数据介绍

二、代码实现

1、UNet网络

import torch.nn as nn
import torch

class UNet(nn.Module):
    def __init__(self, input_channels, out_channels):
        super(UNet, self).__init__()

        self.enc1 = self.conv_block(input_channels, 64)
        self.enc2 = self.conv_block(64, 128)
        self.enc3 = self.conv_block(128, 256)
        self.enc4 = self.conv_block(256, 512)
        self.center = self.conv_block(512, 1024)
        self.dec4 = self.conv_block(1024 + 512, 512)
        self.dec3 = self.conv_block(512 + 256, 256)
        self.dec2 = self.conv_block(256 + 128, 128)
        self.dec1 = self.conv_block(128 + 64, 64)
        self.final = nn.Conv2d(64,out_channels, kernel_size=1)
        self.pool = nn.MaxPool2d(2, 2)
        self.up = nn.Upsample(scale_factor=2, mode='bilinear', align_corners=True)


    def conv_block(self, in_channels, out_channels):
        return nn.Sequential(
            nn.Conv2d(in_channels, out_channels, kernel_size=3, padding=1, bias=False),
            nn.ReLU(inplace=True),
            nn.BatchNorm2d(out_channels),
            nn.Conv2d(out_channels, out_channels, kernel_size=3, padding=1, bias=False),
            nn.ReLU(inplace=True),
            nn.BatchNorm2d(out_channels)
        )

    def forward(self, x):
        enc1 = self.enc1(x)
        enc2 = self.enc2(self.pool(enc1))
        enc3 = self.enc3(self.pool(enc2))
        enc4 = self.enc4(self.pool(enc3))

        center = self.center(self.pool(enc4))

        dec4 = self.dec4(torch.cat([enc4, self.up(center)], 1))
        dec3 = self.dec3(torch.cat([enc3, self.up(dec4)], 1))
        dec2 = self.dec2(torch.cat([enc2, self.up(dec3)], 1))
        dec1 = self.dec1(torch.cat([enc1, self.up(dec2)], 1))
        final = self.final(dec1)

        return final

2、数据集划分

指定训练集、验证集、测试集的大小

if __name__ == '__main__':
    # 指定源文件夹路径和训练集、验证集、测试集文件夹路径
    source_folder = r"./data/data"
    train_folder = r"./data/train"
    valid_folder = r"./data/val"
    test_folder = r"./data/test"

    # 指定数据文件夹路径和标签文件夹路径
    data_folder = r"./data/data"
    label_folder = r"./data/label"

    # 指定训练集、验证集和测试集数据文件夹路径
    train_data_folder = r"./data/train/data"
    valid_data_folder = r"./data/val/data"
    test_data_folder = r"./data/test/data"

    # 指定训练集、验证集和测试集标签文件夹路径
    train_label_folder = r"./data/train/label"
    valid_label_folder = r"./data/val/label"
    test_label_folder = r"./data/test/label"

    # 调用函数划分训练集、验证集和测试集
    split_dataset(data_folder, label_folder,
                  train_data_folder, valid_data_folder, test_data_folder,
                  train_label_folder, valid_label_folder, test_label_folder,
                  valid_ratio=0.2, test_ratio=0.2,
                  label_and_data_name_are_equal=True,label_add_name="")

3、超参数设置

# -------------参数设置------------------------
num_epochs = 50 # 迭代次数
lr = 0.001      # 学习率
class_num = 9   # 类别数量
batch_size = 8  # 批量大小
re_size = (224, 224) # resize大小,如果不需要,则 None

extension_img = "png" # 图像后缀
extension_lab = "png" # 标签后缀
# -------------------------------------------

4、数据加载

支持多波段数据,支持tif、png、jpg等格式。定义数据后缀即可

# 加载训练集
images_dir = r"./data/train/data"
labels_dir = r"./data/train/label"
train_dataset = RSDataset(images_dir, labels_dir,image_size=re_size, extension_img=extension_img, extension_lab=extension_lab)
trainloader = DataLoader(train_dataset, batch_size=batch_size, shuffle=True)

# 加载测试集
images_dir = r"./data/val/data"
labels_dir = r"./data/val/label"
val_dataset = RSDataset(images_dir, labels_dir,image_size=re_size, extension_img=extension_img, extension_lab=extension_lab)
valloader = DataLoader(val_dataset, batch_size=batch_size, shuffle=True)

5、训练

# 开始训练
best_score=0.0
for epoch in range(num_epochs):
    total_loss = 0.0
    model.train()
    label_true = torch.LongTensor()
    label_pred = torch.LongTensor()
    for i, (images, labels) in enumerate(trainloader):
        images = images.to(device)
        labels = labels.to(device)
        outputs = model(images)
        loss = criterion(outputs, labels)
        optimizer.zero_grad()
        loss.backward()
        optimizer.step()

        total_loss += loss.cpu().item()
        label_true = torch.cat((label_true, labels.data.cpu()), dim=0)
        label_pred = torch.cat((label_pred, outputs.argmax(dim=1).data.cpu()), dim=0)

    total_loss /= len(trainloader)
    acc, mean_acc, mean_iou,_ = label_accuracy_score(label_true.numpy(), label_pred.numpy(), class_num)
    print('epoch:[{}/{}], train_loss:{:.4f}, acc:{:.4f}, mean_acc:{:.4f}, mean_iou:{:.4f}'.format(
        epoch + 1,num_epochs, total_loss, acc, mean_acc, mean_iou))

6、结果出图

# -------------参数设置------------------------
class_num = 9                       # 类别数量
re_size= (224, 224)                 # resize大小,如果不需要,则 None
extension_img = "png" # 图像后缀
extension_lab = "png" # 标签后缀
batch_size = 8  # 批量大小

color = np.array([[125, 255, 100],
                  [0, 45, 100],
                  [50, 100, 150],
                  [150, 200, 40],
                  [0, 78, 32],
                  [96, 196, 235],
                  [5, 156, 246],
                  [46, 79, 129],
                  [56, 79, 205]]) # 显示的颜色编码
# -------------------------------------------

数据

预测结果

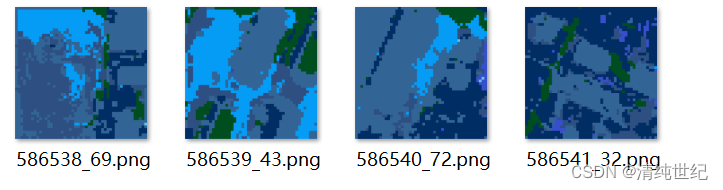
由于训练次数少,使用的数据仅为20个用于测试,因此精度较低,结果不太理想。有需要的可以自行增加数据和迭代次数。

附录

1、RGB彩色标签转单波段

由于网络使用的0,1,2,3的但波段灰度标签。如果我们是RGB色彩的三波段标签,就需要进行转换。根据RGB颜色码转:

import numpy as np
import cv2
import os
from utils import find_files_by_extension

# 标签中每个RGB颜色的值
VOC_COLORMAP = np.array([[0, 0, 0],
                         [0, 0, 128]])

2、查看标签

可通过该代码查看标签

import matplotlib.pyplot as plt
import numpy as np
from PIL import Image

# 读取图像
image_path = r"G:\000 其他参考与资料\0 出售\语义分割数据集\val\mask_merge\2017_2018\9\583538_70.png"
# image = plt.imread(image_path)[:,:,2]
image = np.array(Image.open(image_path))[:,:,1]
print(np.max(image))
print(image.shape)

# 显示图像
plt.imshow(image)
plt.axis('off')
plt.show()

三、项目代码

本项目的代码通过以下链接下载:基于UNet网络的遥感图像语义分割教程(含python代码)

  • 3
    点赞
  • 10
    收藏
    觉得还不错? 一键收藏
  • 打赏
    打赏
  • 0
    评论
【资源介绍】 基于深度学习的场景语义分割python源码+项目说明.zip 本文创建了SUPnetw网络实现利用有限开放基准测试与无语义标签实际城市竣工测绘三维场景数据共同进行训练模型,提高城市三维场景点云语义分割的性能 SUPnet网络结构如下: SUPnet由特征提取器和分类器以及数据对齐模块共同构建MCD。 具体步骤如下: 1)源场景数据流经特征提取器,然后流经两个分类器,利用 cross-entropy_loss 训练特 征提取器以及两个分类器在源场景中的语义分割性能,同时复制一份源场景数据用以进行步 骤 2)PW-ATM 训练。\ 2)目标数据流经 PW-ATM 模块,利用 EMD_loss 来训练 PW-ATM 模块的转换能 力。\ 3)目标数据经过 PW-ATM 转换后,流入提取器和两个分类器,利用 ADV_loss 来最 大化分类器差异。在这一步中,冻结特征提取模块和数据对齐模块,仅更新两个分类器的参 数。\ 4)目标数据经过 PW-ATM 转换后,流入提取器和两个分类器,利用 ADV_loss 来最 小化分类器差异。在这一步中,冻结两个分类器,更新特征提取器和数据对齐模块的参数。 本项目的data下面应包四个文件: .\Source_Scene_Point_Clouds\ .\Target_Scene_Point_Clouds\ .\Validationset\ .\testset python train_SUPnet.py --model SUPnet --batch_size 12 --log_dir SUPnet --epoch 32 python test_SUPnet.py --log_dir SUPnet --visual SUPnet对实际城市竣工数据语义分割结果如下: ![结果.png](%E7%BB%93%E6%9E%9C.png) 其中,a列和c列为PointNet++语义分割结果,b列和d列为SUPnet语义分割结果。 表格 网络测试集语义分割准确率 PointNet++ acc(%) SUPNet acc (%) 实验区A 34.5 89.3 实验区B 37.3 85.1 实验区D 12.8 88.7 实验区F 32.7 90.8 平均 29.3 88.5 【说明】 该项目是个人毕设项目,答辩评审分达到95分,代码都经过调试测试,确保可以运行!欢迎下载使用,可用于小白学习、进阶。 该资源主要针对计算机、通信、人工智能、自动化等相关专业的学生、老师或从业者下载使用,亦可作为期末课程设计、课程大作业、毕业设计等。 项目整体具有较高的学习借鉴价值!基础能力强的可以在此基础上修改调整,以实现不同的功能。 欢迎下载交流,互相学习,共同进步!
以下是使用深度学习进行图像分割Python代码示例,其中使用的是U-Net模型: ```python import numpy as np import matplotlib.pyplot as plt import os import cv2 from skimage import io from keras.models import Model from keras.layers import Input, concatenate, Conv2D, MaxPooling2D, Conv2DTranspose from keras.optimizers import Adam from keras.callbacks import ModelCheckpoint from keras import backend as K # 设置图像大小和路径 IMG_WIDTH = 256 IMG_HEIGHT = 256 IMG_CHANNELS = 3 TRAIN_PATH = 'train/' TEST_PATH = 'test/' # 预处理训练数据 def preprocess_train_data(): train_ids = next(os.walk(TRAIN_PATH))[1] X_train = np.zeros((len(train_ids), IMG_HEIGHT, IMG_WIDTH, IMG_CHANNELS), dtype=np.uint8) Y_train = np.zeros((len(train_ids), IMG_HEIGHT, IMG_WIDTH, 1), dtype=np.bool) print('Preprocessing train data...') for i, id_ in enumerate(train_ids): path = TRAIN_PATH + id_ img = io.imread(path+'/images/'+id_+'.png')[:,:,:IMG_CHANNELS] img = cv2.resize(img, (IMG_HEIGHT, IMG_WIDTH), interpolation=cv2.INTER_AREA) X_train[i] = img mask = np.zeros((IMG_HEIGHT, IMG_WIDTH, 1), dtype=np.bool) for mask_file in next(os.walk(path+'/masks/'))[2]: mask_ = io.imread(path+'/masks/'+mask_file) mask_ = cv2.resize(mask_, (IMG_HEIGHT, IMG_WIDTH), interpolation=cv2.INTER_AREA) mask_ = np.expand_dims(mask_, axis=-1) mask = np.maximum(mask, mask_) Y_train[i] = mask return X_train, Y_train # 构建U-Net模型 def unet(): inputs = Input((IMG_HEIGHT, IMG_WIDTH, IMG_CHANNELS)) s = inputs c1 = Conv2D(16, (3, 3), activation='relu', kernel_initializer='he_normal', padding='same') (s) c1 = Conv2D(16, (3, 3), activation='relu', kernel_initializer='he_normal', padding='same') (c1) p1 = MaxPooling2D((2, 2)) (c1) c2 = Conv2D(32, (3, 3), activation='relu', kernel_initializer='he_normal', padding='same') (p1) c2 = Conv2D(32, (3, 3), activation='relu', kernel_initializer='he_normal', padding='same') (c2) p2 = MaxPooling2D((2, 2)) (c2) c3 = Conv2D(64, (3, 3), activation='relu', kernel_initializer='he_normal', padding='same') (p2) c3 = Conv2D(64, (3, 3), activation='relu', kernel_initializer='he_normal', padding='same') (c3) p3 = MaxPooling2D((2, 2)) (c3) c4 = Conv2D(128, (3, 3), activation='relu', kernel_initializer='he_normal', padding='same') (p3) c4 = Conv2D(128, (3, 3), activation='relu', kernel_initializer='he_normal', padding='same') (c4) p4 = MaxPooling2D(pool_size=(2, 2)) (c4) c5 = Conv2D(256, (3, 3), activation='relu', kernel_initializer='he_normal', padding='same') (p4) c5 = Conv2D(256, (3, 3), activation='relu', kernel_initializer='he_normal', padding='same') (c5) u6 = Conv2DTranspose(128, (2, 2), strides=(2, 2), padding='same') (c5) u6 = concatenate([u6, c4]) c6 = Conv2D(128, (3, 3), activation='relu', kernel_initializer='he_normal', padding='same') (u6) c6 = Conv2D(128, (3, 3), activation='relu', kernel_initializer='he_normal', padding='same') (c6) u7 = Conv2DTranspose(64, (2, 2), strides=(2, 2), padding='same') (c6) u7 = concatenate([u7, c3]) c7 = Conv2D(64, (3, 3), activation='relu', kernel_initializer='he_normal', padding='same') (u7) c7 = Conv2D(64, (3, 3), activation='relu', kernel_initializer='he_normal', padding='same') (c7) u8 = Conv2DTranspose(32, (2, 2), strides=(2, 2), padding='same') (c7) u8 = concatenate([u8, c2]) c8 = Conv2D(32, (3, 3), activation='relu', kernel_initializer='he_normal', padding='same') (u8) c8 = Conv2D(32, (3, 3), activation='relu', kernel_initializer='he_normal', padding='same') (c8) u9 = Conv2DTranspose(16, (2, 2), strides=(2, 2), padding='same') (c8) u9 = concatenate([u9, c1], axis=3) c9 = Conv2D(16, (3, 3), activation='relu', kernel_initializer='he_normal', padding='same') (u9) c9 = Conv2D(16, (3, 3), activation='relu', kernel_initializer='he_normal', padding='same') (c9) outputs = Conv2D(1, (1, 1), activation='sigmoid') (c9) model = Model(inputs=[inputs], outputs=[outputs]) model.compile(optimizer=Adam(lr=1e-4), loss='binary_crossentropy', metrics=['accuracy']) model.summary() return model # 训练模型 def train(): print('Loading train data...') X_train, Y_train = preprocess_train_data() model = unet() print('Fitting model...') earlystopper = EarlyStopping(patience=5, verbose=1) checkpointer = ModelCheckpoint('model.h5', verbose=1, save_best_only=True) results = model.fit(X_train, Y_train, validation_split=0.1, batch_size=16, epochs=50, callbacks=[earlystopper, checkpointer]) return results # 预测测试数据 def predict(): print('Loading test data...') test_ids = next(os.walk(TEST_PATH))[1] X_test = np.zeros((len(test_ids), IMG_HEIGHT, IMG_WIDTH, IMG_CHANNELS), dtype=np.uint8) sizes_test = [] for i, id_ in enumerate(test_ids): path = TEST_PATH + id_ img = io.imread(path+'/images/'+id_+'.png')[:,:,:IMG_CHANNELS] sizes_test.append([img.shape[0], img.shape[1]]) img = cv2.resize(img, (IMG_HEIGHT, IMG_WIDTH), interpolation=cv2.INTER_AREA) X_test[i] = img print('Loading model...') model = unet() print('Predicting masks on test data...') preds_test = model.predict(X_test, verbose=1) preds_test_t = (preds_test > 0.5).astype(np.uint8) return preds_test_t, sizes_test # 显示图像及其掩模 def show_image_mask(image, mask): plt.figure(figsize=(10, 5)) plt.subplot(121) plt.imshow(image) plt.title('Image') plt.subplot(122) plt.imshow(mask, cmap='gray') plt.title('Mask') # 显示预测结果 def show_predict_results(preds_test_t, sizes_test): print('Resizing predicted masks to original images...') preds_test_upsampled = [] for i in range(len(preds_test_t)): preds_test_upsampled.append(cv2.resize(np.squeeze(preds_test_t[i]), (sizes_test[i][1], sizes_test[i][0]), interpolation=cv2.INTER_AREA)) print('Showing prediction results...') for i in range(len(preds_test_upsampled)): show_image_mask(X_test[i], preds_test_upsampled[i]) # 训练和预测 results = train() preds_test_t, sizes_test = predict() show_predict_results(preds_test_t, sizes_test) ``` 这个代码示例使用U-Net模型进行图像分割,在训练过程中使用了早期停止技术和模型检查点技术,在预测过程中使用了图像插值技术。通过修改代码中的路径和参数,可以使用自己的数据集进行训练和预测。

“相关推荐”对你有帮助么?

  • 非常没帮助
  • 没帮助
  • 一般
  • 有帮助
  • 非常有帮助
提交
评论
添加红包

请填写红包祝福语或标题

红包个数最小为10个

红包金额最低5元

当前余额3.43前往充值 >
需支付:10.00
成就一亿技术人!
领取后你会自动成为博主和红包主的粉丝 规则
hope_wisdom
发出的红包

打赏作者

清纯世纪

你的鼓励将是我创作的最大动力

¥1 ¥2 ¥4 ¥6 ¥10 ¥20
扫码支付:¥1
获取中
扫码支付

您的余额不足,请更换扫码支付或充值

打赏作者

实付
使用余额支付
点击重新获取
扫码支付
钱包余额 0

抵扣说明:

1.余额是钱包充值的虚拟货币,按照1:1的比例进行支付金额的抵扣。
2.余额无法直接购买下载,可以购买VIP、付费专栏及课程。

余额充值