


系列文章目录
《双模态检测系列 一》: 一文看懂YOLO11(系列进化史+网络结构+源码目录)
《双模态检测系列 二》: 手把手教你将YOLO11改成多模态YOLO检测(红外+可见光图像,代码实战)
《双模态检测系列 四》: 双模态检测数据集大全 敬请期待…
如果下面的内容对您有帮助,请多多点赞、收藏、转发,谢谢大家的支持。同时博主创建了一个计算机视觉相关的科研互助群Q:950440005。另外,本人最近也对这些年的双模态检测工作做了总结,如果大家正在犯愁如何寻找双模态图像融合和目标检测相关的创新点,欢迎大家加群讨论👏👏👏
文章目录
YOLO11介绍
YOLO(You Only Look Once)是一种流行的物体检测和图像分割模型,由华盛顿大学的 Joseph Redmon 和 Ali Farhadi 开发。YOLO 于 2015 年推出,因其高速度和准确性而迅速流行起来。就在不久前,由ultralytics团队时隔1年再次退出官方版本YOLO11。

一、YOLO系列进化史
| 名称 | 改进方法 | 发布时间 |
|---|---|---|
| YOLOv1 | 开山之作,首次提出目标分类和定位用一个神经网络统一起来,实现端到端目标检测 | 2015 |
| YOLOv2 | 引入Batch Normalization、多尺度训练策略等技术,提高了检测精度和速度 | 2016 |
| YOLOv3 | 采用了Darknet-53,进一步提高了特征提取能力,引入了多尺度检测和逻辑回归损失 | 2018 |
| YOLOv4 | 采用了SPP和CSP,使用Mosaic数据增强,引入DropBlock正则化 | 2020 |
| YOLOv5 | 采用了轻量级网络结构,引入新的训练策略和数据增强方法 | 2020 |
| YOLOv6 | 采用了更先进的网络结构和优化策略,专门针对工业场景进行了优化 | 2022 |
| YOLOv7 | 引入了模型重参数化、新的标签分配策略、ELAN高效网络架构以及带辅助头的训练 | 2022 |
| YOLOv8 | 采用了新的骨干网络、Anchor-Free检测头和新损失函数 | 2023 |
| YOLOv9 | v7的改进版,引入了可编程梯度信息(PGI)和高效层聚合网络(GELAN) | 2024 |
| YOLOv10 | 提出了NMS-free训练的一致双分配策略解决后处理中的冗余预测问题 | 2024 |
| YOLO11 | 将C2f改进为C3K2模块,SPPF后加入C2PSA(注意力卷积),检测头中替换了DW卷积 | 2024 |
YOLOv11在多个方面进行了改进,主要包括以下几个方面:
(1) 模型架构的优化: YOLOv11采用了改进的后端和颈部架构,增强了特征提取能力,从而实现了更精确的物体检测和更复杂的任务执行1。
(2) 特征提取效率的提升: 在主干网络中,YOLOv11将C2f模块更新为C3K2模块,进一步优化了特征提取效率。此外,在SPPF后加入类似注意力机制的C2PSA模块,有助于增强网络的关注机制,改善特征选择能力,提升检测性能2。
(3) 检测头的改进: YOLOv11中的检测头内部进行了调整,替换了两个深度可分离卷积(DWConv),这不仅降低了计算量,还在一定程度上提升了检测效果2。
(4) 深度和宽度参数的优化: YOLOv11对模型的深度和宽度参数进行了优化调整,进一步增强了网络在处理复杂场景下的表现2。
(5) GPU优化: YOLOv11在GPU上进行了优化训练,显著提升了训练速度和模型精度,延迟减少了高达25%3。
(6) 速度提升: 通过GPU优化和架构改进,YOLOv11的训练和推理速度比以往版本快得多,延迟减少高达25%3。
(7) 参数减少: 模型参数的减少使得YOLOv11运行更加高效,速度更快,同时保持高精度,几乎不影响准确性3。
这些改进使得YOLOv11在检测速度与精度之间达到了更好的平衡,进一步强化了其在实际应用中的表现。
二、YOLO11网络结构
2.1 整体网络架构

从网络结构图可以看出,与YOLOv8相比,主要改进如下:
(1)在主干网络中,将C2f模块更新为C3K2模块,进一步优化了特征提取效率。
(2)在SPPF后加入C2PSA模块(基于注意力机制的卷积),有助于增强网络的关注机制,改善特征选择能力,提升检测性能。
(3) YOLOv11中的检测头内部进行了调整,替换了两个深度可分离卷积(DWConv),降低了计算量,提升了检测效果。
2.2 CBS模块介绍
CBS模块就是Pytorch 自带的**Conv + BN +SiLU**,对应yolo11.yaml配置文件的Conv,YOLO11与v8一模一样。
假设args 为[64, 3, 2] ,那么就是conv2d 的 c1 为上一层输出通道、c2=64、k=3、 s =2、、p 为自动计算。
这里一开始连续使用两个3*3卷积stride为2的CBS模块,直接使得源图像宽、高各降低了4倍分辨率(整体变为原来1/16)。
源码部分如下:
 class Conv(nn.Module):
    """Standard convolution with args(ch_in, ch_out, kernel, stride, padding, groups, dilation, activation)."""

    default_act = nn.SiLU()  # default activation

    def __init__(self, c1, c2, k=1, s=1, p=None, g=1, d=1, act=True):
        """Initialize Conv layer with given arguments including activation."""
        super().__init__()
        self.conv = nn.Conv2d(c1, c2, k, s, autopad(k, p, d), groups=g, dilation=d, bias=False)
        self.bn = nn.BatchNorm2d(c2)
        self.act = self.default_act if act is True else act if isinstance(act, nn.Module) else nn.Identity()

    def forward(self, x):
        """Apply convolution, batch normalization and activation to input tensor."""
        return self.act(self.bn(self.conv(x)))

    def forward_fuse(self, x):
        """Perform transposed convolution of 2D data."""
        return self.act(self.conv(x))
2.3 C3K2 模块
从下面图中我们可以看到,C3K2模块其实就是C2F模块转变出来的,它代码中有一个设置,就是当c3k这个参数为FALSE的时候,C3K2模块就是C2F模块,也就是说它的Bottleneck是普通的Bottleneck;反之当它为true的时候,将Bottleneck模块替换成C3模块。

源码部分如下:
class Bottleneck(nn.Module):
    """Standard bottleneck."""

    def __init__(self, c1, c2, shortcut=True, g=1, k=(3, 3), e=0.5):
        """Initializes a standard bottleneck module with optional shortcut connection and configurable parameters."""
        super().__init__()
        c_ = int(c2 * e)  # hidden channels
        self.cv1 = Conv(c1, c_, k[0], 1)
        self.cv2 = Conv(c_, c2, k[1], 1, g=g)
        self.add = shortcut and c1 == c2

    def forward(self, x):
        """Applies the YOLO FPN to input data."""
        return x + self.cv2(self.cv1(x)) if self.add else self.cv2(self.cv1(x))

class C3(nn.Module):
    """CSP Bottleneck with 3 convolutions."""

    def __init__(self, c1, c2, n=1, shortcut=True, g=1, e=0.5):
        """Initialize the CSP Bottleneck with given channels, number, shortcut, groups, and expansion values."""
        super().__init__()
        c_ = int(c2 * e)  # hidden channels
        self.cv1 = Conv(c1, c_, 1, 1)
        self.cv2 = Conv(c1, c_, 1, 1)
        self.cv3 = Conv(2 * c_, c2, 1)  # optional act=FReLU(c2)
        self.m = nn.Sequential(*(Bottleneck(c_, c_, shortcut, g, k=((1, 1), (3, 3)), e=1.0) for _ in range(n)))

    def forward(self, x):
        """Forward pass through the CSP bottleneck with 2 convolutions."""
        return self.cv3(torch.cat((self.m(self.cv1(x)), self.cv2(x)), 1))

class C3k(C3):
    """C3k is a CSP bottleneck module with customizable kernel sizes for feature extraction in neural networks."""

    def __init__(self, c1, c2, n=1, shortcut=True, g=1, e=0.5, k=3):
        """Initializes the C3k module with specified channels, number of layers, and configurations."""
        super().__init__(c1, c2, n, shortcut, g, e)
        c_ = int(c2 * e)  # hidden channels
        # self.m = nn.Sequential(*(RepBottleneck(c_, c_, shortcut, g, k=(k, k), e=1.0) for _ in range(n)))
        self.m = nn.Sequential(*(Bottleneck(c_, c_, shortcut, g, k=(k, k), e=1.0) for _ in range(n)))

class C2f(nn.Module):
    """Faster Implementation of CSP Bottleneck with 2 convolutions."""

    def __init__(self, c1, c2, n=1, shortcut=False, g=1, e=0.5):
        """Initializes a CSP bottleneck with 2 convolutions and n Bottleneck blocks for faster processing."""
        super().__init__()
        self.c = int(c2 * e)  # hidden channels
        self.cv1 = Conv(c1, 2 * self.c, 1, 1)
        self.cv2 = Conv((2 + n) * self.c, c2, 1)  # optional act=FReLU(c2)
        self.m = nn.ModuleList(Bottleneck(self.c, self.c, shortcut, g, k=((3, 3), (3, 3)), e=1.0) for _ in range(n))

    def forward(self, x):
        """Forward pass through C2f layer."""
        y = list(self.cv1(x).chunk(2, 1))
        y.extend(m(y[-1]) for m in self.m)
        return self.cv2(torch.cat(y, 1))

    def forward_split(self, x):
        """Forward pass using split() instead of chunk()."""
        y = list(self.cv1(x).split((self.c, self.c), 1))
        y.extend(m(y[-1]) for m in self.m)
        return self.cv2(torch.cat(y, 1))

class C3k2(C2f):
    """Faster Implementation of CSP Bottleneck with 2 convolutions."""

    def __init__(self, c1, c2, n=1, c3k=False, e=0.5, g=1, shortcut=True):
        """Initializes the C3k2 module, a faster CSP Bottleneck with 2 convolutions and optional C3k blocks."""
        super().__init__(c1, c2, n, shortcut, g, e)
        self.m = nn.ModuleList(
            C3k(self.c, self.c, 2, shortcut, g) if c3k else Bottleneck(self.c, self.c, shortcut, g) for _ in range(n)
        )
2.4 C2PSA 模块
C2PSA它结合了PSA(Pointwise Spatial Attention)块,用于增强特征提取和注意力机制。
下面的图建议从左到右看,这样才能更有条理的理解,其实PSA个人感觉就是仿着VIT 的Attention来做的,是把输入C2PSA的特征图的 hxw 看做VIT 的path数(也可以理解为NLP中token 个数),特征图的channel 数看做VIT特征维度(CNN的宽度,或者理解为NLP中token 编码后的特征维度),然后计算出QKV(这里需要注意第四幅图的QKV是值,不是操作,所以标注成了圆角矩形,这里是为了大家好理解),这里的Attention其实是在 h x w 维度计算空间Attention。
个人感觉是强制给了全局感受野,且并联了一个33的深度可分离卷积的单空间部分,就是仅在每一个特征图上进行33卷积,具体实现是通过Pytorch conv2d 的 group参数设置为特征图的通道数。特别的关于Conv的参数分别为:输入通道数、输出通道数、卷积核尺寸、pad尺寸、group数、是否有激活函数(默认silu)。图中的最后一幅省略了一些细节,可以参考源码。
注意区别C2fPSA,C2fPSA才是对 C2f 模块的扩展,通过在标准 C2f 模块中引入 PSA 块,C2fPSA实现了更强大的注意力机制,从而提高了模型对重要特征的捕捉能力。作者实现了该模块但最终没有使用。

源码部分如下:
class Attention(nn.Module):
    """
    Attention module that performs self-attention on the input tensor.
    Args:
        dim (int): The input tensor dimension.
        num_heads (int): The number of attention heads.
        attn_ratio (float): The ratio of the attention key dimension to the head dimension.
    Attributes:
        num_heads (int): The number of attention heads.
        head_dim (int): The dimension of each attention head.
        key_dim (int): The dimension of the attention key.
        scale (float): The scaling factor for the attention scores.
        qkv (Conv): Convolutional layer for computing the query, key, and value.
        proj (Conv): Convolutional layer for projecting the attended values.
        pe (Conv): Convolutional layer for positional encoding.
    """

    def __init__(self, dim, num_heads=8, attn_ratio=0.5):
        """Initializes multi-head attention module with query, key, and value convolutions and positional encoding."""
        super().__init__()
        self.num_heads = num_heads
        self.head_dim = dim // num_heads
        self.key_dim = int(self.head_dim * attn_ratio)
        self.scale = self.key_dim**-0.5
        nh_kd = self.key_dim * num_heads
        h = dim + nh_kd * 2
        self.qkv = Conv(dim, h, 1, act=False)
        self.proj = Conv(dim, dim, 1, act=False)
        self.pe = Conv(dim, dim, 3, 1, g=dim, act=False)

    def forward(self, x):
        """
        Forward pass of the Attention module.
        Args:
            x (torch.Tensor): The input tensor.
        Returns:
            (torch.Tensor): The output tensor after self-attention.
        """
        B, C, H, W = x.shape
        N = H * W
        qkv = self.qkv(x)
        q, k, v = qkv.view(B, self.num_heads, self.key_dim * 2 + self.head_dim, N).split(
            [self.key_dim, self.key_dim, self.head_dim], dim=2
        )

        attn = (q.transpose(-2, -1) @ k) * self.scale
        attn = attn.softmax(dim=-1)
        x = (v @ attn.transpose(-2, -1)).view(B, C, H, W) + self.pe(v.reshape(B, C, H, W))
        x = self.proj(x)
        return x

class PSABlock(nn.Module):
    """
    PSABlock class implementing a Position-Sensitive Attention block for neural networks.
    This class encapsulates the functionality for applying multi-head attention and feed-forward neural network layers
    with optional shortcut connections.
    Attributes:
        attn (Attention): Multi-head attention module.
        ffn (nn.Sequential): Feed-forward neural network module.
        add (bool): Flag indicating whether to add shortcut connections.
    Methods:
        forward: Performs a forward pass through the PSABlock, applying attention and feed-forward layers.
    Examples:
        Create a PSABlock and perform a forward pass
        >>> psablock = PSABlock(c=128, attn_ratio=0.5, num_heads=4, shortcut=True)
        >>> input_tensor = torch.randn(1, 128, 32, 32)
        >>> output_tensor = psablock(input_tensor)
    """

    def __init__(self, c, attn_ratio=0.5, num_heads=4, shortcut=True) -> None:
        """Initializes the PSABlock with attention and feed-forward layers for enhanced feature extraction."""
        super().__init__()

        self.attn = Attention(c, attn_ratio=attn_ratio, num_heads=num_heads)
        self.ffn = nn.Sequential(Conv(c, c * 2, 1), Conv(c * 2, c, 1, act=False))
        self.add = shortcut

    def forward(self, x):
        """Executes a forward pass through PSABlock, applying attention and feed-forward layers to the input tensor."""
        x = x + self.attn(x) if self.add else self.attn(x)
        x = x + self.ffn(x) if self.add else self.ffn(x)
        return x

class C2PSA(nn.Module):
    """
    C2PSA module with attention mechanism for enhanced feature extraction and processing.
    This module implements a convolutional block with attention mechanisms to enhance feature extraction and processing
    capabilities. It includes a series of PSABlock modules for self-attention and feed-forward operations.
    Attributes:
        c (int): Number of hidden channels.
        cv1 (Conv): 1x1 convolution layer to reduce the number of input channels to 2*c.
        cv2 (Conv): 1x1 convolution layer to reduce the number of output channels to c.
        m (nn.Sequential): Sequential container of PSABlock modules for attention and feed-forward operations.
    Methods:
        forward: Performs a forward pass through the C2PSA module, applying attention and feed-forward operations.
    Notes:
        This module essentially is the same as PSA module, but refactored to allow stacking more PSABlock modules.
    Examples:
        >>> c2psa = C2PSA(c1=256, c2=256, n=3, e=0.5)
        >>> input_tensor = torch.randn(1, 256, 64, 64)
        >>> output_tensor = c2psa(input_tensor)
    """

    def __init__(self, c1, c2, n=1, e=0.5):
        """Initializes the C2PSA module with specified input/output channels, number of layers, and expansion ratio."""
        super().__init__()
        assert c1 == c2
        self.c = int(c1 * e)
        self.cv1 = Conv(c1, 2 * self.c, 1, 1)
        self.cv2 = Conv(2 * self.c, c1, 1)

        self.m = nn.Sequential(*(PSABlock(self.c, attn_ratio=0.5, num_heads=self.c // 64) for _ in range(n)))

    def forward(self, x):
        """Processes the input tensor 'x' through a series of PSA blocks and returns the transformed tensor."""
        a, b = self.cv1(x).split((self.c, self.c), dim=1)
        b = self.m(b)
        return self.cv2(torch.cat((a, b), 1))
2.5 检测头改进
如下图,上边是YOLOV5 的结构,中是YOLOv8 的结构,下面是YOLOV11 结构
YOLOv5: 检测和分类共用一个卷积(coupled head)并且是anchor based ,其 卷积输出为(5+N class)*3,其中 5为 4个bbox值(具体代表什么不同版本略有不同,官方git有说明)+ 1个obj 值 (是否有目标,这个是从YOLO V1 传承下来的,个人感觉有点绕和不合理,并且后面取消),N class 为类别数,3为anchor 的数量,默认是3。
YOLOv8:检测和分类的卷积是解耦的(decoupled),如中图,上面一条卷积支路是回归框,框的特征图channel为4*regmax;分类的channel 为类别数。
YOLO11:检测和分类的卷积是解耦的(decoupled),如右图,上面一条卷积支路是回归框,框的特征图channel为4*regmax,分类的channel 为类别数。值得注意的是,分类分支使用深度可分离卷积替代常规卷积降低计算量。

源码部分如下:
class Detect(nn.Module):
    """YOLO Detect head for detection models."""

    dynamic = False  # force grid reconstruction
    export = False  # export mode
    end2end = False  # end2end
    max_det = 300  # max_det
    shape = None
    anchors = torch.empty(0)  # init
    strides = torch.empty(0)  # init

    def __init__(self, nc=80, ch=()):
        """Initializes the YOLO detection layer with specified number of classes and channels."""
        super().__init__()
        self.nc = nc  # number of classes
        self.nl = len(ch)  # number of detection layers
        self.reg_max = 16  # DFL channels (ch[0] // 16 to scale 4/8/12/16/20 for n/s/m/l/x)
        self.no = nc + self.reg_max * 4  # number of outputs per anchor
        self.stride = torch.zeros(self.nl)  # strides computed during build
        c2, c3 = max((16, ch[0] // 4, self.reg_max * 4)), max(ch[0], min(self.nc, 100))  # channels
        self.cv2 = nn.ModuleList(
            nn.Sequential(Conv(x, c2, 3), Conv(c2, c2, 3), nn.Conv2d(c2, 4 * self.reg_max, 1)) for x in ch
        )
        self.cv3 = nn.ModuleList(
            nn.Sequential(
                nn.Sequential(DWConv(x, x, 3), Conv(x, c3, 1)),
                nn.Sequential(DWConv(c3, c3, 3), Conv(c3, c3, 1)),
                nn.Conv2d(c3, self.nc, 1),
            )
            for x in ch
        )
        self.dfl = DFL(self.reg_max) if self.reg_max > 1 else nn.Identity()

        if self.end2end:
            self.one2one_cv2 = copy.deepcopy(self.cv2)
            self.one2one_cv3 = copy.deepcopy(self.cv3)

    def forward(self, x):
        """Concatenates and returns predicted bounding boxes and class probabilities."""
        if self.end2end:
            return self.forward_end2end(x)

        for i in range(self.nl):
            x[i] = torch.cat((self.cv2[i](x[i]), self.cv3[i](x[i])), 1)
        if self.training:  # Training path
            return x
        y = self._inference(x)
        return y if self.export else (y, x)
2.6 损失函数
Loss 计算包括 2 个分支: 分类和回归分支,没有了之前的 objectness 分支。
分类分支依然采用 BCE Loss。
回归分支使用了 Distribution Focal Loss(DFL Reg_max默认为16)+ CIoU Loss。3 个 Loss 采用一定权重比例加权即可。

三、YOLO11工程文件介绍
3.1 YOLO11源码目录
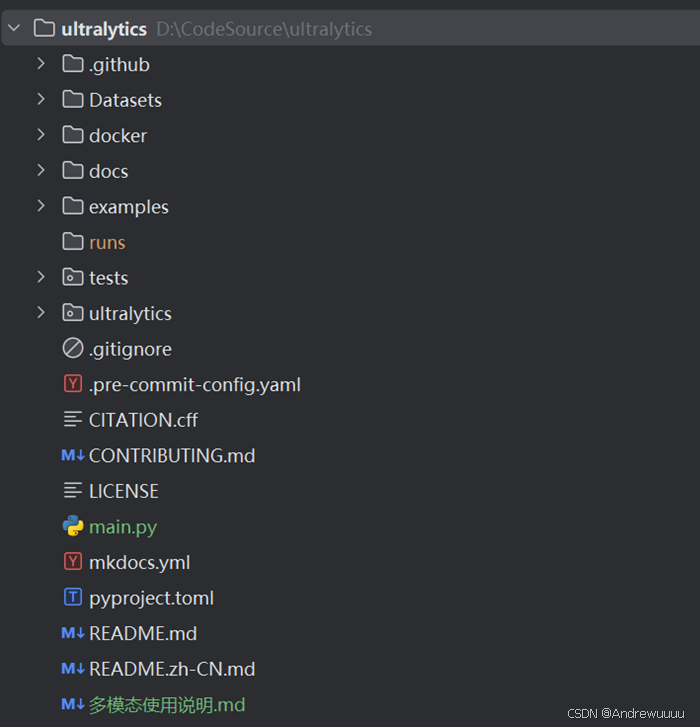
(1).github:方便项目的自动化管理,社区互动,依赖维护;
(2)docker:针对不同环境或者平台的部署文件;
(3)docs:存放文档资料,包括多种语言的翻译;
(4)examples: 不用编程语言和平台的YOLOv8实现,如C++;
(5)test: 包含了项目的自动化测试脚本,如 cuda;
(6)ultralytics(重点): 包含了YOLOv8所有的功能集成;
(7)main.py: 模型训练、验证、推理时运行的主文件;
3.2 ultralytics目录详解
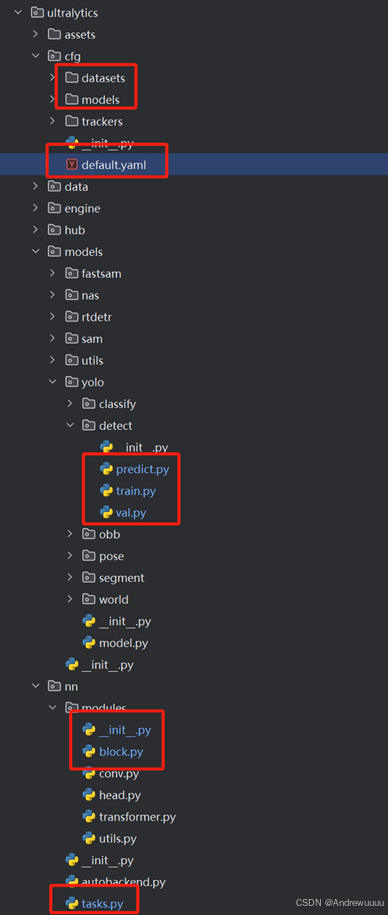
(1)assets:YOLO历史上最经典的两张图片,方便大家测试;
(2)cfg (重点): 项目配置文件的集中地;
(3)data:包含图像导入以及数据处理、增强等文件;
(4)engine:包含与模型训练、验证和推理有关的核心代码 ;
(5)hub: 用于处理与平台或服务继承相关的操作;
(6)models(重点): YOLO模型的方法实现;
(7)nn(重点): 模型的所有基础块,也是自定义结构部分需要改动的地方;
3.3 cfg目录详解
(1)cfg/default.yaml: 这是训练、验证以及预测过程中设置超参数的文件;
(2)cfg/datasets/xx.yaml: 这个文件包含数据集的配置信息,如数据路径、类别信息等;
(3) cfg/models/11/xx.yaml: 该路径下代表所有不同网络模型配置文件,包括网络的模块组件、通道数等。


 2万+
2万+

 被折叠的 条评论
为什么被折叠?
被折叠的 条评论
为什么被折叠?
 到【灌水乐园】发言


