


基于低功耗蓝牙和微信小程序的门禁系统(FPGA课设设计)
文章目录
本次FPGA课程设计基于Cyclone IV的 EP4CE6F17C8。使用的是AX301开发板(正点原子的新起点也是用同一种芯片,只是要修改引脚)。
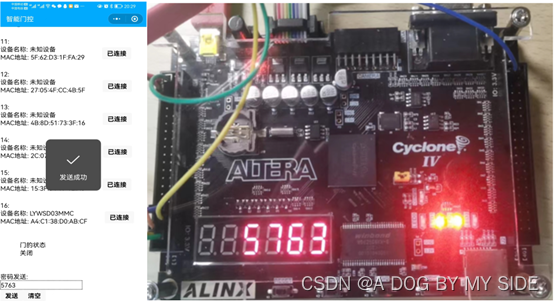
本系统能够实现通过蓝牙发送密码给FPGA,并在开发板的数码管上显示密码,密码正确,则手机端(微信小程序)接收到开门信号,并显示开门。其余时候显示关闭。
一、低功耗蓝牙(BLE)的配置和与FPGA通信代码
1.1 低功耗蓝牙的介绍及配置
低功耗蓝牙的介绍见这篇文章:BLE基础知识详解
买到蓝牙模块后,使用AT指令对蓝牙进行配置,详见:常见蓝牙模块介绍和AT指令
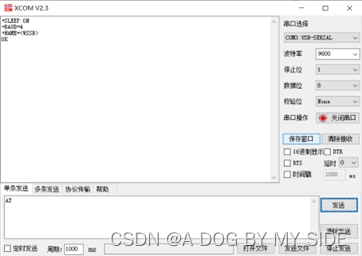
用串口调试助手配置蓝牙
1.2 低功耗蓝牙与FPGA通信
蓝牙通过串口收发实现与FPGA的数据交换,想要了解串口通信可以看这篇文章: 串口通信详解
代码:
// 串口接收模块
module uart_rx(
	input 			sys_clk,			//50M系统时钟
	input 			sys_rst_n,			//系统复位
	input 			uart_rxd,			//接收数据线
	output reg 		uart_rx_done,		//数据接收完成标志
	output reg [7:0]uart_rx_data		//接收到的数据
);
//常量化波特率,可更改
    parameter	BPS=9600;					//波特率9600bps,可更改
    parameter	SYS_CLK_FRE=50_000_000;		//50M系统时钟
    localparam	BPS_CNT=SYS_CLK_FRE/BPS;	//传输一位数据所需要的时钟个数

    reg 			uart_rx_d0;		//寄存1拍
    reg 			uart_rx_d1;		//寄存2拍
    reg [15:0]		clk_cnt;				//时钟计数器
    reg [3:0]		rx_cnt;					//接收计数器
    reg 			rx_flag;				//接收标志位
    reg [7:0]		uart_rx_data_reg;		//数据寄存

    wire 			neg_uart_rx_data;		//数据的下降沿

    assign	neg_uart_rx_data=uart_rx_d1 & (~uart_rx_d0);  //捕获数据线的下降沿,用来标志数据传输开始
    //将数据线打两拍,作用1:同步不同时钟域信号,防止亚稳态;作用2:用以捕获下降沿
    always@(posedge sys_clk or negedge sys_rst_n)begin
        if(!sys_rst_n)begin
            uart_rx_d0<=1'b0;
            uart_rx_d1<=1'b0;
        end
        else begin
            uart_rx_d0<=uart_rxd;
            uart_rx_d1<=uart_rx_d0;
        end
    end
    //捕获到数据下降沿(起始位0)后,拉高传输开始标志位,并在第9个数据(终止位)的传输过程正中(数据比较稳定)再将传输开始标志位拉低,标志传输结束
    always@(posedge sys_clk or negedge sys_rst_n)begin
        if(!sys_rst_n)
            rx_flag<=1'b0;
        else begin
            if(neg_uart_rx_data)
                rx_flag<=1'b1;
            else if((rx_cnt==4'd9)&&(clk_cnt==BPS_CNT/2))//在第9个数据(终止位)的传输过程正中(数据比较稳定)再将传输开始标志位拉低,标志传输结束
                rx_flag<=1'b0;
            else
                rx_flag<=rx_flag;
        end
    end
    //时钟每计数一个BPS_CNT(传输一位数据所需要的时钟个数),即将数据计数器加1,并清零时钟计数器
    always@(posedge sys_clk or negedge sys_rst_n)begin
        if(!sys_rst_n)begin
            rx_cnt<=4'd0;
            clk_cnt<=16'd0;
        end
        else if(rx_flag)begin
            if(clk_cnt<BPS_CNT-1'b1)begin
                clk_cnt<=clk_cnt+1'b1;
                rx_cnt<=rx_cnt;
            end
            else begin
                clk_cnt<=16'd0;
                rx_cnt<=rx_cnt+1'b1;
            end
        end
        else begin
            rx_cnt<=4'd0;
            clk_cnt<=16'd0;
        end
    end
    //在每个数据的传输过程正中(数据比较稳定)将数据线上的数据赋值给数据寄存器
    always@(posedge sys_clk or negedge sys_rst_n)begin
        if(!sys_rst_n)
            uart_rx_data_reg<=8'd0;
        else if(rx_flag)
            if(clk_cnt==BPS_CNT/2) begin
                case(rx_cnt)
                    4'd1:uart_rx_data_reg[0]<=uart_rxd;
                    4'd2:uart_rx_data_reg[1]<=uart_rxd;
                    4'd3:uart_rx_data_reg[2]<=uart_rxd;
                    4'd4:uart_rx_data_reg[3]<=uart_rxd;
                    4'd5:uart_rx_data_reg[4]<=uart_rxd;
                    4'd6:uart_rx_data_reg[5]<=uart_rxd;
                    4'd7:uart_rx_data_reg[6]<=uart_rxd;
                    4'd8:uart_rx_data_reg[7]<=uart_rxd;
                    default:;
                endcase
            end
            else
                uart_rx_data_reg<=uart_rx_data_reg;
        else
            uart_rx_data_reg<=8'd0;
    end
    //当数据传输到终止位时,拉高传输完成标志位,并将数据输出
    always@(posedge sys_clk or negedge sys_rst_n)begin
        if(!sys_rst_n)begin
            uart_rx_done<=1'b0;
            uart_rx_data<=8'd0;
        end
        else if(rx_cnt==4'd9)begin
            uart_rx_done<=1'b1;
            uart_rx_data<=uart_rx_data_reg;
        end
        else begin
            uart_rx_done<=1'b0;
            uart_rx_data<=8'd0;
        end
    end
endmodule
// 串口发送模块
module uart_tx(
	input 			sys_clk,	//50M系统时钟
	input 			sys_rst_n,	//系统复位
	input	[7:0] 	uart_data,	//发送的8位置数据
	input			uart_tx_en,	//发送使能信号
	output reg 		uart_txd	//串口发送数据线

);

parameter 	SYS_CLK_FRE=50_000_000;    //50M系统时钟
parameter 	BPS=9_600;                 //波特率9600bps,可更改
localparam	BPS_CNT=SYS_CLK_FRE/BPS;   //传输一位数据所需要的时钟个数

reg	uart_tx_en_d0;			//寄存1拍
reg uart_tx_en_d1;			//寄存2拍
reg tx_flag;				//发送标志位
reg [7:0]  uart_data_reg;	//发送数据寄存器
reg [15:0] clk_cnt;			//时钟计数器
reg [3:0]  tx_cnt;			//发送个数计数器

wire pos_uart_en_txd;		//使能信号的上升沿
//捕捉使能端的上升沿信号,用来标志输出开始传输
assign pos_uart_en_txd= uart_tx_en_d0 && (~uart_tx_en_d1);

always @(posedge sys_clk or negedge sys_rst_n)begin
	if(!sys_rst_n)begin
		uart_tx_en_d0<=1'b0;
		uart_tx_en_d1<=1'b0;
	end
	else begin
		uart_tx_en_d0<=uart_tx_en;
		uart_tx_en_d1<=uart_tx_en_d0;
	end
end
//捕获到使能端的上升沿信号,拉高传输开始标志位,并在第9个数据(终止位)的传输过程正中(数据比较稳定)再将传输开始标志位拉低,标志传输结束
always @(posedge sys_clk or negedge sys_rst_n)begin
	if(!sys_rst_n)begin
		tx_flag<=1'b0;
		uart_data_reg<=8'd0;
	end
	else if(pos_uart_en_txd)begin
		uart_data_reg<=uart_data;
		tx_flag<=1'b1;
	end
	else if((tx_cnt==4'd9) && (clk_cnt==BPS_CNT/2))begin//在第9个数据(终止位)的传输过程正中(数据比较稳定)再将传输开始标志位拉低,标志传输结束
		tx_flag<=1'b0;
		uart_data_reg<=8'd0;
	end
	else begin
		uart_data_reg<=uart_data_reg;
		tx_flag<=tx_flag;
	end
end
//时钟每计数一个BPS_CNT(传输一位数据所需要的时钟个数),即将数据计数器加1,并清零时钟计数器
always @(posedge sys_clk or negedge sys_rst_n)begin
	if(!sys_rst_n)begin
		clk_cnt<=16'd0;
		tx_cnt <=4'd0;
	end
	else if(tx_flag) begin
		if(clk_cnt<BPS_CNT-1)begin
			clk_cnt<=clk_cnt+1'b1;
			tx_cnt <=tx_cnt;
		end
		else begin
			clk_cnt<=16'd0;
			tx_cnt <=tx_cnt+1'b1;
		end
	end
	else begin
		clk_cnt<=16'd0;
		tx_cnt<=4'd0;
	end
end
//在每个数据的传输过程正中(数据比较稳定)将数据寄存器的数据赋值给数据线
always @(posedge sys_clk or negedge sys_rst_n)begin
	if(!sys_rst_n)
		uart_txd<=1'b1;
	else if(tx_flag)
		case(tx_cnt)
			4'd0:	uart_txd<=1'b0;
			4'd1:	uart_txd<=uart_data_reg[0];
			4'd2:	uart_txd<=uart_data_reg[1];
			4'd3:	uart_txd<=uart_data_reg[2];
			4'd4:	uart_txd<=uart_data_reg[3];
			4'd5:	uart_txd<=uart_data_reg[4];
			4'd6:	uart_txd<=uart_data_reg[5];
			4'd7:	uart_txd<=uart_data_reg[6];
			4'd8:	uart_txd<=uart_data_reg[7];
			4'd9:	uart_txd<=1'b1;
			default:;
		endcase
	else
		uart_txd<=1'b1;
end
endmodule
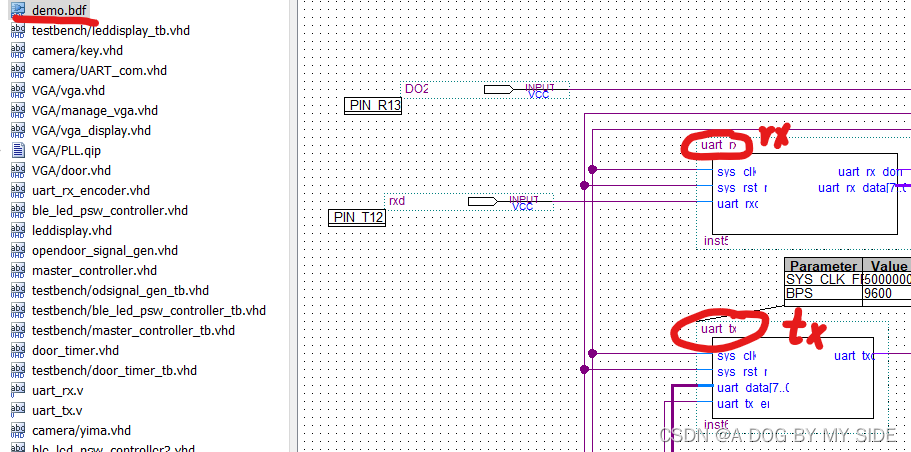
编译代码后可以生成元件,放入bdf中
如下图所示
二、FPGA控制器的设计
由于串口接收器输出的是ASCII码(8位)的vector,这样检测6位密码需要6*8=48个寄存器。我们可以将接收端并行输出的8位数组经过译码器得到4位数组(0-9十进制数用4位二进制数表示)。这样不仅节省了寄存器,也使后续的计算变得方便。所以,我们首先设计84译码器。
2.1 8-4译码器的设计
原理比较简单,直接放代码。注意这里使用的是VHDL代码。
library ieee;
use ieee.std_logic_1164.all;
use ieee.std_logic_unsigned.all;

entity uart_rx_encoder is
    port(clk, en_rxd: in std_logic;
        en_rxd_next: out std_logic;
        D: in std_logic_vector(7 downto 0);
        Q: out std_logic_vector(3 downto 0));
end entity;

architecture behav of uart_rx_encoder is
    signal data: std_logic_vector(7 downto 0);
begin
    process(clk)
    begin
        if (clk'event and clk='1') then
            if (en_rxd = '1') then        --en_rxd必须只持续一个时钟周期,因为我没做上升沿检测
                data <= D;
                en_rxd_next<='1';
            else
                en_rxd_next<='0';
            end if;
        end if;
    end process;

    with data select
    Q<= "0000" when "00110000",
        "0001" when "00110001",
        "0010" when "00110010",
        "0011" when "00110011",
        "0100" when "00110100",
        "0101" when "00110101",
        "0110" when "00110110",
        "0111" when "00110111",
        "1000" when "00111000",
        "1001" when "00111001",
        "1111" when others;

end behav;
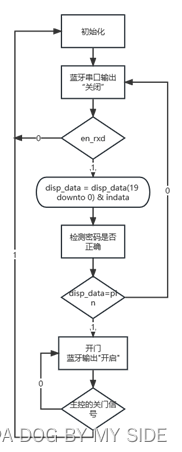
2.2 主控器的设计
主控器的作用是接收发送的密码并存储,当密码正确时向手机端发送开门信号,其余时候发送关门信号。
同时,主控器还连接着数码管,能将输入的密码实时显示出来。
整体设计图如下:
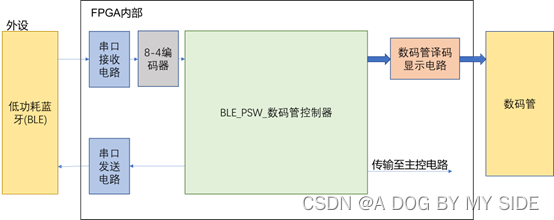 我们小组的本课程设计是实现一整个智慧门控系统(包括VGA显示,开门驱动,摄像头识别开门,红外检测等),我只是将我本人的工作开源,我也负责整个智慧门控系统的主控设计,但这里不需要主控电路的代码,在这篇文章里,主控电路就是上述框图中的BLE_PSW_数码管控制器。
这里给出BLE_PSW_数码管控制器(即主控器)的代码
library ieee;
use ieee.std_logic_1164.all;
use ieee.std_logic_unsigned.all;
use ieee.numeric_std.all;

entity ble_led_psw_controller2 is
    port(clk,rst: in std_logic;
        en_rxd,shutdoor: in std_logic;
        indata: in std_logic_vector(3 downto 0);
        ledout: out std_logic_vector(23 downto 0);
        doorstate: out std_logic;
        en_txd: buffer std_logic;
        txd_out: out std_logic_vector(7 downto 0));
end entity;

architecture behav of ble_led_psw_controller2 is
    type state_type is (s0,s1,s2,s3,s4);
    signal present_state, next_state : state_type;
    signal disp_data: std_logic_vector(27 downto 0);
    signal pin: std_logic_vector(23 downto 0);

    signal en_rxd0,en_rxd1,en_rxd_posedge: std_logic;
begin

    process(clk)
    begin
        if clk'event and clk = '1' then
        en_rxd0 <= en_rxd;           --这里是上升沿检测的入口
        end if;
    end process;

    process(clk)
    begin
        if clk'event and clk = '1' then
            en_rxd1 <= en_rxd0;
        end if;
    end process;

    en_rxd_posedge <= en_rxd0 and not en_rxd1;   --检测en_rxd的上升沿


    pin<="011001100110011001100110";     --密码的初值,就是6个6

    seq:process(clk,en_rxd_posedge)
        variable count : integer range 0 to 4;
    begin
        if rst='0' then
            disp_data <= "1111111111111111111111111111";
            if (present_state /= s4) then
                present_state <= s0;
            else
                present_state <= s4;
            end if;
        elsif (rising_edge(clk)) then
            present_state <= next_state;
            if (en_rxd_posedge = '1') then
                disp_data(3 downto 0) <= indata;
                count := 4;
            elsif count > 0 then
                disp_data <= to_stdlogicvector(to_bitvector(disp_data) sll 1);
                count := count - 1;
            end if;

            case present_state is
                when s0=>
                    disp_data <= "1111111111111111111111111111";
                when others=>
                    null;
            end case;

--            case present_state is
--                when s0=>
--                    disp_data <= "001000110110011110000101";   --全1为数码管不显示
--                when s1=>
--                    disp_data <= "001000110110011110000101";
--                when s2=>
--                    if (en_rxd_posedge = '1')then
--                        disp_data <= disp_data(19 downto 0) & indata ;
--                    end if;
--                when others=>null;
--            end case;
        end if;
    end process seq;

    ledout <= disp_data(27 downto 4);

    com:process(present_state,en_rxd_posedge,shutdoor)
    variable txd_out_buff: std_logic_vector(7 downto 0);
    begin
        doorstate <= '0';
        en_txd <= '0';
        txd_out <= txd_out_buff;
        case present_state is
            when s0=>
                next_state <= s1;
            when s1=>
                txd_out_buff := "00111111";
                en_txd <= '1';                --串口发送未开门
                next_state <= s2;
            when s2=>
                txd_out_buff := "00111111";
                en_txd <= not en_txd;
                --disp_data <= "001000110110011110000101";   --全1为数码管不显示
                if (en_rxd_posedge = '1')then
                    next_state <= s3;
                else
                    next_state <= s2;
                end if;
            when s3=>
                if (disp_data(27 downto 4) = pin) then
                    next_state <= s4;
                    doorstate <= '1';
                else
                    next_state <= s1;
                end if;
            when s4=>
                txd_out_buff := "00111110";
                en_txd <= not en_txd;                --串口发送开门
                if (shutdoor = '1') then
                    next_state <= s0;
                else
                    next_state <= s4;
                end if;
        end case;
    end process com
end behav;
主控器的ASM图:
Modelsim仿真结果
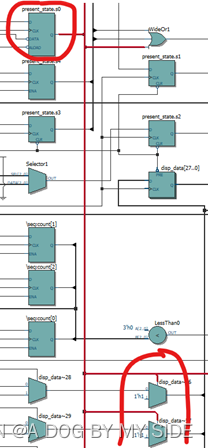
 检查RTL图,我们可以通过RTL图更好理解代码
三、数码管译码电路以及数码管轮询显示
数码管译码电路就是数码管7段译码器,轮询显示就是通过片选的方式每1ms给其中一个数码管供电,每6ms一循环,人的肉眼就看不出数码管的变化。
代码:
library ieee;
use ieee.std_logic_1164.all;
use ieee.std_logic_unsigned.all;

entity leddisplay is
    port(in_information: in std_logic_vector(23 downto 0);
         clk,rst: in std_logic;
         sel: out std_logic_vector(5 downto 0);
         dig: out std_logic_vector(6 downto 0);
         cnt_ceshi: out std_logic_vector(14 downto 0);
         clk1_ceshi: out std_logic);
end leddisplay;

architecture behav of leddisplay is

    signal sel_count: std_logic_vector(2 downto 0);
    signal original_information: std_logic_vector(3 downto 0);
    signal clk1: std_logic;
begin
    freq_divide:process(clk,rst)
        variable cnt : std_logic_vector(14 downto 0);
    begin
        if (rst='0') then
            cnt:="000000000000000";
            clk1 <= '0';
        elsif (clk'event and clk = '1') then
            if (cnt = "110000110100111") then
            --if (cnt = "000000000000111") then
                cnt:="000000000000000";
                clk1 <= not clk1;
            else cnt:=cnt+'1';
            end if;
        end if;
        cnt_ceshi <= cnt;
    end process freq_divide;

    clk1_ceshi <= clk1;
    sel_counter:process(clk1)
    begin
        if (rst='0') then
            sel_count<="000";
        elsif (rising_edge(clk1)) then
            if (sel_count = "101") then
                sel_count<="000";
            else sel_count<=sel_count+'1';
            end if;
        end if;
    end process sel_counter;

    display:process(sel_count)
    begin
        case sel_count is
            when "000" => sel <= "011111"; original_information<=in_information(3 downto 0);
            when "001" => sel <= "101111"; original_information<=in_information(7 downto 4);
            when "010" => sel <= "110111"; original_information<=in_information(11 downto 8);
            when "011" => sel <= "111011"; original_information<=in_information(15 downto 12);
            when "100" => sel <= "111101"; original_information<=in_information(19 downto 16);
            when "101" => sel <= "111110"; original_information<=in_information(23 downto 20);
            when others=> null;
        end case;
    end process display;

    decode:process(original_information)
    begin
        case original_information is   --我们按照从高到低为ABCDEFG,让H永远高电平就行了
            when "0000"=> dig <= "0000001";   --数字0
            when "0001"=> dig <= "1001111";   --数字1
            when "0010"=> dig <= "0010010";   --数字2
            when "0011"=> dig <= "0000110";   --数字3
            when "0100"=> dig <= "1001100";   --数字4
            when "0101"=> dig <= "0100100";   --数字5
            when "0110"=> dig <= "0100000";   --数字6
            when "0111"=> dig <= "0001111";   --数字7
            when "1000"=> dig <= "0000000";   --数字8
            when "1001"=> dig <= "0000100";   --数字9
            when "1111"=> dig <= "1111111";   --全灭
            when others=> dig <= "1111111";
        end case;
    end process decode;
end behav;
最后整个电路整个蓝牙密码显示电路放在bdf图中如下所示。红框里的是本模块的电路。
 这个程序存在一些接口是无用的,这些是为了和主控器通信的,到时候删掉就可以了。
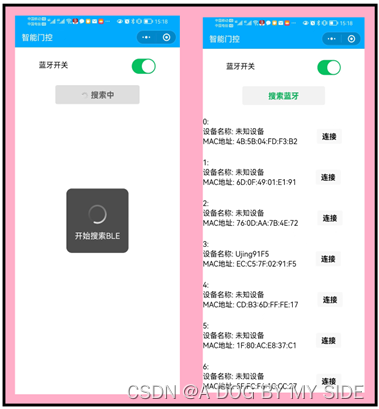
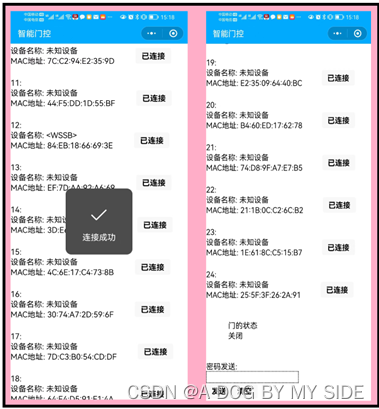
四、微信小程序的设计
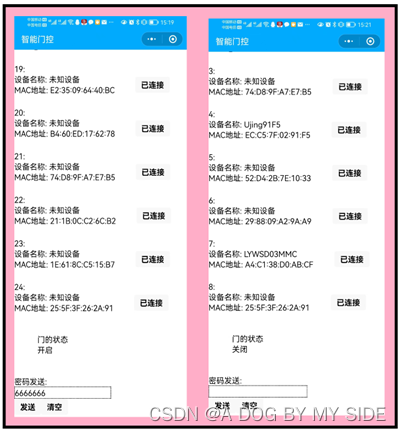
低功耗蓝牙微信小程序官方给出了很多示例代码,我的代码是参考这篇文章微信小程序调用Android手机蓝牙BLE传输数据 改写的。效果如下

 关键程序的代码(主要就是.js和.wxml)
4.1 bluetooth.js
// An highlighted block
// pages/bluetooth/bluetooth.js
var app = getApp()
var temp = []
var string_temp=""
var serviceId = "0000ffe0-0000-1000-8000-00805f9b34fb"
var characteristicId = "0000ffe1-0000-1000-8000-00805f9b34fb"

Page({
  data: {
    isbluetoothready: false,
    defaultSize: 'default',
    primarySize: 'default',
    warnSize: 'default',
    disabled: false,
    plain: false,
    loading: false,
    searchingstatus: false,
    receivedata: '666',
    onreceiving: false,
    id_text: string_temp,
    list: [],
    receive_data:'none',
    door_state:'关闭',
    temperature:'20.0'
  },
  onLoad: function () {

  },
  open_BLE: function () {
    var that = this

    that.setData({
      isbluetoothready: !that.data.isbluetoothready,
    })
    if (that.data.isbluetoothready) {
      //开启蓝牙模块并初始化
      wx.openBluetoothAdapter({
        success: function (res) {

        },
        fail: function (res) {
          wx.showModal({
            title: '提示',
            content: '请检查手机蓝牙是否打开',
          })
        }
      })
      //开启蓝牙模块并初始化

      //检查蓝牙模块是否初始化成功
      wx.getBluetoothAdapterState({
        success: function (res) {
          var available = res.available
          if (!available) {
            wx.showToast({
              title: '蓝牙初始化失败',
              icon: 'loading',
              duration: 2000
            })
          }
          else {
            wx.showToast({
              title: '蓝牙初始化成功',
              icon: 'success',
              duration: 2000
            })
          }
        }
      })
      //检查蓝牙模块是否初始化成功
    }
    else{
      wx.closeBLEConnection({
        deviceId: that.data.connectedDeviceId,
        complete: function (res) {
          that.setData({
            deviceconnected: false,
            connectedDeviceId: ""
          })
          wx.showToast({
            title: '蓝牙连接断开',
            icon: 'success',
            duration: 2000
          })
        }
      })
      setTimeout(function () {
        that.setData({
          list: []
        })
        //释放蓝牙适配器
        wx.closeBluetoothAdapter({
          success: function (res) {
            that.setData({
              isbluetoothready: false,
              deviceconnected: false,
              devices: [],
              searchingstatus: false,
              receivedata: ''
            })
            wx.showToast({
              title: '蓝牙适配器释放',
              icon: 'success',
              duration: 2000
            })
          },
          fail: function (res) {

          }
        })
        //释放蓝牙适配器
      }, 1000)
    }
  },

  search_BLE: function () {
    temp = []
    var that = this
    if (!that.data.searchingstatus) {
      var that = this
      //开始搜索附近蓝牙设备
      wx.startBluetoothDevicesDiscovery({
        success: function (res) {
          wx.showToast({
            title: '开始搜索BLE',
            icon: 'loading',
            duration: 2000
          })
          that.setData({
            searchingstatus: !that.data.searchingstatus
          })
        }
      })
      //开始搜索附近蓝牙设备
    } else {
      //停止搜索附近蓝牙设备
      wx.stopBluetoothDevicesDiscovery({
        success: function (res) {
          wx.showToast({
            title: '停止搜索BLE',
            icon: 'success',
            duration: 2000
          })
          that.setData({
            searchingstatus: !that.data.searchingstatus
          })
        }
      })
      //停止搜索附近蓝牙设备
      setTimeout(function () {
        //获取发现的蓝牙设备
        wx.getBluetoothDevices({
          success: function (res) {
            for(var i=0;i<100;i++){
              if (res.devices[i]) {
                string_temp = string_temp + '\n' + res.devices[i].deviceId
              }
            }
            that.setData({
              id_text: string_temp,
              list: res.devices
            })
          }
        })
        //获取发现的蓝牙设备
      }, 1000) //1s后执行函数
    }
  },

  connectTO: function (e) {
    var that = this
      wx.showLoading({
        title: '连接蓝牙设备中...',
      })
      wx.createBLEConnection({
        deviceId: e.currentTarget.id,
        success: function (res) {
          wx.hideLoading()
          wx.showToast({
            title: '连接成功',
            icon: 'success',
            duration: 1000
          })
          that.setData({
            deviceconnected: true,
            connectedDeviceId: e.currentTarget.id
          })
          // 启用 notify 功能
          wx.notifyBLECharacteristicValueChanged({
            state: true,
            deviceId: that.data.connectedDeviceId,
            serviceId: serviceId,
            characteristicId: characteristicId,
            success: function (res) {

            }
          })
          // 启用 notify 功能
          // ArrayBuffer转为16进制数
          function ab2hex(buffer) {
            var hexArr = Array.prototype.map.call(
              new Uint8Array(buffer),
              function (bit) {
                return ('00' + bit.toString(16)).slice(-2)
              }
            )
            return hexArr.join('');
          }
          // 16进制数转ASCLL码
          function hexCharCodeToStr(hexCharCodeStr) {
            var trimedStr = hexCharCodeStr.trim();
            var rawStr = trimedStr.substr(0, 2).toLowerCase() === "0x" ? trimedStr.substr(2) : trimedStr;
            var len = rawStr.length;
            var curCharCode;
            var resultStr = [];
            for (var i = 0; i < len; i = i + 2) {
              curCharCode = parseInt(rawStr.substr(i, 2), 16);
              resultStr.push(String.fromCharCode(curCharCode));
            }
            return resultStr.join("");
          }
          //监听回调,接收数据
          wx.onBLECharacteristicValueChange(function (characteristic) {
            var hex = ab2hex(characteristic.value)
            var string = hexCharCodeToStr(hex)
            var state_of_door
            var tem_temperature

            if(string.charAt(0)=='?'){
              state_of_door='关闭'

            }
            else {state_of_door='开启'}

            if(string.charAt(0)=='s'){
              if(string.slice(2,6)){tem_temperature=string.slice(2,6)}
              else{tem_temperature='error'}
            }
            else {tem_temperature='error'}

            that.setData({
              receive_data: hexCharCodeToStr(hex),
              door_state: state_of_door,
              temperature: tem_temperature
            })
          })
        },
        fail: function (res) {
          wx.hideLoading()
          wx.showToast({
            title: '连接设备失败',
            icon: 'success',
            duration: 1000
          })
          that.setData({
            connected: false
          })
        }
      })
      wx.stopBluetoothDevicesDiscovery({
        success: function (res) {

        }
      })
  },

  formSubmit: function (e) {
    var senddata = e.detail.value.senddata;
    var that = this
    let buffer = new ArrayBuffer(senddata.length)
    let dataView = new DataView(buffer)
    for (var i = 0; i < senddata.length; i++) {
      dataView.setUint8(i, senddata.charAt(i).charCodeAt())
    }

    wx.writeBLECharacteristicValue({
      deviceId: that.data.connectedDeviceId,
      serviceId: serviceId,
      characteristicId: characteristicId,
      value: buffer,
      success: function (res) {
        wx.showToast({
          title: '发送成功',
          icon: 'success',
          duration: 2000
        })
      }
    })
  },

  receiveMessages: function () {
    var that = this;
    wx.readBLECharacteristicValue({
      deviceId: that.data.connectedDeviceId,
      serviceId: serviceId,
      characteristicId: characteristicId,
      success: function (res) {
      }
    })
  },

})
4.2 bluetooth.wxml
// An highlighted block
<!--pages/bluetooth/bluetooth.wxml-->
<!--pages/mine/mine.wxml-->
<view class="container">

   <view class="section">       <!-- 第一行 -->
     <view class="content">
       <text>蓝牙开关</text>
     </view>
     <view class="switch">
       <switch checked="{{isbluetoothready}}" bindchange="open_BLE" />
     </view>
   </view>

   <view class="section">        <!-- 第二行 -->
     <button type="default" size="{{primarySize}}" loading="{{searchingstatus}}" plain="{{plain}}" disabled="{{disabled}}" bindtap="search_BLE"> {{searchingstatus?"搜索中":"搜索蓝牙"}} </button>
   </view>

   <block wx:for="{{list}}">     <!-- 第三行 -->
     <view class="section" style="flex-direction:row" >
       <view>
         <text>{{index}}:\n </text>
         <text>设备名称:  {{item.name}}\n</text>
         <text>MAC地址:   {{item.deviceId}}</text>
       </view>
       <view class="connection">
       <button id="{{item.deviceId}}" size="mini"
               bindtap="connectTO"> {{deviceconnected?"已连接":"连接"}} </button>
       </view>
     </view>
 </block>

 <block wx:if="{{deviceconnected}}">    <!-- 第四行 -->
    <view class="content1">
      <text decode="{{true}}" space="{{true}}">\n\n门的状态 \n</text>
      <!-- <text>{{receive_data}}\n</text> -->
      <!-- <button size="mini" bindtap="receiveMessages">接收</button> -->
    </view>

    <view class="content1">
      <!-- <text>{{receive_data}}\n</text> -->
      <text decode="{{true}}" space="{{true}}">{{door_state}}\n</text>
      <!-- <button size="mini" bindtap="receiveMessages">接收</button> -->
    </view>

     <view class="send">
       <form bindsubmit="formSubmit">
         <text>\n\n密码发送:</text>
         <input name="senddata"/>
         <button size="mini" formType="submit">发送</button>
         <button size="mini" formType="reset">清空</button>
       </form>
     </view>
 </block>

 </view>


 9372
9372


 被折叠的 条评论
为什么被折叠?
被折叠的 条评论
为什么被折叠?
 到【灌水乐园】发言


