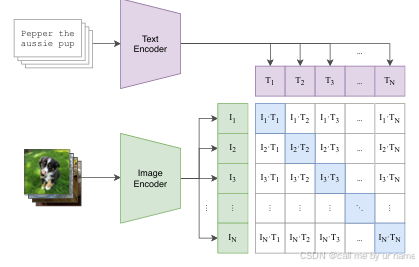
info_nce_loss
这个是clip作对比学习的损失函数
各个博客上都有详细介绍了,我这里就不赘述
def info_nce_loss(image_features, text_features,logit_scale,labels, temperature=0.07):
    batch_size = image_features.shape[0]

    image_features = image_features / image_features.norm(dim=-1, keepdim=True)
    text_features = text_features / text_features.norm(dim=-1, keepdim=True)

    similarity_matrix = torch.matmul(image_features, text_features.T) / temperature

    logits_per_image = similarity_matrix
    logits_per_text = similarity_matrix.T

    # 构造标签,正样本对应的位置为1,其余为0,这里假设批次内第一个文本特征是对应图像的正样本文本特征
    gen_labels = torch.arange(batch_size).long().to(image_features.device)

    total_loss = (
        F.cross_entropy(logits_per_image, gen_labels)+
        F.cross_entropy(logits_per_text, gen_labels)
    )/2

    return total_loss, logits_per_image, logits_per_text
我踩的坑
我微调
c
l
i
p
clip
clip 做分类任务类别数为3:
- 数据集为图像-文本对数据集:即一个数据样本为一个图像和对应的文本在json文件里。
这里每个类别的图像的文本都是一样的,也就是a类别下图像可能会有细微不同,但是文本都是一样的 - 微调
c
l
i
p
clip
clip 的结构同原始
c
l
i
p
clip
clip 一致,输出的图像特征维度为
[
输入图像数量
,
512
]
[输入图像数量,512]
[输入图像数量,512],文本特征维度为
[
输入的文本数量
,
512
]
[输入的文本数量,512]
[输入的文本数量,512]。
这里选用不同的clip结构,输出维度可能有所不同 - 我微调过程输入 c l i p clip clip 的数据为 b a t c h _ s i z e batch\_size batch_size个图像、文本。输出的logit维度为 [ b a t c h _ s i z e , b a t c h _ s i z e ] [batch\_size,batch\_size] [batch_size,batch_size]
当使用
c
l
i
p
clip
clip 去做分类任务假设类别为3时,直接使用上面的损失函数并不合适
因为:
g
e
n
_
l
a
b
e
l
s
gen\_labels
gen_labels会产生一个
[
0
…
…
b
a
t
c
h
_
s
i
z
e
−
1
]
[0……batch\_size-1]
[0……batch_size−1]的序列,接着和
l
o
g
i
t
logit
logit 做交叉熵。这里的
l
o
g
i
t
logit
logit 维度为
[
b
a
t
c
h
_
s
i
z
e
,
b
a
t
c
h
_
s
i
z
e
]
[batch\_size,batch\_size]
[batch_size,batch_size]
这意味着: l o g i t logit logit的对角线处的数据才会被 l o s s loss loss记录即第 i i i 个图像和第 i i i 个文本才是匹配的正样本,其余的为负样本。
这跟我实验设置下的分类任务有所冲突:因为我只有3个类别,而对于 l o g i t logit logit的第 i i i 行(即第 i i i 图像),只会跟第 i i i 列(即第 i i i 个文本)是正样本,而第 i i i 个图像应该和不止一个文本是正样本。例如:第0行图像和第0列的文本是正样本,还会和第 0 + 3 i , i = 0 , 1 , 2 … … 0+3i,i=0,1,2…… 0+3i,i=0,1,2……列的文本是正样本,而 i n f o _ n c e _ l o s s info\_nce\_loss info_nce_loss会忽略掉后面的正样本
导致微调出来的 A C C ACC ACC 和 F 1 F1 F1 都比较低
clip选用这样的损失函数,是因为其并不是做分类任务,而是直接用海量的互联网数据去预训练(a类别下图像可能会有细微不同,但是文本都是一样的这个情况存在的可能性小)

clip分类任务损失函数
def info_nce_loss(image_features, text_features,logit_scale,labels, temperature=0.07):
    """
    计算InfoNCE损失函数,模拟CLIP中的对比学习损失计算

    参数:
    image_features (torch.Tensor): 图像特征表示,形状为 [batch_size, feature_dim]
    text_features (torch.Tensor): 文本特征表示,形状为 [batch_size, feature_dim]
    temperature (float): 用于缩放相似度得分的温度参数,控制分布的平滑程度

    返回:
    loss (torch.Tensor): InfoNCE损失值
    """
    batch_size = image_features.shape[0]

    image_features = image_features / image_features.norm(dim=-1, keepdim=True)
    text_features = text_features / text_features.norm(dim=-1, keepdim=True)

    similarity_matrix = torch.matmul(image_features, text_features.T) / temperature

    logits_per_image = similarity_matrix
    logits_per_text = similarity_matrix.T

    gen_labels = labels
    total_loss = F.cross_entropy(logits_per_image, gen_labels)

    return total_loss, logits_per_image, logits_per_text
- 给每个图像-文本对记录类别 l a b e l label label
- 改变文本输入,每个 b a t c h _ s i z e batch\_size batch_size下输入的文本维度为 [ n _ c l a s s , ] [n\_class,] [n_class,],经过 c l i p _ e n c o d e r clip\_encoder clip_encoder 后维度为 [ n _ c l a s s , 512 ] [n\_class,512] [n_class,512]
- 接着做交叉熵计算


 2万+
2万+

 被折叠的 条评论
为什么被折叠?


