


我们在进行游戏开发的时候,脚本是必不可少的。而我们应该始终拒绝去重新制造轮子,一些比较基础的脚本如果直接使用或修改成型的脚本,会在开发中节约不少时间。以下分享一个控制Unity2D角色移动脚本,让大家能够少造轮子,高效开发。
拿走即可用代码见文章尾部
含跑跳动画及跳跃音效功能代码如下:
using System.Collections;
using System.Collections.Generic;
using UnityEngine;

public class Playermovement : MonoBehaviour
{
    private Rigidbody2D rb;
    private BoxCollider2D coll;
    private SpriteRenderer sprite;
    private Animator anim;

    [SerializeField] private LayerMask jumpableGround;

    private float dirX = 0f;
    [SerializeField] private float moveSpeed = 7f;
    [SerializeField] private float jumpForce = 7f;

    private enum MovementState { Idle, Run, Jump, Fall }

    [SerializeField] private AudioSource jumpSoundEffect;

    private void Start()
    {
        rb= GetComponent<Rigidbody2D>();
        coll = GetComponent<BoxCollider2D>();
        sprite = GetComponent<SpriteRenderer>();
        anim = GetComponent<Animator>();
    }

    // Update is called once per frame
    private void Update()
    {
        dirX = Input.GetAxisRaw("Horizontal");
        rb.velocity = new Vector2(dirX * moveSpeed, rb.velocity.y);

        if(Input.GetButtonDown("Jump")&&IsGrounded())
        {
            jumpSoundEffect.Play();
            rb.velocity=new Vector2(rb.velocity.x,jumpForce);
        }

        UpdateAnimationState();
    }
    private void UpdateAnimationState()
    {
        MovementState state;

        if(dirX > 0f)
        {
            state = MovementState.Run;
            sprite.flipX = false;
        }
        else if (dirX < 0f)
            {
            state = MovementState.Run;
            sprite.flipX = true;
            }
        else
        {
            state = MovementState.Idle;
        }
        if(rb.velocity.y > .1f)
        {
            state = MovementState.Jump;
        }
        else if (rb.velocity.y< -.1f)
        {
            state = MovementState.Fall;
        }
        anim.SetInteger("state",(int)state);
    }
    private bool IsGrounded()
    {
        return Physics2D.BoxCast(coll.bounds.center, coll.bounds.size, 0f, Vector2.down, .1f, jumpableGround);
    }
}
该代码中有几个比较特别的值:
1.第12行中的jumpableGround代表角色可跳跃的图层,需要挂上对应的图层Layer,以此来判断当前角色站立的平台是否为可跳跃的平台,在后续的标签选择中选上自己作为可跳跃平台的图层Layer,我这里是Ground
2.第15,16行调整角色的移动速度与跳跃速度,代码中的f指速度单位,只修改数字即可。
3.第20行的jumpSoundEffect是角色跳跃时的音效,在36-40行中对它进行了调用,需要在Jump Sound Effect中挂上音频文件才能运行,如果不需要的话把20,36-40行删去即可。
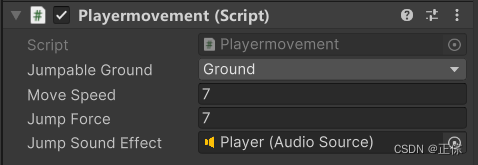
脚本挂载后的样子
4.第18行的Idle,Run,Jump,Fall分别对应角色的静止,奔跑,跳跃,下落四种状态,因为这四种状态我在项目中是设置的动画的,故在44行的UpdateAnimationState()方法使用来判断角色在不同情况下对应的动画。故如果你不需要角色的动画变换,18行与UpdateAnimationState()都是可以删去的。
综上所述,如果你只是需要控制角色移动,而不需要音效、动画转换等功能,那么你只需要保留Start()、Update()、IsFrounded()三个方法与其声明的变量即可。以下是简化后的代码
using System.Collections;
using System.Collections.Generic;
using UnityEngine;

public class PlayerMovement : MonoBehaviour
{
    private Rigidbody2D rb;
    public float moveSpeed = 7f; // 移动速度
    public float jumpForce = 7f; // 跳跃力
    // 地面检测
    public Transform groundCheck;
    public LayerMask groundLayer;
    private bool isGrounded;
    void Start()
    {
        rb = GetComponent<Rigidbody2D>();
    }
    void Update()
    {
        // 地面检测
        isGrounded = Physics2D.OverlapCircle(groundCheck.position, 0.1f, groundLayer);

        float dirX = Input.GetAxisRaw("Horizontal");
        rb.velocity = new Vector2(dirX * moveSpeed, rb.velocity.y);

        if (Input.GetButtonDown("Jump") && isGrounded)
        {
            rb.velocity = new Vector2(rb.velocity.x, jumpForce);
        }
    }
}
添加上可跳跃平面的图层与物体检测就可以运行了。


 1751
1751


 被折叠的 条评论
为什么被折叠?
被折叠的 条评论
为什么被折叠?
 到【灌水乐园】发言


