


近期,Qwen 团队发布了其最新一代大语言模型 Qwen3,引起了业界的广泛关注。除了其在各项基准测试上的出色表现和对多语言、思考模式的创新支持外,其开源的代码实现也为我们提供了一个深入了解其内部结构和设计的绝佳机会。本文将基于 Hugging Face Transformers 库中的 Qwen3 实现代码,对其核心组件进行解析。
(1)Decoder-Only架构
与主流LLM模型类似,Qwen3 采用了经典的 Decoder-Only Transformer 架构。这意味着模型的核心由多个相同的解码器层(Decoder Layer)堆叠而成,专注于根据前面的序列预测下一个 token。
Qwen3 Dense的模型结构与Qwen2大体相同,只是在注意力层的加入了对q和k的归一化。而Qwen3 MoE模型则是把某些MLP层替换为了MoE层。两个模型的结构图如下:
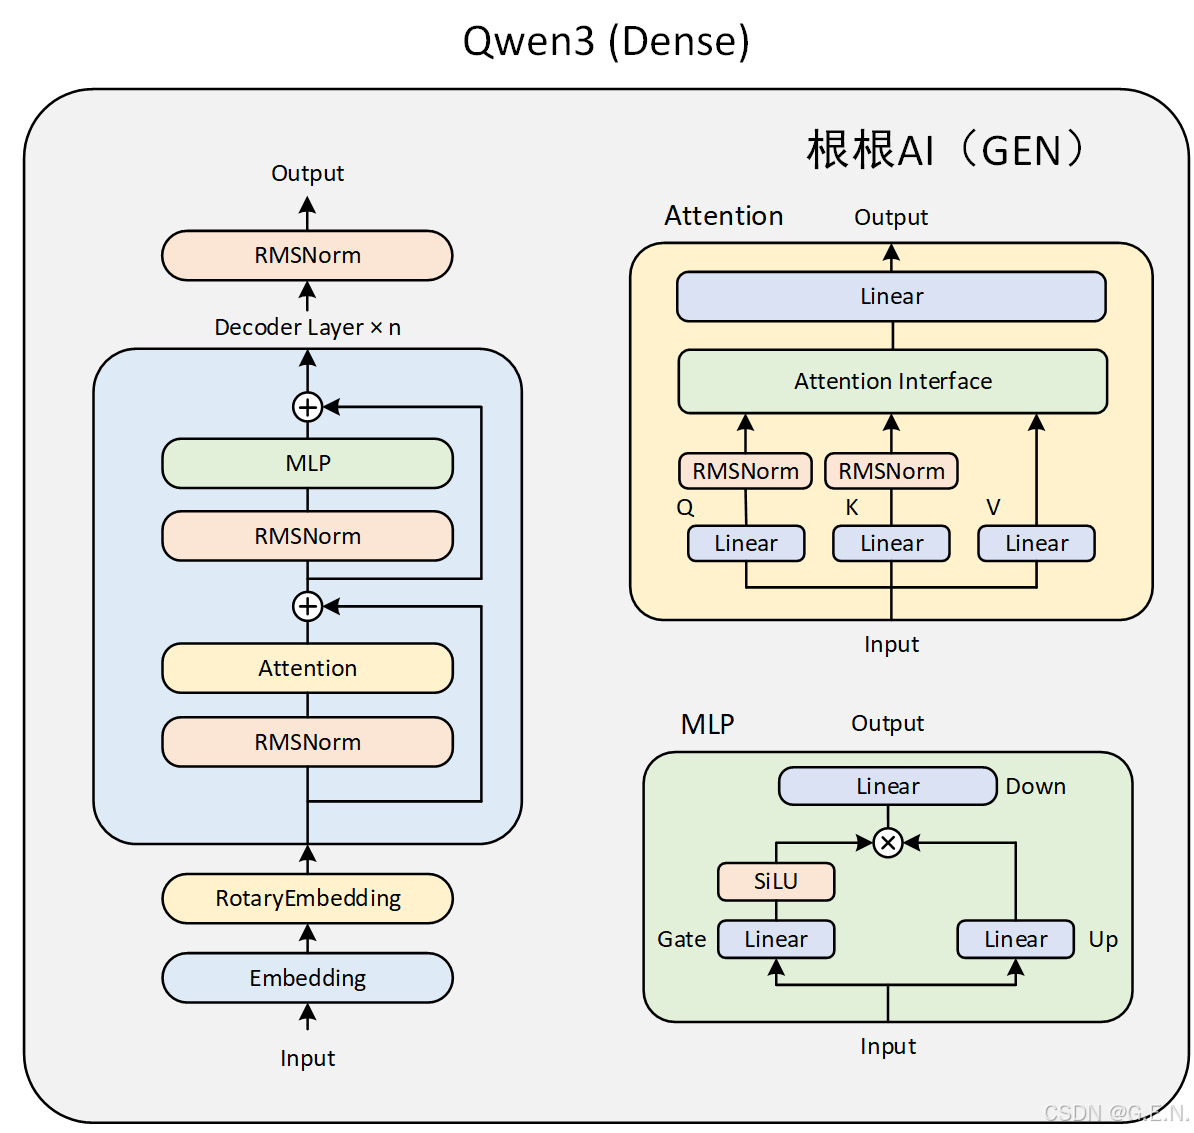

Qwen3主要由四个部分组成:
- embed_tokens:嵌入层。这是模型处理输入的第一步。它的核心功能是将输入的离散文本符号(通常是经过 Tokenizer 处理后的 Token ID)转换为连续的、稠密的向量表示(称为嵌入向量或 Embeddings)。
- layers:多个堆叠的解码器。这是模型的核心计算引擎,负责理解输入序列的上下文、提取特征并进行深度信息处理。模型的能力(如理解、推理、生成)主要源于这些层。
- norm:归一化层。处理完毕后,对最终的隐藏状态 (Hidden States) 进行最后一次归一化。
- rotary_emb:旋转位置编码。为模型提供关于序列中 Token 位置的信息。标准 Transformer 的自注意力机制本身是排列不变的(即打乱输入顺序可能得到相同结果),因此需要显式地注入位置信息。
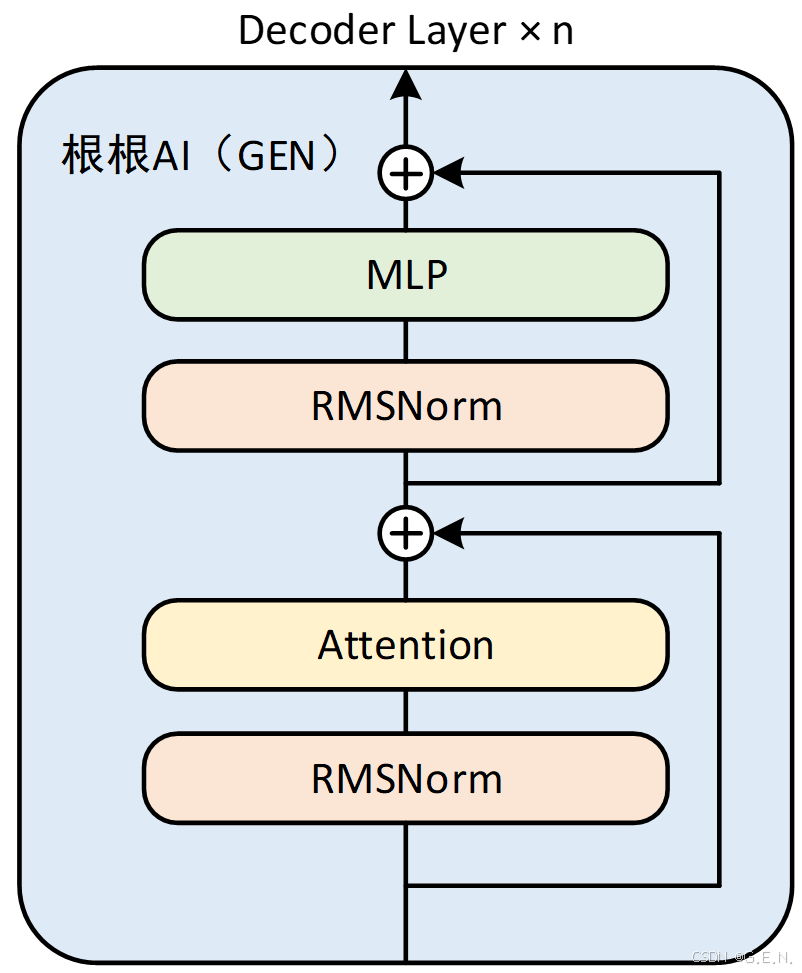
(2)Qwen3 Decoder:
Qwen3 Decoder的结构与Qwen2 Decoder大致相同。
Dense模型:
MoE模型:
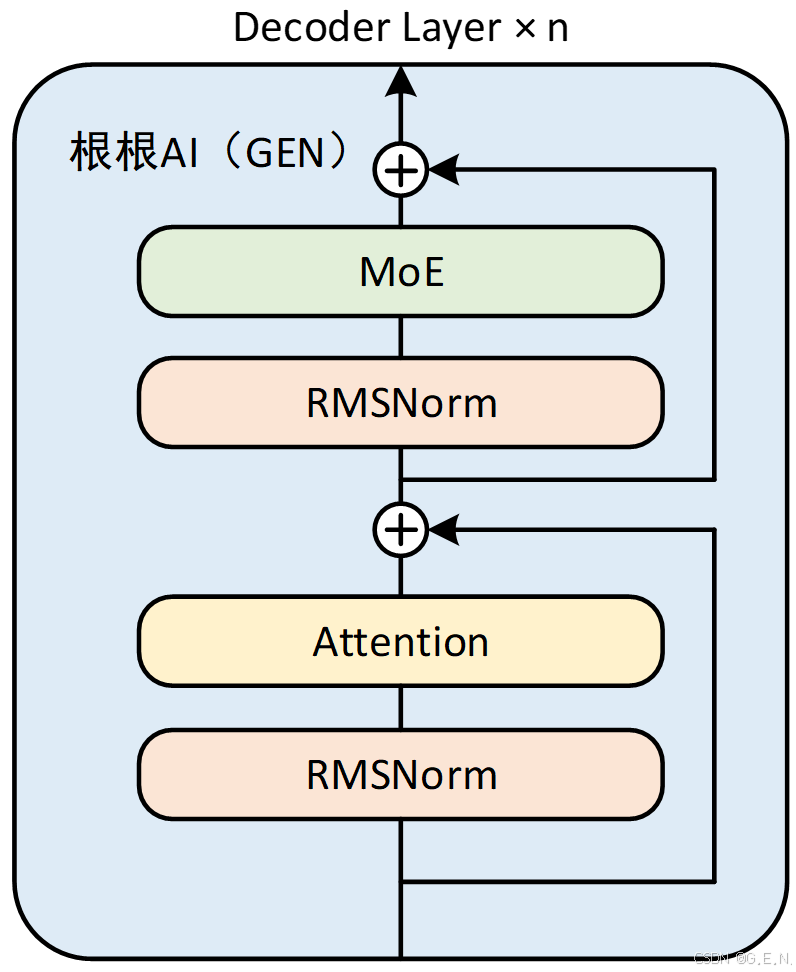
MoE模型实际上是把Dense模型中的某些MLP层替换为了MoE结构。
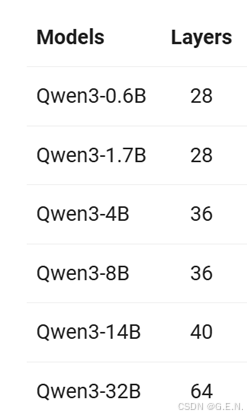
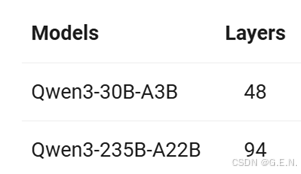
不同规格的模型具有不同数量的Decoder层:
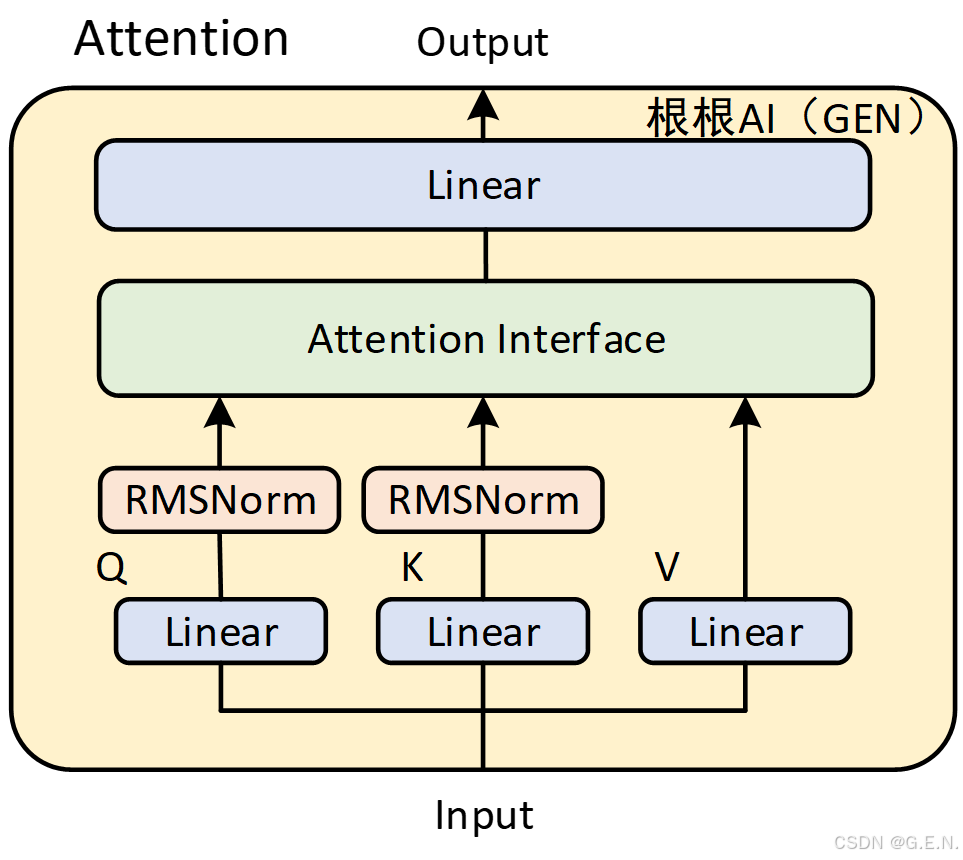
(3)Qwen3 Attention:
Qwen3的注意力机制在Qwen2的基础上进行了微调,在Q、K的线性投影后面分别加入了一个归一化层,有助于提高稳定性。
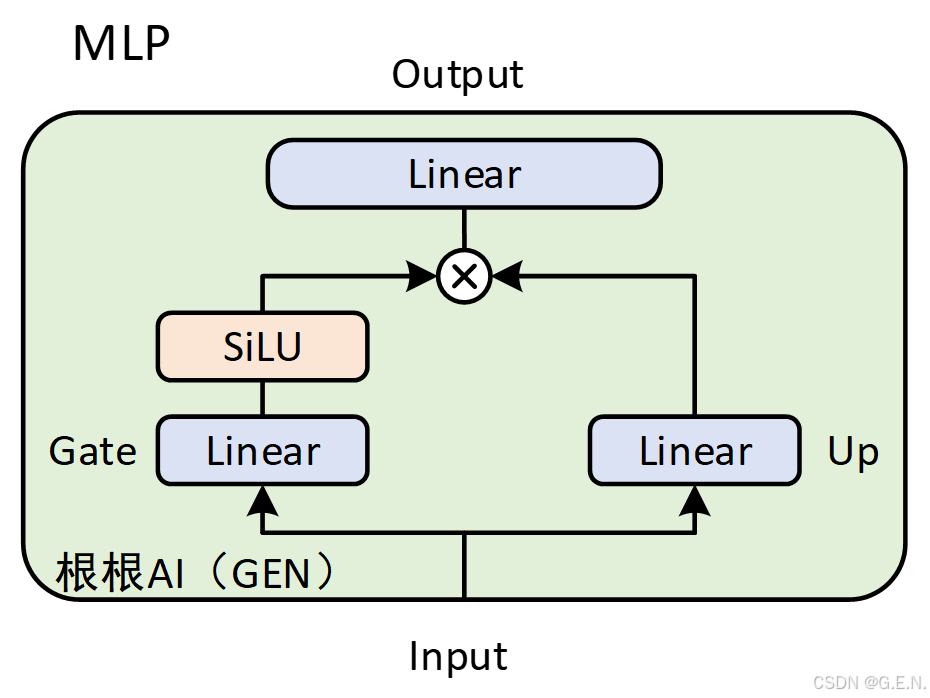
(4)Qwen3 MLP:
Qwen3的MLP层与Qwen2完全一致。Qwen使用了一种常见的 MLP 变体,称为 SwiGLU ( Gated Linear Unit with SiLU activation)。这种结构被认为比标准的 MLP 更有效。
(5)Qwen3 MoE:
Qwen3 的MoE是Qwen3在模型结构上最大的更新:
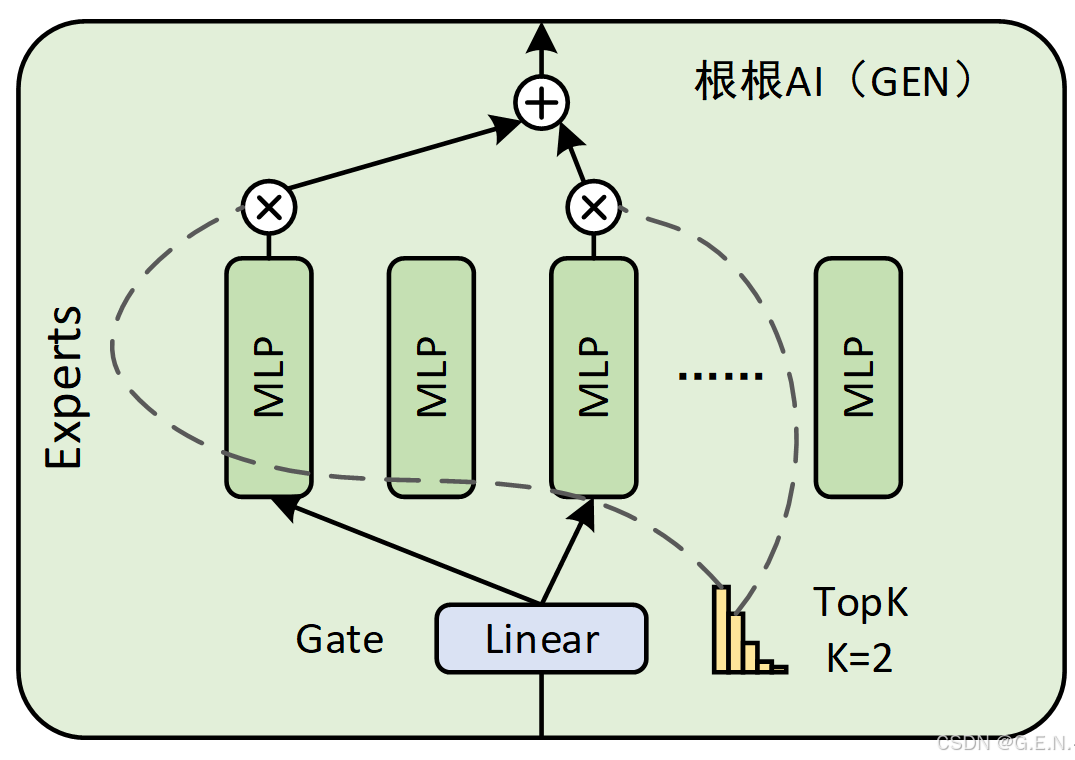
Qwen3 的 MoE 结构是一种稀疏 MoE 实现。它用一个包含多个(num_experts 个)小型 MLP(Qwen3MoeMLP)专家和一个门控网络(gate)的块(Qwen3MoeSparseMoeBlock)替换了传统 Transformer 中的密集 MLP 层。
门控网络为每个 Token 选择最相关的 top_k 个专家,并将 Token 的计算任务加权分配给这些专家。最后,将加权后的专家输出组合起来形成该层的最终输出。这种方式允许模型在保持(甚至降低)每个 Token 推理计算量的情况下,显著增加模型的总参数量(通过增加专家数量),从而可能提升模型的容量和性能。
Qwen3 MoE结构的代码如下:
class Qwen3MoeSparseMoeBlock(nn.Module):

    def __init__(self, config):

        super().__init__()

        self.num_experts = config.num_experts

        self.top_k = config.num_experts_per_tok

        self.norm_topk_prob = config.norm_topk_prob


        # gating

        self.gate = nn.Linear(config.hidden_size, config.num_experts, bias=False)

        self.experts = nn.ModuleList(

            [Qwen3MoeMLP(config, intermediate_size=config.moe_intermediate_size) for _ in range(self.num_experts)]

        )


    def forward(self, hidden_states: torch.Tensor) -> torch.Tensor:

        """ """

        batch_size, sequence_length, hidden_dim = hidden_states.shape

        hidden_states = hidden_states.view(-1, hidden_dim)

        # router_logits: (batch * sequence_length, n_experts)

        router_logits = self.gate(hidden_states)


        routing_weights = F.softmax(router_logits, dim=1, dtype=torch.float)

        routing_weights, selected_experts = torch.topk(routing_weights, self.top_k, dim=-1)

        if self.norm_topk_prob:  # only diff with mixtral sparse moe block!

            routing_weights /= routing_weights.sum(dim=-1, keepdim=True)

        # we cast back to the input dtype

        routing_weights = routing_weights.to(hidden_states.dtype)


        final_hidden_states = torch.zeros(

            (batch_size * sequence_length, hidden_dim), dtype=hidden_states.dtype, device=hidden_states.device

        )


        # One hot encode the selected experts to create an expert mask

        # this will be used to easily index which expert is going to be sollicitated

        expert_mask = torch.nn.functional.one_hot(selected_experts, num_classes=self.num_experts).permute(2, 1, 0)


        # Loop over all available experts in the model and perform the computation on each expert

        for expert_idx in range(self.num_experts):

            expert_layer = self.experts[expert_idx]

            idx, top_x = torch.where(expert_mask[expert_idx])


            # Index the correct hidden states and compute the expert hidden state for

            # the current expert. We need to make sure to multiply the output hidden

            # states by `routing_weights` on the corresponding tokens (top-1 and top-2)

            current_state = hidden_states[None, top_x].reshape(-1, hidden_dim)

            current_hidden_states = expert_layer(current_state) * routing_weights[top_x, idx, None]


            # However `index_add_` only support torch tensors for indexing so we'll use

            # the `top_x` tensor here.

            final_hidden_states.index_add_(0, top_x, current_hidden_states.to(hidden_states.dtype))

        final_hidden_states = final_hidden_states.reshape(batch_size, sequence_length, hidden_dim)

        return final_hidden_states, router_logits
希望这篇文章能帮助大家对 Qwen3 的结构有更深的理解。
你也可以亲自探索 Qwen3 的开源代码和模型(可以在 Hugging Face的Transformer库中找到)。


 124
124

 被折叠的 条评论
为什么被折叠?
被折叠的 条评论
为什么被折叠?
 到【灌水乐园】发言


