


Qwen-3 系列包含两个模型:
-
Qwen-3,对标 Qwen-2 的升级版
-
Qwen-3-MoE,最新的 MoE 结构的模型
改进点总结:
-
Qwen-3:
-
Attention使用了和LLaMA-4一样的QK RMSNorm
-
-
Qwen-3-MoE:
-
FFN使用了MoE架构,支持间隔k层使用。
-
MoE的专家支持Top-K加权输出。
-
训练时使用了Switch Transformer的辅助损失。
-
-
Qwen-3 模型架构
先回顾一下Qwen-2的模型结构,然后再来对比Qwen-3的改进在哪:
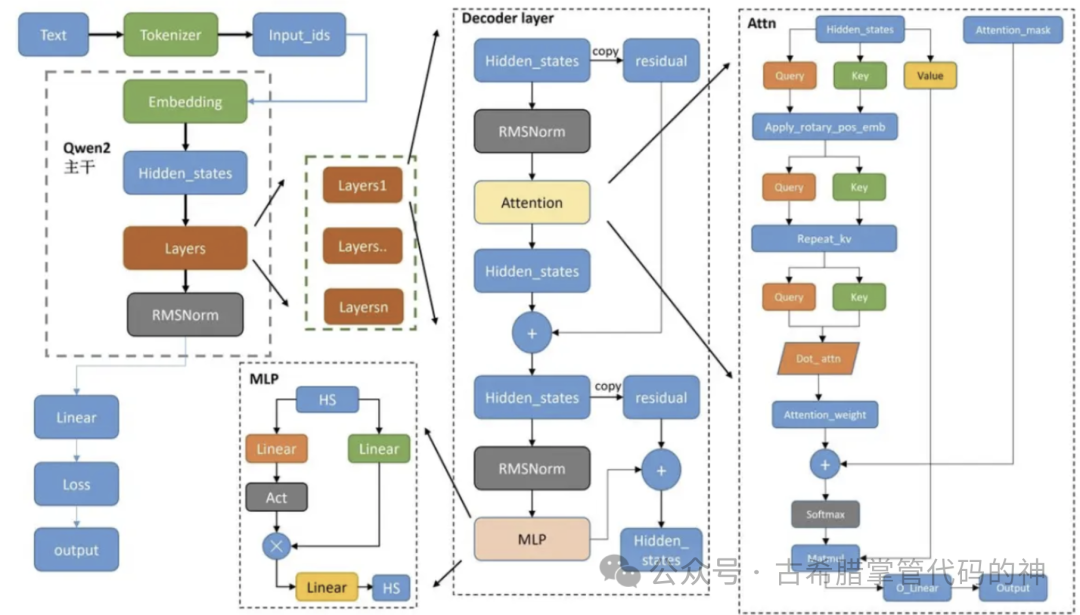
-
GQA
-
SwiGLU 激活函数
-
RoPE 位置编码
-
增加注意力机制中 QKV bias
-
RMSNorm 归一化。
1.1. Attention 模块差异
1.1.1. QK预归一化(QK RMSNorm)
-
Qwen3:在
Qwen3Attention中,在对输入做线性变换得到的查询和键向量上调用了专门的归一化层(Qwen3RMSNorm),在forward方法中,查询和键向量分别先经过这些层再进行后续的旋转位置编码(RoPE)处理:
self.q_norm = Qwen3RMSNorm(self.head_dim, eps=config.rms_norm_eps)self.k_norm = Qwen3RMSNorm(self.head_dim, eps=config.rms_norm_eps)-
Qwen2:在
Qwen2Attention的实现中,并未显式对查询和键向量做类似的预归一化操作。其直接通过线性层得到查询、键、值,再应用 RoPE(调用apply_rotary_pos_emb),这样设计上可能略有不同,体现了一定的架构改进和优化。
1.1.2. 取消投影层的偏置
-
Qwen3:在
Qwen3Attention中,所有线性层(q_proj、k_proj、v_proj、o_proj)在构造时都通过config.attention_bias来决定是否使用 bias(默认不使用):
self.q_proj = nn.Linear(config.hidden_size, config.num_attention_heads * self.head_dim, bias=config.attention_bias)-
Qwen2:在
Qwen2Attention中,查询、键和值的投影均明确设置了bias=True,而输出投影层o_proj则设置为bias=False:
self.q_proj = nn.Linear(config.hidden_size, config.num_attention_heads * self.head_dim, bias=True)1.2. MLP
默认使用的仍然是SwiGLU结构(无偏置MLP)
1.3. RMSNorm
这块和Qwen2一样的,只是回顾一下前几天解析的LLaMA-4的L2Norm本质上也就是RMSNorm,并且Qwen3RMSNorm还用在了QK_Norm上,也就是说,Attention模块的修改和LLaMA-4一样。
class Qwen3RMSNorm(nn.Module):def __init__(self, hidden_size, eps=1e-6):"""Qwen3RMSNorm is equivalent to T5LayerNorm"""super().__init__()self.weight = nn.Parameter(torch.ones(hidden_size))self.variance_epsilon = epsdef forward(self, hidden_states):input_dtype = hidden_states.dtypehidden_states = hidden_states.to(torch.float32)variance = hidden_states.pow(2).mean(-1, keepdim=True)hidden_states = hidden_states * torch.rsqrt(variance + self.variance_epsilon)return self.weight * hidden_states.to(input_dtype)def extra_repr(self):return f"{tuple(self.weight.shape)}, eps={self.variance_epsilon}"
2. Qwen-3-MoE 模型架构
这里我们以Qwen-3为基础,分析Qwen-3-MoE的架构变化:
2.1. Attention 模块
Attention 模块的改动和 Qwen-3 是一致的。
2.2. MoE FFN 模块
MoE架构使用一个nn.Linear(config.hidden_size, config.num_experts, bias=False)门控来决策每一个token要使用哪些专家来计算。并且这里选择专家的逻辑:
-
基于Top-K策略选取。
-
选取的Top-K专家基于Top-K的加和加权累计输出
current_hidden_states。
class Qwen3MoeSparseMoeBlock(nn.Module):def __init__(self, config):super().__init__()self.num_experts = config.num_experts # 总的专家数self.top_k = config.num_experts_per_tok # 每个 token 仅使用 top_k 个专家self.norm_topk_prob = config.norm_topk_prob # 是否对选出的 top_k 概率进行归一化# gating: 用于给每个 token 计算对应到 num_experts 个专家上的 logits(路由分数)self.gate = nn.Linear(config.hidden_size, config.num_experts, bias=False)# experts: 每个专家都是一个独立的 MLP,这里用一个 ModuleList 存放self.experts = nn.ModuleList([Qwen3MoeMLP(config, intermediate_size=config.moe_intermediate_size) for _ in range(self.num_experts)])def forward(self, hidden_states: torch.Tensor) -> torch.Tensor:batch_size, sequence_length, hidden_dim = hidden_states.shape# (batch_size, seq_len, hidden_dim) -> (batch_size*seq_len, hidden_dim)hidden_states = hidden_states.view(-1, hidden_dim)# ===================== 1) 计算 gating 得分 =====================# router_logits: (batch_size * sequence_length, num_experts)router_logits = self.gate(hidden_states)# 对路由分数做 softmax,得到对各专家的概率分布routing_weights = F.softmax(router_logits, dim=1, dtype=torch.float)# 只取最大的 top_k 个专家和相应概率routing_weights, selected_experts = torch.topk(routing_weights, self.top_k, dim=-1)# norm_topk_prob: 是否把选出来的 top_k 概率再做归一化,使它们之和为 1if self.norm_topk_prob:routing_weights /= routing_weights.sum(dim=-1, keepdim=True)# 将概率 cast 回输入相同的 dtype (如 FP16/BF16 等)routing_weights = routing_weights.to(hidden_states.dtype)# ===================== 2) 初始化输出张量final_hidden_states = torch.zeros((batch_size * sequence_length, hidden_dim), dtype=hidden_states.dtype, device=hidden_states.device)# ===================== 3) 构造 one-hot mask,标识每个 token 被分配给哪些专家# expert_mask: (num_experts, batch_size*sequence_length, top_k)# - one_hot会先得到 (batch_size*sequence_length, num_experts) 的one_hot编码,然后我们选了 top_k 列# - permute(2,1,0) 目的是把 expert 这个维度放在最前面,便于后面 for expert_idx in ... 的循环使用expert_mask = torch.nn.functional.one_hot(selected_experts, num_classes=self.num_experts).permute(2, 1, 0)# ===================== 4) 分别计算每个专家的输出并累加for expert_idx in range(self.num_experts):expert_layer = self.experts[expert_idx]# idx, top_x 记录哪些 token 被分配给了 expert_idx# expert_mask[expert_idx] 是 (batch_size*sequence_length, top_k) 的 one-hot# torch.where 返回 (行index, 列index)# 其中 "top_x" 表示第几个 token 的行索引,"idx" 表示 top_k 中第几个列位置idx, top_x = torch.where(expert_mask[expert_idx])# 取出对应 token 的 hidden_statescurrent_state = hidden_states[None, top_x].reshape(-1, hidden_dim)# 进入该 expert 的 MLP,并乘以对该 expert 的 gating 权重current_hidden_states = expert_layer(current_state) * routing_weights[top_x, idx, None]# 把该 expert 的输出累加回 final_hidden_states# index_add_ 是原位操作,会把 current_hidden_states 累加到 final_hidden_states[top_x] 上final_hidden_states.index_add_(0, top_x, current_hidden_states.to(hidden_states.dtype))# 最后 reshape 回 (batch_size, sequence_length, hidden_dim) 形式final_hidden_states = final_hidden_states.reshape(batch_size, sequence_length, hidden_dim)return final_hidden_states, router_logits
2.2. 间隔decoder_sparse_step使用开启MoE
if (layer_idx not in config.mlp_only_layers) and (config.num_experts > 0 and (layer_idx + 1) % config.decoder_sparse_step == 0):self.mlp = Qwen3MoeSparseMoeBlock(config)else:self.mlp = Qwen3MoeMLP(config, intermediate_size=config.intermediate_size)
Qwen3-MoE 专门多了一个 load_balancing_loss_func();在 Qwen3MoeForCausalLM 的 forward 中,如果 output_router_logits=True,则会计算该辅助损失并加到主 loss 上。
这个辅助损失的设计和Switch Transformer是一致的,具体来说:
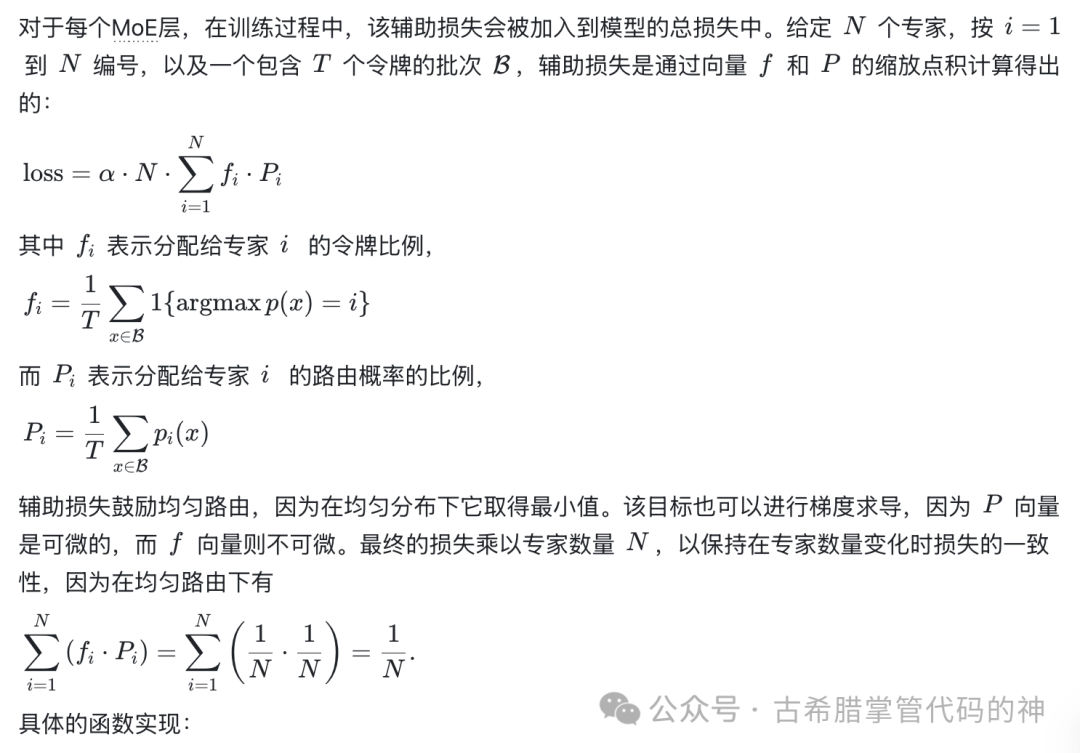
def load_balancing_loss_func(gate_logits: Union[torch.Tensor, Tuple[torch.Tensor], None],num_experts: Optional[int] = None,top_k=2,attention_mask: Optional[torch.Tensor] = None,) -> Union[torch.Tensor, int]:...if attention_mask is None:# Compute the percentage of tokens routed to each expertstokens_per_expert = torch.mean(expert_mask.float(), dim=0)# Compute the average probability of routing to these expertsrouter_prob_per_expert = torch.mean(routing_weights, dim=0)else:batch_size, sequence_length = attention_mask.shapenum_hidden_layers = concatenated_gate_logits.shape[0] // (batch_size * sequence_length)# Compute the mask that masks all padding tokens as 0 with the same shape of expert_maskexpert_attention_mask = (attention_mask[None, :, :, None, None].expand((num_hidden_layers, batch_size, sequence_length, top_k, num_experts)).reshape(-1, top_k, num_experts).to(compute_device))# Compute the percentage of tokens routed to each expertstokens_per_expert = torch.sum(expert_mask.float() * expert_attention_mask, dim=0) / torch.sum(expert_attention_mask, dim=0)# Compute the mask that masks all padding tokens as 0 with the same shape of tokens_per_expertrouter_per_expert_attention_mask = (attention_mask[None, :, :, None].expand((num_hidden_layers, batch_size, sequence_length, num_experts)).reshape(-1, num_experts).to(compute_device))# Compute the average probability of routing to these expertsrouter_prob_per_expert = torch.sum(routing_weights * router_per_expert_attention_mask, dim=0) / torch.sum(router_per_expert_attention_mask, dim=0)overall_loss = torch.sum(tokens_per_expert * router_prob_per_expert.unsqueeze(0))return overall_loss * num_experts

如何学习AI大模型?
我在一线互联网企业工作十余年里,指导过不少同行后辈。帮助很多人得到了学习和成长。
我意识到有很多经验和知识值得分享给大家,也可以通过我们的能力和经验解答大家在人工智能学习中的很多困惑,所以在工作繁忙的情况下还是坚持各种整理和分享。但苦于知识传播途径有限,很多互联网行业朋友无法获得正确的资料得到学习提升,故此将并将重要的AI大模型资料包括AI大模型入门学习思维导图、精品AI大模型学习书籍手册、视频教程、实战学习等录播视频免费分享出来。

第一阶段: 从大模型系统设计入手,讲解大模型的主要方法;
第二阶段: 在通过大模型提示词工程从Prompts角度入手更好发挥模型的作用;
第三阶段: 大模型平台应用开发借助阿里云PAI平台构建电商领域虚拟试衣系统;
第四阶段: 大模型知识库应用开发以LangChain框架为例,构建物流行业咨询智能问答系统;
第五阶段: 大模型微调开发借助以大健康、新零售、新媒体领域构建适合当前领域大模型;
第六阶段: 以SD多模态大模型为主,搭建了文生图小程序案例;
第七阶段: 以大模型平台应用与开发为主,通过星火大模型,文心大模型等成熟大模型构建大模型行业应用。

👉学会后的收获:👈
• 基于大模型全栈工程实现(前端、后端、产品经理、设计、数据分析等),通过这门课可获得不同能力;
• 能够利用大模型解决相关实际项目需求: 大数据时代,越来越多的企业和机构需要处理海量数据,利用大模型技术可以更好地处理这些数据,提高数据分析和决策的准确性。因此,掌握大模型应用开发技能,可以让程序员更好地应对实际项目需求;
• 基于大模型和企业数据AI应用开发,实现大模型理论、掌握GPU算力、硬件、LangChain开发框架和项目实战技能, 学会Fine-tuning垂直训练大模型(数据准备、数据蒸馏、大模型部署)一站式掌握;
• 能够完成时下热门大模型垂直领域模型训练能力,提高程序员的编码能力: 大模型应用开发需要掌握机器学习算法、深度学习框架等技术,这些技术的掌握可以提高程序员的编码能力和分析能力,让程序员更加熟练地编写高质量的代码。

1.AI大模型学习路线图
2.100套AI大模型商业化落地方案
3.100集大模型视频教程
4.200本大模型PDF书籍
5.LLM面试题合集
6.AI产品经理资源合集
👉获取方式:
😝有需要的小伙伴,可以保存图片到wx扫描二v码免费领取【保证100%免费】🆓


 2万+
2万+

 被折叠的 条评论
为什么被折叠?
被折叠的 条评论
为什么被折叠?
 到【灌水乐园】发言


