


一、ROS配置安装
二、ORB_SLAM2配置安装
可参考前文
三、Android手机摄像头与ROS建立通信
GitHub有个开源的项目,可以通过wifi将摄像头捕捉到的图片传输到ROS,地址:
作者也给出了博文,
下载代码、安装工具包
git clone https://github.com/hitcm/Android_Camera-IMU.git

sudo apt-get install ros-melodic-imu-tools  # 按实际安装indigo、Kinetic 等安装对应的工具包
三个文件

Camera_Imu.apk安装到手机上,注意有的手机可能因为安装版本过高导致无法运行此程序,可以试着在手机上装一个虚拟软件如VMOS Pro,这个安卓版本是7.1可以运行,还有一个版本的apk
这个版本的apk带源码,大佬可以二次开发,但是此apk笔者并未试成功
手机和电脑要在同一局域网下,在实验前可以在手机上安装一个ping工具,确保电脑和手机的网络是互通的,笔者是虚拟机,为了让手机与虚拟机的网互通,这是把虚拟机的网络模式设为桥接模式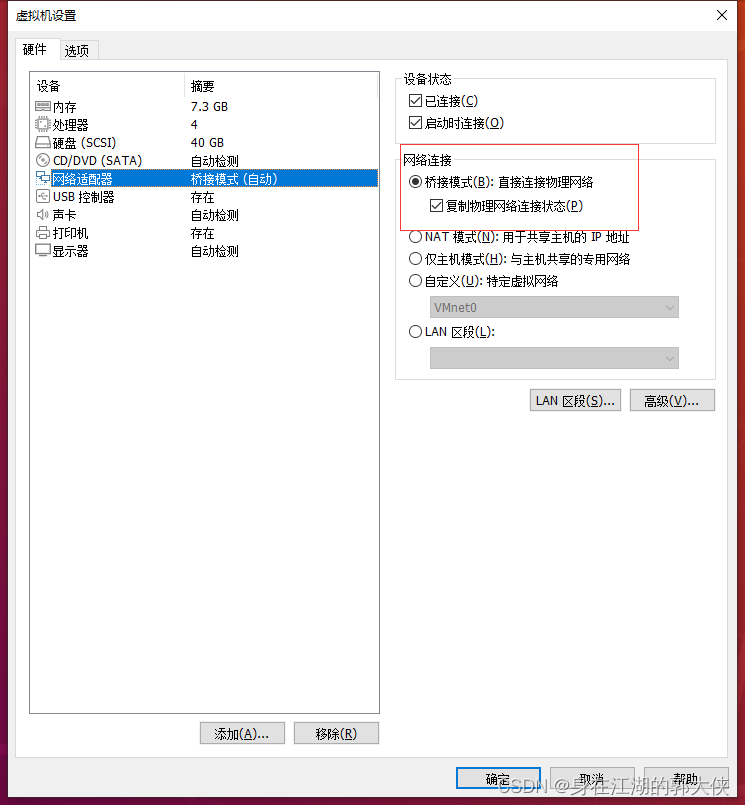
虚拟机打开
Terminal1 输入:
roscoreAndroid: 打开应用,在 在 IP Port 中修改 IP 地址为 PC的 IP地址,port不需要修改(PC 的 IP 可在 PC 终端输入 ifconfig 查看),之后点击 Connect,连接成功则进入相机界面。
Terminal 2 到下载git文件的目录打开android_cam-imu.launch:
cd Android_Camera-IMU
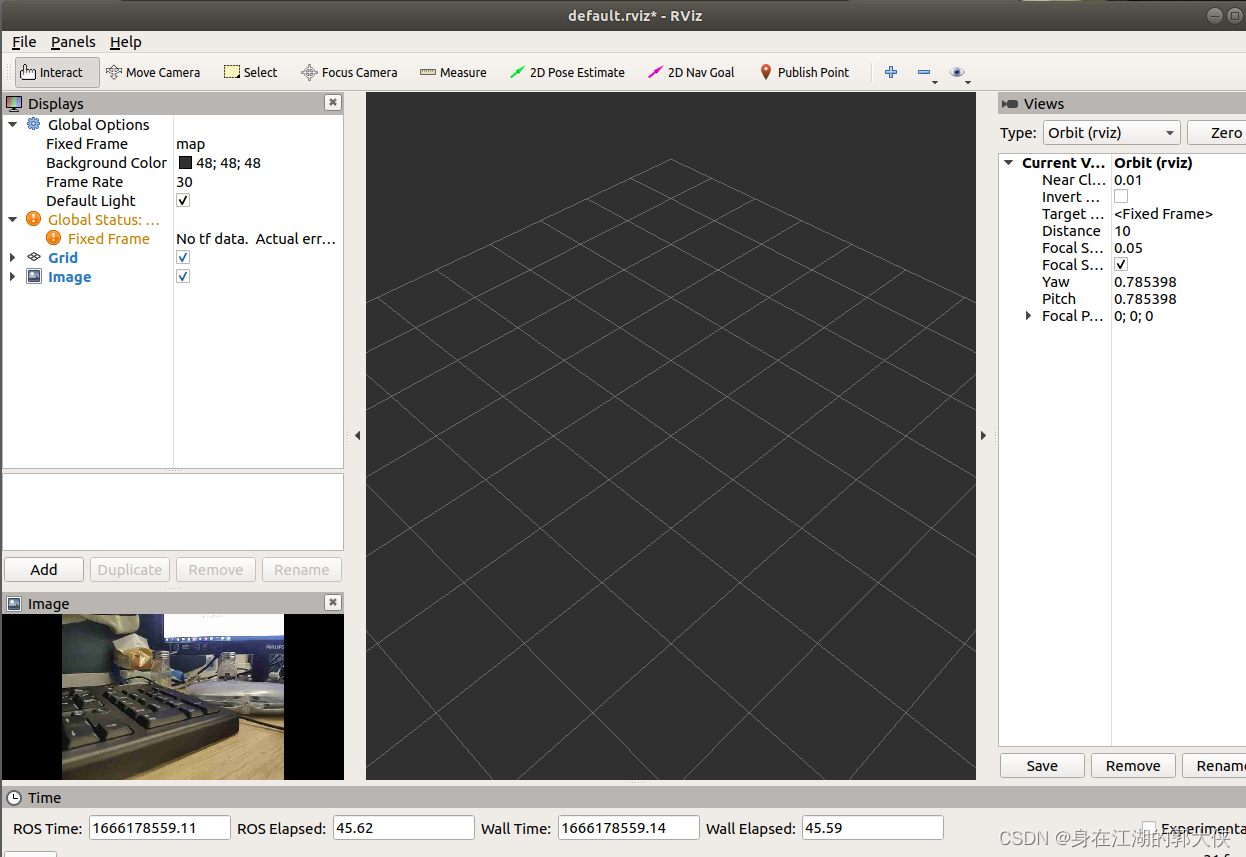
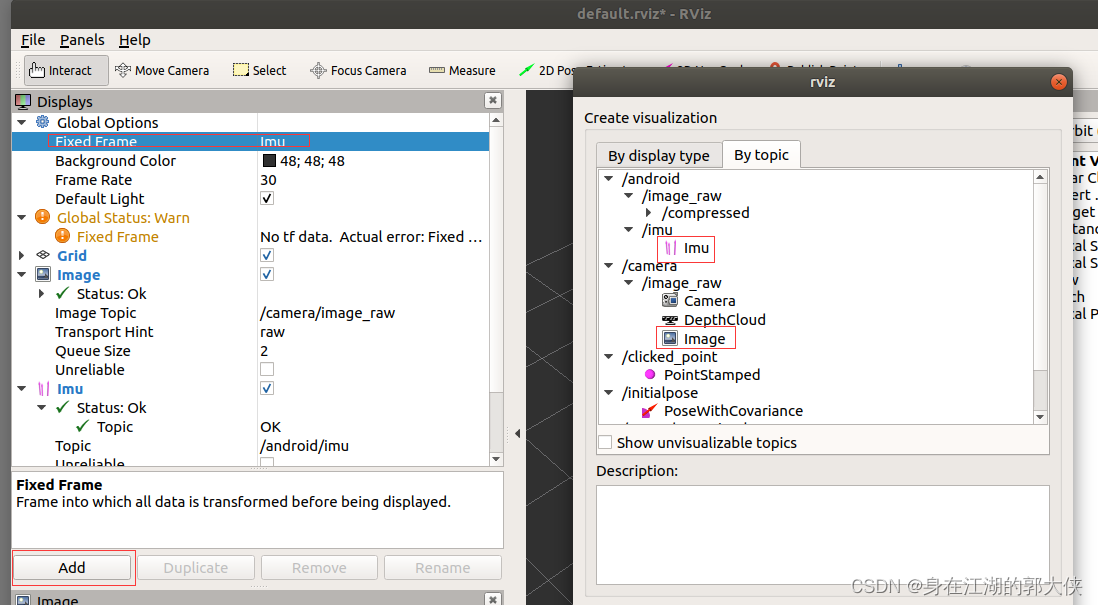
roslaunch android_cam-imu.launch这是会弹出一个Rviz界面:
如果要实时显示则
- 如果要实时显示 image,需要 Add - By topic - 添加/camera/image_raw/image。
- 如果要显示 imu,则需要 Add - By topic - 添加 imu,且在 Fix Frame 中 将 map 改为 imu。
 PS:
PS:
可以在Ubuntu里面用
rostopic list查询订阅的主题,可以看到有订阅的图像和imu

手机摄像头标定
为了 ORB-SLAM2 准确运行,需要对手机摄像头进行标定。标定方式为:对棋盘格标定板进行各个方向的拍照,之后基于 OpenCV 进行标定。注意这里采集的图片需要和 ORB-SLAM2 程序读取到的一致,所以不能直接使用手机自带相机 app 拍照,因为手机会自动通过算法进行校正,而上述通信传输的是 raw images。因此,首先我们需要完成的任务是:采集并保存摄像头图像。
使用下图作为标定板(参考资料),可直接在电脑屏幕上显示,对其拍照即可。

注意:
- 实验发现,使用长宽格数不一样的棋盘标定板效果更好。
- 实验发现,标定板周围要是白色的才行,黑色的提取不出角点来(在电脑屏幕上显示标定板时尤其需要注意)。
- 摄像头需要从不同方向拍摄棋盘格,可参考 OpenCV 安装目录下 samples/data 中的 left0x.jpg 系列标定图片。
采集并保存图片
目前没有找到直接保存的方法,所以我们选择写一个 ROS node 来接收手机传来的图像,再通过 OpenCV 进行显示和保存。
为了方便,我们选择直接在 ORB-SLAM2 的 ros_mono.cc 的代码基础上进行修改,在 ros_mono.cc 同一目录下写了个 ros_camera_capture.cc:
/**
* This file is to capture images from Android phone, for camera calibration
* This file is used with Android_Camera-IMU
*/

#include<iostream>
#include<algorithm>
#include<fstream>
#include<chrono>

#include<ros/ros.h>
#include <cv_bridge/cv_bridge.h>

#include<opencv2/core/core.hpp>

#include"../../../include/System.h"

using namespace std;

string save_dir = "PATH"; // 修改为自己保存图片的路径
int imgId = 0;

void GrabImage(const sensor_msgs::ImageConstPtr& msg);

int main(int argc, char **argv)
{

    std::cout << "To save the current frame, please press 'Q' or 'q' " << std::endl;
    std::cout << "The images will be saved to " <<  save_dir << std::endl;

    ros::init(argc, argv, "PClistener");
    ros::start();

    ros::NodeHandle nodeHandler;
    ros::Subscriber sub = nodeHandler.subscribe("/camera/image_raw", 1, GrabImage);

    ros::spin();

    ros::shutdown();

    return 0;
}

void GrabImage(const sensor_msgs::ImageConstPtr& msg)
{
    string imgname;
    cv_bridge::CvImageConstPtr cv_ptr;
    try
    {
        cv_ptr = cv_bridge::toCvShare(msg);
        cv::Mat img = cv_ptr->image;
        cv::imshow("img_name", img);

        char key = cv::waitKey(1);
        // press "q" to save the image
        if(key == 'q' || key == 'Q'){
            imgId++;
            imgname = "img_" + to_string(imgId) + ".jpg";
            cv::imwrite(save_dir + imgname, img);
            std::cout << "has saved image "<< imgId << " to " << save_dir << std::endl;
        }
    }
    catch (cv_bridge::Exception& e)
    {
        ROS_ERROR("cv_bridge exception: %s", e.what());
        return;
    }
}
注意捕捉图像存储地址换成自己的
另外,在 ORB_SLAM2/Examples/ROS/ORB_SLAM2 目录中的 CMakeLists.txt 中添加如下内容(添加在 # Node for monocular camera 上方即可):
# Node for capture images for camera calibration
rosbuild_add_executable(CameraCapture
src/ros_camera_capture.cc
)

target_link_libraries(CameraCapture
${LIBS}
)
之后重新编译 ORB_SLAM2 项目。
cd PATH/ORB_SLAM2
./build_ros.sh
使用方法:
Terminal 1:
roscore
手机进入 app 运行
Terminal 2: 在 Android_Camera-IMU 目录
roslaunch android_cam-imu.launch
(可以关掉 Rviz)
Terminal 3:
rosrun ORB_SLAM2 CameraCapture
鼠标选中弹出的图像框,按下 q 键保存图像。一定要多角度多捕捉几张图片,否则很难捕捉到关键点。像这样
进行标定
使用 OpenCV samples 中的代码实现。参考资料
标定例程
新建一个工作目录(文件夹)camera_calibration_opencv,将 OpenCV 安装目录中的 samples/cpp/tutorial_code/calib3d/camera_calibration 文件夹内的内容拷贝至该目录。
修改 VID5.xml
VID5.xml 中存储着标定图像的路径,所以要在 VID.xml 中添加所有标定图像的路径,eg:图片换成自己捕捉照片存储的位置
<?xml version="1.0"?>
<opencv_storage>
<images>
/home/ghj/Desktop/slam/pictureimg_1.jpg
/home/ghj/Desktop/slam/pictureimg_2.jpg
/home/ghj/Desktop/slam/pictureimg_3.jpg
/home/ghj/Desktop/slam/pictureimg_4.jpg
/home/ghj/Desktop/slam/pictureimg_5.jpg
</images>
</opencv_storage>
修改 in_VID5.xml
表示棋盘格的宽和高,注意,这里的宽度和高度是指内部交叉点的个数,而不是方形格的个数。如上图棋盘的数据就是9和6。
<BoardSize_Width> 9</BoardSize_Width>
<BoardSize_Height>6</BoardSize_Height>
修改为每格的边长 (mm),拿尺子量。
<Square_Size>20</Square_Size>
修改 输入的VID5.xml 的路径(换成自己的))
<Input>"/home/ghj/Desktop/slam/camera_calibration_opencv/VID5.xml"</Input>
修改输出参数信息存储的地址(换成自己的)
<Write_outputFileName>"/home/ghj/Desktop/slam/camera_calibration_opencv/out_camera_data.xml"</Write_outputFileName>此处原来是0,需要改为1,表示引入切向畸变参数(因为 ORB-SLAM2 中也引入了切向畸变参数),否则只有径向畸变参数。
<Calibrate_FixPrincipalPointAtTheCenter> 1 </Calibrate_FixPrincipalPointAtTheCenter>
其它地方应该不需要改动,想进一步了解可看其中的注释。
<?xml version="1.0"?>
<opencv_storage>
<Settings>
  <!-- Number of inner corners per a item row and column. (square, circle) -->
  <BoardSize_Width> 9</BoardSize_Width>
  <BoardSize_Height>6</BoardSize_Height>

  <!-- The size of a square in some user defined metric system (pixel, millimeter)-->
  <Square_Size>20</Square_Size>

  <!-- The type of input used for camera calibration. One of: CHESSBOARD CIRCLES_GRID ASYMMETRIC_CIRCLES_GRID -->
  <Calibrate_Pattern>"CHESSBOARD"</Calibrate_Pattern>

  <!-- The input to use for calibration.
		To use an input camera -> give the ID of the camera, like "1"
		To use an input video  -> give the path of the input video, like "/tmp/x.avi"
		To use an image list   -> give the path to the XML or YAML file containing the list of the images, like "/tmp/circles_list.xml"
		-->
  <Input>"/home/ghj/Desktop/slam/camera_calibration_opencv/VID5.xml"</Input>
  <!--  If true (non-zero) we flip the input images around the horizontal axis.-->
  <Input_FlipAroundHorizontalAxis>0</Input_FlipAroundHorizontalAxis>

  <!-- Time delay between frames in case of camera. -->
  <Input_Delay>100</Input_Delay>

  <!-- How many frames to use, for calibration. -->
  <Calibrate_NrOfFrameToUse>25</Calibrate_NrOfFrameToUse>
  <!-- Consider only fy as a free parameter, the ratio fx/fy stays the same as in the input cameraMatrix.
	   Use or not setting. 0 - False Non-Zero - True-->
  <Calibrate_FixAspectRatio> 1 </Calibrate_FixAspectRatio>
  <!-- If true (non-zero) tangential distortion coefficients  are set to zeros and stay zero.-->
  <Calibrate_AssumeZeroTangentialDistortion>1</Calibrate_AssumeZeroTangentialDistortion>
  <!-- If true (non-zero) the principal point is not changed during the global optimization.-->
  <Calibrate_FixPrincipalPointAtTheCenter> 1 </Calibrate_FixPrincipalPointAtTheCenter>

  <!-- The name of the output log file. -->
  <Write_outputFileName>"/home/ghj/Desktop/slam/camera_calibration_opencv/out_camera_data.xml"</Write_outputFileName>
  <!-- If true (non-zero) we write to the output file the feature points.-->
  <Write_DetectedFeaturePoints>1</Write_DetectedFeaturePoints>
  <!-- If true (non-zero) we write to the output file the extrinsic camera parameters.-->
  <Write_extrinsicParameters>1</Write_extrinsicParameters>
  <!-- If true (non-zero) we show after calibration the undistorted images.-->
  <Show_UndistortedImage>1</Show_UndistortedImage>

</Settings>
</opencv_storage>
编译
在工作目录 camera_calibration_opencv 中新建 CMakeLists.txt:
project(Camera_Calibration)
set(CMAKE_CXX_STANDARD 11)

find_package(OpenCV 3.0 QUIET)
if(NOT OpenCV_FOUND)
    find_package(OpenCV 2.4.3 QUIET)
    if(NOT OpenCV_FOUND)
        message(FATAL_ERROR "OpenCV > 2.4.3 not found.")
    endif()
endif()

include_directories(${OpenCV_INCLUDE_DIR})
add_executable(Camera_Calibration camera_calibration.cpp)
target_link_libraries(Camera_Calibration ${OpenCV_LIBS})
之后编译:
cd camera_calibration_opencv
mkdir build
cd build
cmake ..
make
运行,标定
cd camera_calibration_opencv
./build/Camera_Calibration ../in_VID5.xml
程序启动后会显示标定图像的角点提取情况,之后会显示校正后图像,一个一个全部关闭后才会保存标定参数至 out_camera_data.xml。

标定结果写入camera_calibration/out_cam

<camera_matrix type_id="opencv-matrix">是相机内参矩阵,顺序为 fx, 0, cx; 0, fy, cy; 0, 0, 1。<distortion_coefficients type_id="opencv-matrix">是畸变参数,其顺序为 k1, k2, p1, p2, k3。
之后在 ORB_SLAM2 中新建一个配置文件 mycam.yaml(建哪儿都行),将 TUM1.yaml 的内容拷贝过来,并把其中的 Camera 参数进行修改。

注意: 相机参数对 ORB-SLAM2 的运行效果有极大影响(尤其是初始化),所以标定过程须认真完成。
运行 ORB-SLAM2 Mono
Terminal 1:
roscore
手机进入 app 运行
Terminal 2: 在 Android_Camera-IMU 目录
roslaunch android_cam-imu.launch
(可以关掉 Rviz)
Terminal 3(加载的两个文件换成自己的):
rosrun ORB_SLAM2 Mono /home/ghj/ROS_SIM/src/ORB_SLAM2/Vocabulary/ORBvoc.txt /home/ghj/ROS_SIM/src/ORB_SLAM2/Examples/ROS/ORB_SLAM2/mycam.yaml
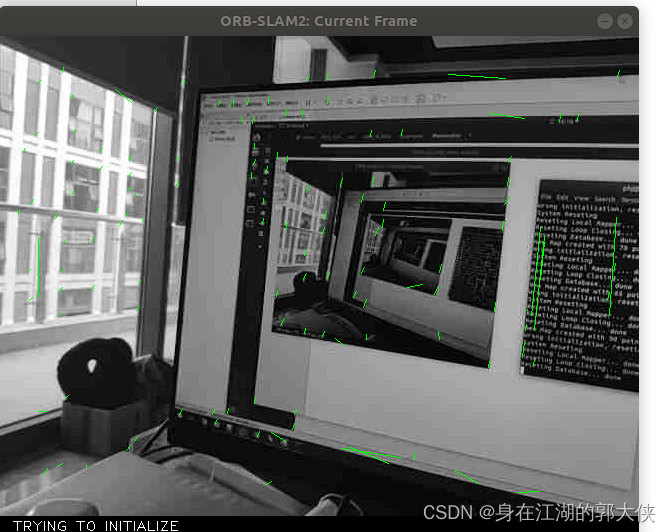
运行效果展示: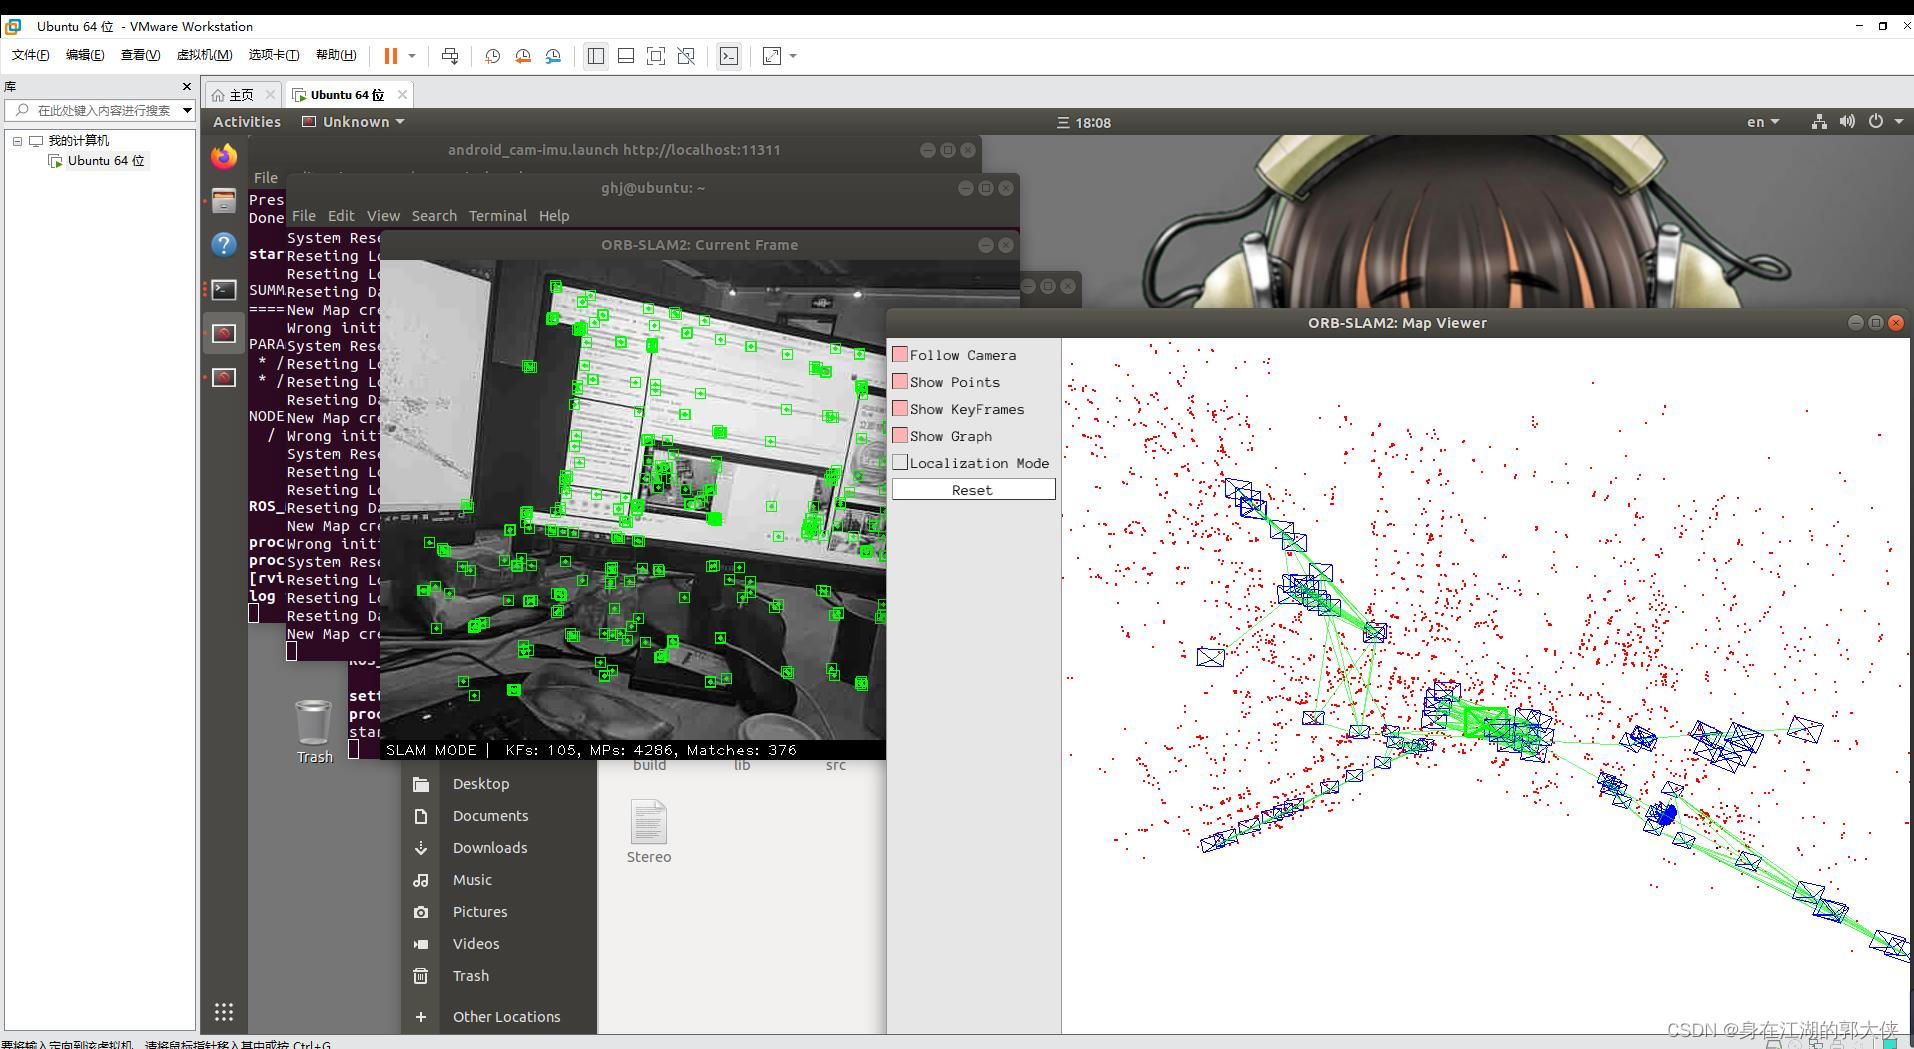
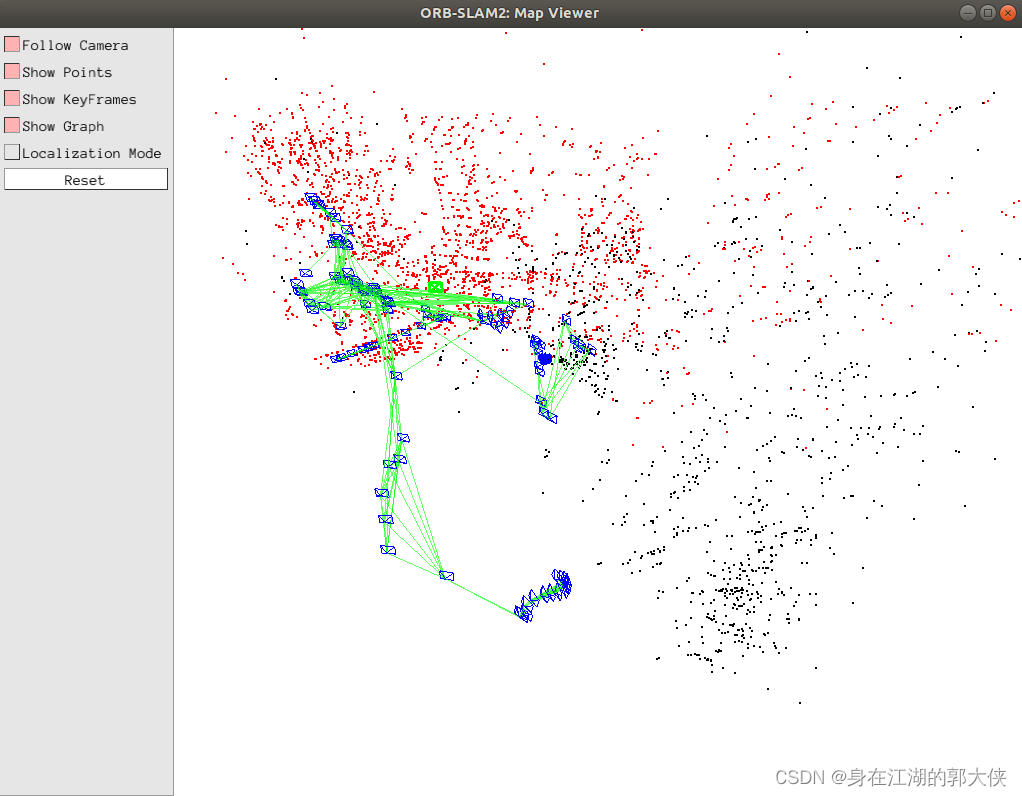

注意: ORB-SLAM2 Mono 还是比较难以初始化的(其设置的初始化条件相对苛刻),在开始时,选择特征纹理丰富的区域,多上下左右平移相机,有利于初始化。
简化启动
上述启动步骤需要启动3个终端,挺麻烦的,所以可以选择写一个脚本来自动启动这3个终端。参考资料
新建 ORB_SLAM2_with_AndroidPhone.sh,在其中填入:
gnome-terminal --title="roscore" -x bash -c "roscore"
# 暂停 2s,保证几个不同终端的启动顺序
sleep 2s;

gnome-terminal --title="AndroidPhone" -x bash -c "cd /home/ghj/Desktop/slam/Android_Camera-IMU; roslaunch android_cam-imu.launch"
sleep 2s;

gnome-terminal --title="ORB-SLAM2" -x bash -c "rosrun ORB_SLAM2 Mono /home/ghj/ROS_SIM/src/ORB_SLAM2/Vocabulary/ORBvoc.txt /home/ghj/ROS_SIM/src/ORB_SLAM2/Examples/ROS/ORB_SLAM2/mycam.yaml"
之后赋予权限(仅需一次):
chmod +x ORB_SLAM2_with_AndroidPhone.sh
运行:
./ORB_SLAM2_with_AndroidPhone.sh
即可一次性打开3个终端,并运行相关命令。之后手机再打开 app 就可以了。
注意: 此时终端运行结束后会自动退出,如果不想自动退出,可 在terminal点右键,选择Preferences然后找到Command,里面有一项When command exits,后面选择为Hold the terminal open。参考资料


 301
301


 被折叠的 条评论
为什么被折叠?
被折叠的 条评论
为什么被折叠?
 到【灌水乐园】发言


