ROS小车研究笔记:二维SLAM建图简介与源码分析

本文介绍了ROS中用于小车建图的Gmapping和Cartographer算法。Gmapping依赖粒子滤波,适用于小场景,需要深度、IMU和里程计信息。Cartographer适用于大场地,自带回环检测,仅需雷达数据。Gmapping通过tf和scan话题获取信息,发布实时地图,而Cartographer分为local和global扫描阶段进行回环检测以减少误差。
摘要由CSDN通过智能技术生成

ROS提供了现成的各类建图算法实现。如果只是应用的话不需要了解详细算法原理,只需要了解其需要的输入输出即可。

1 Gmapping

Gmapping使用粒子滤波算法进行建图,在小场景下准确度高,但是在大场地中会导致较大计算量和内存需求

Gmapping需要机器人提供深度信息,IMU信息,和里程计信息这三个中至少两个。利用这些输入信息gmapping算法可以输出栅格地图即小车在地图中定位
在这里插入图片描述
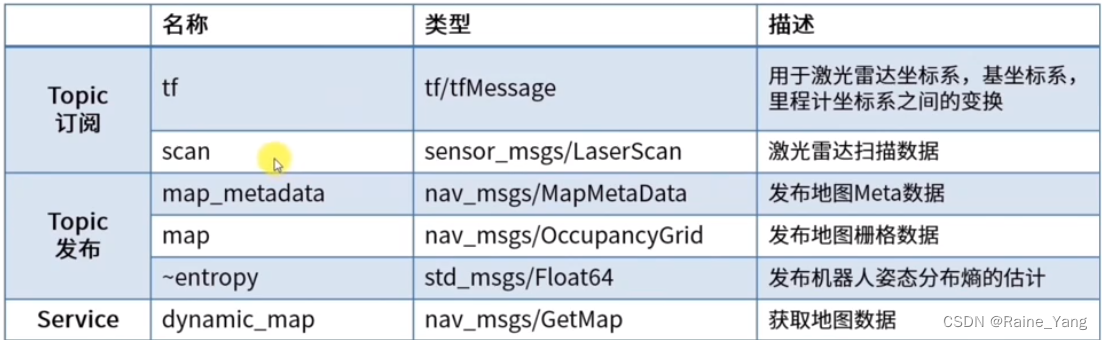
Gmapping订阅话题tf和scan。tf话题包含激光雷达和机器人基坐标系位置关系,scan包含激光雷达信息和IMU加速度信息。Gmapping可以通过话题和服务两种方式发布地图信息。其中map话题发布实时地图栅格数据,而服务dynamic_map只有在客户端发布请求是才会发布最新地图,相对于话题可以节省通信开支

在这里插入图片描述
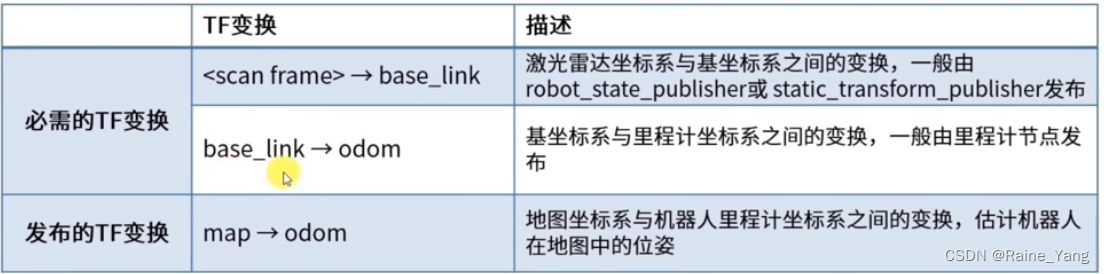
对于odom里程计信息,Gmapping不用话题获取,而是通过TF树进行维护。其中 -> base_link为激光雷达相对base_link(默认的机器人基坐标系)位置,这一值一般为静态,在小车模型文件中定义好。

base_link ->odom为机器人位置相对于里程计原点坐标。其中odom坐标系位置为小车开始运行时里程计位置。通过速度积分得到base_link和odom的距离即可得到小车里程信息

map->odom 为地图中机器人位置关于里程计坐标。这里map和odom都为1不同的参考坐标系,odom是里程计测得的位置坐标,依靠小车自身移动速度积分得到,map为激光雷达测得的小车在地图上位置坐标。两者坐标系差距即为里程计的偏移

小车源码:
1 mapping.launch 启动建图的launch文件(只保留和gmapping相关内容)

<launch>
  <arg name="mapping_mode"  default="gmapping" doc="opt: gmapping,hector,cartographer,karto"/>


  <!-- turn on lidar开启雷达  -->
  <include file="$(find turn_on_wheeltec_robot)/launch/wheeltec_lidar.launch" />

  <!-- 开启gmapping建图算法  -->
  <group if="$(eval mapping_mode == 'gmapping')">
  <include file="$(find turn_on_wheeltec_robot)/launch/include/algorithm_gmapping.launch" />
  <!-- 开启机器人底层相关节点  -->
  <include file="$(find turn_on_wheeltec_robot)/launch/turn_on_wheeltec_robot.launch">
    <arg name=
  • 1
    点赞
  • 17
    收藏
    觉得还不错? 一键收藏
  • 0
    评论
以下是一个简单的 ROS 小车基于激光雷达 SLAM 建图单点导航功能的实现代码: ```python #!/usr/bin/env python import rospy from geometry_msgs.msg import Twist from sensor_msgs.msg import LaserScan from nav_msgs.msg import Odometry from tf.transformations import euler_from_quaternion # 回调函数,用于获取小车当前位置 def get_odom(msg): global x, y, yaw x = msg.pose.pose.position.x y = msg.pose.pose.position.y orientation = msg.pose.pose.orientation (roll, pitch, yaw) = euler_from_quaternion([orientation.x, orientation.y, orientation.z, orientation.w]) # 回调函数,用于获取激光雷达数据 def get_scan(msg): global laser_data laser_data = msg.ranges # 判断小车是否到达目标点 def reached_goal(goal_x, goal_y, distance_tolerance): global x, y distance = abs(((goal_x - x)**2 + (goal_y - y)**2)**0.5) if distance < distance_tolerance: return True else: return False # 主函数 def main(): rospy.init_node('nav_test', anonymous=True) velocity_publisher = rospy.Publisher('/cmd_vel', Twist, queue_size=10) laser_subscriber = rospy.Subscriber('/scan', LaserScan, get_scan) odom_subscriber = rospy.Subscriber('/odom', Odometry, get_odom) # 等待获取激光雷达数据和小车当前位置 while not rospy.is_shutdown(): try: laser_data[0] x y break except: continue goal_x = input("Enter goal x: ") goal_y = input("Enter goal y: ") distance_tolerance = input("Enter tolerance: ") # 控制小车前进或转向 vel_msg = Twist() while not rospy.is_shutdown(): if reached_goal(goal_x, goal_y, distance_tolerance): vel_msg.linear.x = 0 vel_msg.angular.z = 0 velocity_publisher.publish(vel_msg) rospy.loginfo("Goal reached!") break else: # 根据激光雷达数据,确定小车前进方向 front_middle_distance = laser_data[len(laser_data)/2] if front_middle_distance > 0.5: vel_msg.linear.x = 0.2 vel_msg.angular.z = 0 else: right_distance = laser_data[len(laser_data)*3/4] left_distance = laser_data[len(laser_data)/4] if right_distance > left_distance: vel_msg.linear.x = 0 vel_msg.angular.z = -0.5 else: vel_msg.linear.x = 0 vel_msg.angular.z = 0.5 velocity_publisher.publish(vel_msg) rospy.spin() if __name__ == '__main__': try: main() except rospy.ROSInterruptException: pass ``` 该代码首先初始化 ROS 节点,并订阅了激光雷达数据和小车当前位置。然后,通过回调函数获取了激光雷达数据和小车当前位置,并等待获取到这些信息之后再开始执行主循环。 在主循环中,通过输入目标点的坐标和容许的距离误差,控制小车前进或转向,直到到达目标点位置。在控制小车前进或转向时,先通过激光雷达数据确定小车前进方向,然后根据前进方向和目标点的位置计算出小车应该前进的速度和转向的角速度,并通过 /cmd_vel 话题发布给小车的底盘控制器。 值得注意的是,该代码中的小车前进方向的判断方法并不完备,只是一个简单的示例。如果需要更加精确的导航功能,需要使用更为复杂的算法和模型。
评论
添加红包

请填写红包祝福语或标题

红包个数最小为10个

红包金额最低5元

当前余额3.43前往充值 >
需支付:10.00
成就一亿技术人!
领取后你会自动成为博主和红包主的粉丝 规则
hope_wisdom
发出的红包
实付
使用余额支付
点击重新获取
扫码支付
钱包余额 0

抵扣说明:

1.余额是钱包充值的虚拟货币,按照1:1的比例进行支付金额的抵扣。
2.余额无法直接购买下载,可以购买VIP、付费专栏及课程。

余额充值